這種結構型指令會透過新增、刪除來動態的改變DOM的元素
內建有三種NgIf、NgSwitch、NgFor
使用的時候要注意,資料來源有異動的時候,會重新產生DOM的元素
首先介紹
*ngIf
用法非常簡單,
在要控制的標籤內直接使用 *ngIf 後面接一個boolean 值
<div *ngIf="h4_counter%2 == 0">
  <a href="http://www.facebook.com.tw"><img src="../../assets/images/facebook.png"></a>
</div>
就可以直接使用,但是要特別注意的是
這種結構型指令會透過新增、刪除來動態的改變DOM的元素,
也就是說,當條件不成立的時候,他是完全刪掉整個DOM元素,
如果DOM裡面有使用其他的component的話,就必須要考慮到內嵌component的生命週期,
畢竟刪除之後再新增回來,裡面的變數都是重新初始化,不會保留上一次刪除前的資料。
ngSwitch
安裝保哥設計的code snitppet 之後,直接打a-ngs 就會跳出 intellisense
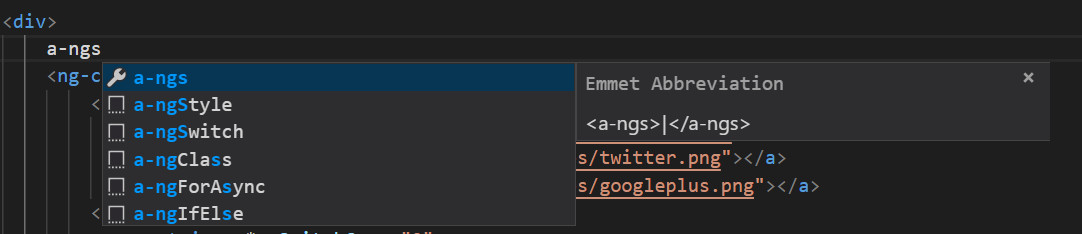
選擇a-ngSwitch之後,按下Tab鍵會出現以下的程式碼區段
<div [ngSwitch]="conditionExpression">
   <div *ngSwitchCase="expression">output</div>
   <div *ngSwitchDefault>output2</div>
</div>
修改一下內容,
"conditionExpression" =>改為要判斷的條件
"expression" => 改為要判斷的值
code snippet 產生的 <div></div> 可以改為<ng-container></ng-container> 這樣版型才不會跑掉
畫面上不會產生額外的div
<ng-container [ngSwitch]="h4_counter%2 ">
	<ng-container *ngSwitchCase="1">
		<a href="#"><img src="../../assets/images/facebook.png"></a>
		<a href="#"><img src="../../assets/images/twitter.png"></a>
		<a href="#"><img src="../../assets/images/googleplus.png"></a>
	</ng-container>
	<ng-container *ngSwitchCase="0">
		<a href="#"><img src="../../assets/images/plurk.png"></a>
		<a href="#"><img src="../../assets/images/weibo.png"></a>
		<a href="#"><img src="../../assets/images/rss.png"></a>
	</ng-container>
	<div *ngSwitchDefault>N/A</div>
</ng-container>
這樣就會按照h4_counter的值自動切換。
ngFor
首先在component.ts內定義要給For迴圈使用的資料來源,
注意到'href-link' ,因為使用了符號 '-' ,所以要使用單引號將
data = [
    {
      title: 'Google',
      'href-link': 'http://www.google.com.tw',
      date: '2018/05/10',
      content: '<p>Google Content</p>'
    },
    {
      title: 'Facebook',
      'href-link': 'http://www.facebook.com.com.tw',
      date: '2018/05/11',
      content: '<p>Facebook Content</p>'
    },
    {
      title: 'Yahoo',
      'href-link': 'http://www.yahoo.com.tw',
      date: '2018/05/12',
      content: '<p>Yahoo Content</p>'
    }
  ];
在template:component.html 用法跟上面兩種Structure Directive很類似
使用 a-ngFor 來叫出Intellisense
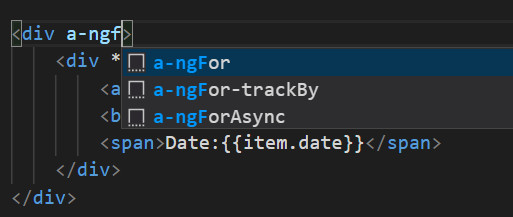
使用迴圈內的資料,注意href-link 因為有特殊符號,所以不能用物件'.'的方式貸出資料,要用中括號,括號裡面接字串
其餘的部分就用property binding 跟 interpolation binding(內嵌) 去呈現資料
還有可以使用 let 變數名稱 = index 來使用現在迴圈所用的index
<div>
    <div id="id_{{_idx}}" *ngFor="let item of data;let _idx = index">
        <a [href]="item['href-link']">{{item.title}}</a>
        <br>
        <span>Date:{{item.date}}</span>
        <span [innerHTML]="item.content"></span>
    </div>
</div>
PS.如果要內嵌繫節的內容有HTML Element的話,使用innerHTML 將HTML Element 注入到span之中
例如:item.content 內容有 content: '<p>Google Content</p>'
在這邊就要使用 HTML 的property: innerHTML 繫結 Property Binding 將HTML Element 注入
否則畫面上會直接跑出<p>Google Content</p>
PS.使用 Structure Directive 的時候要注意,當資料來源有異動時,
Structure Directive 會重新產生component內容,
例如:父元件有一個物件陣列,子元件在template內使用 *ngFor 將陣列內容撈出來使用,
當父元件陣列內的物件有異動的時候,子元件透過 *ngFor 產生的DOM將會重新產生!!