使用SignalR 實現全域廣播,群組廣播,特定使用者廣播功能,客製化OnConnected與OnDisconnected事件
一直以來聽過SignalR好多次,但卻沒有時間好好好去了解它
直到過年前才懂這套工具在前端Web有多好用
如果你是前端開發者,若要開發出不按F5就有互動性的網頁,你絕對不能不去學如何使用SignalR
以Facebook的即時通知訊息來講,它是以非常即時的方式通知你所參與的主題有被回應,增加互動性
再以Booking的訂房網頁為例,若是有人同時在跟你看同一個飯店時,該網頁就會彈出這一類的訊息"線上有xx人在看這個房型,只剩幾間房"
這時你就會陷入你本來不需要訂,卻因為怕被搶走而"不小心"就訂房了的情況
在沒學會SignalR之前,我不知道這該怎麼做
但學會SignalR後,這樣的功能就算對一個初學者來說,要做到個五成像應當也不難
這就是SignalR的厲害之處, 且它能以瀏覽器尋找出最適合的通訊方式
Forever Frame、Long Polling、Server Sent Event、WebSocket
以下要介紹的就是如果利用SignalR 實現以下功能:
1. 線上人數(廣播)
2. 群組廣播,並設定其變數值
3. 特定ClientID廣播,並設定其變數值
因為類似的文章在網路上應當可以找到非常多,所以如果想知道完整的步驟
可以跳到最後面看參考資料跟著做即可
一開始先用nuget 安裝 SingalR 與 Angular (網頁顯示用),並建立Hub class
SignalR 啟動時會在Server端建立Hub,並在Client端建立 Hub proxy,讓它們進行即時溝通資料
首先要完成的是簡單的實行線上人數的廣播,我們希望在client連線時就把人數加1,失去連線要減掉
在hub class裡
 public class MyPowerHub : Hub
    {
        public static List<string> lstConnectionID = new List<string>();
        public override Task OnConnected()
        {
            lstConnectionID.Add(Context.ConnectionId);
            broadCastOnlineCount(lstConnectionID.Count);
            return base.OnConnected();
        }

        public override Task OnDisconnected(bool stop)
        {
            lstConnectionID.Remove(Context.ConnectionId);
            broadCastOnlineCount(lstConnectionID.Count);
            return base.OnDisconnected(stop);
        }

        public void broadCastOnlineCount(int count)
        {
            Clients.All.broadCastOnlineCount(count);
        }
    }
在Client端也要建立被Server Hub呼叫的Client function
SamplePower.js (在SignalR與網頁建立完成後,會取得一個ClientID,這個ID與Server onConnected的ID是一樣的)
(function () {
    var app = angular.module('chat-app', []);

    app.controller('ChatController', function ($scope) {
        // scope variables
        $scope.toClientID = '';
        $scope.count = 0;
        $scope.connectionJoinFinishFlag = false;
        $scope.MyPowerHub = null; // holds the reference to hub

        $scope.MyPowerHub = $.connection.myPowerHub; // initializes hub
        //set clientID
        $.connection.hub.start().done(function () {
            $scope.toClientID = $.connection.hub.id;
            $scope.$apply();
        });

        $scope.MyPowerHub.client.broadCastOnlineCount = function (count) {
            $scope.count = count
            $scope.$apply();
        };

    })
}());
在網頁端更是簡單
<!DOCTYPE html>
<html xmlns="http://www.w3.org/1999/xhtml">
<head>
    <title></title>
</head>
<body ng-app="chat-app">
    Hello this is my first singalR

    <div ng-controller="ChatController" id="divChat">
        <div>
            Online user: <span ng-bind="count"></span> <br />
        </div>
    </div>
    <script src="Scripts/jquery-1.6.4.js"></script>
    <script src="Scripts/jquery.signalR-2.2.1.js"></script>
    <script src="signalr/hubs"></script>
    <script src="Scripts/angular.js"></script>
    <script src="Scripts/samplePower.js"></script>
</body>
</html>
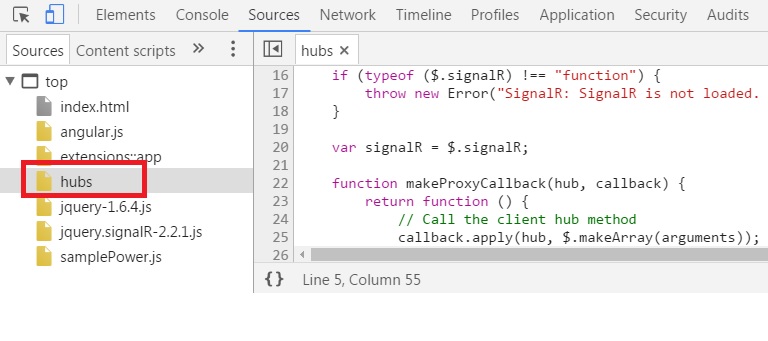
特別要注意的是這段 <script src="signalr/hubs"></script>,這段是SignalR會自動幫我們產生的,並不是一個實體檔案
在執行階段的話,是可以看到這個被產生出來的檔案喔

就這樣三兩、下,我們就實現了線上人數的功能了,而且網頁關掉,人數也會同步減少
再來就要來介紹比較複雜一點點的群組廣播跟特定ClientID廣播
我們在網頁上放了兩個textbox,一個是在初始化時放入我們自己的ClientID以及GroupID以便測試
不同的是GroupID得先按Button讓使用者確認他們要加入到哪一個Group,以達到註冊的動作
讓Server知道這個Group有哪些ClientID要加到到Group裡
所以我們修改Hub class檔案,並加入三個function
    public class MyPowerHub : Hub
    {
        public static List<string> lstConnectionID = new List<string>();
        public override Task OnConnected()
        {
            lstConnectionID.Add(Context.ConnectionId);
            broadCastOnlineCount(lstConnectionID.Count);
            return base.OnConnected();
        }

        public override Task OnDisconnected(bool stop)
        {
            lstConnectionID.Remove(Context.ConnectionId);
            broadCastOnlineCount(lstConnectionID.Count);
            return base.OnDisconnected(stop);
        }

        public void broadCastOnlineCount(int count)
        {
            Clients.All.broadCastOnlineCount(count);
        }
        public void SetPower(string powerFlag, string clientID)
        {
            if (string.IsNullOrEmpty(clientID))
                Clients.All.ResetPower(powerFlag);
            else
                Clients.Client(clientID).ResetPower(powerFlag);
        }
        public void RegisterGroup(String GroupId)
        {
            Groups.Add(Context.ConnectionId, GroupId);
        }
        public void SetGroupPower(string powerFlag, string GroupId)
        {
            Clients.Group(GroupId).ResetPower(powerFlag);
        }

    }
client端修改如下
(function () {
    var app = angular.module('chat-app', []);

    app.controller('ChatController', function ($scope) {
        // scope variables
        $scope.name = 'Guest'; // holds the user's name
        $scope.power = ''; // holds the new message
        $scope.toClientID = '';
        $scope.toGroupID = '';
        $scope.count = 0;
        $scope.connectionJoinFinishFlag = false;
        //$scope.messages = []; // collection of messages coming from server
        $scope.MyPowerHub = null; // holds the reference to hub

        $scope.MyPowerHub = $.connection.myPowerHub; // initializes hub
        //set clientID
        $.connection.hub.start().done(function () {
            $scope.toClientID = $.connection.hub.id;
            $scope.connectionJoinFinishFlag = true;
            $scope.$apply();
        });

        // register a client method on hub to be invoked by the server
        $scope.MyPowerHub.client.ResetPower = function (powerFlag) {
            $scope.power = powerFlag
            $scope.$apply();
        };


        $scope.MyPowerHub.client.broadCastOnlineCount = function (count) {
            $scope.count = count
            $scope.$apply();
        };


        $scope.setPower = function () {
            // sends a new message to the server
            //***事件首字必須是小寫
            if ($scope.toClientID != '')
                $scope.MyPowerHub.server.setPower($scope.power, $scope.toClientID);
            if ($scope.toGroupID != '')
                $scope.MyPowerHub.server.setGroupPower($scope.power, $scope.toGroupID);
        }

        $scope.joinGroup = function () {
            $scope.MyPowerHub.server.registerGroup($scope.toGroupID);
            $scope.connectionJoinFinishFlag = true;
        }
    })
}());
View的部份即加入三個textbox跟兩個button即可
<div ng-controller="ChatController" id="divChat">
        <div>
            Online user: <span ng-bind="count"></span> <br />
            ClientID: <input type="text" style="width:300px" ng-model="toClientID" /><br />
            GroupID: <input type="text" style="width:300px" ng-model="toGroupID" />
            <input type="button" value="JOIN" disabled ng-disabled=" (connectionJoinFinishFlag) " ng-click="joinGroup()" /><br />
            power: <input type="text" ng-model="power" /><br />
            <input type="button" value="Send" disabled ng-disabled="!(connectionJoinFinishFlag && (power.length > 0))"  ng-click="setPower()" />
        </div>
    </div>
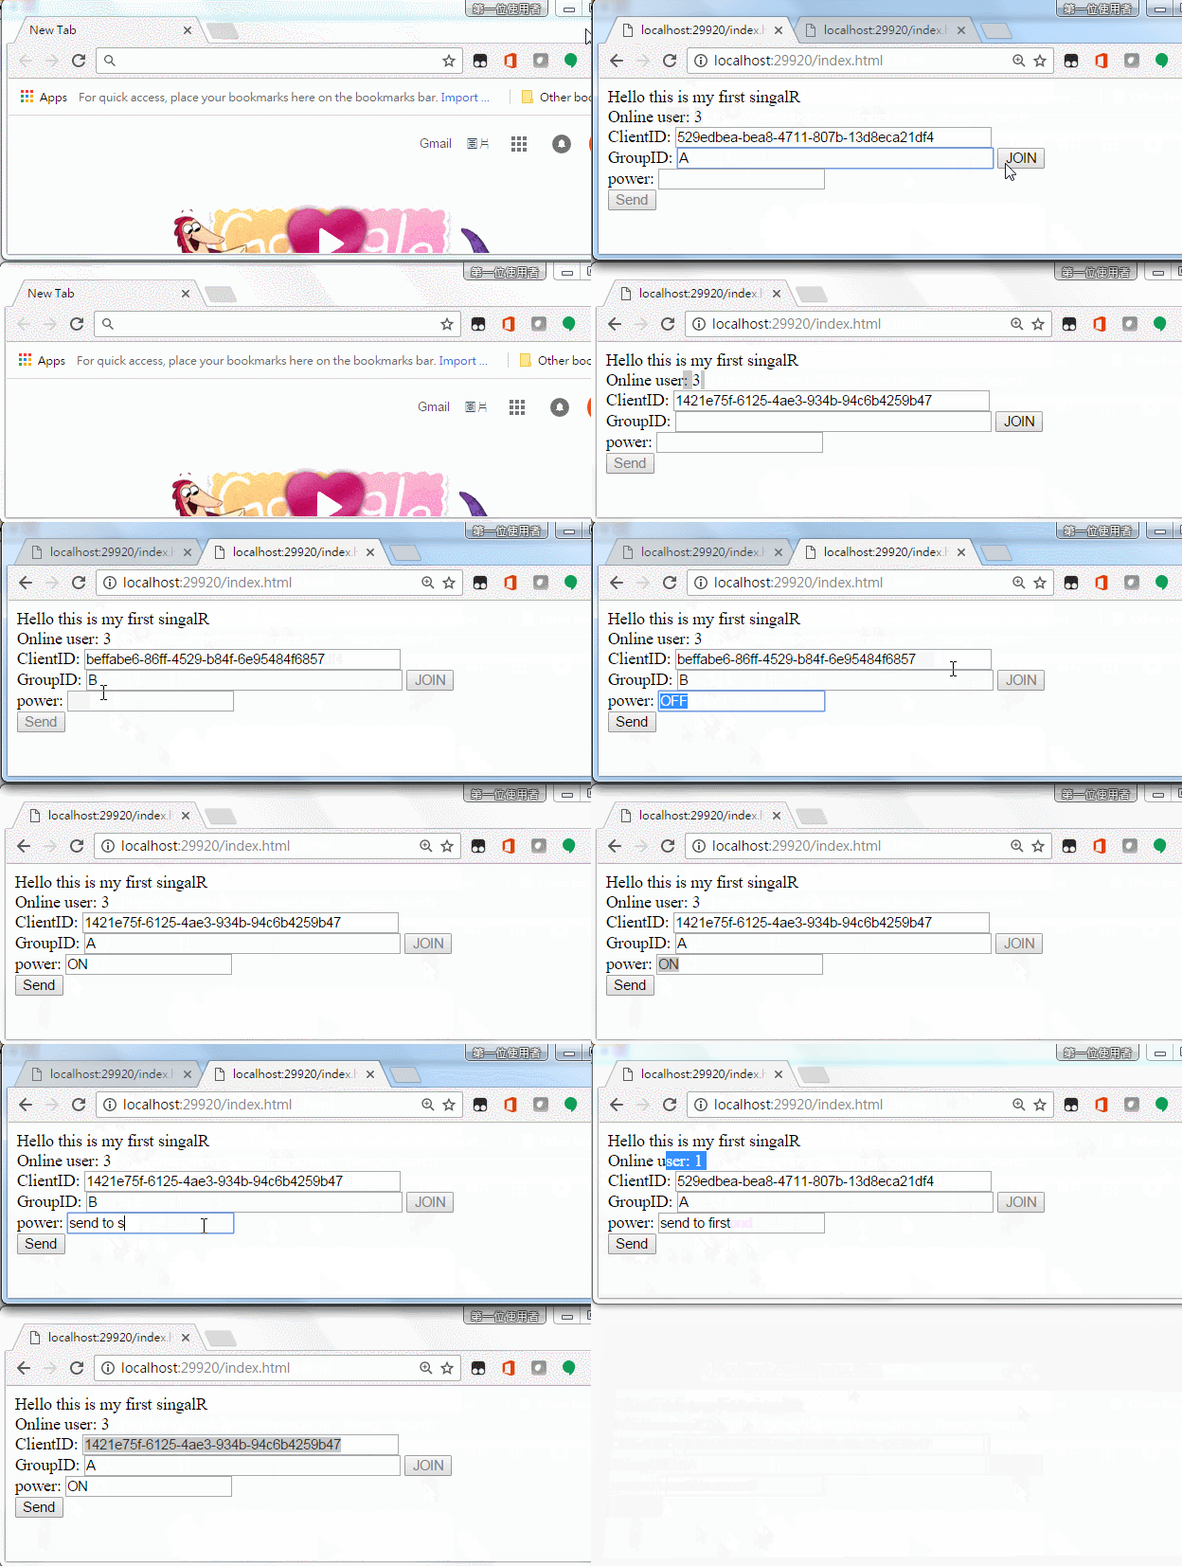
Demo 結果如下

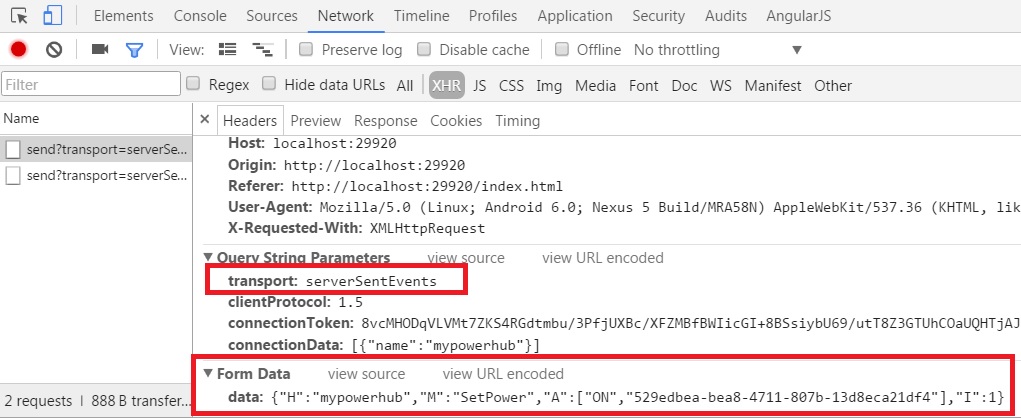
最後我們可以用Chrome來看一下SignalR是幫我們用什麼樣的方式送資料,以及送了什麼樣的資料

如同我們一開始所講的,共有四種方式可以選擇 Forever Frame、Long Polling、Server Sent Event、WebSocket
在這裡SignalR會根據我們的環境選擇了使用Server Sent Event
參考資料