本篇將介紹如何在Android手機上搜尋BLE Device並建立連線,BLE相較於傳統BL較不一樣,需使用另外BLE專屬的API才能找到BLE設備,此範例使用的Android版本為
4.4,據所知5.0版本以上 BLE已使用新的API,未來在補充5.0版本以上的BLE方法。
既然需使用到藍牙相關,也當然就須在manifests中加入藍牙的使用權限
<uses-permission android:name="android.permission.BLUETOOTH_ADMIN"/>
<uses-permission android:name="android.permission.BLUETOOTH"/>
<uses-feature android:name="android.hardware.bluetooth_le" android:required="true"/>
需要注意的是,相較於一般藍牙使用的聲明,多了uses-feature...............bluetooth_le此項。
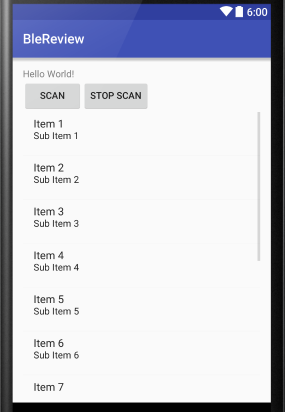
其大概Layout如上圖,兩個Button分別為開始搜尋BLE Device與停止搜尋,下面為一個ListView,將搜尋到的BLE添加到ListView顯示。
    private TextView textView;
    private ListView scanlist;
    private ArrayList<String> deviceName;
    private ListAdapter listAdapter;
    private boolean mScanning=false;

    private BluetoothManager mBluetoothManager;
    private BluetoothAdapter mBluetoothAdapter;
    private static final int REQUEST_ENABLE_BT=1;
    private static final int SCAN_TIME=10000;
    private ArrayList<BluetoothDevice> mBluetoothDevices=new ArrayList<BluetoothDevice>();

    private Handler mHandler; //該Handler用來搜尋Devices10秒後,自動停止搜尋
以上將使用到的元件定義出來,找到BLE設備的最主要兩個為BluetoothManager與BluetoothAdapter兩項,再將找到的Devices存到ArrayList<BluetoothDevice>當中。
在一開始onCreate當中,需檢查手機本身是否支持BLE? 以及BL,分別為下面兩式:
    @Override
    protected void onCreate(Bundle savedInstanceState) {
        super.onCreate(savedInstanceState);
        setContentView(R.layout.activity_main);

        if(!getPackageManager().hasSystemFeature(getPackageManager().FEATURE_BLUETOOTH_LE)){
            Toast.makeText(getBaseContext(),R.string.No_sup_ble,Toast.LENGTH_SHORT).show();
            finish();
        }//利用getPackageManager().hasSystemFeature()檢查手機是否支援BLE設備,否則利用finish()關閉程式。

       //試著取得BluetoothAdapter,如果BluetoothAdapter==null,則該手機不支援Bluetooth
       //取得Adapter之前,需先使用BluetoothManager,此為系統層級需使用getSystemService
        mBluetoothManager=(BluetoothManager)this.getSystemService(BLUETOOTH_SERVICE);
        mBluetoothAdapter=mBluetoothManager.getAdapter();

        if(mBluetoothAdapter==null){
            Toast.makeText(getBaseContext(),R.string.No_sup_Bluetooth,Toast.LENGTH_SHORT).show();
            finish();
            return;
        }//如果==null,利用finish()取消程式。

        textView=(TextView)findViewById(R.id.textViewID);
        scanlist=(ListView)findViewById(R.id.scanlistID);
        deviceName=new ArrayList<String>();   //此ArrayList屬性為String,用來裝Devices Name
        listAdapter=new ArrayAdapter<String>(getBaseContext(),android.R.layout.simple_expandable_list_item_1,deviceName);//ListView使用的Adapter,
        scanlist.setAdapter(listAdapter);//將listView綁上Adapter
        scanlist.setOnItemClickListener(new onItemClickListener()); //綁上OnItemClickListener,設定ListView點擊觸發事件
        mHandler=new Handler();
    }
 @Override
    protected void onResume() {
        super.onResume();
        //一般來說,只要使用到mBluetoothAdapter.isEnabled()就可以將BL開啟了,但此部分添加一個Result Intent
        //跳出詢問視窗是否開啟BL,因此該Intenr為BluetoothAdapter.ACTION.REQUEST_ENABLE
        if(!mBluetoothAdapter.isEnabled()){
            Intent intent=new Intent(BluetoothAdapter.ACTION_REQUEST_ENABLE);
            startActivityForResult(intent,REQUEST_ENABLE_BT); //再利用startActivityForResult啟動該Intent
        }
        ScanFunction(true); //使用ScanFunction(true) 開啟BLE搜尋功能,該Function在下面部分
    }
   //這個Override Function是因為在onResume中使用了ActivityForResult,當使用者按了取消或確定鍵時,結果會
   //返回到此onActivvityResult中,在判別requestCode判別是否==RESULT_CANCELED,如果是則finish()程式
    @Override
    protected void onActivityResult(int requestCode, int resultCode, Intent data) {
        if(REQUEST_ENABLE_BT==1 && resultCode== Activity.RESULT_CANCELED){
            finish();
            return;
        }
        super.onActivityResult(requestCode, resultCode, data);
    }
   //此為ScanFunction,輸入函數為boolean,如果true則開始搜尋,false則停止搜尋
   private void ScanFunction(boolean enable){
       if(enable){
           mHandler.postDelayed(new Runnable() { //啟動一個Handler,並使用postDelayed在10秒後自動執行此Runnable()
               @Override
               public void run() {
                   mBluetoothAdapter.stopLeScan(mLeScanCallback);//停止搜尋
                   mScanning=false; //搜尋旗標設為false
                   textView.setText("Stop Scan");
                   Log.d(TAG,"ScanFunction():Stop Scan");
               }
           },SCAN_TIME); //SCAN_TIME為幾秒後要執行此Runnable,此範例中為10秒
           mScanning=true; //搜尋旗標設為true
           mBluetoothAdapter.startLeScan(mLeScanCallback);//開始搜尋BLE設備
           textView.setText("Scanning");
           Log.d(TAG, "Start Scan");
       }
       else {
           mScanning=false;
           mBluetoothAdapter.stopLeScan(mLeScanCallback);
       }
   }
//注意,在此enable==true中的Runnable是在10秒後才會執行,因此是先startLeScan,10秒後才會執行Runnable內的stopLeScan
//在BLE Devices Scan中,使用的方法為startLeScan()與stopLeScan(),兩個方法都需填入callback,當搜尋到設備時,都會跳到
//callback的方法中
    //建立一個BLAdapter的Callback,當使用startLeScan或stopLeScan時,每搜尋到一次設備都會跳到此callback
    private BluetoothAdapter.LeScanCallback mLeScanCallback=new BluetoothAdapter.LeScanCallback() {
        @Override
        public void onLeScan(final BluetoothDevice device, final int rssi, byte[] scanRecord) {
            runOnUiThread(new Runnable() { //使用runOnUiThread方法,其功能等同於WorkThread透過Handler將資訊傳到MainThread(UiThread)中,
                                           //詳細可進到runOnUiThread中觀察
                @Override
                public void run() {
                    if (!mBluetoothDevices.contains(device)) { //利用contains判斷是否有搜尋到重複的device
                        mBluetoothDevices.add(device);         //如沒重複則添加到bluetoothdevices中
                        deviceName.add(device.getName()+" rssi:"+rssi+"\r\n" + device.getAddress()); //將device的Name、rssi、address裝到此ArrayList<Strin>中
                        ((BaseAdapter)listAdapter).notifyDataSetChanged();//使用notifyDataSetChanger()更新listAdapter的內容
                    }
                }
            });
        }

    };
  //分別按下搜尋予停止搜尋button時的功能,分別為開始搜尋與停止搜尋
   public void btnClick(View v){
        switch (v.getId()){
            case R.id.scanbtnID:
                ScanFunction(true);
                mBluetoothAdapter.startLeScan(mLeScanCallback);
                break;
            case R.id.stopbtnID:
                ScanFunction(false);
                textView.setText("Stop Scan");
                mBluetoothAdapter.stopLeScan(mLeScanCallback);
                break;
        }
    }
  //需要注意的是,需加入一個stopLeScan在onPause()中,當按返回鍵或關閉程式時,需停止搜尋BLE
  //否則下次開啟程式時會影響到搜尋BLE device
    @Override
    protected void onPause() {
        super.onPause();
        Log.d(TAG, "onPause():Stop Scan");
        mBluetoothAdapter.stopLeScan(mLeScanCallback);
    }
   //以下為ListView ItemClick的Listener,當按下Item時,將該Item的BLE Name與Address包起來,將送到另一
   //Activity中建立連線
    private class onItemClickListener implements AdapterView.OnItemClickListener{

        @Override
        public void onItemClick(AdapterView<?> parent, View view, int position, long id) {
            //mBluetoothDevices為一個陣列資料ArrayList<BluetoothDevices>,使用.get(positon)取得
            //Item位置上的BluetoothDevice
            final BluetoothDevice mBluetoothDevice=mBluetoothDevices.get(position);
            //建立一個Intent,將從此Activity進到ControlActivity中
            //在ControlActivity中將與BLE Device連線,並互相溝通
            Intent goControlIntent=new Intent(MainActivity.this,ControlActivity.class);
            //將device Name與address存到ControlActivity的DEVICE_NAME與ADDRESS,以供ControlActivity使用
            goControlIntent.putExtra(ControlActivity.DEVICE_NAME,mBluetoothDevice.getName());
            goControlIntent.putExtra(ControlActivity.DEVICE_ADDRESS,mBluetoothDevice.getAddress());
            mBluetoothAdapter.stopLeScan(mLeScanCallback);
            startActivity(goControlIntent);
        }
    }
以上為MainActivity大致寫法,整體流程為:
開啟程式後判斷是否支援BLE->onCreate內直接開始搜尋BLE Devices->將搜尋到的Devices存到mBluetoothDevices(ArrayList)內,名稱存到deviceName(ArrayList)內,並加到ListView中 ->點擊List Item將該device Name與address打包傳到ControlActivity內以供連線與控制。
下一篇將進行ControlActivity的BLE連線與溝通。