如何建置自己第一個jqGrid??
這次實作純粹針對實作jqGrid並記錄,所以會跳過建立MVC專案與如何建立資料的部分。
1. 開發軟體:Visual Studio 2015
2. 資料來源:Visual Studio 2015 LocalDB,使用EntityFramework取得資料
3. 準備:(都可以在NuGet下載,至於版本都載最新的)
- jquery
- jquery-ui
- jqGrid
4. 準備資料,此資料來源為LINE Rangers 手冊,此資料僅限運用在測試 jqGrid之用途。
 (圖一)
(圖一)
準備好這些必備的工具與套件後,就來實作看看了。
Step1.載入套件
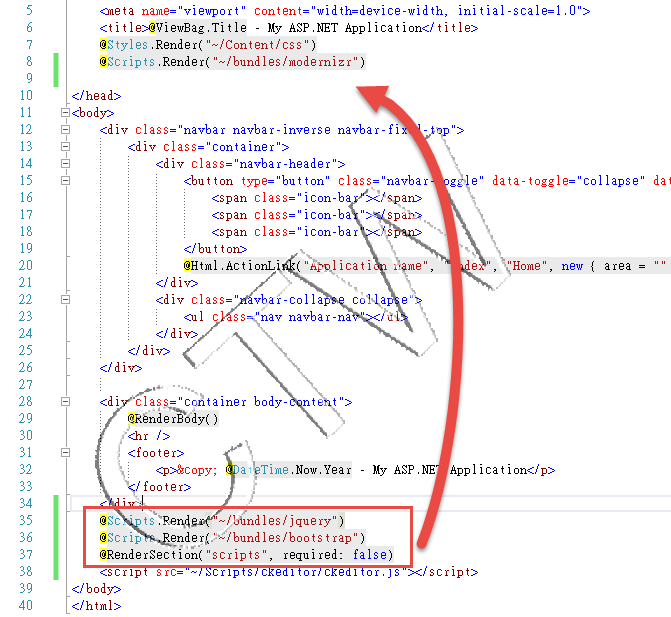
因為_Layout.cshtml的部分Script會放在@RenderBody()後才載入,故要特別移到上面,如(圖二)所示,這樣才不會因為沒有載入相關元件,導致grid出不來。
還要特別注意一下,就是Bundle後的套件,跟自己載入的套件,不要重複載入。
 (圖二)
(圖二)
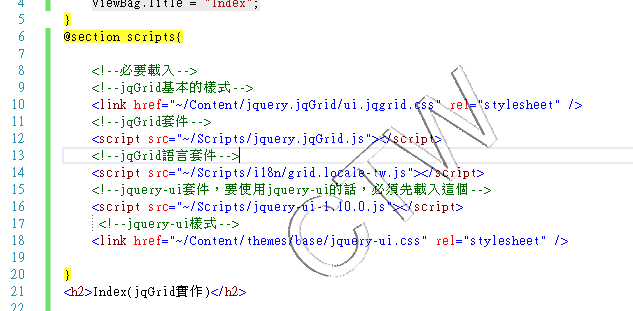
在專案中,並不是每一個網頁都會使用到jqGrid,故我並未將套件使用Bundle綁定,在_Layout.cshtml載入,而是透過@section script,在要實作的View中才載入這些元件。
 (圖三)
(圖三)
Step2.建置一個基本的jqGrid
1. 建置一個jqGrid,必須要有一組<table>標籤,以及一個<div>標籤。
jqGrid會將<table>轉換成要呈現的表格,而div會變成分頁的項目,此兩個標籤都要給其id,到後面會使用到。
<table id="myGrid"></table>
<div id="pager"></div>
2. 接著,在畫面一載入的時候,我預設會直接載入資料並呈現在畫面上,所以在View裡,直接在網頁載入時,就將jqGrid的語法套上。各個屬性解釋在程式碼中,要更詳細可以參考最後方的參考連結。
<script type="text/javascript">

    $("#myGrid").jqGrid({                  //將id=myGrid的DOM元件轉換成jqGrid
        url: '/Admin/Ranger/QueryRanger',  //取得資料的URL,這邊我會到controller取得資料
        datatype: 'json',                  //資料回傳的類型,有json,xml...等等
        jsonReader: {                      //jqgrid讀取json的時候,需要配置jsonReader才能讀取。
            repeatitems: false              //預設是true,但是我回傳的json的內容並不會按照順序回傳,故這邊要設定false,讓jsonReader是用搜尋name去塞入對應的值
        },
        mtype: 'GET',                      //ajax的類型,有GET和POST
        colModel: [                        //這個是欄位的屬性,name屬性必須要與後端回傳的欄位名稱相同,另外也可以顯示欄位名稱,樣式等等。
           { name: 'Name', label: '名稱', width: 200 },
           { name: 'Grade', label: '等級' },
           { name: 'Type', label: '類型' },
           { name: 'AttackDistance', label: '攻擊距離', sorttype: 'number' }, //sorttype排序方式使用number類型排序
           { name: 'AttackArea', label: '濺射範圍', sorttype: 'number' },
           { name: 'MovingSpeed', label: '移動速度', sorttype: 'number' },
           { name: 'AttackSpacing', label: '攻擊速度', sorttype: 'number' },
           { name: 'AttackTime', label: '攻擊間隔', sorttype: 'number' },
           { name: 'NormalCD', label: '正常CD', sorttype: 'number' },
           { name: 'MasterDPS', label: '大師DPS', sorttype: 'number' },
           { name: 'MasterDEF', label: '大師防禦', sorttype: 'number' },
           { name: 'MasterHP', label: '大師體力', sorttype: 'number' },
           { name: 'Mine', label: '礦', width: '110', sorttype: 'number' }
        ],
        pager: '#pager',                 //這是對應到<div>的id,會透過<div>變成分頁的相關UI
        width: '1000',                   //jqGrid的寬度
        height: 'auto',                  //jqGrid的高度
        rowNum: 10,                      //jqGrid預設顯示筆數
        rowList: [5, 10, 20, 50],        //jqGrid可選擇每頁顯示幾筆
        sortname: 'Name',                //jqGrid預設排序欄位名稱
        sortorder: "asc",                //jqGrid預設排序方式asc升冪,desc降冪
        viewrecords: true,               //是否要顯示總筆數
        caption: 'Ranger清單',           //jqGrid標題欄顯示的文字
        loadonce: true                   //是否只載入一次
    });

</script>
這邊特別說明一下loadonce屬性,若這個設成false,而分頁又沒有自己控制的話,那麼分頁就無法使用了
以這個範例呈現的內容,是撈取整個資料表的資料,若自己有作分頁控制邏輯的話,每次按分頁都會在進入倒controller撈取資料, 對於資料庫來說,這可能會對效能不太好。
這邊設定成true的話,一開始會先去資料庫撈取一次,之後整份資料就會前端,分頁也會透過jqGrid自行處理,這時不論是按上下頁或是排序,都不會再進入倒controller在重新撈取資料。
Step3. 到Controller取得資料
因為我的資料來自於資料庫,所以我在controller中有寫一個函式去取得資料
// GET: Admin/Ranger/QueryRanger
public JsonResult QueryRanger()
{
    //取得所有資料
    var rangerList = db.RANGER.ToList();

    //組成jqGrid要讀取的資料
    var jsonData = new
    {
        rows = rangerList   //jqGrid呈現在表格中的資料
    };

    //回傳
    return Json(jsonData, JsonRequestBehavior.AllowGet);
}
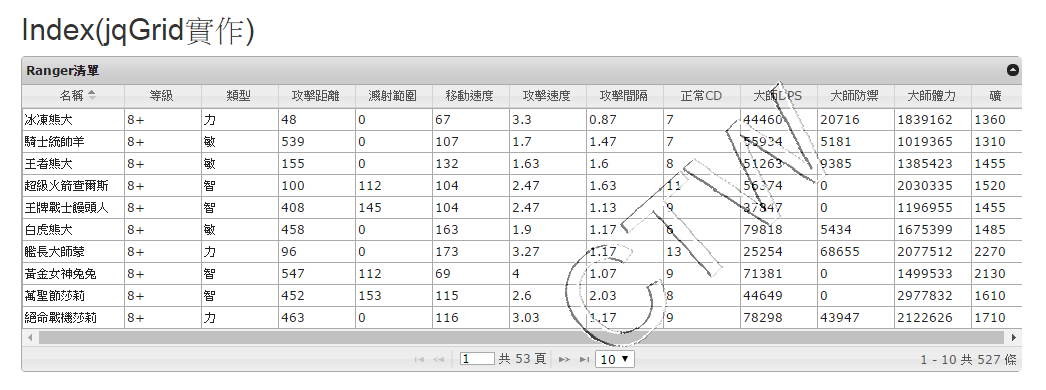
Step4. 成果展現
 (圖四)
(圖四)
總結:
這只是一開始基本的寫法,希望可以一邊記錄,一邊幫助到想起步jqGrid但失敗的新手,後面還有很多實用的功能還在學習,像CRUD等功能都可以透過jqGrid實作,子表格、客製化按鈕......等。
如果後期有心得,會在這邊持續記錄。
參考資料:

本著作由Chenting Weng製作,以創用CC 姓名標示 4.0 國際 授權條款釋出。
This work by Chenting Weng is licensed under a Creative Commons Attribution 4.0 International License.
Based on a work at https://dotblogs.com.tw/chentingw.
部分文章內容會引用到其他網站的簡介或圖片,若有侵犯到您的著作權,請留言告知,本人會儘快移除。
免責聲明:文章屬個人記事使用,僅供參考,若引用文章造成一切損失,本人不承擔任何責任。如有錯誤,歡迎留言告知。
Part of the content of the article will refer to the profile or picture of other websites.
If there is any infringement of your copyright, please leave a message and let me remove it as soon as possible.
Disclaimer:The article is for personal use and is for reference only. I will not bear any responsibility for any loss caused by quoting the article. If there is an error, please leave a message to inform.

