SQL Server 2017在Linux平台安裝雖然很簡單,只要按照指令一行一行貼上就可以完成,但懶人總是想著更快的方法,於是找了官方文件發現竟然有自動安裝的範例,測試一下果真OK。
請參閱以Red Hat Enterprise Linux為例,利用vi指令在Linux內建一個檔案例如installsql.sh,然後將範例指令碼貼上
預設只會安裝database engine,SQL Server 命令列工具,SQL Server Agent
#!/bin/bash

# Use the following variables to control your install:

# Password for the SA user (required)
MSSQL_SA_PASSWORD='<YourStrong!Passw0rd>'

# Product ID of the version of SQL server you're installing
# Must be evaluation, developer, express, web, standard, enterprise, or your 25 digit product key
# Defaults to developer
MSSQL_PID='evaluation'

# Install SQL Server Agent (recommended)
SQL_INSTALL_AGENT='y'

# Install SQL Server Full Text Search (optional)
# SQL_INSTALL_FULLTEXT='y'

# Create an additional user with sysadmin privileges (optional)
# SQL_INSTALL_USER='<Username>'
# SQL_INSTALL_USER_PASSWORD='<YourStrong!Passw0rd>'

if [ -z $MSSQL_SA_PASSWORD ]
then
  echo Environment variable MSSQL_SA_PASSWORD must be set for unattended install
  exit 1
fi

echo Adding Microsoft repositories...
sudo curl -o /etc/yum.repos.d/mssql-server.repo https://packages.microsoft.com/config/rhel/7/mssql-server-2017.repo
sudo curl -o /etc/yum.repos.d/msprod.repo https://packages.microsoft.com/config/rhel/7/prod.repo

echo Installing SQL Server...
sudo yum install -y mssql-server

echo Running mssql-conf setup...
sudo MSSQL_SA_PASSWORD=$MSSQL_SA_PASSWORD \
     MSSQL_PID=$MSSQL_PID \
     /opt/mssql/bin/mssql-conf -n setup accept-eula

echo Installing mssql-tools and unixODBC developer...
sudo ACCEPT_EULA=Y yum install -y mssql-tools unixODBC-devel

# Add SQL Server tools to the path by default:
echo Adding SQL Server tools to your path...
echo PATH="$PATH:/opt/mssql-tools/bin" >> ~/.bash_profile
echo 'export PATH="$PATH:/opt/mssql-tools/bin"' >> ~/.bashrc
source ~/.bashrc

# Optional SQL Server Agent installation:
if [ ! -z $SQL_INSTALL_AGENT ]
then
  echo Installing SQL Server Agent...
  sudo yum install -y mssql-server-agent
fi

# Optional SQL Server Full Text Search installation:
if [ ! -z $SQL_INSTALL_FULLTEXT ]
then
    echo Installing SQL Server Full-Text Search...
    sudo yum install -y mssql-server-fts
fi

# Configure firewall to allow TCP port 1433:
echo Configuring firewall to allow traffic on port 1433...
sudo firewall-cmd --zone=public --add-port=1433/tcp --permanent
sudo firewall-cmd --reload

# Example of setting post-installation configuration options
# Set trace flags 1204 and 1222 for deadlock tracing:
#echo Setting trace flags...
#sudo /opt/mssql/bin/mssql-conf traceflag 1204 1222 on

# Restart SQL Server after making configuration changes:
echo Restarting SQL Server...
sudo systemctl restart mssql-server

# Connect to server and get the version:
counter=1
errstatus=1
while [ $counter -le 5 ] && [ $errstatus = 1 ]
do
  echo Waiting for SQL Server to start...
  sleep 5s
  /opt/mssql-tools/bin/sqlcmd \
    -S localhost \
    -U SA \
    -P $MSSQL_SA_PASSWORD \
    -Q "SELECT @@VERSION" 2>/dev/null
  errstatus=$?
  ((counter++))
done

# Display error if connection failed:
if [ $errstatus = 1 ]
then
  echo Cannot connect to SQL Server, installation aborted
  exit $errstatus
fi

# Optional new user creation:
if [ ! -z $SQL_INSTALL_USER ] && [ ! -z $SQL_INSTALL_USER_PASSWORD ]
then
  echo Creating user $SQL_INSTALL_USER
  /opt/mssql-tools/bin/sqlcmd \
    -S localhost \
    -U SA \
    -P $MSSQL_SA_PASSWORD \
    -Q "CREATE LOGIN [$SQL_INSTALL_USER] WITH PASSWORD=N'$SQL_INSTALL_USER_PASSWORD', DEFAULT_DATABASE=[master], CHECK_EXPIRATION=ON, CHECK_POLICY=ON; ALTER SERVER ROLE [sysadmin] ADD MEMBER [$SQL_INSTALL_USER]"
fi

echo Done!
要修改的參數只有1個,修改SA的密碼
# Password for the SA user (required)
MSSQL_SA_PASSWORD='<YourStrong!Passw0rd>'
以下為可以調整的選項
安裝的版本預設是試用版
# Defaults to developer
MSSQL_PID='evaluation'
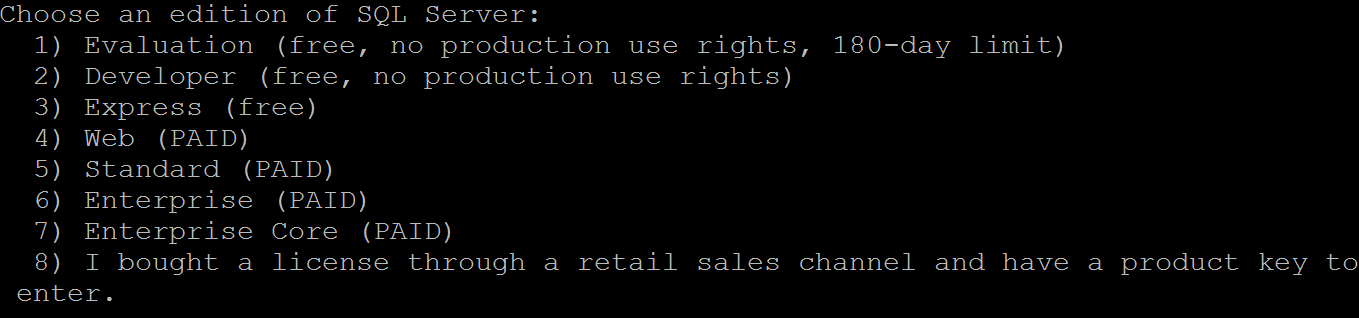
可以改為以下7種選項
如果要安裝全文檢索,請移除#
# Install SQL Server Full Text Search (optional)
# SQL_INSTALL_FULLTEXT='y'
如果要建立另一個具有sysadmin權限使用者請移除#後輸入使用者名稱及密碼
# Create an additional user with sysadmin privileges (optional)
# SQL_INSTALL_USER='<Username>'
# SQL_INSTALL_USER_PASSWORD='<YourStrong!Passw0rd>'
如果要開啟追蹤dead lock請移除#
# Example of setting post-installation configuration options
# Set trace flags 1204 and 1222 for deadlock tracing:
#echo Setting trace flags...
#sudo /opt/mssql/bin/mssql-conf traceflag 1204 1222 on
實測後有段指令少了,要讓sqlcmd/bcp bash 殼層互動式/非登入工作階段,少了第2行指令
echo 'export PATH="$PATH:/opt/mssql-tools/bin"' >> ~/.bashrc
source ~/.bashrc
存檔離開vi後,將檔案修改為可執行
chmod +x installsql.sh
然後執行即可
./installsql.sh