本文章內容:
Docker鏡像管理。
1. 製作鏡像三種方式
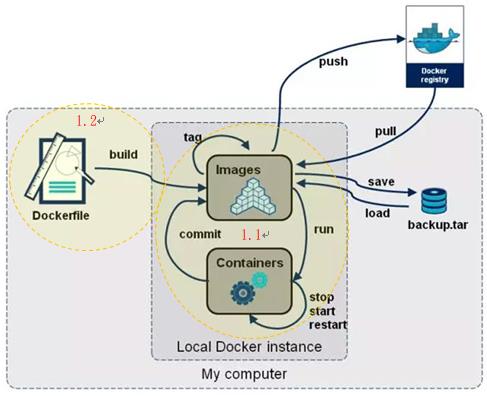
1. 基於容器來做鏡像
容器啟動起來以後最上面有一層叫可寫層,這個可寫層裡面你可能做了很多改變,比如你yum install一個程序包都在這裡頭,回頭我們就把這可寫層給它固定下來做成一個鏡像,使用docker commit命令來實現。
2. 基於dockerfile來做鏡像
使用命令docker build基於dockerfile來做,dockerfile就是Docker做鏡像的一個指令文件。
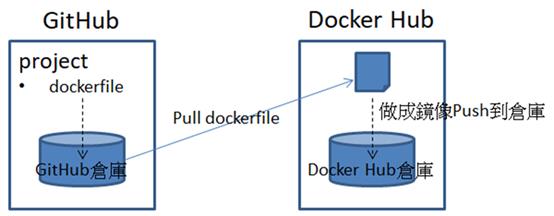
3. Docker Hub automated builds
Docker Hub上的功能,需搭配 Webhooks以及GitHub。它還是基於Dockerfile來做,只是製作途徑不同。
1.1 基於容器來做鏡像
1.1.1 示例1
需求
在busybox的基礎之上給它加一個/data/html目錄,在/data/html目錄裡面創建一個index.html的網頁,然後做成鏡像。以後基於做的這個鏡像去啟動一個容器,每次啟動那個文件都會自動在。
做法
1. 執行docker container run --name b1 -it busybox:latest
[root@localhost ~]# docker container run --name b1 -it busybox:latest
WARNING: IPv4 forwarding is disabled. Networking will not work.
/ # ls
bin   dev   etc   home  proc  root  sys   tmp   usr   var
2. 創建/data/html目錄以及/data/html/index.html網頁
/ # mkdir -p /data/html
/ # vi /data/html/index.html
<h1>Busybox httpd server.</h1>
3. b1容器不要關閉,在另一終端執行docker container commit [-p] b1 [tom/httpd:v0.1-1] #-p:Pause container during commit (default true),做鏡像過程當中這個容器中的應用程序還在運行還不斷的在生成新文件,那麼很有可能你保存下來的文件有的是一半的,為了避免出現這樣的問題可以使用-p選項就表示暫停;tom/httpd:v0.1-1:假設Docker Hub上有個用戶叫tom,這樣可以push上去,如果不加"tom/httpd:v0.1-1",則創建出的鏡像REPOSITORY和TAG會顯示"<none>",隨後也可以使用docker image tag命令來補上
[root@localhost ~]# docker container commit -p b1 tom/httpd:v0.1-1
sha256:728f35102e8be5d16a8e127d4af8a58cac498100fe726573e699317019d65007
[root@localhost ~]# docker image ls
REPOSITORY   TAG             IMAGE ID       CREATED         SIZE
tom/httpd    v0.1-1          728f35102e8b   6 seconds ago   1.23MB
busybox      latest          491198851f0c   5 days ago      1.23MB
nginx        stable-alpine   f2343e2e2507   2 months ago    21.9MB
4. 為tom/httpd:v0.1-1再打一個標籤叫tom/httpd:latest
[root@localhost ~]# docker image tag tom/httpd:v0.1-1 tom/httpd:latest
[root@localhost ~]# docker image ls
REPOSITORY   TAG             IMAGE ID       CREATED          SIZE
tom/httpd    latest          728f35102e8b   13 minutes ago   1.23MB
tom/httpd    v0.1-1          728f35102e8b   13 minutes ago   1.23MB
busybox      latest          491198851f0c   5 days ago       1.23MB
nginx        stable-alpine   f2343e2e2507   2 months ago     21.9MB
5. 執行docker image push tom/httpd,這樣就可以把tom/httpd:v0.1-1和tom/httpd:latest鏡像推送到Docker Hub的tom用戶的倉庫上去了 #Docker Hub上需要有tom用戶以及httpd倉庫
6. 基於tom/httpd:v0.1-1鏡像創建並啟動容器
[root@localhost ~]# docker container run --name busybox1 -it tom/httpd:v0.1-1
WARNING: IPv4 forwarding is disabled. Networking will not work.
/ # cat /data/html/index.html  #/data/html目錄有,/data/html/index.html文件也有
<h1>Busybox httpd server.</h1>
/ #
1.1.2 示例2
需求
像示例1做的tom/httpd:v0.1-1鏡像,其默認運行的命令還是busybox:latest這個基礎鏡像的命令,執行docker image inspect tom/httpd:v0.1-1看"Cmd"運行的是sh
[root@localhost ~]# docker image inspect tom/httpd:v0.1-1
...
            "Cmd": [
                "sh"
            ],
...
現在我們想做鏡像時默認運行我們想運行的命令,比如默認運行httpd。
做法
1. 基於示例1做的tom/httpd:v0.1-1鏡像創建並啟動容器
[root@localhost ~]# docker container run --name busybox1 -it tom/httpd:v0.1-1
WARNING: IPv4 forwarding is disabled. Networking will not work.
/ # ls /data/html  #當網頁文件的根目錄
index.html
/ # cat /data/html/index.html  #網站首頁
<h1>Busybox httpd server.</h1>
/ # which httpd  #查看httpd命令的路徑,等下會用到
/bin/httpd
/ # httpd -h
httpd: option requires an argument -- h
BusyBox v1.32.1 (2021-02-18 00:40:10 UTC) multi-call binary.

Usage: httpd [-ifv[v]] [-c CONFFILE] [-p [IP:]PORT] [-u USER[:GRP]] [-r REALM] [-h HOME]
or httpd -d/-e/-m STRING

Listen for incoming HTTP requests

        -i              Inetd mode
        -f              Don't daemonize  #表示運行在前台
        -v[v]           Verbose
        -p [IP:]PORT    Bind to IP:PORT (default *:80)
        -u USER[:GRP]   Set uid/gid after binding to port
        -r REALM        Authentication Realm for Basic Authentication
        -h HOME         Home directory (default .)  #指定網頁文件的根目錄
        -c FILE         Configuration file (default {/etc,HOME}/httpd.conf)
        -m STRING       MD5 crypt STRING
        -e STRING       HTML encode STRING
        -d STRING       URL decode STRING
2. busybox1容器不要關閉,在另一終端執行docker container commit -a 'tom <tom@gmail.com>' -c 'CMD ["/bin/httpd","-f","-h","/data/html"]' -p busybox1 tom/httpd:v0.1-2 #-a:Author (e.g., "John Hannibal Smith <hannibal@a-team.com>");-c:Apply Dockerfile instruction to the created image,我們這只改"Cmd"部分,注意CMD一定要純大寫,後面命令用列表表示;-p:製作時先暫停容器,busybox1是被做鏡像的容器名,tom/httpd:v0.1-2表示"用戶/倉庫名和標籤名"
[root@localhost ~]# docker container commit -a 'tom <tom@gmail.com>' -c 'CMD ["/bin/httpd","-f","-h","/data/html"]' -p busybox1 tom/httpd:v0.1-2
sha256:4e25fc9af78b045043f0688173d44cb60dd21c6ad5df75013faff0f3621ec97e
[root@localhost ~]# docker image ls
REPOSITORY   TAG             IMAGE ID       CREATED          SIZE
tom/httpd    v0.1-2          4e25fc9af78b   3 minutes ago    1.23MB
tom/httpd    latest          728f35102e8b   52 minutes ago   1.23MB
tom/httpd    v0.1-1          728f35102e8b   52 minutes ago   1.23MB
busybox      latest          491198851f0c   5 days ago       1.23MB
nginx        stable-alpine   f2343e2e2507   2 months ago     21.9MB
3. 基於tom/httpd:v0.1-2鏡像創建並啟動容器
[root@localhost ~]# docker container run --name busybox2 tom/httpd:v0.1-2  #加-d選項可以運行到後台
WARNING: IPv4 forwarding is disabled. Networking will not work.  #啟動後沒顯示什麼信息,它默認運行的是httpd且運行在前台所以不用加-it
4. 在另一終端執行docker container ls --no-trunc或執行docker container inspect busybox2看"Cmd",可以看到busybox2運行的命令是"/bin/httpd -f -h /data/html"
[root@localhost ~]# docker container ls --no-trunc
CONTAINER ID                                                       IMAGE              COMMAND                         CREATED          STATUS          PORTS     NAMES
cf080e4d1d9f96677ed42477bfe1063d8ee694eed7b96046eff711e9b8a86c88   tom/httpd:v0.1-2   "/bin/httpd -f -h /data/html"   2 minutes ago    Up 2 minutes              busybox2
88b29576a476fc7b0626ff2ba3a8bc8f16abf3ad4ba1fbb3e83b86c5fee76979   tom/httpd:v0.1-1   "sh"                            24 minutes ago   Up 24 minutes             busybox1

or

[root@localhost ~]# docker container inspect busybox2
...
            "Cmd": [
                "/bin/httpd",
                "-f",
                "-h",
                "/data/html"
            ],
...
1.2 基於dockerfile來做鏡像
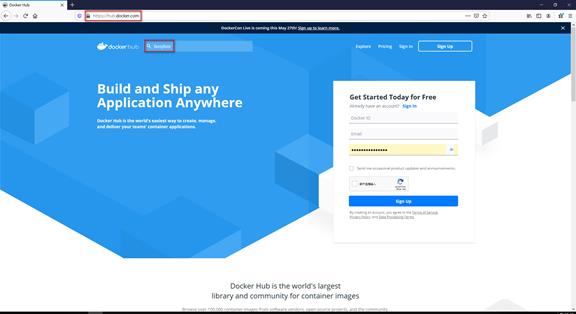
2. 鏡像的pull(下載)
默認下載的是Docker Hub上的鏡像。
1. 訪問Docker Hub網站"https://hub.docker.com/" → 搜索"busybox"
2. 點官方版的倉庫
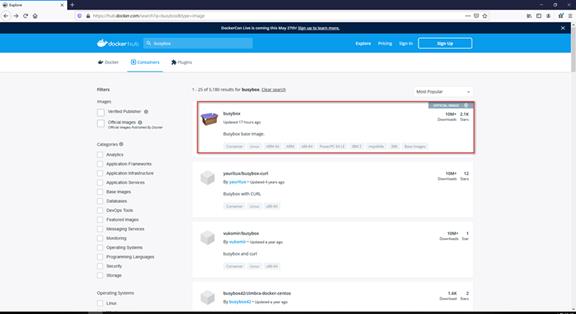
3. 點"Tags"

4. 下載標籤latest鏡像
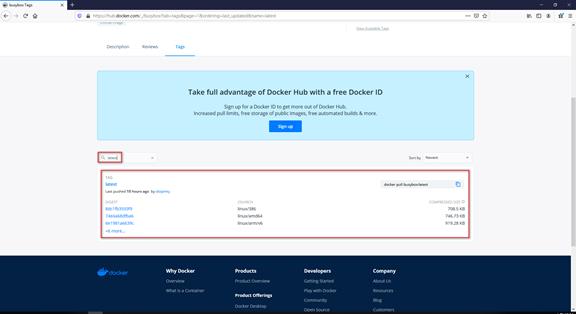
5. 執行docker image pull busybox:latest,提示:標籤不寫就是下載latest鏡像
[root@localhost ~]# docker image pull busybox:latest
latest: Pulling from library/busybox
5c4213be9af9: Pull complete
Digest: sha256:c6b45a95f932202dbb27c31333c4789f45184a744060f6e569cc9d2bf1b9ad6f
Status: Downloaded newer image for busybox:latest
docker.io/library/busybox:latest
3. 鏡像的push(推送)
默認推送到Docker Hub上。
1. 將本地的tom/httpd:v0.1-1鏡像push到Docker Hub上
2. 執行docker image push tom/httpd:v0.1-1
注意:
1. Docker Hub上需有tom用戶以及httpd倉庫。
2. 如果不是要推送到Docker Hub上,則鏡像名前要加推送到的registry伺服器網站。比如推送到阿里雲的registry伺服器,鏡像名就是registry.cn-qingdao.aliyuncs.com/tom/httpd:v0.1-1。
4. 鏡像的查看
1. 執行docker image ls顯示所有下載的鏡像
[root@localhost ~]# docker image ls
REPOSITORY   TAG       IMAGE ID       CREATED        SIZE
busybox      latest    491198851f0c   19 hours ago   1.23MB
2. 執行docker image ls busybox:latest只顯示busybox:latest鏡像
[root@localhost ~]# docker image ls busybox:latest
REPOSITORY   TAG       IMAGE ID       CREATED        SIZE
busybox      latest    491198851f0c   19 hours ago   1.23MB
3. 執行docker image --no-trunc顯示"IMAGE ID"的完整sha256名稱(默認只顯示前12碼)
[root@localhost ~]# docker image ls --no-trunc
REPOSITORY   TAG       IMAGE ID                                                                  CREATED        SIZE
busybox      latest    sha256:491198851f0ccdd0882cb9323f3856043d4e4c65b773e8eac3e0f6bc979a2ae7   19 hours ago   1.23MB
5. 鏡像的刪除
執行docker image rm busybox:latest,提示:標籤不寫就是刪除latest鏡像
[root@localhost ~]# docker image rm busybox:latest
Untagged: busybox:latest
Untagged: busybox@sha256:c6b45a95f932202dbb27c31333c4789f45184a744060f6e569cc9d2bf1b9ad6f
Deleted: sha256:491198851f0ccdd0882cb9323f3856043d4e4c65b773e8eac3e0f6bc979a2ae7
Deleted: sha256:84009204da3f70b09d2be3914e12844ae9db893aa85ef95df83604f95df05187
[root@localhost ~]# docker image ls
REPOSITORY   TAG       IMAGE ID   CREATED   SIZE
6. 鏡像的搜索
執行docker search busybox
[root@localhost ~]# docker search busybox
NAME                      DESCRIPTION                                      STARS     OFFICIAL   AUTOMATED
busybox                   Busybox base image.                              2110      [OK]
progrium/busybox                                                           70                   [OK]
radial/busyboxplus        Full-chain, Internet enabled, busybox made f…   35                   [OK]
yauritux/busybox-curl     Busybox with CURL                                12
arm32v7/busybox           Busybox base image.                              8
armhf/busybox             Busybox base image.                              6
...
7. 鏡像的save(匯出)
[root@localhost ~]# docker image --help
...
  save        Save one or more images to a tar archive (streamed to STDOUT by default)
...
1. 將本地的tom/httpd:v0.1-1和tom/httpd:v0.1-2鏡像打包
2. 執行docker image save -o myimages.gz tom/httpd:v0.1-1 tom/httpd:v0.1-2 #-o:Write to a file, instead of STDOUT
[root@localhost ~]# docker image ls
REPOSITORY   TAG             IMAGE ID       CREATED             SIZE
tom/httpd    v0.1-2          4e25fc9af78b   About an hour ago   1.23MB
tom/httpd    latest          728f35102e8b   2 hours ago         1.23MB
tom/httpd    v0.1-1          728f35102e8b   2 hours ago         1.23MB
busybox      latest          491198851f0c   5 days ago          1.23MB
nginx        stable-alpine   f2343e2e2507   2 months ago        21.9MB
[root@localhost ~]# docker image save -o myimages.gz tom/httpd:v0.1-1 tom/httpd:v0.1-2
[root@localhost ~]# ls
anaconda-ks.cfg  myimages.gz
8. 鏡像的load(匯入)
1. 將匯出的鏡像myimages.gz匯入到本地registry中
[root@localhost ~]# ls
anaconda-ks.cfg  myimages.gz  #打包的鏡像
2. 執行docker image load -i myimages.gz #-i:Read from tar archive file, instead of STDIN
[root@localhost ~]# docker image ls
REPOSITORY   TAG       IMAGE ID   CREATED   SIZE
[root@localhost ~]# docker image load -i myimages.gz
Loaded image: tom/httpd:v0.1-1
Loaded image: tom/httpd:v0.1-2
[root@localhost ~]# docker image ls
REPOSITORY   TAG       IMAGE ID       CREATED             SIZE
tom/httpd    v0.1-2    4e25fc9af78b   About an hour ago   1.23MB
tom/httpd    v0.1-1    728f35102e8b   2 hours ago         1.23MB