在本篇介紹SQL Server on Linux的Database Mail設定,其實設定方式跟在Windows的版本差不多,只是這裡將自行額外安裝postfix套件來設定Mail Server,擔任MTA(Mail Transfer Agent)的角色,並嘗試設定兩種郵件設定檔(Profile),即"公開性質"跟"私人性質"兩種,另外,將在sqllnx1及sqllnx2分別使用【UI介面】及【T-SQL】兩種方式分別建置Database Mail。
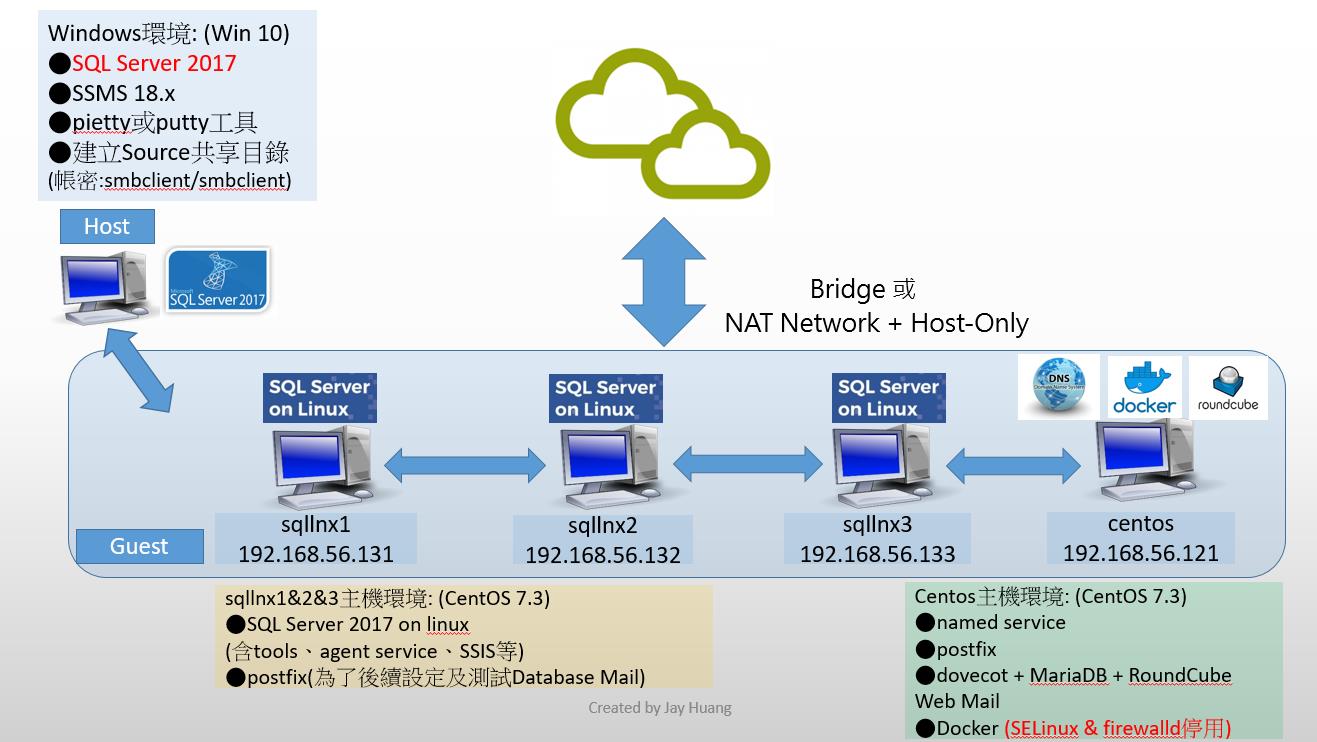
為了方便對照,再次說明下圖是對部門內部介紹SQL Server on Linux時的實作環境,安裝完CentOS 7.x後,記得先執行 #yum update -y ,以更新所有使用yum下載安裝的套件。
<前置作業-設定postfix郵件伺服器>
--請在sqllnx1 & sqllnx2上設定
--(1)安裝套件
#mail    --找不到命令
#yum install -y postfix mailx            --安裝相關套件套件,安裝mailx套件是為了在client端收發郵件
#less /etc/postfix/main.cf               --檢視postfix的設定檔
#grep -n '^[^#]' /etc/postfix/main.cf    --或 #cat /etc/postfix/main.cf | grep -n '^[^#]'    --檢視postfix設定檔中的"非註解部分"的內容

--(2)修改postfix設定檔
#vi /etc/postfix/main.cf
-------------------------------------
--在sqllnx1的設定內容
myhostname = sqllnx1.dba.com  --郵件伺服器主機名稱
mydomain = sqllnx1.dba.com    --郵件伺服器負責的網域名稱,與DNS的MX設定有關
myorigin = $mydomain          --由postfix寄出的郵件,其寄件人的欄位,所要顯示的網域名稱
inet_interfaces = all         --設定想要接收主機裡哪些網路介面傳來的郵件
mydestination = $myhostname, localhost.$mydomain, localhost, $mydomain    --定義這台郵件伺服器自家人的網域
-------------------------------------
--在sqllnx2的設定內容
myhostname = sqllnx2.dba.com
mydomain = sqllnx2.dba.com
myorigin = $mydomain
inet_interfaces = all
mydestination = $myhostname, localhost.$mydomain, localhost, $mydomain
-------------------------------------

--(3)設定防火牆
#firewall-cmd --list-all
#firewall-cmd --permanent --add-service=smtp
#firewall-cmd --reload
#firewall-cmd --list-all

--(4)啟用服務並重新開機
#systemctl enable postfix
#reboot
#systemctl status postfix

--(5)以root權限,建立測試用帳戶sqlalert(後面設定Database Mail時會用到此帳戶),並設定其密碼
#adduser sqlalert
#passwd sqlalert

--(6)測試電子郵件的傳送與接收
--在sqllnx2上,以root登入,輸入以下內容:
#mail sqlalert@[192.168.56.131]     --@後面的郵件網域名稱,系統會到DNS解析,但目前環境沒有架DNS,所以直接用#mail sqlalert@sqllnx1.dba.com會執行錯誤(查/var/log/maillog)
Subject: Test send mail from sqllnx2
Hello! Test mailer!!
.    --輸入一個點號,代表本文結束
#tail /var/log/maillog    --檢查電子郵件傳送記錄
--切換至sqllnx1,以sqlalert帳戶登入(記得退出所有以su指令切換的帳戶),並執行以下指令,確認是否有收到mail
#mail

--(7)反向測試,在sqllnx1上,以root登入,輸入以下內容:
#mail sqlalert@[192.168.56.132]     --@後面的郵件網域名稱,系統會到DNS解析,但目前環境沒有架DNS,所以直接用#mail sqlalert@sqllnx2.dba.com會執行錯誤(查/var/log/maillog)
Subject: Test send mail from sqllnx1
Hello! Test mailer!!
.    --輸入一個點號,代表本文結束
#tail /var/log/maillog    --檢查電子郵件傳送記錄
--切換至sqllnx2,以sqlalert帳戶登入(記得退出所有以su指令切換的帳戶),並執行以下指令,確認是否有收到mail
#mail
<Database Mail的服務架構>
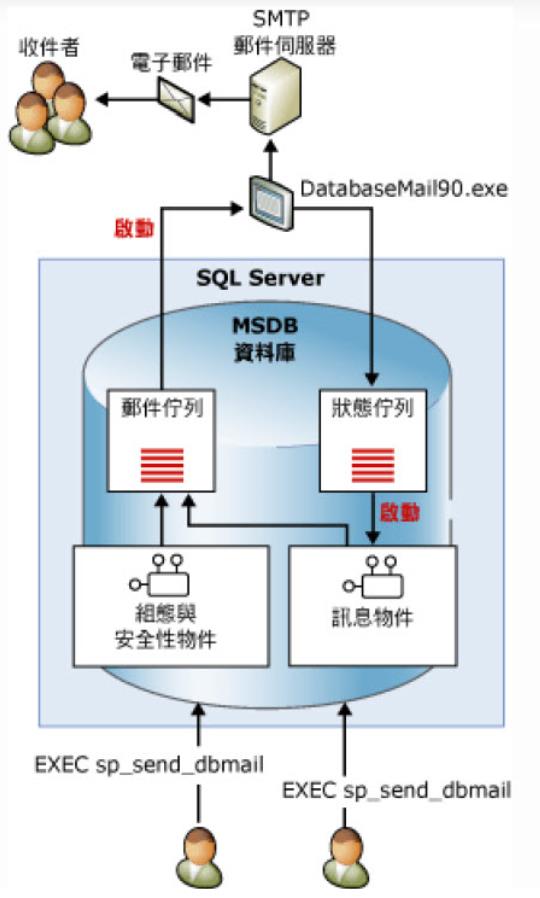
見上圖,我們可以使用sp_send_dbmail系統預存程序來傳送電子郵件,若要使用屬於私人性質的郵件設定檔(Profile),該電子郵件傳送的帳戶(User),必須是msdb資料庫中的DatabaseMailUserRole資料庫角色的成員才能傳送郵件。而DatabaseMail90.exe外部程序,可視為一個SMTP用戶端,即MUA ( Mail User Agent )郵件使用者代理人的角色,是幫忙使用者進行郵件收發工作的軟體。SMTP郵件伺服器,即MTA ( Mail Transfer Agent )郵件傳送代理人的角色,主要的功能就是將所收受的信件,依照信件的Flow( 送到哪裡去 ) 來決定將該信件放置到本機帳戶下的郵件信箱中 ( Mailbox ),或者是再將這個信件送到下個MTA 去。另外,Database Mail有支援叢集架構。
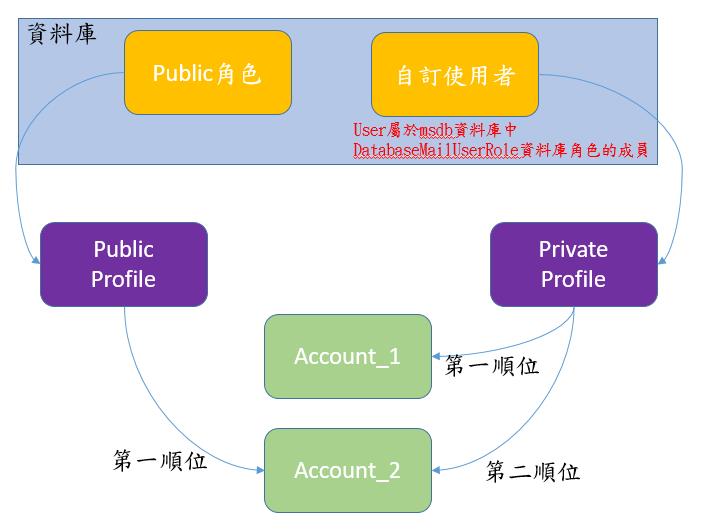
<Database Mail的運作架構>
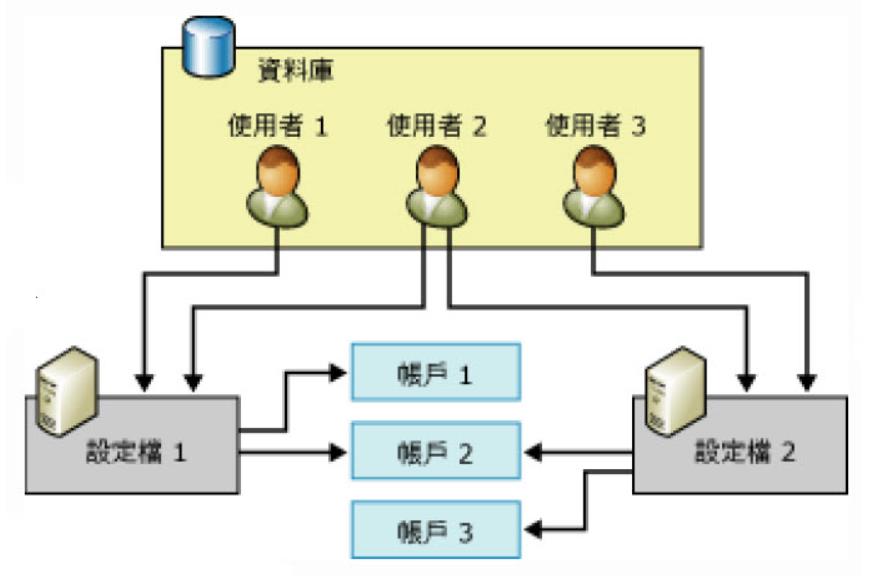
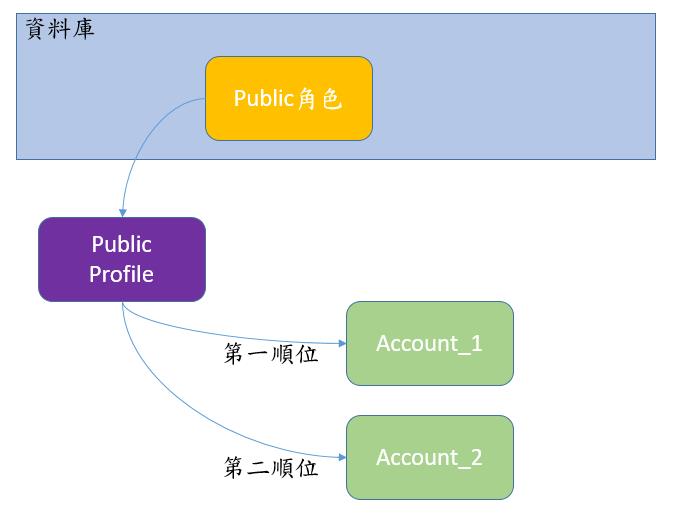
見上圖,[使用者] vs [設定檔],以及[設定檔] vs [帳戶],都可以是1對多的關係,即同一個[使用者],可以對應至不同的[設定檔],同一個[設定檔],亦可以指定不同的[帳戶]。依據[使用者]為"msdb資料庫的public角色"或是屬於"在msdb資料庫自訂的user",郵件設定檔(Profile)可分為"公開性質"跟"私人性質"。上圖中每個[帳戶],指的都是一個郵件伺服器的設定。
<練習1: 設定Database Mail - 使用UI介面> 請連上sqllnx1操作 (僅設定"公用設定檔")
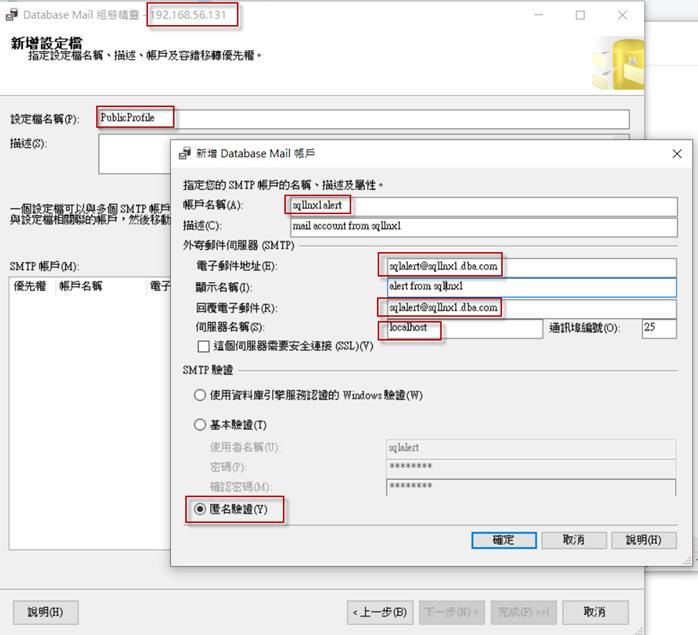
使用Host上的SSMS連結至sqllnx1(192.168.56.131),啟用Database Mail後,開始新增設定檔。給定「設定檔名稱」後,開始設定第一個帳戶,即”sqllnx1alert”。因為sqllnx1alert是透過sqllnx1自己本身的postfix服務來寄送Email,所以「伺服器名稱」記得設定為”localhost”,可使用匿名驗證。
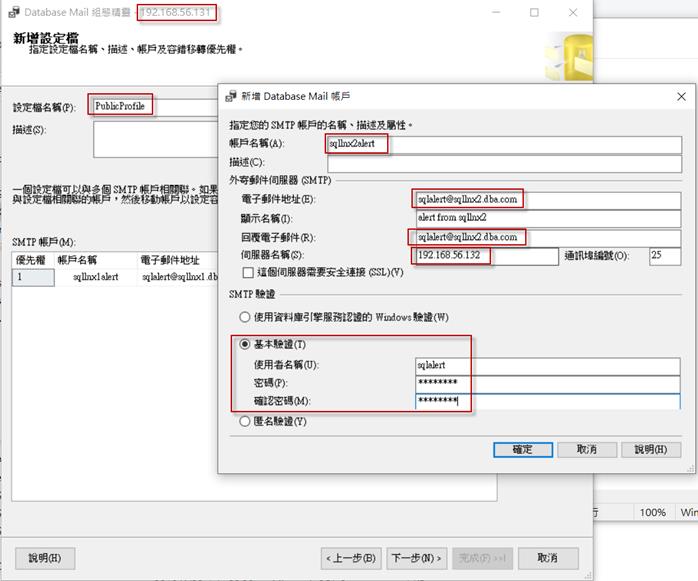
緊接著設定第二個帳戶,即”sqllnx2alert”。因為sqllnx2alert是透過sqllnx2的postfix服務來送Email,所以「伺服器名稱」設定為”192.168.56.132”,用之前在sqllnx2上建立的sqlalert帳戶來做驗證。
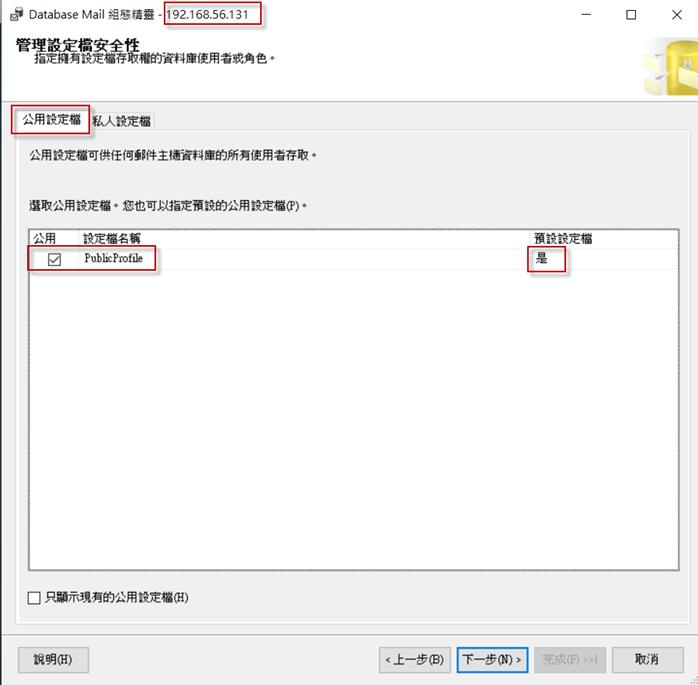
將該設定檔設定為「公用設定檔」,會自動使用msdb資料庫的public角色來提供處理Email資料的權限
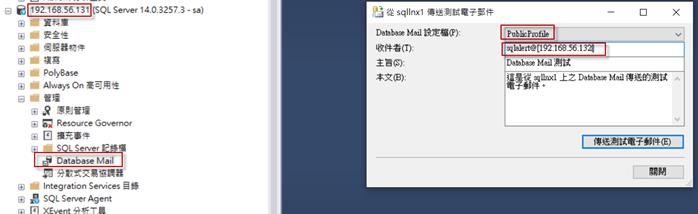
測試Database Mail,從sqllnx1寄Email給sqllnx2上的sqlalert帳戶,注意「收件者」欄位,若要使用IP,則要加上中括弧[ ]
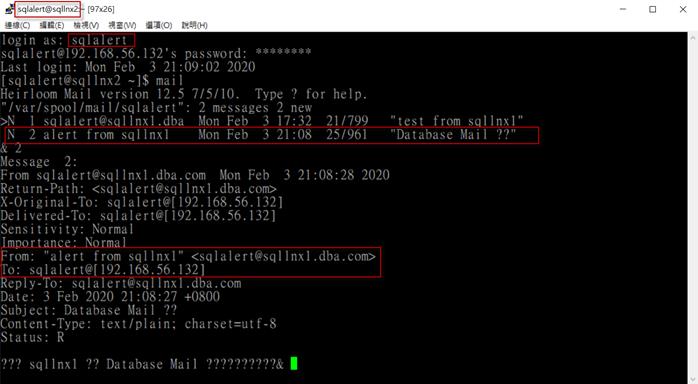
以sqlalert帳戶登入sqllnx2,用mail指令查看信件,確實有收到sqlalert@sqllnx1.dba.com寄來的Email
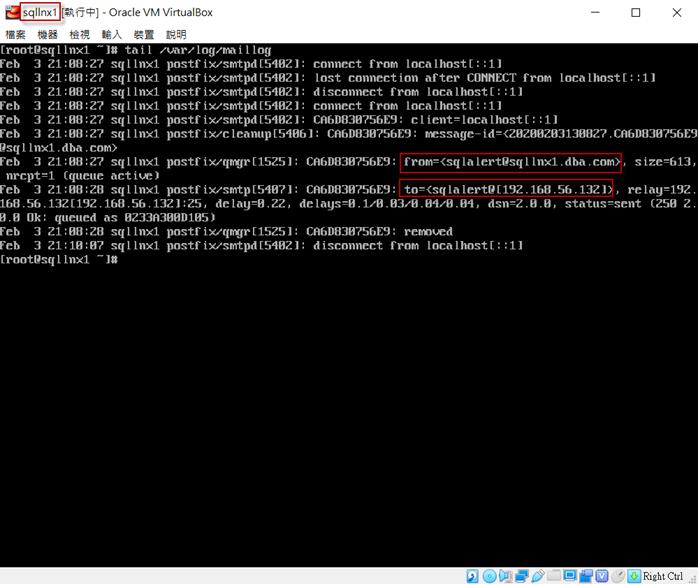
以root帳戶登入sqllnx1,用tail指令查看/var/log/maillog
<練習2: 設定Database Mail - 使用T-SQL> 請連上sqllnx2操作 (設定"公用設定檔"及"私人設定檔")
--請在sqllnx2(192.168.56.132)上執行
--create login 'sql2admin1'
USE [master]
GO
CREATE LOGIN [sql2admin1] WITH PASSWORD=N'xxxxxx'  --密碼請自行變更
GO

--create user 'sqladmin1' for private profile
use msdb
go
create user sqladmin1 for login sql2admin1
go
exec sp_addrolemember 'DatabaseMailUserRole','sqladmin1'  --加入msdb資料庫中的DatabaseMailUserRole資料庫角色的成員
go

-- Create DB Mail Account
EXECUTE msdb.dbo.sysmail_add_account_sp
@account_name = 'sqllnx1alert',  --第一個帳戶名稱
@description = 'This Mail Account is set for SQLLNX1',
@email_address = 'sqlalert@sqllnx1.dba.com',   --寄件者
@replyto_address = 'sqlalert@sqllnx1.dba.com',
@display_name = 'SQL Agent on SQLLNX1',
@mailserver_name = '192.168.56.131',   --因為指令是在sqllnx2上執行,且指定mail server為sqllnx1
@port = 25,
@enable_ssl = 0,         --當設定為1時,表示此服務可以使用TLS
@username = 'sqlalert',  --指定Linux的sqlalert帳戶來進行驗證
@password = 'xxxxxxxx'   --密碼請自行變更
GO

EXECUTE msdb.dbo.sysmail_add_account_sp
@account_name = 'sqllnx2alert',  --第二個帳戶名稱
@description = 'This Mail Account is set for SQLLNX2',
@email_address = 'sqlalert@sqllnx2.dba.com',    --寄件者
@replyto_address = 'sqlalert@sqllnx2.dba.com',
@display_name = 'SQL Agent on SQLLNX2',
@mailserver_name = 'localhost',     --因為指令是在sqllnx2上執行,且指定mail server為sqllnx2自己本身,故採匿名驗證
@port = 25,
@enable_ssl = 0
GO

-- Create DB Mail Profile
EXECUTE msdb.dbo.sysmail_add_profile_sp
@profile_name = 'publicProfile',
@description = 'Public Profile for sending Automated DBA Notifications'
GO

EXECUTE msdb.dbo.sysmail_add_profile_sp
@profile_name = 'privateProfile',
@description = 'Private Profile for sending Automated DBA Notifications'
GO

-- Add Mail Account to Mail Profile
EXECUTE msdb.dbo.sysmail_add_profileaccount_sp
@profile_name ='publicProfile',
@account_name = 'sqllnx2alert',
@sequence_number = 1
go

EXECUTE msdb.dbo.sysmail_add_profileaccount_sp
@profile_name ='privateProfile',
@account_name = 'sqllnx1alert',
@sequence_number = 1
go

EXECUTE msdb.dbo.sysmail_add_profileaccount_sp
@profile_name ='privateProfile',
@account_name = 'sqllnx2alert',
@sequence_number = 2
go

--設定公開設定檔
EXECUTE msdb.dbo.sysmail_add_principalprofile_sp
@principal_name = 'public',       --msdb資料庫的public角色
@profile_name = 'publicProfile',  --此profile設為公開
@is_default = 1
go

--設定私人設定檔
EXECUTE msdb.dbo.sysmail_add_principalprofile_sp
@principal_name = 'sqladmin1',     --msdb資料庫的使用者帳戶,有加入msdb資料庫中的DatabaseMailUserRole資料庫角色的成員
@profile_name = 'privateProfile',  --此profile設為私人
@is_default = 1
go


--可使用SSMS查看sqllnx2的Database Mail設定


--測試
EXECUTE msdb.dbo.sp_send_dbmail
@profile_name = 'publicProfile',  --此profile設為公開
@recipients = 'sqlalert@[192.168.56.131]',  --指定[收件者]
@Subject = 'Testing DBMail from SQLLNX2',   --此郵件由sqllnx2發送
@Body = 'This message is a test for DBMail'
GO
--以sqlalert帳戶登入sqllnx1,並檢視mail

EXECUTE msdb.dbo.sp_send_dbmail
@profile_name = 'privateProfile',  --此profile設為私人
@recipients = 'sqlalert@[192.168.56.132]',  --指定[收件者]
@Subject = 'Testing DBMail from SQLLNX2 by SQLLNX1', --此郵件由sqllnx1(為第一順位)或sqllnx2(為第二順位)發送
@Body = 'This message is a test for DBMail'
GO
--以sqlalert帳戶登入sqllnx2,並檢視mail
<補充說明: 當Lab環境有安裝DNS Server時的參考>
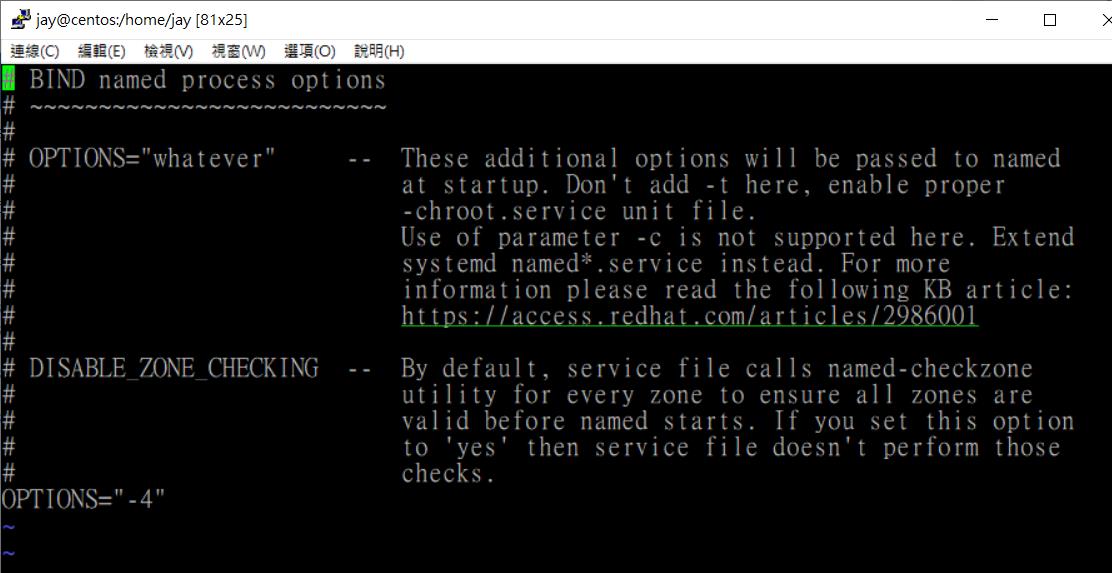
--若在centos(192.168.56.121)架設DNS Server後,[寄件者]就可以使用email address來寄信,而不用IP
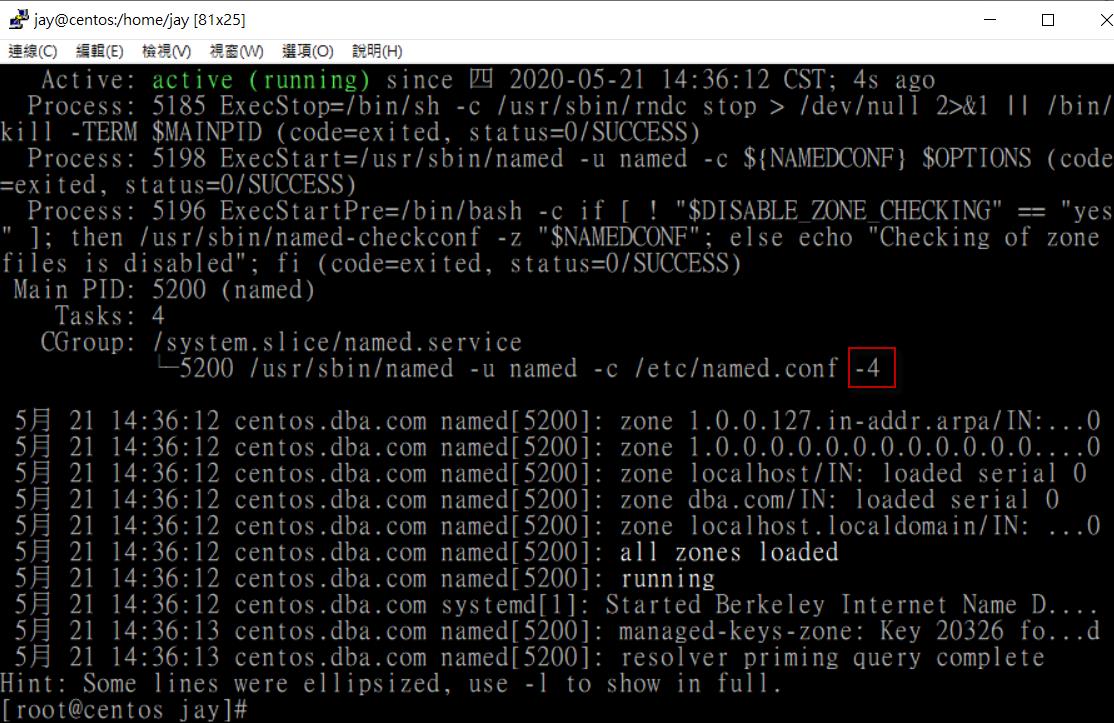
--請自行安裝BIND(Berkeley Internet Name Domain)相關套件及調整設定檔,此部分不細談
--(1)在centos(192.168.56.121)執行
# less /etc/named.conf
----------------------------------------------
--擷取部分內容
options {
listen-on port 53 { any; }; --有調整為"any"
listen-on-v6 port 53 { ::1; };
directory "/var/named";
dump-file "/var/named/data/cache_dump.db";
statistics-file "/var/named/data/named_stats.txt";
memstatistics-file "/var/named/data/named_mem_stats.txt";
recursing-file "/var/named/data/named.recursing";
secroots-file "/var/named/data/named.secroots";
allow-query { any; }; --有調整為"any"
.
.
.
(中間省略)
.
.
.
include "/etc/named.rfc1912.zones";
include "/etc/named.root.key";
----------------------------------------------
# less /etc/named.rfc1912.zones --查看內容,有自行增加一個zone,即"dba.com"
----------------------------------------------
zone "dba.com" IN {
type master;
file "named.dba"; --此檔案需自行建立
allow-update { none; };
};
----------------------------------------------
# ll /var/named/
# less /var/named/named.dba --查看內容,有簡單地指定了幾筆A紀錄、NS(Name Server)記錄、MX(Mail Server)記錄
----------------------------------------------
$TTL 1D
@ IN SOA @ rname.invalid. (
0 ; serial
1D ; refresh
1H ; retry
1W ; expire
3H ) ; minimum
NS @
A 192.168.56.121
sqllnx3 A 192.168.56.133
sqllnx2 A 192.168.56.132
sqllnx1 A 192.168.56.131
@ IN MX 10 @
----------------------------------------------
--(2)在sqllnx1(192.168.56.131)執行
# dig @192.168.56.121 sqllnx2.dba.com --指定使用192.168.56.121為DNS Server,查sqllnx2的主機IP
----------------------------------------------
; <<>> DiG 9.11.4-P2-RedHat-9.11.4-16.P2.el7_8.3 <<>> @192.168.56.121 sqllnx2.dba.com
; (1 server found)
;; global options: +cmd
;; Got answer:
;; ->>HEADER<<- opcode: QUERY, status: NOERROR, id: 44666
;; flags: qr aa rd ra; QUERY: 1, ANSWER: 1, AUTHORITY: 1, ADDITIONAL: 2
;; OPT PSEUDOSECTION:
; EDNS: version: 0, flags:; udp: 4096
;; QUESTION SECTION:
;sqllnx2.dba.com. IN A
;; ANSWER SECTION:
sqllnx2.dba.com. 86400 IN A 192.168.56.132
;; AUTHORITY SECTION:
dba.com. 86400 IN NS dba.com.
;; ADDITIONAL SECTION:
dba.com. 86400 IN A 192.168.56.121
;; Query time: 0 msec
;; SERVER: 192.168.56.121#53(192.168.56.121)
;; WHEN: 四 5月 21 16:38:39 CST 2020
;; MSG SIZE rcvd: 90
----------------------------------------------
# dig @192.168.56.121 dba.com --指定使用192.168.56.121為DNS Server,查Domain所在的IP
----------------------------------------------
; <<>> DiG 9.11.4-P2-RedHat-9.11.4-16.P2.el7_8.3 <<>> @192.168.56.121 dba.com
; (1 server found)
;; global options: +cmd
;; Got answer:
;; ->>HEADER<<- opcode: QUERY, status: NOERROR, id: 12126
;; flags: qr aa rd ra; QUERY: 1, ANSWER: 1, AUTHORITY: 1, ADDITIONAL: 1
;; OPT PSEUDOSECTION:
; EDNS: version: 0, flags:; udp: 4096
;; QUESTION SECTION:
;dba.com. IN A
;; ANSWER SECTION:
dba.com. 86400 IN A 192.168.56.121
;; AUTHORITY SECTION:
dba.com. 86400 IN NS dba.com.
;; Query time: 0 msec
;; SERVER: 192.168.56.121#53(192.168.56.121)
;; WHEN: 四 5月 21 16:41:20 CST 2020
;; MSG SIZE rcvd: 66
----------------------------------------------
# dig @192.168.56.121 dba.com NS --指定使用192.168.56.121為DNS Server,查詢dba.com網域的NS記錄
----------------------------------------------
; <<>> DiG 9.11.4-P2-RedHat-9.11.4-16.P2.el7_8.3 <<>> @192.168.56.121 dba.com NS
; (1 server found)
;; global options: +cmd
;; Got answer:
;; ->>HEADER<<- opcode: QUERY, status: NOERROR, id: 3616
;; flags: qr aa rd ra; QUERY: 1, ANSWER: 1, AUTHORITY: 0, ADDITIONAL: 2
;; OPT PSEUDOSECTION:
; EDNS: version: 0, flags:; udp: 4096
;; QUESTION SECTION:
;dba.com. IN NS
;; ANSWER SECTION:
dba.com. 86400 IN NS dba.com.
;; ADDITIONAL SECTION:
dba.com. 86400 IN A 192.168.56.121
;; Query time: 0 msec
;; SERVER: 192.168.56.121#53(192.168.56.121)
;; WHEN: 四 5月 21 16:45:05 CST 2020
;; MSG SIZE rcvd: 66
----------------------------------------------
# dig @192.168.56.121 dba.com MX --指定使用192.168.56.121為DNS Server,查詢dba.com網域的MX記錄
----------------------------------------------
; <<>> DiG 9.11.4-P2-RedHat-9.11.4-16.P2.el7_8.3 <<>> @192.168.56.121 dba.com MX
; (1 server found)
;; global options: +cmd
;; Got answer:
;; ->>HEADER<<- opcode: QUERY, status: NOERROR, id: 18426
;; flags: qr aa rd ra; QUERY: 1, ANSWER: 1, AUTHORITY: 1, ADDITIONAL: 2
;; OPT PSEUDOSECTION:
; EDNS: version: 0, flags:; udp: 4096
;; QUESTION SECTION:
;dba.com. IN MX
;; ANSWER SECTION:
dba.com. 86400 IN MX 10 dba.com.
;; AUTHORITY SECTION:
dba.com. 86400 IN NS dba.com.
;; ADDITIONAL SECTION:
dba.com. 86400 IN A 192.168.56.121
;; Query time: 0 msec
;; SERVER: 192.168.56.121#53(192.168.56.121)
;; WHEN: 四 5月 21 16:52:21 CST 2020
;; MSG SIZE rcvd: 82
----------------------------------------------
--(3)在sqllnx1(192.168.56.131)執行
--若要暫時讓sqllnx1(192.168.56.131)使用centos(192.168.56.121)當作DNS Server(但是重開機後會回復原設定)
# vi /etc/resolv.conf --修改檔案,在檔案前面增加一筆"nameserver 192.168.56.121"
# ping sqllnx2.dba.com --成功
--測試電子郵件的傳送與接收
--在sqllnx1上,以root登入,輸入以下內容:
#mail sqlalert@sqllnx2.dba.com
Subject: Test send mail from sqllnx1
Hello! Test mailer!!
. --輸入一個點號,代表本文結束
#tail /var/log/maillog --檢查電子郵件傳送記錄
--切換至sqllnx2,以sqlalert帳戶登入(記得退出所有以su指令切換的帳戶),並執行以下指令,確認是否有收到mail
#mail
參考資料:
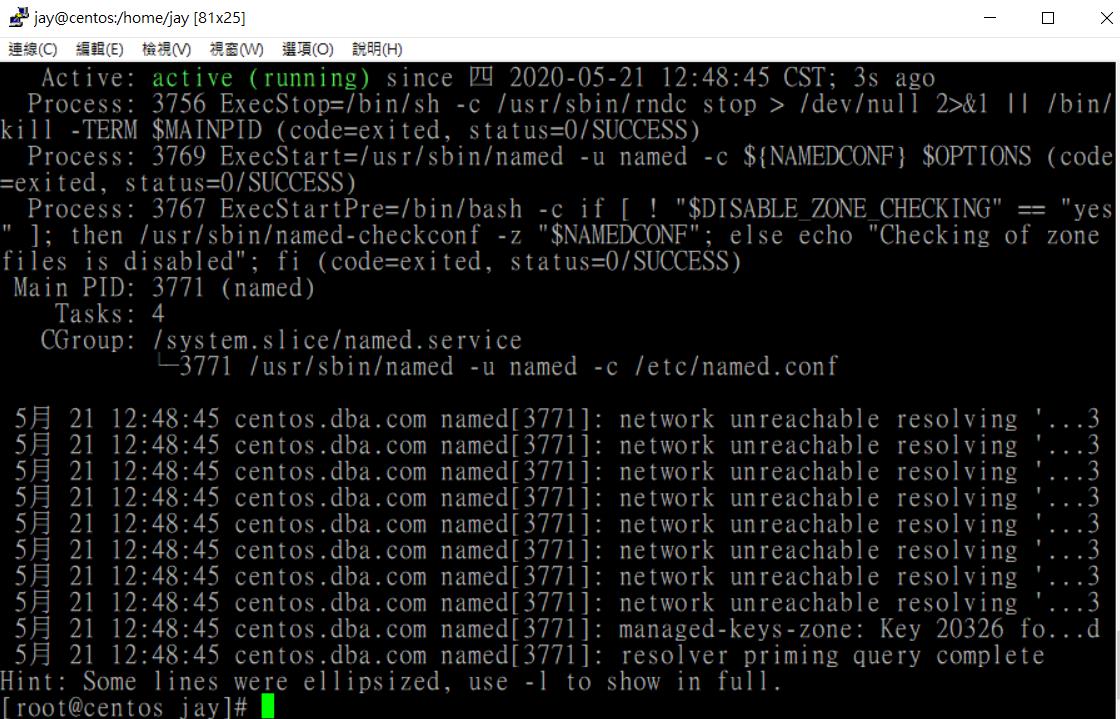
1. CENTOS6.4中修正錯誤訊息error (network unreachable) resolving

 Jay Huang