此篇紀錄Identity的配置流程。
上一篇提到如何設置 Identity 達到透過RoleManager修改網站的權限並且使用了UserManager修改使用者權限,再來透過AuthManager賦予當前經過驗證帳密的使用者一組經過認證的Cookie認證聲明,之後再透過Controller的[Authorize]達到網站權限控管的效果!!
那這一次主要介紹 :
- 新增自定義Identity的DataModel。也就是自定義屬性 使用者 或是 權限 的DataModel
- 了解EF原理與Identity更新資料庫結構時不刪除數據的方法
- 第三方認證(如Google、FaceBook..等),會省略此部分因無這方面的需求
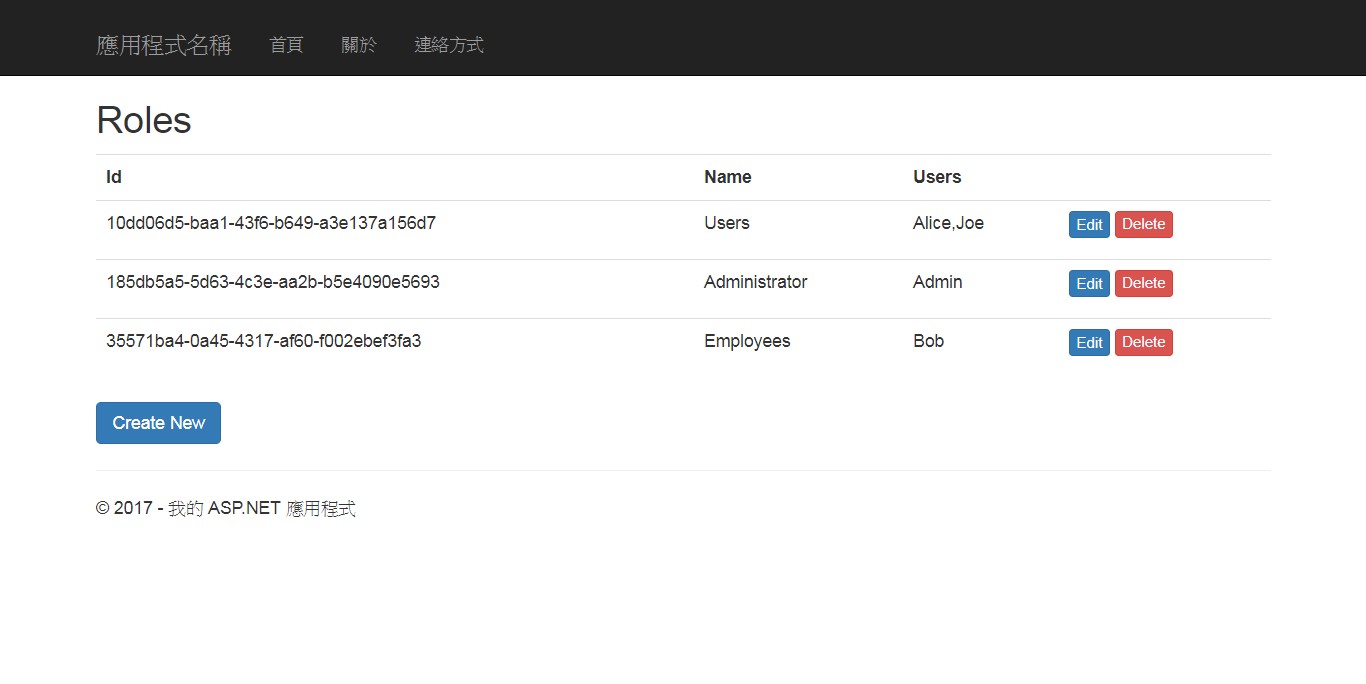
在開始之前先將資料庫清空並加入以下資訊
再增加DataModel屬性之前要先建立會員並賦予權限方便後續測試。目前資料庫只擁有Admin網站管理員
- 帳號 信箱 密碼 權限
- Alice alice@example.com ~pWd~ Users、Employees
- Bob bob@example.com ~pWd~ Employees
- Joe joe@example.com ~pWd~ Users
- Admin AdminAdmin@example.com ~pWd~ Admin
當 Identity 所定義的資料結構不符合需求時,這時我們想要自訂欄位!!
A. 增加 DataModel 的屬性(資料表欄位)
-
修改 AppUser 類別 :
using System; using Microsoft.AspNet.Identity.EntityFramework; namespace MvcIdentityTest2.Models { /// <summary> /// 列舉目的是 給自定義的使用者屬性 城市 /// </summary> public enum Cities { LONDON, PARIS, CHICAGO } /// <summary> /// 使用者的 DataModel 類別。繼承自 <see cref="IdentityUser"/> /// </summary> public class AppUser : IdentityUser { //這裡可添加屬性 /// <summary> /// 使用列舉儲存資料,此屬性代表使用者的城市 /// </summary> public Cities City { get; set; } } } -
修改 HomeController 達到修改使用者 City 這個欄位的目的 :
只顯示修改程式碼與引入組件 =>using System.Collections.Generic; using System.Web.Mvc; using Microsoft.AspNet.Identity; using System.Threading.Tasks; namespace MvcIdentityTest2.Controllers { public class HomeController : MyBaseController { ...... // 回傳當前使用者的DataModel [Authorize] public ActionResult UserProps() { return View(this._CurrentUser); } // 接收使用Post的請求並附有 inCity = 相對的列舉值 [Authorize][HttpPost] public async Task<ActionResult> UserProps(Models.Cities inCity) { Models.AppUser user = this._CurrentUser; // 根據使用者選擇修改城市欄位 user.City = inCity; await base.BaseUserManager.UpdateAsync(user); return View(user); } /// <summary> /// 使用當前使用者名稱 找尋對應的 DataModel /// </summary> private Models.AppUser _CurrentUser { get { return base.BaseUserManager.FindByName(HttpContext.User.Identity.Name); } } } } -
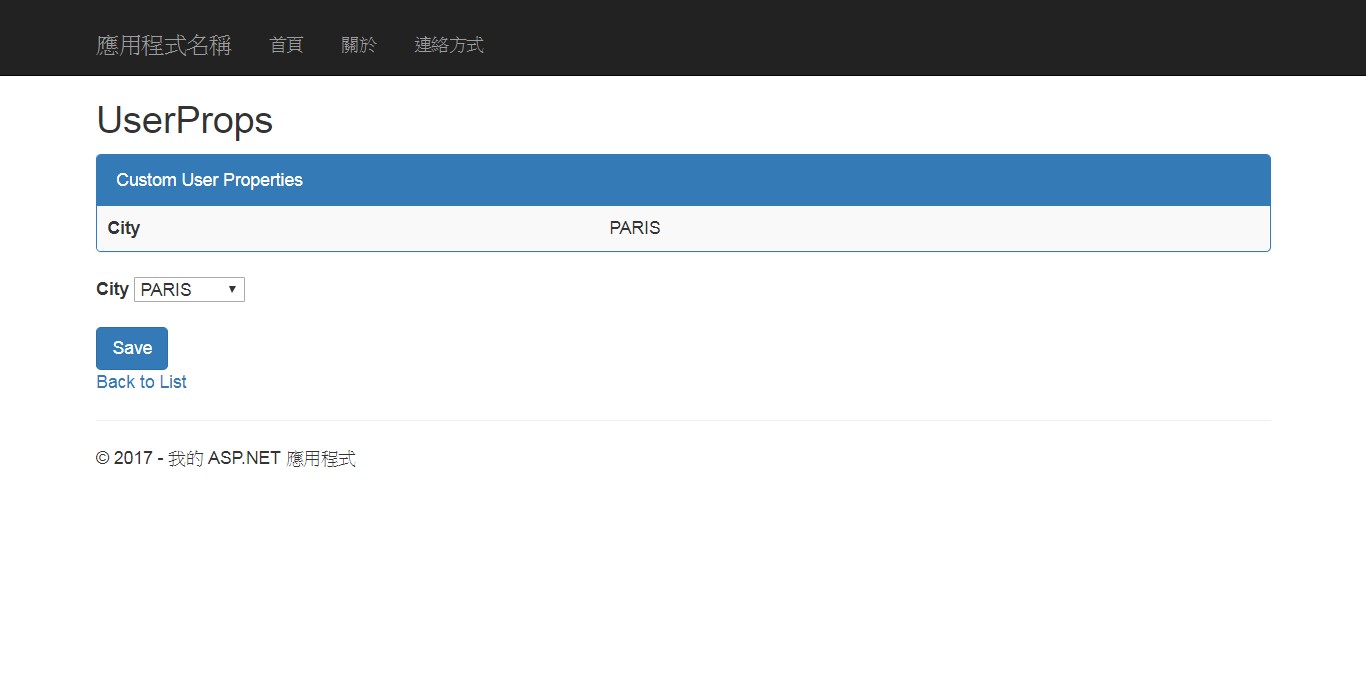
新增 HomeController 中的 UserProps 方法相對應的表單,再 \Views\Home\ 底下新增 UserProps.cshtml主要是可以修改使用者的城市 :
@model MvcIdentityTest2.Models.AppUser

@{
    ViewBag.Title = "UserProps";
}

<h2>UserProps</h2>

<div class="panel panel-primary">
    <div class="panel-heading"> Custom User Properties </div>
    <table class="table table-striped">
        <tr>
            <th>@Html.DisplayNameFor(x => x.City)</th>
            <td>@Html.DisplayFor(x => x.City)</td>
        </tr>
    </table>
</div>

@using (Html.BeginForm())
{
    @Html.AntiForgeryToken()

    <div class="form-group">
        <label>@Html.DisplayNameFor(x => x.City)</label>
        @*創建一個Name為inCity的下拉選單,裡面的值為 Enum 所有 Name ,然後選擇使用者資料庫內的列舉值*@
        @Html.DropDownList("inCity",
                new SelectList(Enum.GetNames(typeof(MvcIdentityTest2.Models.Cities)),
                Enum.GetName(typeof(MvcIdentityTest2.Models.Cities), Model.City)))
    </div>
    <div>
        <input type="submit" value="Save" class="btn btn-primary" />
    </div>
}

<div>
    @Html.ActionLink("Back to List", "Index")
</div>
此時若直接執行程式,Identity會偵測到資料結構異動會刷新數據庫。所以先不要執運行網站下一步驟會演示如何不清除資料的修改資料庫。
B. EF移轉資料庫結構的基本設定 : 此設定可兼容(EF、Identity的EF)
『enable-migrations –ContextTypeName Models.DbContext』 : 這個指令是當DbContext來源有很多時可以指定 DbContext 的類別
-
第一個步驟是在 Visual Studio 的 "Package Manager Console(套件管理器主控台)" 輸入指令 :
『Enable-Migrations –EnableAutomaticMigrations』
這一行指令代表著 啟用了資料庫的異動開關,並在專案中創建一個 Migrations 資料夾,其中包含著一個 Configuration.cs 的類別檔 -
修改 \Migrations\Configuration.cs 的內容 :
using System;
using System.Data.Entity.Migrations;
using MvcIdentityTest2.Infrastructure;
using Microsoft.AspNet.Identity.EntityFramework;
using Microsoft.AspNet.Identity;

namespace MvcIdentityTest2.Migrations
{
    internal sealed class Configuration : DbMigrationsConfiguration<Infrastructure.AppIdentityDbContext>
    {
        public Configuration()
        {
            //以後若資料結構異動 是否自動轉移
            AutomaticMigrationsEnabled = true;
            //此專案中的 DbContext 物件
            ContextKey = "MvcIdentityTest2.Infrastructure.AppIdentityDbContext";
        }

        //是使用套件管理主控台(Powershell)
        //這個方法在使用 EF 更新資料庫結構時的時候執行,
        protected override void Seed(Infrastructure.AppIdentityDbContext context)
        {
            //  This method will be called after migrating to the latest version.

            //  You can use the DbSet<T>.AddOrUpdate() helper extension method
            //  to avoid creating duplicate seed data. E.g.
            //
            //    context.People.AddOrUpdate(
            //      p => p.FullName,
            //      new Person { FullName = "Andrew Peters" },
            //      new Person { FullName = "Brice Lambson" },
            //      new Person { FullName = "Rowan Miller" }
            //    );
            //

            // 在網站初始(第一次建立資料表時)時 需要配給一個Admin管理者 此時可以先外加工 以搭配Controller的 驗證機制與規則

            // 新增使用者管理器類 並使用自定義連線
            AppUserManager userMgr = new AppUserManager(new UserStore<Models.AppUser>(context));
            // 新增權限管理器類 並使用自定義連線
            AppRoleManager roleMgr = new AppRoleManager(new RoleStore<Models.AppRole>(context));
            // 建立一個權限管理者的相關資訊
            var adminInfo = new {
                roleName = "Administrator",
                userName = "Admin",
                password = "~pWd~",
                email = "AdminAdmin@example.com"
            };

            Models.AppUser user = userMgr.FindByName(adminInfo.userName);
            // 若找不到預設管理員帳號
            if (user == null)
            {
                // 創建網站管理員帳號
                userMgr.Create(new Models.AppUser() { UserName = adminInfo.userName, Email = adminInfo.email },
                    adminInfo.password);
                user = userMgr.FindByName(adminInfo.userName);
            }
            // 若對應的權限名稱不存在 則創建指定權限
            if (!roleMgr.RoleExists(adminInfo.roleName))
            {
                roleMgr.Create(new Models.AppRole(adminInfo.roleName));
            }
            // 若使用者中無對應的權限 則賦予指定使用者指定的權限
            if (!userMgr.IsInRole(user.Id, adminInfo.roleName))
            {
                userMgr.AddToRole(user.Id, adminInfo.roleName);
            }

            // 將使用者某個欄位的屬性 賦予 預設值
            foreach (var dbUser in userMgr.Users)
            {
                dbUser.City = Models.Cities.PARIS;
            }

            // 儲存此次的更新
            context.SaveChanges();
        }
    }
}
你可能會注意到,添加到Seed方法中的許多代碼取自於IdentityDbInit類別,再之前我用這個類將管理用戶植入了資料庫。這是因為這個新添加的、用以支持資料庫移轉的Configuration類別,將代替IdentityDbInit類別類別的移轉功能,接下來會修改IdentityDbInit類別 -
修改 \Infrastructure\AppIdentityDbContext.cs 的內容 :
只顯示修改程式碼 =>/// <summary> /// 此類別是設定 Identity 連線至資料庫伺服的基本設定檔。等同於使用Entity中的DbContex類別 /// </summary> public class AppIdentityDbContext : IdentityDbContext<AppUser> //該泛型中的類型就是剛剛建立的 AppUser 類別 條件約束是 where T : IdentityUser { public AppIdentityDbContext() : base("IdentityDb") { } static AppIdentityDbContext() { // 該泛型 必須是自己配置的 類別 才會產生效用 Database.SetInitializer<AppIdentityDbContext>(new IdentityDbInit2()); <----修改 } /// <summary> /// 主要是在 IdentityConfig 中,需要返回實例的方法 /// </summary> public static AppIdentityDbContext Create() { return new AppIdentityDbContext(); } } /// <summary> /// 資料庫初始化時的基本設定 /// 繼承自 NullDatabaseInitializer<> 這個類別 等同於 Identity 不參與資料庫更新結構的設定 /// </summary> public class IdentityDbInit2 : NullDatabaseInitializer<AppIdentityDbContext> { }在Configuration類別中添加種植代碼的原因是我需要修改IdentityDbInit類別。先前,IdentityDbInit類別繼承於描述性命名的DropCreateDatabaseIfModelChanges<AppIdentityDbContext>類別,和你想的一樣,它會在Code First類別改變時刪除整個資料庫。以上就是對IdentityDbInit類別所做的修改,以防止Identity影響資料庫。 -
使用移轉(更新)資料庫,在 "Package Manager Console(套件管理器主控台)" 輸入指令 :
『Add-Migration UpdAppUserStruct』註記 : Add-Migration 之後是自定義的類別(檔案)名稱
這一行指令會產生一個相對的類別檔 201709120620039_UpdAppUserStruct.cs 代表著此次的更新與修改資料庫的細節。
-
最後一步真正更新資料庫結構 在 "Package Manager Console(套件管理器主控台)" 輸入指令 :
『Update-Database –TargetMigration UpdAppUserStruct』註記 : Update-Database –TargetMigration 之後的是對應的類別名稱!!
這一行指令會使用第 4. 步驟所產生的檔案 修改資料庫結構,且會與 1. 步驟所產生的檔案做連結
可以運行網站看有無異常 !! 此時查看資料庫發現,舊有資料都未遺失且還新增了賦予預設值的 City 欄位。
現在已經建立了資料庫移轉,我打算再定義一個屬性,這恰恰演示如何處理持續不斷的修改資料結構,也為了演示Configuration.Seed方法更有用(至少無害)的示例。
C. 增加 DataModel 的屬性(資料表欄位)
-
修改 AppUser 類別,添加欄位屬性 :
using System;
using Microsoft.AspNet.Identity.EntityFramework;

namespace MvcIdentityTest2.Models
{
    /// <summary>
    /// 列舉目的是 給自定義的使用者屬性 城市
    /// </summary>
    public enum Cities
    {
        LONDON, PARIS, CHICAGO
    }

    /// <summary>
    /// 列舉目的是 給自定義使用者的屬性 國家
    /// </summary>
    public enum Countries
    {
        NONE, UK, FRANCE, USA
    }

    /// <summary>
    /// 使用者的 DataModel 類別。繼承自 <see cref="IdentityUser"/>
    /// </summary>
    public class AppUser : IdentityUser
    {
        //這裡可添加屬性
        /// <summary>
        /// 使用列舉儲存資料,此屬性代表使用者的城市
        /// </summary>
        public Cities City { get; set; }

        /// <summary>
        /// 使用列舉儲存資料,此屬性代表使用者的國家
        /// </summary>
        public Countries Country { get; private set; }

        /// <summary>
        /// 根據使用者的 城市 自動選擇 國家 列舉值
        /// </summary>
        public void SetCountryFromCity(Cities inCity)
        {
            switch (inCity)
            {
                case Cities.LONDON:
                    this.Country = Countries.UK;
                    break;
                case Cities.PARIS:
                    this.Country = Countries.FRANCE;
                    break;
                case Cities.CHICAGO:
                    this.Country = Countries.USA;
                    break;
                default:
                    this.Country = Countries.NONE;
                    break;
            }
        }
    }
}
定義了國家名稱。還添加了一個輔助方法,它可以根據City屬性選擇一個國家。 -
修改 \Migrations\ 底下的 Configuration 類別 :
這裡只顯示修改程式碼 =>internal sealed class Configuration : DbMigrationsConfiguration<Infrastructure.AppIdentityDbContext> { ...... protected override void Seed(Infrastructure.AppIdentityDbContext context) { ....... //// 將使用者某個欄位的屬性 賦予 預設值 <--註解掉 注入City 的程式碼 //foreach (var dbUser in userMgr.Users) //{ // dbUser.City = Models.Cities.PARIS; //} // 若使用者的國家為空的話,則使用城市自動填入對應的預設值 foreach (var dbUser in userMgr.Users) { if (dbUser.Country == Models.Countries.NONE) dbUser.SetCountryFromCity(dbUser.City); } // 儲存此次的更新 context.SaveChanges(); } } -
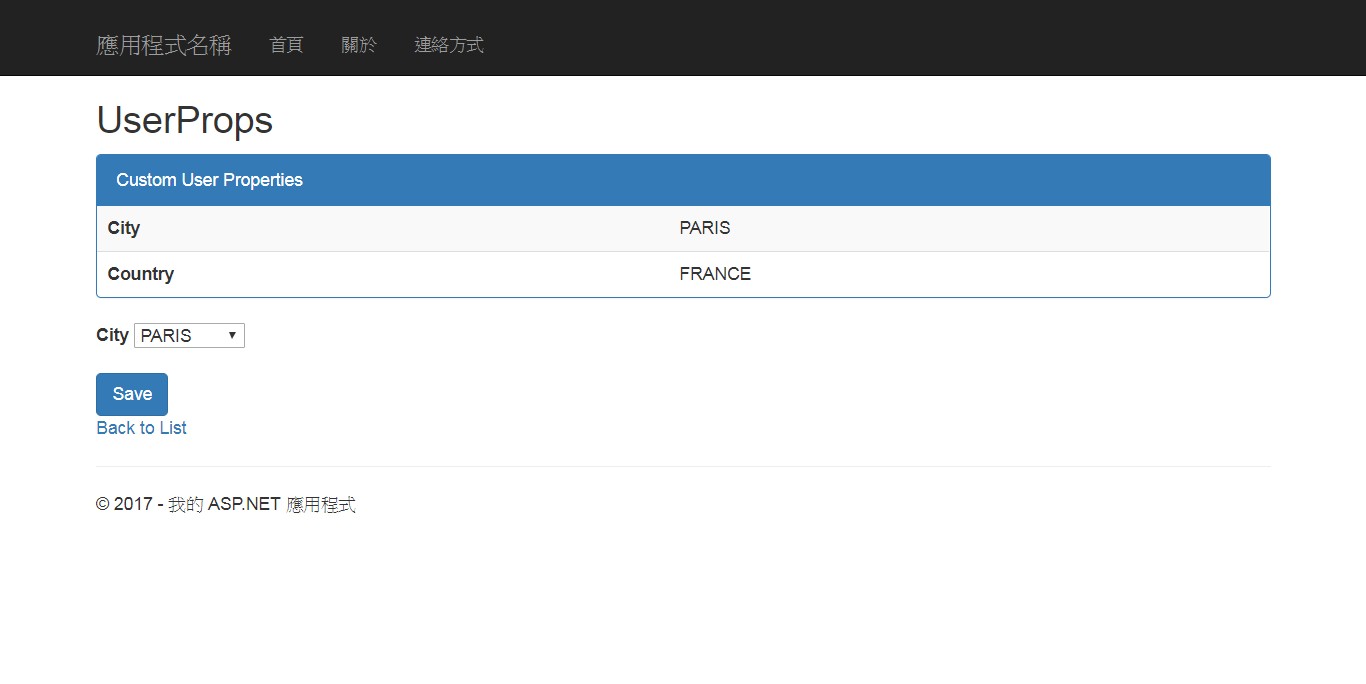
修改 UserProps.cshtml 程式碼 :
只顯示修改部分,主要增加顯示欄位於 Table 上 =>.... <div class="panel panel-primary"> <div class="panel-heading"> Custom User Properties </div> <table class="table table-striped"> <tr> <th>@Html.DisplayNameFor(x => x.City)</th> <td>@Html.DisplayFor(x => x.City)</td> </tr> <tr> <th>@Html.DisplayNameFor(x => x.Country)</th> <td>@Html.DisplayFor(x => x.Country)</td> </tr> </table> </div> .... -
修改 HomeController 的 [HttpPost]UserProps 方法 :
主要是若使用者修改了城市,那對國家要相應更改 =>public class HomeController : MyBaseController { .... // 接收使用Post的請求並附有 inCity = 相對的列舉值 [Authorize] [HttpPost] public async Task<ActionResult> UserProps(Models.Cities inCity) { Models.AppUser user = this._CurrentUser; // 根據使用者選擇修改城市欄位 user.City = inCity; // 相對應的國家要修改 user.SetCountryFromCity(inCity); await base.BaseUserManager.UpdateAsync(user); return View(user); } .... } -
移轉資料庫
- 製作此次的更新文件(異動細節) 在 "Package Manager Console(套件管理器主控台)" 輸入指令 :
『Add-Migration UpdAppUserStruct2』
這一行指令會產生一個相對的類別檔 201709120652558_UpdAppUserStruct2.cs 代表著此次的更新與修改資料庫的細節。
要注意的是如果檔案同名,會幫你在檔名後面增加流水序號,到時更新請選擇正確的檔名 - 真正更新資料庫結構 在 "Package Manager Console(套件管理器主控台)" 輸入指令 :
『Update-Database –TargetMigration UpdAppUserStruct2』
這一行指令會使用上個步驟所產生的檔案修改資料庫結構,且會與 Configuration.cs 檔案做連結
此時再觀察資料庫的變化,舊有資料未消失且新增了 Country 這個欄位且依照使用者的城市去賦予其值。
此時在運行網站看看城市與國家是否正常顯示於頁面並試著修改城市。
※到了這裡應該要了解 :
- Identity 修改 DataModel 的屬性(資料欄位),若想要保留原始資料是透過"套件管理主控台"下達標準語法達到手動建立資料轉移的目的,並且新增自定義的連線初始類別 IdentityDbInit2
- 資料庫轉移時植入相關資料
對於以上若不能了解,建議再體會一次。
多多指教!! 歡迎交流!!
你不知道自己不知道,那你會以為你知道