MVVM 軟體架構模式 - 透過 Behavior 獲取滑鼠座標
參考之前文章 [WPF] MVVM 軟體架構模式 - 透過 AttachedBehaviorCommand 偵測滑鼠狀態 改寫一下讓程式碼比較精簡的版本
這版本只要實作 Behavior 介面就好,不用再去自定義處理的介面,這次比較貪心直接套用泛型類型是 UIElement
順便記錄一下 UIElement/FrameworkElement/Control 的核心功能與繼承關係:(參考處)
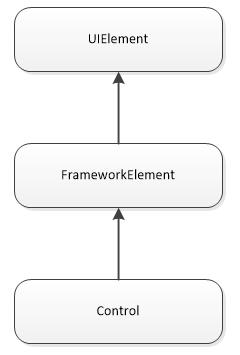
- UIElement (Layout + Input + Focus + Events)
- Layout behavior (parent/child relationship, measure/arrange passes)
- Responding to user input (input events, command bindings)
- Managing focus
- Raising and responding to routed events
- FrameworkElement adds
- Alignment-related and Margin properties
- Animation support
- Data binding
- Data templates
- Styles
- Defaults Focusable to false
- Control adds
- Control templates
- Background, Foreground
- Font-related properties
- Border-related properties
- Defaults Focusable to true
回到主題,直接上碼看這次主要的功能核心~XD
using System.Windows;
using System.Windows.Input;
using System.Windows.Interactivity;

namespace MVVM
{
    class FrameworkElementMouseBehavior : Behavior<UIElement>
    {
        public static readonly DependencyProperty MouseXProperty
            = DependencyProperty.Register("MouseX",
                                          typeof(double),
                                          typeof(FrameworkElementMouseBehavior),
                                          new PropertyMetadata(default(double)));
        public static readonly DependencyProperty MouseYProperty
            = DependencyProperty.Register("MouseY",
                                          typeof(double),
                                          typeof(FrameworkElementMouseBehavior),
                                          new PropertyMetadata(default(double)));

        public double MouseX
        {
            get { return (double)GetValue(MouseXProperty); }
            set { SetValue(MouseXProperty, value); }
        }
        public double MouseY
        {
            get { return (double)GetValue(MouseYProperty); }
            set { SetValue(MouseYProperty, value); }
        }

        protected override void OnAttached()
        {
            base.OnAttached();

            this.AssociatedObject.PreviewMouseMove += AssociatedObject_OnMouseMove;
        }
        protected override void OnDetaching()
        {
            base.OnDetaching();

            this.AssociatedObject.PreviewMouseMove -= AssociatedObject_OnMouseMove;
        }

        private void AssociatedObject_OnMouseMove(object sender, MouseEventArgs e)
        {
            var pos = e.GetPosition(AssociatedObject);
            MouseX = pos.X;
            MouseY = pos.Y;
        }
    }
}
同樣以下開始使用時作範例,在開始前要在前臺 XAML 加入以下的命名空間
xmlns:i="http://schemas.microsoft.com/expression/2010/interactivity"如之前文章一樣附加在 Canvas 上,但作用是取得滑鼠在其中 Image 上的座標
這次還要在 ViewModel 增加兩個屬性來承接 Behavior 獲得的座標 X,Y
private double _ImageMousePoxX = 0.0;
public double ImageMousePoxX
{
    get { return _ImageMousePoxX; }
    set
    {
        _ImageMousePoxX = value;
        OnPropertyChanged();
    }
}
private double _ImageMousePoxY = 0.0;
public double ImageMousePoxY
{
    get { return _ImageMousePoxY; }
    set
    {
        _ImageMousePoxY = value;
        OnPropertyChanged();
    }
}對了!這裡要參考一下這一篇,才會知道為什麼中間有那個 root
<!-- Canvas must have a background, even if it's Transparent -->
<Canvas Background="White">
    <i:Interaction.Behaviors>
        <root:FrameworkElementMouseBehavior MouseX="{Binding ImageMousePoxX, Mode=OneWayToSource}"
                                            MouseY="{Binding ImageMousePoxY, Mode=OneWayToSource}"/>
    </i:Interaction.Behaviors>
    <Image Source="Lena.png" Stretch="Fill"/>
</Canvas>
另外要注意是這兩個屬性綁定模式是 OneWayToSource,單向 UI 數值給定 Property;因為我們是要得知滑鼠座標而不是去改變它!
這樣一陣操作下來,感覺比先前的方法寫的程式碼少了些,只是有些使用限制不一樣,就自行斟酌使用囉~
PS. 中間有一些技術點要往前回顧一下,這邊就省略了(ex: 設定 DataContext)