Windows Service 紀錄帳號登入(Logon)、登出(Logoff)、鎖定(Lock)、解除鎖定(Unlock)狀態至 Database
因為疫情的關係,公司預備 Working from Home 計畫,當然免不了就是要記錄員工電腦使用狀況,以作為確認居家辦公狀態的輔助,第一次寫 Windows Service,於是寫一篇開發筆記。
情境
使用公司 AD 帳號登入電腦,透過 AD 帳號尋找記錄在鼎新 EasyFlow 上的員工編號(EasyFlow 員工表單上的 email @前面就是 AD 帳號),將員工工號、員工姓名、Session 狀態、電腦名稱、時間/日期、版本 Insert 到 txt,再逐行讀取 txt 文件寫入資料庫,寫入到資料庫的 txt 移到另一個資料夾,並修改檔名留做紀錄。如果外點電腦連不到公司內網,可再下一次連到內網時將之前的記錄寫入資料庫。
2020/04/17 更新
- 因外點電腦無法與公司內部資料庫連接,所以外點電腦的 Session 會抓不到員工工號,經討論後決定把員工編號拿掉,變成 Null,之後要 join 其他 Table 就用 AD 帳號。
- Table 中加上版本編號。
- 若有多個帳號登入同一台電腦,一開始使用 ManagementObjectSearcher 只會抓到第一位登入者 AD 帳號,故使用 Windows API 抓取每個登入者 AD 帳號。
前置準備
要開發 Windows Service,首先要了解它的功用,以及基本開發環境建置,找了幾篇不錯的網站作為參考(另開視窗):
[.Net / C#] 撰寫在背景執行的服務 (Windows Service)
當然也要新增 Table,以下為這次開發的 Table:
Table Name:ClientPCLoginStatus
| 資料行名稱 | 資料類型 | 允許 Null |
| emplid | varchar(50) | Y |
| emplaccount | varchar(50) | Y |
| event | varchar(50) | Y |
| ComputerName | varchar(50) | Y |
| datetime | datetime | Y |
| version | varchar(50) | Y |
開發
Windows Service 無法直接按 F5 偵錯,找到一篇文章幫助偵錯:如何對 [Windows 服務] 與 [安裝專案的自訂動作] 進行除錯
在環境建置好後,最開始在 ComputerSession.cs 看到 ComputerSession()、OnStart()、OnStop() 這三個 function。
在 class ComputerSession { } 裡面先定義會用到的變數:
public partial class ComputerSession : ServiceBase
{
    #region 初始化設定
    public static string ComputerName = Environment.MachineName; // 取得電腦名稱
    public static string logPath = @"C:\SystemLogs.txt";  // 定義log路徑
    public static string newPath = @"C:\SystemLogs_old\";  // 定義移動資料夾
    public static string version = Assembly.GetExecutingAssembly().GetName().Version.ToString();  // 取得版本編號
    public static string event_id = "";  // 定義事件
    public System.Timers.Timer timer;  // 定義計時器

    public ComputerSession()
    {
        InitializeComponent();

        // 允許程式抓Session狀態
        this.CanHandleSessionChangeEvent = true;
        this.AutoLog = true;
        this.CanHandlePowerEvent = true;
        this.CanPauseAndContinue = true;
        this.CanShutdown = true;
        this.CanStop = true;
        }
    #endregion
}
程式會先進到 OnStart() 裡面,建立 Thread 來執行任務,並建立 log file 確認服務是否啟動;程式結束就會執行 OnStop() 事件,意味著當服務停止時,清空計時器。
using System.IO;
using System.Threading;

#region OnStart(), OnStop()
protected override void OnStart(string[] args)
{
    Thread.Sleep(31000);  //Simulates processing time leading to a time out.

    // 服務執行時若沒有檔案路徑,新增txt
    if (!File.Exists(logPath))
    {
                File.Create(logPath).Close();
    }
}

protected override void OnStop()
{
    // 當服務停止時,清空計時器
    if (timer != null)
    {
        timer.Stop();
        timer.Close();
        timer = null;
    }
}
#endregion
接下來就是重點囉!要抓到每一位登入者 AD 帳號資訊,必須串接 Windows API,詳細 API 可參考官方文件。
using System.Runtime.InteropServices;

#region 串接WindowsApi
// 串接原因: 為了安裝方便,Account選擇「LocalSystem」,但是服務抓到的username=SYSTEM,而ManagementObjectSearcher無法取得多重使用者登入資訊,所以改用Win API抓當前使用者
[DllImport("Wtsapi32.dll")]
protected static extern void WTSFreeMemory(IntPtr pointer);
[DllImport("Wtsapi32.dll")]
protected static extern bool WTSQuerySessionInformation(IntPtr hServer, int sessionId, WTSInfoClass wtsInfoClass, out IntPtr ppBuffer, out uint pBytesReturned);
#endregion
接下來就要列舉 Windows API 資訊,之後就可以拿這些列舉取得 API 內容,何謂列舉?我爬到一篇寫得還不錯的文章,提供給大家參考:C#資料群集系列菜單-『列舉(Enum)』。
#region 列舉Win API資訊
// enum 為列舉,針對某資料片段只允許特定的資料行別
// 詳見可參考: https://dotblogs.com.tw/h091237557/2014/05/19/145177
public enum WTSInfoClass
{
    WTSInitialProgram,
    WTSApplicationName,
    WTSWorkingDirectory,
    WTSOEMId,
    WTSSessionId,
    WTSUserName,
    WTSWinStationName,
    WTSDomainName,
    WTSConnectState,
    WTSClientBuildNumber,
    WTSClientName,
    WTSClientDirectory,
    WTSClientProductId,
    WTSClientHardwareId,
    WTSClientAddress,
    WTSClientDisplay,
    WTSClientProtocolType,
    WTSIdleTime,
    WTSLogonTime,
    WTSIncomingBytes,
    WTSOutgoingBytes,
    WTSIncomingFrames,
    WTSOutgoingFrames,
    WTSClientInfo,
    WTSSessionInfo
}
#endregion
當 user 改變電腦 Session,該如何抓到 Session 呢?在 C# 裡面有一個 OnSessionChange 事件,在每一次 Session 改變時就抓一次登入者 AD 帳號,並在 txt 中 Append 每一筆紀錄。詳細介紹可參考微軟官方文件 ServiceBase.OnSessionChange(SessionChangeDescription) 方法。
#region OnSessionChange()
// 當User Session改變時執行以下語法
protected override void OnSessionChange(SessionChangeDescription changeDescription)
{
    string emplaccount = GetUsername(changeDescription.SessionId);  // 取得登入者資訊
    //string emplid = getEmplid(emplaccount);  // 呼叫 getEmplid() 取得員工工號

    // TEST
    /**/
    if (!File.Exists(logPath))
    {
        File.Create(logPath).Close();
    }

    switch (changeDescription.Reason)
    {
        case SessionChangeReason.SessionLogon:
            event_id = "Logon";
            File.AppendAllText(logPath, emplaccount + "," + event_id + "," + ComputerName + "," + DateTime.Now.ToString("yyyy-MM-dd HH:mm:ss") + "," + version + Environment.NewLine);
            break;
        case SessionChangeReason.SessionLogoff:
            event_id = "Logoff";
            File.AppendAllText(logPath, emplaccount + "," + event_id + "," + ComputerName + "," + DateTime.Now.ToString("yyyy-MM-dd HH:mm:ss") + "," + version + Environment.NewLine);
            break;
        case SessionChangeReason.RemoteConnect:
            event_id = "RemoteConnect";
            File.AppendAllText(logPath, emplaccount + "," + event_id + "," + ComputerName + "," + DateTime.Now.ToString("yyyy-MM-dd HH:mm:ss") + "," + version + Environment.NewLine);
            break;
        case SessionChangeReason.RemoteDisconnect:
            event_id = "RemoteDisconnect";
            File.AppendAllText(logPath, emplaccount + "," + event_id + "," + ComputerName + "," + DateTime.Now.ToString("yyyy-MM-dd HH:mm:ss") + "," + version + Environment.NewLine);
            break;
        case SessionChangeReason.SessionLock:
            event_id = "Lock";
            File.AppendAllText(logPath, emplaccount + "," + event_id + "," + ComputerName + "," + DateTime.Now.ToString("yyyy-MM-dd HH:mm:ss") + "," + version + Environment.NewLine);
            break;
        case SessionChangeReason.SessionUnlock:
            event_id = "Unlock";
            File.AppendAllText(logPath, emplaccount + "," + event_id + "," + ComputerName + "," + DateTime.Now.ToString("yyyy-MM-dd HH:mm:ss") + "," + version + Environment.NewLine);
            break;
       default:
            break;
    }

    // 呼叫 recordInfo(),傳入emplid, emplaccount, event_id, ComputerName
    recordInfo(emplaccount, event_id, ComputerName);

    base.OnSessionChange(changeDescription);
}
#endregion
那 GetUsername(changeDescription.SessionId) 的用途是什麼?就是用 API 實際抓每個狀態 Session 改變時當下的登入者 AD 帳號。詳細可見下方註解說明。
#region GetUsername()
/// <summary>
/// 獲取當前登錄用戶(可用於管理員身份運行)
/// </summary>
/// <returns></returns>
public static string GetUsername(int sessionId)
{
    IntPtr buffer;  // 定義指標,IntPtr為指標類型,可參考官方文件: https://docs.microsoft.com/zh-tw/dotnet/api/system.intptr?view=netframework-4.8
    uint strLen;  // 定義不帶符號的int型態
    string username = "SYSTEM";  // 預設username=SYSTEM

    // WTSQuerySessionInformation(hServer, SessionId, WTSInfoClass, *ppBuffer, *pBytesReturned)
    // hServer: 作用目標
    // SessionId: Windows Session ID
    // WTSInfoClass: WTS_INFO_CLASS列舉的值,指示對WTSQuerySessionInformation()中要用到的值
    // *ppBuffer: 存放修改過的指標內容
    // *pBytesReturned: 接收*ppBuffer回傳的資料大小
    // 可參考官方文件: https://docs.microsoft.com/en-us/windows/win32/api/wtsapi32/nf-wtsapi32-wtsquerysessioninformationa

    // IntPtr.Zero: 初始化指標
    // WTSInfoClass.WTSDomainName: WTSInfoClass列舉中的username
    // out buffer修改傳入的參數'buffer',可參考: https://dotblogs.com.tw/erictsaiblog/2015/05/10/151238
    if (WTSQuerySessionInformation(IntPtr.Zero, sessionId, WTSInfoClass.WTSUserName, out buffer, out strLen) && strLen > 1)
    {
        // Marshal 類別: 用於配置 Unmanaged 記憶體、複製 Unmanaged 記憶體區塊和將 Managed 類型轉換為 Unmanaged 類型
        // PtrToStringAnsi: 將指標轉換為編碼為ANSI的字串
        username = Marshal.PtrToStringAnsi(buffer);

        // WTSFreeMemory(): 釋放記憶體
        WTSFreeMemory(buffer);
    }

    return username;
}
#endregion
接下來就是將 txt 每行資料寫入到資料庫,在寫入的時候要先判斷當下電腦是否能連到公司內網(也就是資料庫本身),於是用 System.Net.NetworkInformation 中 Ping() 方法去判斷。 如果能 ping 成功,就將 txt 資料逐行讀取並寫入資料庫,整份文件全部寫到資料庫後,再把文件複製到其他資料夾,並刪除原本的檔案;相反的,如果當下 ping 不到主機,就保留 txt 文件,等到下一次 Session 狀態改變時能連到公司內網(資料庫),再將之前 txt 的紀錄寫入到資料庫中。
在 ConfigurationManager 我卡了一下,雖然已經有 using System.Configuration;,但找不到 ConfigurationManager,查了一下原因出在 方案總管>參考(右鍵)>加入參考>搜尋 configuration>將 System.Configuration 打勾,即可加入 ConfigurationManager,詳細可參考 如何透過 C# 類別庫讀取 Web.config 或 App.config 的參數設定值。
整段 code 如下:
using System.Data.SqlClient;
using System.Net.NetworkInformation;

#region recordInfo()
// 將Session Log寫入txt,若能ping到主機則將txt內容Insert到資料庫
public void recordInfo(string emplaccount, string event_id, string ComputerName)
{
    Ping ping = new Ping();

    // 定義ping目標為XXX.XXX.XXX.XXX:80
    // 參考官方文件: https://docs.microsoft.com/zh-tw/dotnet/api/system.net.networkinformation.ping.send?view=netframework-4.8
    PingReply pingReply = ping.Send("XXX.XXX.XXX.XXX", 80);

    try
    {
        // 檢測網路是否能ping到主機(XXX.XXX.XXX.XXX)
        if (pingReply.Status == IPStatus.Success)
        {
            StreamReader streamReader = new StreamReader(logPath);  // 設定讀取串流
            string line = null;

            // 若串流讀取到的行數不為空值,將txt內容Insert到資料庫
            while ((line = streamReader.ReadLine()) != null)
            {
                // 將每行資料用','分割,存入陣列
                string[] str = line.Split(',');
                SqlConnection dataConnection = new SqlConnection(null);  // 新增SqlConnection
                dataConnection.ConnectionString = System.Configuration.ConfigurationManager.ConnectionStrings["TEST"].ConnectionString;  // 連線詳細資訊參考App.config
                string strMsgInsert = @"INSERT INTO ClientPCLoginStatus ([emplaccount],[event],[ComputerName],[datetime],[version]) VALUES(@emplaccount, @event_id, @ComputerName, @datetime, @version) ";
                // SQL INSERT 語法: INSERT INTO  [table] ([欄位名1],[欄位名2],[欄位名3],....) VALUES (@值1, @值2, @值3,...)

                SqlCommand mySqlCmd = new SqlCommand(strMsgInsert, dataConnection);  // C# SQL Command 物件 SqlCommand( SQL語法 , SqlConnection )
                                                                                             // insert into DB

                try
                {
                    dataConnection.Open();

                    //mySqlCmd.Parameters.AddWithValue("@emplid", DBNull.Value);
                    mySqlCmd.Parameters.AddWithValue("@emplaccount", str[0]);
                    mySqlCmd.Parameters.AddWithValue("@event_id", str[1]);
                    mySqlCmd.Parameters.AddWithValue("@ComputerName", str[2]);
                    mySqlCmd.Parameters.AddWithValue("@datetime", str[3]);
                    mySqlCmd.Parameters.AddWithValue("@version", str[4]);

                    mySqlCmd.ExecuteNonQuery();
                    dataConnection.Close();
                }
                catch (Exception ex)
                {
                    throw new Exception(ex.ToString());
                }
                finally
                {
                    mySqlCmd.Cancel();
                    dataConnection.Close();
                    dataConnection.Dispose();
                }
            }
            streamReader.Close();
            streamReader.Dispose();

            string newLogPath = @"C:\SystemLogs_old\SystemLogs_" + emplaccount + "_" + DateTime.Now.ToString("yyyyMMddhhmmssfff") + ".txt";  // 定義移動的文件檔名

            // 若目錄下沒有[移動資料夾],新增資料夾,並將檔案移動到該路徑,並重新命名
            if (!(Directory.Exists(newPath)))
            {
                Directory.CreateDirectory(newPath);
            }
            File.Copy(logPath, newLogPath);
            File.Delete(logPath);
        }
    }
    catch (Exception ex)
    {
        throw new Exception(ex.ToString());
    }
}
#endregion
以上,程式大致完成。
安裝
接下來就要進行打包安裝,如果有寫過 Windows Form 大概就知道該怎麼打包,大致簡述流程:
- Visual Studio 現有專案中加入安裝專案
- 專案輸出
- Windows Service 安裝
- 啟動 Windows Service。
Visual Studio 現有專案中加入安裝專案、專案輸出
這部份可參考:Windows Form程式 如何製作安裝檔?,就不多做說明。
注意:Visual Studio 2017 以後(含),請用 Visual Studio Installer 安裝
Windows Service 安裝
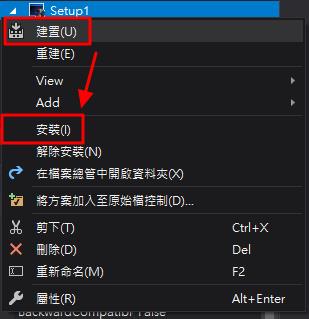
網路上有許多做法,包含 製作 bat 指令安裝,或是用 InstallUtil.exe 安裝,但我個人很懶,直接在 VS 方案總管>安裝專案中,按右鍵 [建置]>右鍵 [安裝],如下圖:
等到真正需要安裝檔,檔案會在 \安裝專案資料夾\Debug\安裝檔.msi。
啟動 Windows Service
[開始]>輸入 service>就能找到服務程式,直接將安裝好的服務右鍵→啟動即可。
後記
由於公司使用 AD 帳號,在 ProcessInstaller 的 Account 屬性我只能選 User,Environment.UserName 才能抓到 user 的網域名稱,如果屬性改為 LocalService、NetworkService、LocalSystem,都無法抓到真正的 AD 登入名稱,後來我嘗試安裝,就必須要輸入登入者 AD 帳號密碼,對於 MIS 或是 user 自己安裝都有些不便,目前還在想其他解決方案,如果有想到會再補充上來。
2020/04/17 補充
使用 Windows API 之後,確實就能抓到每個登入者的 AD 帳號,之前所有的問題都已經排除。現在就差工號抓不到,不然就算完美了 XD
如果有使用鼎新 EasyFlow 的朋友,可以討論看看要如何用 AD 帳號抓員工工號吧~
只有自己摸索過,才能內化轉換成力量。