把利用selenium 套件build 的py 檔打包成為win exe
會使用py2exe或是 pyinstaller
此次使用較簡易的pyinstaller
在打包的過程中可能會有無法import selenium的問題
還有chromedriver.exe路徑問題等
本次的範例是在虛擬環境下開發,利用chrome(chrome必須安裝)開啟一個google網頁(filepath:C:\P_local\xx.py)
前置設定:1.安裝chrome 2.設定已安裝好的chrome.exe路徑至環境變數(更新:如果是照chrome給的路徑安裝,沒自變路徑,就不用另外設定) 3.下載chromedriver.exe
from selenium import webdriver
import time
chromedriver = 'C:\P_local\chromedriver_win32_2.36\chromedriver.exe'
driver = webdriver.Chrome(chromedriver)
driver.get('http://google.com')
如果直接利用下方式打包成一個.exe
pyinstaller -F C:\P_local\xx.py
就算chromedriver.exe放在與.exe同層路徑下
可能會有閃退或報「'chromedriver.exe' executable needs to be in PATH 」相關的錯誤
從stack overflow中查到,在包.exe檔的時候,可以增加binary 填入目前的chromedriver.exe在什麼路徑裡與打包後chromedriver.exe的相對位置
pyinstaller -F --add-binary "C:\P_local\chromedriver_win32_2.36\chromedriver.exe";"." C:\P_local\xx.py
(關於相對位置的部分嘗試了幾回,只設定「.」認知是把.exe跟chromedriver.exe放在同個階層)
打包後,
將chromedriver.exe放在與.exe同個路徑下
直接在虛擬機上執行.exe就可以成功了!
以上是在以下環境中實現:
os:虛擬機win7 64bit
python:python3.5
chrome: 65.0.3325.146
chromedriver:V2.36 win32
接著下範例是先在虛擬機建置好.py並打包成.exe放到實體機上執行
前置設定:1.安裝chrome 2.設定已安裝好的chrome.exe路徑至環境變數(更新:如果是照chrome給的路徑安裝,沒自變路徑,就不用另外設定)3.下載chromedriver.exe
from selenium import webdriver
import time
driver = webdriver.Chrome()
driver.get('http://google.com')
直接打包.exe
pyinstaller -F C:\P_local\xx.py
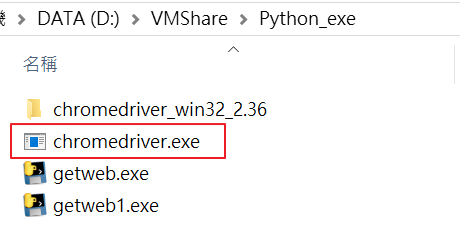
最後,記得把chromedriver.exe 跟exe 放一起如下圖,接著就放心執行getweb.exe吧!
 以上是在以下環境中實現:
os:實體機win10 64bit run exe 虛擬機 win7 64bit create .py
python:無安裝
chrome: 64.0.3282.18
chromedriver:V2.36 win32