[Silverlight]學習筆記-使用 Deep Zoom 功能並顯示Sub-Images的Metadata(1)
此例主要是使用Deep Zoom功能進行影片圖片的縮放移動效果,並於點選某張圖片後,該圖片自動置中並且於頁面右方顯示該影片的相關資訊(見下圖)。

要製作Deep Zoom效果,我們必須要運用Deep Zoom Composer這個軟體來進行。
Deep Zoom Composer的使用方式請參考下列這二篇文章:
小猴子的零元學Expression Blend 4 - Chapter 23 Deep Zoom Composer與Deep Zoom功能
艾小克的試玩 Deep Zoom Composer WIth Silverlight Beta2
簡述如下:
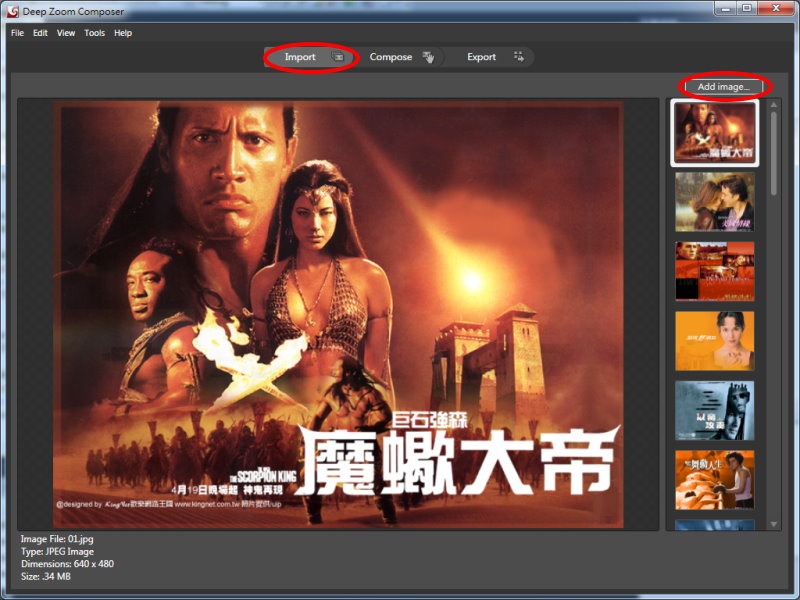
1.使用Deep Zoom Composer開啟一個新專案,在Import這個步驟底下,使用【Add Image】將原始的圖片加入。
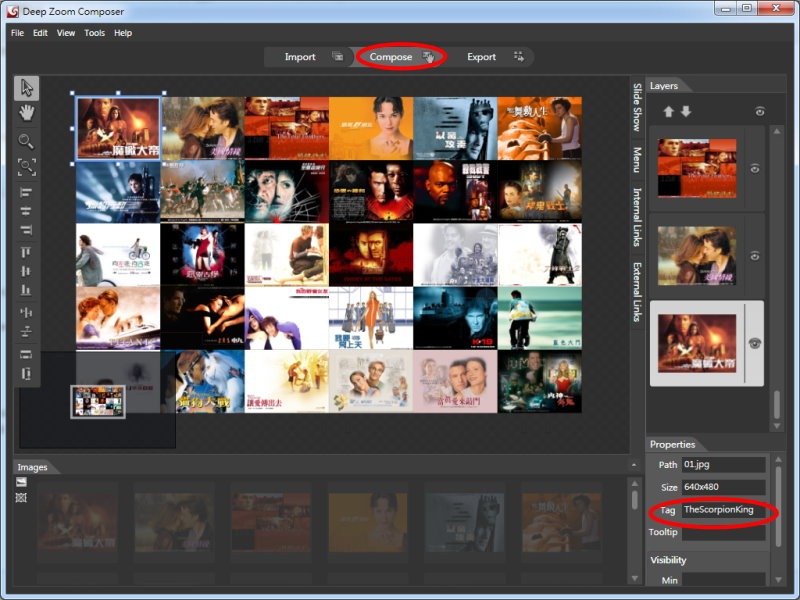
2.在Compose這個步驟底下,將剛Import進來的圖片分別拉至工作區,並依自已的需求適當的進行排列。
這裡要注意的一點,在工作區裡的每張圖片的 Tag 屬性都要設定一個唯一值,每張圖片都要不一樣,因後面的程式會以此Tag值為Key值去取出該圖片對應的資訊。
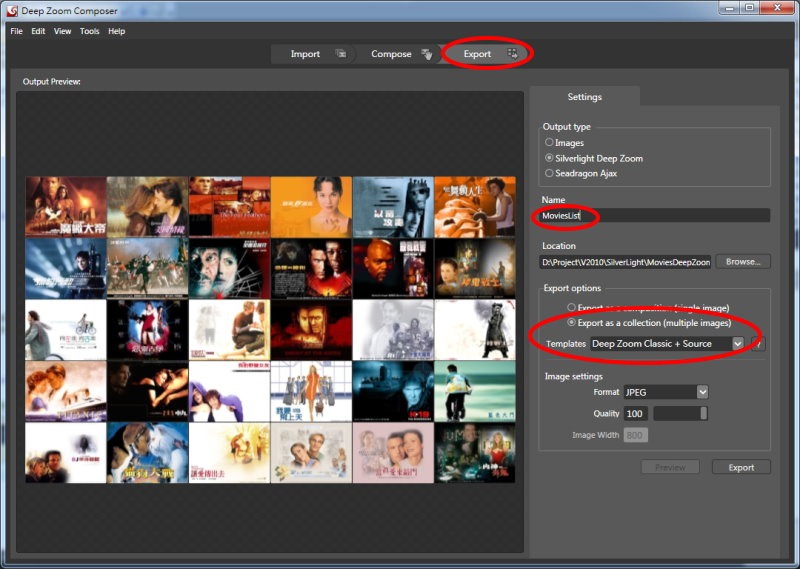
3.最後一個步驟就是Export,此例Export options要選擇【Export as a collection(multiple images)】,Templates則選擇【Deep Zoom Classis + Source】,Name就設成【MoviesList】,設定完成之後,執行【Export】即可完成。
4.完成後,該專案目錄底下的Exported Data目錄中,會有一個movieslist(第三步驟所設定的Name)目錄產生,該目錄底下Deep Zoom Composer會自動產生一個方案(因第三步驟Export options有設定【Deep Zoom Classis + Source】)。
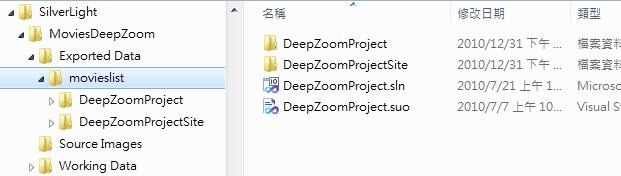
基本上該方案已可直接執行,讓我們不用寫一行code就可体驗Deep Zoom的功能。
但我們還要繼續追加顯示影片說明的功能,所以還要繼續進行下去。
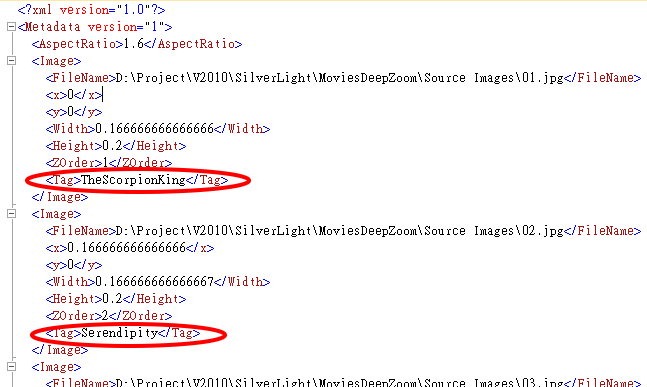
在繼續之前,先開啟movieslist\DeepZoomProjectSite\ClientBin\GeneratedImages\Metadata.xml 檔案看一下內容,可看到其中已包含剛才為每張圖片加上的Tag屬性。
接著使用 Blend 4 開啟剛建立的 DeepZoomProject.sln 方案。
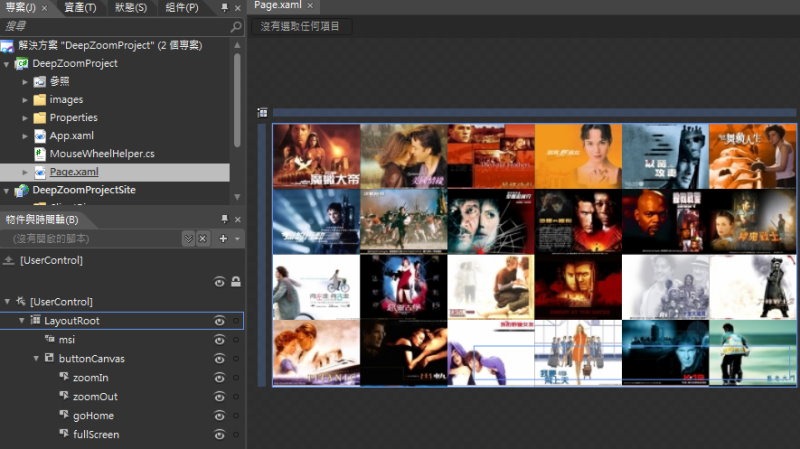
預設的Page.xaml頁面配置如下,其LayoutRoot底下只放一個 MultiScaleImage控制項 (msi)及一個Canvas容器 (buttonCanvas),buttonCanvas底下則又放四個Button控制項,分另可執行ZoomIn、ZoomOut、GoHome、FullScreen的功能。
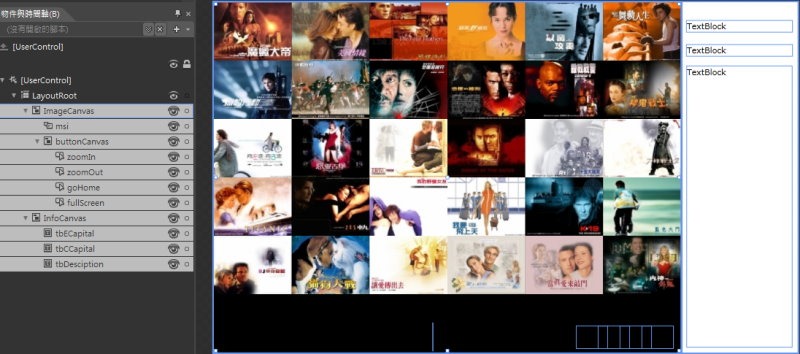
因要追加在頁面的右方顯示影片資訊的功能,所以必須將原頁面的配置進行調整。
新增一個Canvas容器 (ImageCanvas),將原有的msi及buttonCanvas置入此ImageCanvas容器內,並調整其右方可以有多餘的空間再放置一個Canvas容器(InfoCanvas)以顯示影片內容,InfoCanvas容器底下則再放入三個TextBlock控制項分別顯示影片的英文片名(tbECapital)、中文片名(tbCCpital)及影片描述(tbDesciption)。
調整完的頁面如下:
XAML的內容如下:
	<Grid x:Name="LayoutRoot" Background="White" Width="800" Height="480" MouseEnter="EnterMovie" MouseLeave="LeaveMovie">
		<Canvas x:Name="ImageCanvas" Margin="0,0,160,112" Width="640" Height="480" Background="Black">
			<MultiScaleImage x:Name="msi" Source="/GeneratedImages/dzc_output.xml" Width="640" Height="480" d:LayoutOverrides="Width, Margin"/>
			<Canvas Height="37" Margin="300,440,164,8" x:Name="buttonCanvas" VerticalAlignment="Bottom" Opacity="0" Background="{x:Null}">
				<Button Height="30" x:Name="zoomIn" Width="42" Canvas.Left="197" Canvas.Top="4" Template="{StaticResource zoomInTemplate}" Content="Button" Click="ZoomInClick"/>
				<Button Height="30" x:Name="zoomOut" Width="42" Template="{StaticResource zoomOutTemplate}" Content="Button" Canvas.Left="227" Canvas.Top="4" Click="ZoomOutClick"/>
				<Button Height="30" x:Name="goHome" Width="42" Template="{StaticResource homeTemplate}" Content="Button" Canvas.Left="257" Canvas.Top="4" Click="GoHomeClick"/>
				<Button Height="30" x:Name="fullScreen" Width="42" Template="{StaticResource fullScreenTemplate}" Content="Button" Canvas.Left="287" Canvas.Top="4" Click="GoFullScreenClick"/>
			</Canvas>
		</Canvas>
    	<Canvas x:Name="InfoCanvas" HorizontalAlignment="Right" Width="160">
    		<TextBlock x:Name="tbECapital" Canvas.Left="8" TextWrapping="Wrap" Text="TextBlock" Canvas.Top="25" Width="144" Height="16"/>
    		<TextBlock x:Name="tbCCapital" Canvas.Left="8" TextWrapping="Wrap" Text="TextBlock" Canvas.Top="58" Width="144" Height="16"/>
    		<TextBlock x:Name="tbDesciption" Canvas.Left="8" TextWrapping="Wrap" Text="TextBlock" Canvas.Top="88" Width="144" Height="384"/>
    	</Canvas>
    </Grid>
頁面調整完畢,接下來就要開始加上顯示影片資訊的程式碼。
1.使用Visual Studio 2010 開啟DeepZoomProject.sln 方案。
這時可發現先前Deep Zoom Composer已自動產一個MouseWheelHelper.cs類別,並且Page.xaml.cs裡也包含了使用滑鼠操作Deep Zoom的相關EventHandler。

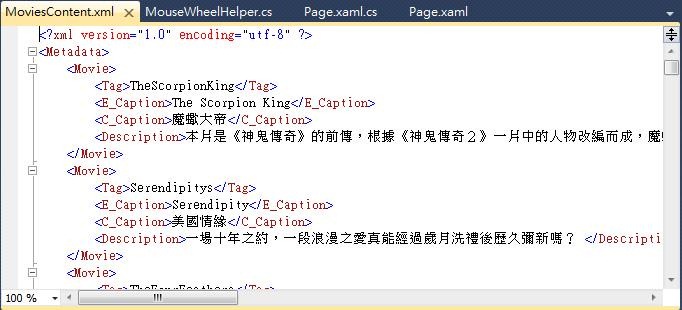
2.影片資料的部份,一般資料會存放在DataBase以方便維護,此例我另外準備一個XML檔(MoviesContent.xml)取代DB資料。
XML資料檔的內容如下,其中<Tag>就是之為每張圖片所定的Key值,<E_Caption>為英文片名,<C_Caption>為中文片名,<Description>為影片的說明。
3.切換到 Page.xaml.cs ,先加這二個namespace (必須先將 System.Xml.Linq.dll 加入參考)
	using System.Xml.Linq;
using System.Linq;
4.接著另外宣告一組class用來存放影片的資訊。
	public class SubImageInfo
    {
        public int Index { get; set; }
        public string E_Caption { get; set; }
        public string C_Caption { get; set; }
        public string Description { get; set; }
    }
然後再宣告一個 List<SubImageInfo>泛型集合,用來存放每張圖片的資訊集合。
List<SubImageInfo> ImageInfo = new List<SubImageInfo>();
5.再來修改msi_ImageopenSucceeded(),當MultiScaleImage載入成功之後,則使用WebClient 去下載Metadata.xml資源,以取得圖片的Tag資料。
另外再為WebClient追加一個DownloadStringCompleted事件,在非同步資源下載作業完成時執行該事件。
	void msi_ImageOpenSucceeded(object sender, RoutedEventArgs e)
        {
            //If collection, this gets you a list of all of the MultiScaleSubImages
            //
            //foreach (MultiScaleSubImage subImage in msi.SubImages)
            //{
            //    Do something
            //}
            WebClient xmlClient = new WebClient();
            xmlClient.DownloadStringCompleted += new DownloadStringCompletedEventHandler(xmlClient_DownloadStringCompleted);
            xmlClient.DownloadStringAsync(new Uri("GeneratedImages/Metadata.xml", UriKind.Relative));   //下載 Metadata.xml 檔

            msi.ViewportWidth = 1;
        }
xmlClient_DownloadStringCompleted()的內容如下,主要是以Metadata.xml中每張圖片的Tag值當key,去讀取存放影片資料的 MoviesContent.xml 資料檔。
讀到的每個影片資料全置入 List<SubImageInfo>中,之後若點選每張圖片,則會至此ImageInfo中取得影片資料。
	// Metadata.xml下載完成
        private void xmlClient_DownloadStringCompleted(object sender, DownloadStringCompletedEventArgs e)
        {
            if (e.Error == null)
            {
                //取得 Metadata.xml 的內容
                XDocument metadataXML = XDocument.Parse(e.Result);
                XElement metaDataElement = metadataXML.Element("Metadata");
                var imageItems = from g in metaDataElement.Descendants()
                                 where g.Name == "Image"
                                 select g;

                //載入 MoviesContent.xml 電影的說明內容
                XDocument docMenu = XDocument.Load("MoviesContent.xml");
                ImageInfo = new List<SubImageInfo>();
                foreach (XElement g in imageItems)
                {
                    SubImageInfo subImageInfo = new SubImageInfo();
                    int zOrder = int.Parse(g.Element("ZOrder").Value) - 1;
                    string strTag = g.Element("Tag").Value;    //取得每張圖片的 Tag 值

                    subImageInfo.Index = zOrder;

                    if (strTag == "")
                    {
                        strTag = "None";
                        subImageInfo.E_Caption = string.Empty;
                        subImageInfo.C_Caption = string.Empty;
                        subImageInfo.Description = string.Empty;
                    }
                    else
                    {
                        //以每張圖片的 Tag 為 key 去取得 MoviesContent.xml 裡的電影的說明內容
                        var descriptions = from movies in docMenu.Descendants("Movie")
                                           where movies.Element("Tag").Value == strTag
                                           select new
                                           {
                                               E_Caption = movies.Element("E_Caption").Value,
                                               C_Caption = movies.Element("C_Caption").Value,
                                               Description = movies.Element("Description").Value
                                           };

                        foreach (var movie in descriptions)
                        {
                            subImageInfo.E_Caption = movie.E_Caption;
                            subImageInfo.C_Caption = movie.C_Caption;
                            subImageInfo.Description = movie.Description;
                        }
                    }
                    ImageInfo.Add(subImageInfo);
                }
            }
        }
6.接著在加上SubImageHit()這個Method,傳入滑鼠在MultiScaleImage點擊處的Point,這裡另外使用 GetSubImageRect()取得每張圖片的方框的範圍,然後使用 Rect.Contains(Point)方法判斷哪張圖片包含該Point,並回傳圖片的索引值。
	// 取得滑鼠點擊的圖片索引
        private int SubImageHit(Point p)
        {
            for (int i = 0; i < msi.SubImages.Count; i++)
            {
                Rect subImageRect = GetSubImageRect(i);
                if (subImageRect.Contains(p))
                    return i;
            }
            return -1;
        }

        //取得每張圖片的方框
        private Rect GetSubImageRect(int indexSubImage)
        {
            if (indexSubImage < 0 || indexSubImage >= msi.SubImages.Count)
                return Rect.Empty;
            MultiScaleSubImage subImage = msi.SubImages[indexSubImage];
            double scaleBy = 1 / subImage.ViewportWidth;
            return new Rect(-subImage.ViewportOrigin.X * scaleBy, -subImage.ViewportOrigin.Y * scaleBy, 1 * scaleBy, (1 / subImage.AspectRatio) * scaleBy);
        }
知道點擊哪張圖片後,就可自List<SubImageInfo>中取出影片的資料。
7.修改Page()這個Method底下的 this.MouseLeftButtonUp += delegate(object sender, MouseButtonEventArgs e){}如下,先使用SubImageHit()取得點擊的圖片index值,再用該index值去取得List<SubImageInfo>中的影片資訊。
	this.MouseLeftButtonUp += delegate(object sender, MouseButtonEventArgs e)
            {
                if (!duringDrag)
                {
                    bool shiftDown = (Keyboard.Modifiers & ModifierKeys.Shift) == ModifierKeys.Shift;
                    double newzoom = zoom;

                    if (shiftDown)
                        newzoom /= 2;
                    else
                        newzoom *= 2;

                    int index = SubImageHit(this.msi.ElementToLogicalPoint(e.GetPosition(this.msi)));  //取得滑鼠點擊的圖片索引
                    if (index >= 0)
                    {
                        //由ImageInfo取得該張圖片的影片資訊
                        SubImageInfo subImageInfo = ImageInfo.FirstOrDefault(s => s.Index == index);
                        tbECapital.Text = subImageInfo.E_Caption;       //英文片名
                        tbCCapital.Text = subImageInfo.C_Caption;       //中文片名
                        tbDesciption.Text = subImageInfo.Description;   //影片說明

                        this.DisplaySubImageCentered(index);            //將點擊的圖片置中
                        Zoom(newzoom, msi.ElementToLogicalPoint(this.lastMousePos));
                    }
                    else
                    {
                        tbECapital.Text = string.Empty;
                        tbCCapital.Text = string.Empty;
                        tbDesciption.Text = string.Empty;
                    }
                }
                duringDrag = false;
                mouseDown = false;

                msi.ReleaseMouseCapture();
            };
其中將圖片置中的DisplaySubImageCentered() Method內容如下
	//將指定的圖片置中
        private void DisplaySubImageCentered(int indexSubImage)
        {
            if (indexSubImage < 0 || indexSubImage >= msi.SubImages.Count)
                return;
            Rect subImageRect = GetSubImageRect(indexSubImage);
            double msiAspectRatio = msi.ActualWidth / msi.ActualHeight;
            Point newOrigin = new Point(subImageRect.X - (msi.ViewportWidth / 2) + (subImageRect.Width / 2), subImageRect.Y - ((msi.ViewportWidth / msiAspectRatio) / 2) + (subImageRect.Height / 2));
            msi.ViewportOrigin = newOrigin;
        }
8.到此大功告成,直接執行看看。
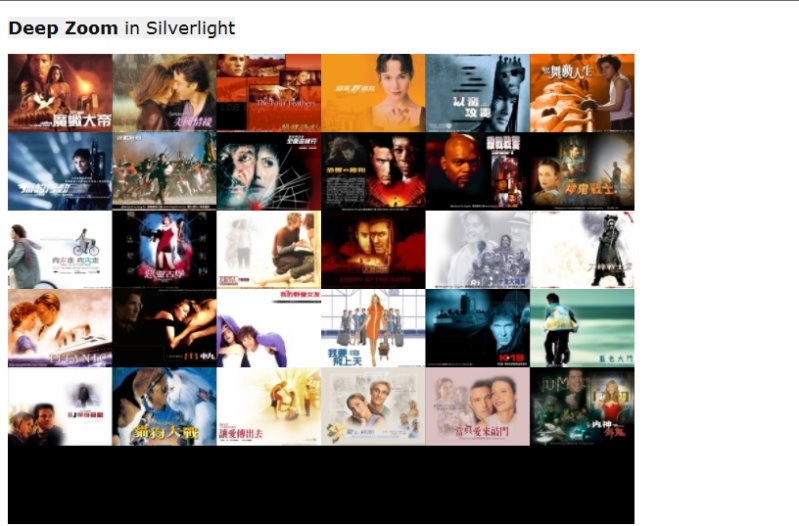
點選任一張圖片驗證一下結果。點選的圖片會放大且置中,並且頁面右方會顯示該影片的資訊。

以上是使用Deep Zoom功能並顯示Sub-Images的Metadata的基本介紹,範例程式碼可於此下載MoviesList.zip。
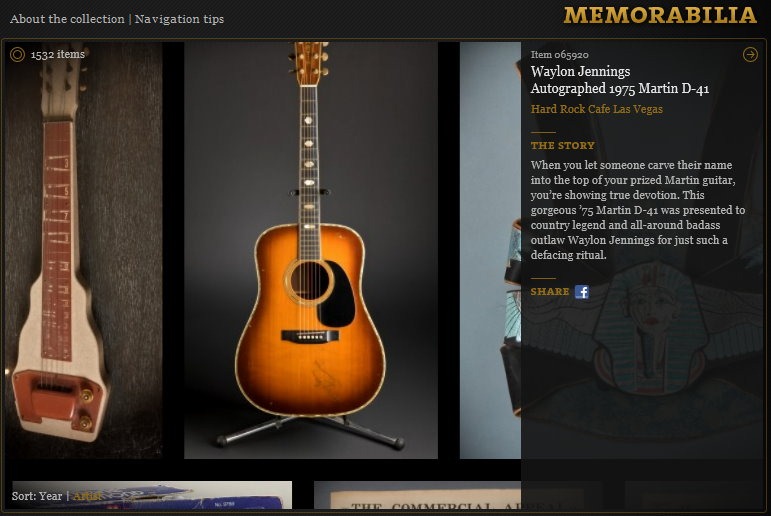
但若要做到像如下圖Hard Rock Cafe Memorabilia網站一樣的效果,則必須另外再加工,下回再來將此例修改成類似Hard Rock Cafe Memorabliia網站那樣自動顯示Metadata的效果。
今天剛好是民國100年的元旦,最後祝大家新年快樂!!
參考資料:
How to add text in Deep Zoom Composer?
[Silverlight]要如何把Deep Zoom產生的檔案內嵌到已完成的Silverlight網頁中?
零元學Expression Blend 4 - Chapter 23 Deep Zoom Composer與Deep Zoom功能
試玩 Deep Zoom Composer WIth Silverlight Beta2
電影圖片及資料來源:
