係滴,繼Android之後,接下來要玩的是Windows Mobile,可惜不是WP7。在Windows Mobile上面不像Andorid一樣,有Google提供的超好用控制項;雖然Google Map本身有提供一些API可以使用,但是因為在Windows Mobile瀏覽器上的諸多限制,所以我們只能使用靜態圖片的API...
係滴,繼Android之後,接下來要玩的是Windows Mobile,可惜不是WP7。在Windows Mobile上面不像Andorid一樣,有Google提供的超好用控制項;雖然Google Map本身有提供一些API可以使用,但是因為在Windows Mobile瀏覽器上的諸多限制,所以我們只能使用靜態圖片的API,相對的在圖層以及畫面上的控制就麻煩很多,尤其是當你需要轉換圖片像素跟坐標以及距離位置的時候,那更是會算到吐血,更別提圖片最大只能用到640*640,再加上預載圖片功能之類的問題、縮放大小之後比例尺又要重算的問題、還有MouseMove之類圖片跟著移動計算位置…還沒寫之前就覺得頭大了。
在幾番尋找下,我發現了一個超超超~好用的控制項GMap.NET,而且還是OpenSource,這叫人怎麼不感動啊!以上提到的問題他都幫你做好好了,提供的地圖資源還不只Google一個,而且提供了不同平台的功能,來看一下簡介:
GMap.NET is great and Powerful, Free, cross platform, open source .NET control. Enable use routing, geocoding and maps from Coogle, Yahoo!, Bing, OpenStreetMap, ArcGIS, Pergo, SigPac, Yandex, Mapy.cz, Maps.lt, iKarte.lv, NearMap, OviMap in Windows Forms & Presentation, supports caching and runs on windows mobile!
註:如果Windows Mobile要下載原始碼使用,記得要選擇相對應的Branch比較好,我之前直接下載最新的會開不起來Orz
需要引用的只有GMap.NET.WindowsMobile.dll,不過連帶他有使用的記得都要一起安裝:
OpenNETCF.Configuration.dll
OpenNETCF.dll
SQLite.Interop.DLL
System.Data.SQLite.dll
開發環境:VS2008 + .NET CF 3.5 + Windows Mobile 6.0 Professional
初始化控制項:
private GMapControl _map;

private void initMapControl()
{

    _map = new GMapControl();
    _map.BackColor = System.Drawing.Color.White;
    _map.CanDragMap = true;
    _map.Dock = System.Windows.Forms.DockStyle.Fill;
    _map.Location = new System.Drawing.Point(0, 0);
    _map.MapType = GMap.NET.MapType.GoogleMap;
    _map.MarkersEnabled = true; //圖標
    _map.Name = "MainMap";
    _map.RoutesEnabled = true; //路線
    _map.ShowTileGridLines = false; //格線
    _map.TabIndex = 0;
    _map.Manager.Language = LanguageType.ChineseTraditional; //地圖語系
    _map.Zoom = trackBar1.Value;

    panel1.Controls.Add(_map);

}
GMap.NET和Android的GoogleMap一樣,都是使用圖層概念,所以如果要加上路徑或圖示,可以利用圖層來切割方便管理。
增加圖示:
var current = new PointLatLng(x , y);
var currentMark = new GMapMarkerGoogleGreen(current);
var overlay = new GMapOverlay(_map, "current");
overlay.Markers.Add(currentMark);
_map.Overlays.Add(overlay);
增加路徑:路徑的部份因為需要透過其它服務提供的API,因為我需要詳細資料內容,所以我是自己利用Google Map API去查了路徑之後解碼,然後再畫到地圖上面;GMap.NET本身也有提供可以直接實用的函數:
//透過GMap.NET取得路徑
PointLatLng end = new PointLatLng(x, y);
PointLatLng start = new PointLatLng(x2, y2);

MapRoute route = Singleton<GMaps>.Instance.GetRouteBetweenPoints(start, end, false, (int)_map.Zoom);

//畫路線
var routeOverLay = new GMapOverlay(_map, "route");
routeOverLay.Routes.Add(r);
_map.Overlays.Add(routeOverLay);
地圖的放大縮小也很簡單,只要自己加個TrackBar,然後在值變動的時候:
_map.Zoom = trackBar1.Value;
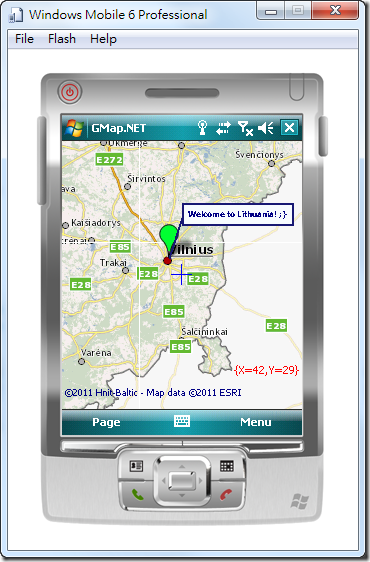
下面這個是他的demo程式運作的狀況:
當然啦,裡面還有很多可以玩的東西,像是圖片快取的控制啦…族繁不及備載。不過可惜的是他沒有自動畫定位的圈圈,所以得自己手動加,為了讓做個跟Google很像的定位圓,你可以選擇自己客制化:(我是去網路上找了二個圖自己畫上去,當縮放比例大於16的時候換一張小一點的圖)
public class CurrentMark : GMapMarker
{
	public int Radius { get; set; }
	public int Zoom { get; set; }

	public CurrentMark(PointLatLng p, int zoom, int radius)
		: base(p)
	{
		this.Zoom = zoom;
		this.Radius = radius;

		if (zoom >= 16)
		{
			Size = new System.Drawing.Size(Resources.circle_32.Width, Resources.circle_32.Height);
			Offset = new System.Drawing.Point(Resources.circle_32.Width / 2, Resources.circle_32.Height / 2);
		}
		else
		{
			Size = new System.Drawing.Size(Resources.circle_16.Width, Resources.circle_16.Height);
			Offset = new System.Drawing.Point(Resources.circle_16.Width / 2, Resources.circle_16.Height / 2);
		}

	}

	public override void OnRender(System.Drawing.Graphics g)
	{
		int x = LocalPosition.X - this.Radius / 2;
		int y = LocalPosition.Y - this.Radius / 2;

		if (this.Zoom >= 16)
		{
			DrawImageUnscaled(g, Resources.circle_32, LocalPosition.X - Resources.circle_32.Width / 2, LocalPosition.Y - Resources.circle_32.Height / 2);
		}
		else
		{
			DrawImageUnscaled(g, Resources.circle_16, LocalPosition.X - Resources.circle_16.Width / 2, LocalPosition.Y - Resources.circle_16.Height / 2);
		}


	}
}
也許你會和我一樣,想畫一個跟Google一樣的半透明的圓(Wifi定位是概略定位,所以會需要標示誤差範圍),很可惜的是.NET CF沒有直接可以畫半透明的顏色,這讓我傷透了腦筋;網路上有一些免費的Library可以畫半透明的控制項(請參考最下方連結),可是直接把底打成半透明的,會出現淡淡灰色的長方形上面疊了一個圓…後來想到另外一個方法,直接先畫一層白色長方形當底,然後再弄成半透明就好啦!
using (Bitmap bitmap = new Bitmap(this.Radius, this.Radius))
{
    Graphics g2 = Graphics.FromImage(bitmap);
    g2.FillRectangle(new SolidBrush(Color.White), 0, 0, this.Radius, this.Radius);
    g2.FillEllipse(new SolidBrush(Color.FromArgb(30, 14, 225)), 0, 0, this.Radius - 2, this.Radius - 2);

    g.DrawAlpha(bitmap, 40, x, y);
}

g.DrawEllipse(new Pen(Color.FromArgb(30, 14, 225), 2), x, y, this.Radius, this.Radius);
至於圓的半徑計算方式呢?GMap.NET一樣貼心的提供你計算方式:
private int getCurrentRadius()
{
    return (int)( meter / _map.Projection.GetGroundResolution(trackBar1.Value, current.Latitude));
}
結論:真是超強大的控制項,雖然文件少少,很多東西要自己找,可是還是超感動Q_Q
相關連結:
[WM]利用Microsoft.Drawing擴充Graphics & 製作我的按鈕
UI Framework for .NET Compact Framework 3.5
GMap.NET - Great Maps for Windows Forms & Presentation
