閱讀Stephens' C#教材第四十一章筆記 介紹介紹如何用WPF進行列印
Chapter 41 Printing with WPF
在第31章在Windows Form應用程式中,曾透過PrintDocument物件的PrintPage事件以及e.Graphics參數進行列印,本章將介紹非常直覺式的WPF列印。
在WPF中是使用PrintDialog物件開啟列印的程序,透過這個物件可以顯示選擇印表機的對話框以及提供PrintVisual方法進行列印。
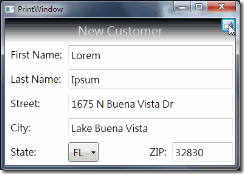
PrintWindows程式示範基本的列印程序,按下右上角的列印鈕就會出現選擇印表機的對話框,確定後才會列印。
列印的結果如下,畫面出現在左上角。
程式碼非常簡單
1: // Print the window.
2: private void printButton_Click(object sender, RoutedEventArgs e)
3: {
4: // Display the print dialog and check the result.
5: PrintDialog printDialog = new PrintDialog();
6: if (printDialog.ShowDialog() == true)
7: {
8: // Print.
9: printDialog.PrintVisual(this, "PrintWindow Image");
10: }
11: }
第5行宣告一個PrintDialog物件,讓使用者選擇印表機,當使用者按下「確定」時會回傳True,所以第6行判斷為True才呼叫第9行的PrintVisual方法列印。
不過這樣的列印有很大多缺點就是會列印在左上角,並且畫面太偏沒有留邊。
WPF提供了兩個方式解決這個問題,第一是提供相關的transformations功能,讓你可以輕易地將圖片進行延展、旋轉及轉換的操作
第二是讓你簡便地可以把圖形物件放到其他的圖形物件中。
要讓上面的程式顯示在列印畫面中間,可以把影像放到其他的控制項裡,例如Grid與Viewboxes。
列印結果變成下圖
程式碼如下,建立一個PrintWindowsCentered副程式讓printButton呼叫,在副程式宣告Grid、Viewbox及Rectangle物件,讓Grid填滿可列印的區域,Grid包含Viewbox,透過Viewbox的延展、旋轉及轉換特性,可以彈性處理列印內容,最後再將Viewbox放入一個經過VisualBrush處理過的Rectangle,得到一個陰影的外框。
1: // Print an image of the window centered.
2: private void printButton_Click(object sender, RoutedEventArgs e)
3: {
4: PrintDialog printDialog = new PrintDialog();
5: if (printDialog.ShowDialog() == true)
6: {
7: PrintWindowCentered(printDialog, this, "New Customer", null);
8: }
9: }
10:
11: // Print a Window centered on the printer.
12: private void PrintWindowCentered(PrintDialog printDialog, Window win,
13: String title, Thickness? margin)
14: {
15: // Make a Grid to hold the contents.
16: Grid drawingGrid = new Grid();
17: drawingGrid.Width = printDialog.PrintableAreaWidth;
18: drawingGrid.Height = printDialog.PrintableAreaHeight;
19:
20: // Make a Viewbox to stretch the result if necessary.
21: Viewbox viewBox = new Viewbox();
22: drawingGrid.Children.Add(viewBox);
23: viewBox.HorizontalAlignment = HorizontalAlignment.Center;
24: viewBox.VerticalAlignment = VerticalAlignment.Center;
25:
26: if (margin == null)
27: {
28: // Center without resizing.
29: viewBox.Stretch = Stretch.None;
30: }
31: else
32: {
33: // Resize to fit the margin.
34: viewBox.Margin = margin.Value;
35: viewBox.Stretch = Stretch.Uniform;
36: }
37:
38: // Make a VisualBrush holding an image of the Window's contents.
39: VisualBrush br = new VisualBrush(win);
40:
41: // Make a Rectangle the size of the Window.
42: Rectangle windowRect = new Rectangle();
43: viewBox.Child = windowRect;
44: windowRect.Width = win.Width;
45: windowRect.Height = win.Height;
46: windowRect.Fill = br;
47: windowRect.Stroke = Brushes.Black;
48: windowRect.Effect = new DropShadowEffect();
49:
50: // Arrange to produce output.
51: Rect rect = new Rect(0, 0,
52: printDialog.PrintableAreaWidth, printDialog.PrintableAreaHeight);
53: drawingGrid.Arrange(rect);
54:
55: // Print it.
56: printDialog.PrintVisual(drawingGrid, title);
57: }
如果還覺得列印圖片不夠大,可以在printButton傳的參數改成如下程式,第八行加入50代表列印的Margin(邊界)是50像素,於是圖片就相對放大了。
1: // Print an image of the window centered and stretched to fill the page.
2: private void printButton_Click(object sender, RoutedEventArgs e)
3: {
4: PrintDialog printDialog = new PrintDialog();
5: if (printDialog.ShowDialog() == true)
6: {
7: PrintWindowCentered(printDialog, this, "New Customer",
8: new Thickness(50));
9: }
10: }
除了PrintVisual方法,PrintDialog類別還提供了PrintDocument方法進行多頁列印或印成如FlowDocuments或FixedDocuments物件
相關資料請參閱微軟網頁:PrintDocument, FixedDocument, FlowDocument
TRY IT中示範如何印出旋轉90度的結果。


