[WM]利用Microsoft.Drawing擴充Graphics & 製作自己的"option" form

首先今天會使用到的是Graphics.DrawAlpha這個功能,Graphics.DrawAlpha可以繪製半透明的效果,例如下面的程式碼

這篇接著繼續說明Microsoft.Control.dll的功能,同樣的,如果看官還不知道要怎麼加入的話,可以參考之前的[WM]利用Microsoft.Drawing擴充Graphics & 製作我的按鈕這篇文章。
首先今天會使用到的是Graphics.DrawAlpha這個功能,Graphics.DrawAlpha可以繪製半透明的效果,例如下面的程式碼


Dim gOff As Graphics = Graphics.FromImage(_bmpOff)
        ''清除原先的圖形
        gOff.Clear(Color.Black)
        ''繪圖動作
        ''繪製具透明度的背景
        e.Graphics.DrawAlpha(_bmpOff, _Opacity, 0, 0)

其中_bmpOff是一個與Form同樣大小的bitamp,取得bitmap的Graphics之後,會先用黑色去清除整個bitmap;而為什麼是黑色?不是白色、藍色...這邊到沒有限定要用什麼顏色,只是黑色套用半透明後會有感覺像"lightbox"的效果就是了。接下來DrawAlpha的第一個參數是要繪製的圖形,第二個是透明度,255是完全不透明,0則是完全透明,第三、第四個參數就是要繪製的位置了。用這樣就可以簡單的繪製出半透明的效果;有一個部分要特別注意,如果繪製時要"透過去",看到下一層的東西,那麼就要複寫掉OnPaintBackground的事件,讓背景繪製不要發生,不然就會變成"一張有透明效果的圖,畫在白色(背景色)上"。
接下來就來看看今天測試的程式碼,筆者這邊是繼承Form的類別,來做一個可以設定透明度的Form就姑且稱做myForm吧(myPhone..?),之後在myForm上面放了3個myButton來做選擇的功能,選擇後會自行把Form關閉,並且將相關的資訊儲存在property中,程式碼會像下面這樣


Imports Microsoft.Drawing

Public Class myForm
    Inherits Windows.Forms.Form

    Private _bmpOff As Bitmap
    Private _Opacity As Byte = 175
    ''儲存圖形
    Private _imgList As ImageList
    ''自訂Form的回應情形
    Private _Result As myFormResult = myFormResult.Ignore

    Public Enum myFormResult As Integer
        Ignore = 0
        Option1 = 1
        Option2 = 2
        Option3 = 3
    End Enum

#Region "Property"
    ''' 
''' 設定背景透明度(255:不透明,0:全透明)
'''
''' ''' ''' Public Property [Opacity]() As Byte Get Return _Opacity End Get Set(ByVal value As Byte) _Opacity = value End Set End Property '''
''' 自行定義的回應狀態
'''
''' ''' ''' Public ReadOnly Property CustomResult() As myFormResult Get Return _Result End Get End Property '''
''' 設定要繪製在畫面上的圖形
'''
''' ''' ''' Public ReadOnly Property ImageItem() As ImageList.ImageCollection Get Return _imgList.Images End Get End Property #End Region '''
''' 直接點選Form的其他位置視為取消選擇的動作
'''
''' ''' Protected Overrides Sub OnClick(ByVal e As System.EventArgs) ''設定回傳訊息是忽略 Me.DialogResult = Windows.Forms.DialogResult.Ignore Me.Close() End Sub Protected Overrides Sub OnPaint(ByVal e As System.Windows.Forms.PaintEventArgs) If _bmpOff Is Nothing Then _bmpOff = New Bitmap(Me.ClientSize.Width, Me.ClientSize.Height) End If Dim gOff As Graphics = Graphics.FromImage(_bmpOff) ''清除原先的圖形 gOff.Clear(Color.Black) ''繪圖動作 ''繪製具透明度的背景 e.Graphics.DrawAlpha(_bmpOff, _Opacity, 0, 0) ''繪製其他圖形 If _imgList.Images.Count > 0 Then Dim rect As New Rectangle rect.Size = _imgList.Images(0).Size For i As Integer = 0 To _imgList.Images.Count - 1 rect.X = (Me.ClientSize.Width \ _imgList.Images.Count \ 2) + (32 * (i Mod 4) + (i * 20)) ''如果要位置在接近置中的地方 ''rect.Y = (Me.ClientSize.Height - 32) \ 2 rect.Y = 20 e.Graphics.DrawImageTransparent(_imgList.Images(i), rect) Next End If 'release resource gOff.Dispose() 'MyBase.OnPaint(e) End Sub '''
''' 一定要複寫才能有透過去的效果
'''
''' ''' Protected Overrides Sub OnPaintBackground(ByVal e As System.Windows.Forms.PaintEventArgs) ''不要繪製背景 ''MyBase.OnPaintBackground(e) End Sub ''設定回應狀態 Private Sub MyButton1_Click(ByVal sender As System.Object, ByVal e As System.EventArgs) Handles MyButton1.Click _Result = myFormResult.Option1 Me.Close() End Sub ''設定回應狀態 Private Sub MyButton2_Click(ByVal sender As System.Object, ByVal e As System.EventArgs) Handles MyButton2.Click _Result = myFormResult.Option2 Me.Close() End Sub ''設定回應狀態 Private Sub MyButton3_Click(ByVal sender As System.Object, ByVal e As System.EventArgs) Handles MyButton3.Click _Result = myFormResult.Option3 Me.Close() End Sub End Class

而在"new"的部分,筆者也加了初始化的動作,像是下面這樣


呼叫的時候大概會像下面這樣子


Dim f As New myForm
        f.ImageItem.Add(New Bitmap("\Storage Card\1.png"))
        f.ImageItem.Add(New Bitmap("\Storage Card\2.png"))
        f.ImageItem.Add(New Bitmap("\Storage Card\3.png"))
        f.ImageItem.Add(New Bitmap("\Storage Card\4.png"))
        f.ShowDialog()
        Select Case f.CustomResult
            Case Is = myForm.myFormResult.Option1
                TextBox1.Text = "button1 selected"
            Case Is = myForm.myFormResult.Option2
                TextBox1.Text = "button2 selected"
            Case Is = myForm.myFormResult.Option3
                TextBox1.Text = "button3 selected"
            Case Else
                TextBox1.Text = "nothing"
        End Select
        f.Dispose()

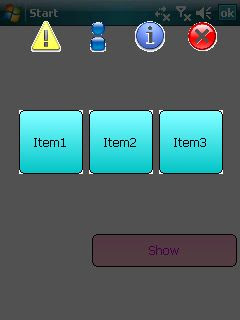
執行時,呼叫出自訂的form大致會像下面這樣

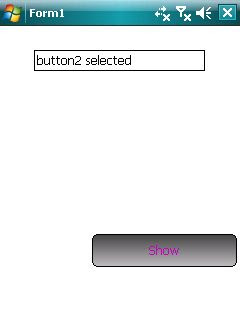
選擇某個按鈕後可以將選擇的值放置在屬性中讓呼叫的form去讀取,大致像下圖