終於要來完成整個發送回應的畫面主體程式,基本上這個程式是由 [Serial Port 系列(7) 基本篇 -- 建立一個簡單的純發送程式(多緒型範例)] 改編而來。
終於要來完成整個發送回應的畫面主體程式,基本上這個程式是由 [Serial Port 系列(7) 基本篇 -- 建立一個簡單的純發送程式(多緒型範例)] 改編而來。
畫面

(1) 左邊 On/Off RadioButton 代表要選擇開燈/關燈,Light on/off Button 則是送出命令。
(2) 右上 Block 旁的 NumericUpDown 代表要寫入或讀取的 Block ,Data 旁的 TextBox在按下 Read Block 送出讀取資料命令時會將回傳的資料顯示在此TextBox;而當使用 Write Block 寫入資料時則會將此TextBox 的資料送出。
(3) error Data Button 則是用來測試錯誤的資料使用。
命名空間匯入
這支程式需要匯入以下命名空間
System.IO.Ports
System.Threading
System.Text
System.Text.RegularExpressions
私有變數與委派宣告
	Private comport As SerialPort
	Private writeCommand As WriteProtocol
	Private readResponse As ReadProtocol
	Private sending As Boolean
	Private receiving As Boolean
	Protected Delegate Sub ShowBlockMethod(content As Byte())
		private SerialPort comport;
		private WriteProtocol writeCommand;
		private ReadProtocol readResponse;
		private Boolean sending;
		private Boolean receiving;
		protected delegate void ShowBlockMethod(Byte[] content);
第一行不用說了,當然是為了SerialPort而來。
第二行與第三行則是為了處理送出與讀取的資料:參考 [Serial Port 系列(16) 基本篇 -- 發送回應(二)] [Serial Port 系列(17) 基本篇 -- 發送回應(三)] [Serial Port 系列(18) 基本篇 -- 發送回應(四)]
第四行則是要辨識資料是否在傳送狀態:參考 [Serial Port 系列(7) 基本篇 -- 建立一個簡單的純發送程式(多緒型範例)]
第五行則是為了讀取資料而設定:參考 [Serial Port 系列(12) 基本篇 -- 完整接收資料(一)] [Serial Port 系列(13) 基本篇 -- 完整接收資料(二)] [Serial Port 系列(14) 基本篇 -- 完整接收資料(三)]
第六行的委派宣告則是因為我們有個功能是要將讀回的 Block Data 顯示出來,因為通訊在另一個執行緒啟動的關係,所以連帶的由通訊觸發的事件而呼叫的事件委派方法也會在此一非UI執行緒中被啟動;而在 .Net 2.0 以後的規範是『凡是跨執行緒呼叫 UI 控制項一定要使用跨執行緒委派呼叫』,為了這個原因所以要宣告這個委派。
在Form Load 時要做的事
	Private Sub Form1_Load(sender As System.Object, e As System.EventArgs) Handles MyBase.Load
		RB_On.Checked = True
		writeCommand = New WriteProtocol()
		readResponse = New ReadProtocol()
		AddHandler readResponse.DataChecked, AddressOf ReadResponse_DataChcked
		AddHandler readResponse.ReceiveErrorData, AddressOf ReadResponse_ReceiveErrorData
		AddHandler readResponse.ReceiveActionResult, AddressOf ReadResponse_ReceiveActionResult
		AddHandler readResponse.ReceiveReturnData, AddressOf ReadResponse_ReceiveReturnData
		sending = False
	End Sub
		private void Form1_Load(object sender, EventArgs e)
		{
			RB_On.Checked = true;
			writeCommand = new WriteProtocol();
			readResponse = new ReadProtocol();
			readResponse.DataChecked += new ReadProtocol.DataCheckecdHandler(ReadResponse_DataChcked);
			readResponse.ReceiveErrorData += new ReadProtocol.ReceiveErrorDataHandler(ReadResponse_ReceiveErrorData);
			readResponse.ReceiveActionResult += new ReadProtocol.ReceiveActionResultHandler(ReadResponse_ReceiveActionResult);
			readResponse.ReceiveReturnData += new ReadProtocol.ReceiveReturnDataHandler(ReadResponse_ReceiveReturnData);
			sending = false;
		}
這段程式比較重要的地方就是產生 WriteProtocol 與 ReadProtocol 類別的執行個體,並且將 ReadProtocol 中的事件加入其委派函式,於是順便建立這四個事件委派函式的內容。如果你對事件不熟悉,建議你先看以下文件 [事件 (C# 程式設計手冊)] [事件 (Visual Basic)]。
	Private Sub ReadResponse_DataChcked(result As Boolean, checkedMessage As String)
		If result = False Then
			MessageBox.Show(String.Format("{0}:{1}", "資料檢查錯誤", checkedMessage))
		End If
	End Sub

	Private Sub ReadResponse_ReceiveErrorData()
		MessageBox.Show("傳輸的資料無法判讀")
	End Sub

	Private Sub ReadResponse_ReceiveActionResult(result As Boolean, command As Protocol.CommandCode)
		Dim resultString As String
		If result = True Then
			resultString = "成功"
		Else
			resultString = "失敗"
		End If
		MessageBox.Show(String.Format("命令{0}:{1}", command, resultString))
	End Sub

	Private Sub ReadResponse_ReceiveReturnData(content As Byte(), command As Protocol.CommandCode)
		Dim d As New ShowBlockMethod(AddressOf ShowBlockData)
		Me.Invoke(d, New Object() {content})
	End Sub

	Private Sub ShowBlockData(content As Byte())
		Dim dataBytes(15) As Byte
		Array.Copy(content, 1, dataBytes, 0, dataBytes.Length)
		TextBox1.Text = BitConverter.ToString(dataBytes).Replace("-", "")
	End Sub
		private void ReadResponse_DataChcked(Boolean result, String checkedMessage)
		{
			if (!result)
			{
				MessageBox.Show(String.Format("{0}:{1}", "資料檢查錯誤", checkedMessage));
			}
		}

		private void ReadResponse_ReceiveErrorData()
		{
			MessageBox.Show("傳輸的資料無法判讀");
		}

		private void ReadResponse_ReceiveActionResult(Boolean result, Protocol.CommandCode command)
		{
			String resultString;
			if (result)
			{ resultString = "成功"; }
			else
			{ resultString = "失敗"; }
			MessageBox.Show(String.Format("命令{0}:{1}", command, resultString));
		}

		private void ReadResponse_ReceiveReturnData(Byte[] content, Protocol.CommandCode command)
		{
			ShowBlockMethod d = ShowBlockData;
			this.Invoke(d, new Object[] { content });
		}

		private void ShowBlockData(Byte[] content)
		{
			Byte[] dataBytes = new Byte[16];
			Array.Copy(content, 1, dataBytes, 0, dataBytes.Length);
			TextBox1.Text = BitConverter.ToString(dataBytes).Replace("-", "");
		}
上面這些程式碼大概不需要多做解釋,幾乎都是靠 MessageBox 在顯示資料,唯一要特別強調的是 ReadResponse_ReceiveReturnData 方法中使用了 [Control.Invoke 方法 (Delegate, Object[])]。
基本的 CreateComport 、 OpenComport 與 CloseComport
	Private Sub CreateComport()
		If comport Is Nothing Then
			comport = New SerialPort("COM4", 9600, Parity.None, 8, StopBits.One)
			comport.ReadTimeout = 2000
		End If
	End Sub

	Private Function OpenComport() As Boolean
		CreateComport()
		Try
			If comport.IsOpen = False Then
				comport.Open()
			End If
			Return True
		Catch ex As Exception
			'這邊你可以自訂發生例外的處理程序
			MessageBox.Show(String.Format("出問題啦:{0}", ex.ToString()))
			Return False
		End Try
	End Function

	Private Sub CloseComport()
		Try
			If (sending = False) AndAlso (Not comport Is Nothing) AndAlso (comport.IsOpen) Then
				comport.Close()
				MessageBox.Show("序列埠已關閉")
			End If
		Catch ex As Exception
			'這邊你可以自訂發生例外的處理程序
			MessageBox.Show(String.Format("出問題啦:{0}", ex.ToString()))
		End Try
	End Sub
		private void CreateComport()
		{
			if (comport == null)
			{
				comport = new SerialPort("COM4", 9600, Parity.None, 8, StopBits.One);
				comport.ReadTimeout = 2000;
			}
		}

		private Boolean OpenComport()
		{
			CreateComport();
			try
			{
				if (!comport.IsOpen)
				{
					comport.Open();
				}
				return true;
			}
			catch (Exception ex)
			{
				//這邊你可以自訂發生例外的處理程序
				MessageBox.Show(String.Format("出問題啦:{0}", ex.ToString()));
				return false;
			}
		}


		private void CloseComport()
		{
			try
			{
				if (!sending && comport != null && comport.IsOpen)
				{
					comport.Close();
					MessageBox.Show("序列埠已關閉");
				}
			}
			catch (Exception ex)
			{
				//這邊你可以自訂發生例外的處理程序
				MessageBox.Show(String.Format("出問題啦:{0}", ex.ToString()));
			}
		}
這段有個要強調的地方,千萬要記得設定ReadTimeOut。
發送資料的 SendData
這和原來[Serial Port 系列(7) 基本篇 -- 建立一個簡單的純發送程式(多緒型範例)] 中的程式碼差異也不大,主要是多了在發送後呼叫 DoReceive 方法接收。
	Private Sub SendData(ByVal sendBuffer As Object)
		If Not sendBuffer Is Nothing Then
			Dim buffer() As Byte = DirectCast(sendBuffer, Byte())
			Try
				sending = True
				comport.Write(buffer, 0, buffer.Length)
				receiving = True
				Thread.Sleep(200)
				DoReceive()
			Catch ex As Exception
				'這邊你可以自訂發生例外的處理程序
				CloseComport()
				MessageBox.Show(String.Format("出問題啦:{0}", ex.ToString()))
			Finally
				sending = False
			End Try
		End If
	End Sub
private void SendData(Object sendBuffer)
{
if (sendBuffer != null)
{
Byte[] buffer = sendBuffer as Byte[];
try
{
sending = true;
comport.Write(buffer, 0, buffer.Length);
receiving = true;
Thread.Sleep(200);
DoReceive();
}
catch (Exception ex)
{
//這邊你可以自訂發生例外的處理程序
CloseComport();
MessageBox.Show(String.Format("出問題啦:{0}", ex.ToString()));
}
finally
{
sending = false;
}
}
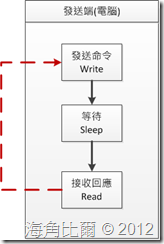
}其實上面這一段就是發送回應的核心了,回顧一下 [Serial Port 系列(15) 基本篇 -- 發送回應(一)] 的基本邏輯圖,不就是這麼一回事嗎?
處理接收資料的 DoReceive
	Private Sub DoReceive()
		Dim tempList As New List(Of Byte)
		Dim buffer(1023) As Byte
		Dim ticks As Int32 = 0
		While receiving = True
			Thread.Sleep(100)
			If comport.BytesToRead > 0 Then
				Try
					Dim receivedLength As Int32 = comport.Read(buffer, 0, buffer.Length)
					Array.Resize(buffer, receivedLength)
					tempList.AddRange(buffer)
					Array.Resize(buffer, 1024)
				Catch timeEx As TimeoutException
					'這邊你可以自訂發生例外的處理程序
					tempList.Clear()
					receiving = False
					MessageBox.Show(String.Format("讀取逾時:{0}", timeEx.ToString()))
				Catch ex As Exception
					'這邊你可以自訂發生例外的處理程序
					CloseComport()
					receiving = False
					MessageBox.Show(String.Format("出問題啦:{0}", ex.ToString()))
				End Try
			End If
			If tempList.Count > 0 Then
				receiving = Not readResponse.ArrangeReceiveData(tempList)
			End If
			ticks += 1
			If ticks >= 20 Then
				receiving = False
				MessageBox.Show("接收延遲過久")
			End If
		End While
	End Sub
		private void DoReceive()
		{
			List<Byte> tempList = new List<Byte>();
			Byte[] buffer = new Byte[1024];
			Int32 ticks = 0;
			while (receiving)
			{
				Thread.Sleep(100);
				if (comport.BytesToRead > 0)
				{
					try
					{
						Int32 receivedLength = comport.Read(buffer, 0, buffer.Length);
						Array.Resize(ref buffer, receivedLength);
						tempList.AddRange(buffer);
						Array.Resize(ref buffer, 1024);
					}
					catch (TimeoutException timeEx)
					{
						//這邊你可以自訂發生例外的處理程序
						tempList.Clear();
						receiving = false;
						MessageBox.Show(String.Format("讀取逾時:{0}", timeEx.ToString()));
					}
					catch (Exception ex)
					{
						//這邊你可以自訂發生例外的處理程序
						CloseComport();
						receiving = false;
						MessageBox.Show(String.Format("出問題啦:{0}", ex.ToString()));
					}
				}

				if (tempList.Count > 0)
				{
					receiving = !readResponse.ArrangeReceiveData(tempList);
				}
				ticks++;
				if (ticks >= 20)
				{
					receiving = false;
					MessageBox.Show("接收延遲過久");
				}
			}
		}
其實這個方法中大部份的技巧都是前面談過了,主要的重點在因為我們將分析讀回資料的部份寫在另外一個類別中,於是當 tempList 中有資料存在的時後就直接呼叫 readResponse.ArrangeReceiveData 方法進行資料的解析,並回傳一個 Blooean 值表示是否完成資料完整讀取,如果是則將 receiving 設為 False 以結束迴圈;若尚未完成資料讀取則繼續進入迴圈直到 完整讀取或 ticks 值超過設定目標。
有沒有發現將協定獨立成其它類別的威力就這邊發生了,這個 DoReceive Method 看起來就乾淨很多,當你的協定有變化時,主要修改的對象會是該類別,這樣的修改過程就可以確保 UI 部份的程式碼較不會有機會被更動到,省得越改錯越多。如果更進一步使用介面多型且將協定另外做成一個DLL 組件,那程式架構的彈性與可維護性又會更好。
CreateThread
因為基本上我是個懶人,既然每個協定發送都要產生一個執行緒來執行 SendData Method,不如就寫一個方法包起來,這樣整個程式可以少寫幾行。
	Private Function CreateThread() As Thread
		Dim t As Threading.Thread = New Threading.Thread(AddressOf SendData)
		t.IsBackground = True
		Return t
	End Function
		private Thread CreateThread()
		{
			Thread t = new Thread(SendData);
			t.IsBackground = true;
			return t;
		}
剩下了什麼?就是按Button啦
	Private Sub Button_Light_Click(sender As System.Object, e As System.EventArgs) Handles Button_Light.Click
		If sending = False AndAlso OpenComport() = True Then
			Dim lightstatus As Boolean = RB_On.Checked
			Dim t As Thread = CreateThread()
			t.Start(writeCommand.GetLightControlBytes(lightstatus))
		End If

	End Sub

	Private Sub Button_ReadBlock_Click(sender As System.Object, e As System.EventArgs) Handles Button_ReadBlock.Click
		If sending = False AndAlso OpenComport() = True Then
			Dim block As Byte = Convert.ToByte(NumericUpDown1.Value)
			Dim t As Thread = CreateThread()
			t.Start(writeCommand.GetReadBlockBytes(block))
		End If
	End Sub

	Private Sub Button_WriteBlock_Click(sender As System.Object, e As System.EventArgs) Handles Button_WriteBlock.Click
		If sending = False AndAlso OpenComport() = True Then
			Dim block As Byte = Convert.ToByte(NumericUpDown1.Value)
			Dim dataBytes() As Byte = ConvertStringToBytes(TextBox1.Text)
			If Not dataBytes Is Nothing Then
				Dim t As Thread = CreateThread()
				t.Start(writeCommand.GetWriteBlockBytes(block, dataBytes))
			End If
		End If
	End Sub

	Private Function ConvertStringToBytes(ByVal dataString As String) As Byte()
		dataString = dataString.PadLeft(32, "0"c).ToUpper()
		TextBox1.Text = dataString
		If Regex.IsMatch(dataString, "([^0-9a-fA-F])") Then
			'表示有不符的字元
			MessageBox.Show("Block 資料錯誤")
			Return Nothing
		Else
			Dim result(15) As Byte
			For i As Int32 = 0 To 15
				result(i) = Convert.ToByte(dataString.Substring(i * 2, 2), 16)
			Next
			Return result
		End If
	End Function
		private void Button_Light_Click(object sender, EventArgs e)
		{
			if (!sending && OpenComport())
			{
				Boolean lightstatus = RB_On.Checked;
				Thread t = CreateThread();
				t.Start(writeCommand.GetLightControlBytes(lightstatus));
			}
		}

		private void Button_ReadBlock_Click(object sender, EventArgs e)
		{
			if (!sending && OpenComport())
			{
				Byte block = Convert.ToByte(NumericUpDown1.Value);
				Thread t = CreateThread();
				t.Start(writeCommand.GetReadBlockBytes(block));
			}
		}

		private void Button_WriteBlock_Click(object sender, EventArgs e)
		{
			if (!sending && OpenComport())
			{
				Byte block = Convert.ToByte(NumericUpDown1.Value);
				Byte[] dataBytes = ConvertStringToBytes(TextBox1.Text);
				if (dataBytes != null)
				{
					Thread t = CreateThread();
					t.Start(writeCommand.GetWriteBlockBytes(block, dataBytes));
				}
			}
		}

		private Byte[] ConvertStringToBytes(String dataString)
		{
			dataString = dataString.PadLeft(32, 'c').ToUpper();
			TextBox1.Text = dataString;
			if (Regex.IsMatch(dataString, "([^0-9a-fA-F])"))
			{
				//表示有不符的字元
				MessageBox.Show("Block 資料錯誤");
				return null;
			}
			else
			{
				Byte[] result = new Byte[16];
				for (Int32 i = 0; i <= 15; i++)
				{
					result[i] = Convert.ToByte(dataString.Substring(i * 2, 2), 16);
				}
				return result;
			}
		}
藉由 WriteProtocol 類別,只要產生執行個體,傳入正確的參數來呼叫對應的方法,就能夠產生所要送出的 Byte 陣列內容。比方要開關燈就只需 writeCommand.GetLightControlBytes(lightstatus) 就可以得到需要的值,比起那種用瀨尿蝦牛丸設計模式全寫一個 Form Class 中的寫法是不是美麗很多( 註:如果你不知道什麼叫『瀨尿蝦牛丸設計模式』的話,請看星爺主演的『食神』,有線電視應該常常有重播)。
至於規則運算式的部份,不多做講解,請自行查詢資料。主要只是為了避免手殘打到 0~9 或 A~F 以外的字導致 16 進位字串要轉成 Byte 陣列出錯而已。
這個範例使用的模擬器
有東西發資料,總要有個東西收資料才能測測看哪邊寫的有問題,所以我另外寫了一個簡單的模擬器程式 (其實它就是個接收—>回應),請注意,發送程式和模擬器程式要用兩個不同的 COM Port!這邊不打算介紹模擬器怎麼寫,只講它怎麼用。

 |
 |
(1) PictureBox 代表燈號狀態,紅色為開,黑色則是關 (2) Port 代表你所要使用的 Com port (3) 點選開啟通訊,當狀態為通訊中此按鈕的作用則轉換為關閉通訊 (4) 點選傳輸內容將會開啟另一個畫面可觀察模擬器傳接的狀況 |
詳細通訊內容畫面

主畫面右方,64個 Block 的資料

這64個 Block 內容的資料是用亂數產生,當你使用發送程式的寫入Block資料功能時,相對應的TextBox 的內容也會跟著改變。
另外,我有使用亂數來決定燈號命令或寫入資料命令是否會成功,在我的設定中有百分之一失敗的機會,所以在測試時會有機會看到模擬器回傳命令失敗。
總算把發送回應整個寫完了,希望這些文章能對大家有所助益。
檔案下載
[發送回應程式]
[模擬器程式]