開發者可以在 Unity 裡面自己設計好用的工具視窗,就像 Unity 內建的 Inspector、Animation 和 Profiler 視窗一樣。
要建立一個基本的 Editor Window 雛形需要以下三個簡單的步驟
- 建立一個 C# Script 並繼承自 EditorWindow
- 撰寫觸發視窗開啟的程式碼
- 實作 GUI
繼承自 EditorWindow
在撰寫和 Unity Editor 相關的程式之前,記得你的程式碼檔案要放在命名為 "Editor" 的目錄下。開啟程式碼後,第一件要做的事情就是,引用 UnityEditor 的命名空間,因為所有和 Editor 相關的功能,都會放在這個 Namespace 下。第二步,讓這個 Class 繼承自 EditorWindow,並在 OnGUI function 中撰寫 GUI 控制的相關程式邏輯。這兩個步驟做完後的程式碼如下:
using UnityEngine;
using UnityEditor;
using System.Collections;

public class MyWindow : EditorWindow
{
    void OnGUI ()
    {
        // The actual window code goes here
    }
}
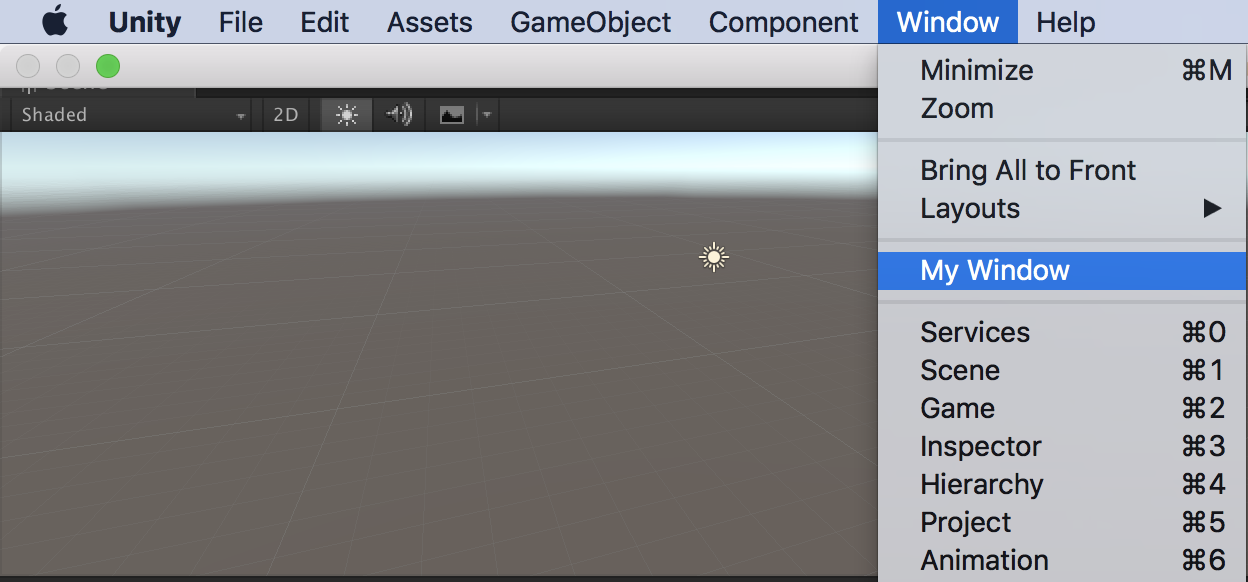
視窗開啟
Unity Editor 視窗通常是點擊 Unity 上方的選單列來顯示。這裡要利用帶有 MenuItem Property 的 Function 來觸發視窗的開啟。在 Fundtion 內,我們要使用 Unity 預設的 Recycle Windows (如果開發者在 Menu 裡重新點選,只會顯示目前開啟的視窗,並不會多開視窗),也就是 EditorWindow.GetWindow。
public class MyWindow : EditorWindow
{
    [MenuItem ("Window/My Window")]
    public static void  ShowWindow ()
    {
        EditorWindow.GetWindow(typeof(MyWindow));
    }

    void OnGUI ()
    {
        // The actual window code goes here
    }
}
MenuItem
MenuItem 的屬性可以讓你新增自定義的選單選項到 Unity 上方的主選單列,後面的字串參數就是選單的位置。例如:下方的範例就是將 Window/ My Window 帶入參數中。要特別注意的是,MenuItem 只會將 Static Function 作轉換,記得不要漏掉這個 static 關鍵字喔!
你可以為你的選單設定快捷鍵。你只需要在字串參數的最後,先空一個空白,再打上一個特殊符號代表鍵盤上相對應的輔助按鍵(% 代表 Windows 的 Ctrl 或 Mac 的 Cmd,#代表 Shift,&代表 Alt ,_代表不用按任何輔助按鍵),最後再加上某個英文字或功能鍵( LEFT, RIGHT, UP, DOWN, F1 .. F12, HOME, END, PGUP, PGDN.)舉個例子:"MyMenu/Do Something #g" 就是按下 Shift + g,"Windows/My Window _g" 就是直接按 g 來開啟視窗。
GetWindow
GetWindow 會帶以下幾個參數,回傳值為 EditorWindow 物件。
| 參數名稱 | 型別 | 預設 | 說明 |
| t | Type | Window 的型別,這個型別必需繼承自 EditorWindow | |
| utility | Boolean | false | True 為開啟系統預設視窗;False 為開啟 Unity 預設視窗 (此視窗才可以使用 Unity Layout 合併) |
| title | String | null | 視窗名稱(如果沒有設定,預設為 Class 名稱) |
| focus | Boolean | true | 是否要讓視窗一直保持在最上層的狀態 |
實作視窗 GUI
以上的程式碼已經可以開啟視窗了,但是裡面空空如也什麼也沒有。想要在視窗裡增加元件,都要寫在 OnGUI ( ) Function 中。你可以用遊戲裡你熟悉的 GUI 和 GUILayout 來實作,也可以使用 Unity 為 Editor 量身打造的 EditorGUI 和 EditorGUILayout 來完成。兩者都可以直接使用,也可以混著使用。
using UnityEngine;
using UnityEditor;
using System.Collections;

public class MyWindow : EditorWindow
{
	string myString = "Hello World";
	bool groupEnabled;
	bool myBool = true;
	float myFloat = 1.23f;

	[MenuItem ("Window/My Window")]
	public static void  ShowWindow ()
	{
		EditorWindow.GetWindow(typeof(MyWindow), false, "HI", true);
	}

	void OnGUI()
	{
		// 純文字顯示
		GUILayout.Label ("Base Settings", EditorStyles.boldLabel);
		// 輸入欄位。使用 EditorGUIlayout 提供的功能,會包含輸入欄位前的文字提示
		myString = EditorGUILayout.TextField ("Text Field", myString);

		// 切換區塊是否開啟或關閉功能。EditorGUIlayout 提供的功能。
		// 若使用者將欄位勾選,便會使 BeginToggleGroup 到 EndToggleGroup 之間的元件開啟編輯。反之,則關閉不給予修改
		groupEnabled = EditorGUILayout.BeginToggleGroup ("Optional Settings", groupEnabled);

		// 勾選元件。EditorGUIlayout 提供的功能,會包含勾選前的文字提示
		myBool = EditorGUILayout.Toggle ("Toggle", myBool);
		// 浮點拉桿輸入元件。EditorGUIlayout 提供的功能,以拉桿的方式控制輸入的浮點數,並提供設定範圍最小最大值
		myFloat = EditorGUILayout.Slider ("Slider", myFloat, -3, 3);
		EditorGUILayout.EndToggleGroup ();
	}
}
以上的程式碼執行起來如下圖所示

以上,大致就是 Unity Editor Window 的基礎教學,更進階的內容會在下一篇文章做說明囉!
參考資料
-
Unity Manual - Editor Windows (本篇文章的主要參考)
https://docs.unity3d.com/Manual/editor-EditorWindows.html -
Unity Manual - MenuItem
https://docs.unity3d.com/ScriptReference/MenuItem.html