利用Swashbuckle來製作Web API文件,開發WebAPI後:
(O)就可以讓介接工程師參考與進行測試。
(X)就是叫其他工程師沒事別煩我的工具。
前言:
回想約三年前的第一份工作,在 Java Application 或 Android App 專案開發過程中,與其他開
發者溝通與確認WebAPI格式是必須且非常繁瑣的。雖然工作內容不難,但常常因為一些細節
耗費相當多的時間。
在開發過程中,必須要了解WebAPI使用方式、解析或回傳不同格式資料(XML、JSON)、需
要保持資料一致性...等。所以我們必須以文件紀錄這些資訊,並作為開發者之間溝通的方式。
早期紀錄的方式,以簡單的Google document或Word方式紀錄與說明 WebAPI,記錄範例如
下:
方法:GET
參數格式:String
參數名稱:Id
回傳資料格式:JSON
回傳資料內容:{ "name" : "duran" }
這種紀錄方式有些缺點:
1.人工撰寫文件:非常花費時間。
2.文字記錄錯誤:因為人工輸入,運氣不好可能因為錯字花費很多時間。
3.無法即時測試:Get可能方便測試,輸入網址即可測試,如果是Post呢? 如果有10個參數呢?
如果超長JSON呢?
4.難以紀錄歷程:問題比較小,使用版本控管軟體可以解決這個問題。
5.文件不夠詳細:可能又要找WebAPI開發者討論,花費時間。
換了新環境,當然也要入境隨俗的偷學新東西!! 而不能像過去一樣花費時間在鎖碎的
問題上!!
今天這篇主要簡單介紹swashbuckle,一個整合ApiExplorer and Swagger/swagger-ui,容易安裝、
發者溝通與確認WebAPI格式是必須且非常繁瑣的。雖然工作內容不難,但常常因為一些細節
耗費相當多的時間。
在開發過程中,必須要了解WebAPI使用方式、解析或回傳不同格式資料(XML、JSON)、需
要保持資料一致性...等。所以我們必須以文件紀錄這些資訊,並作為開發者之間溝通的方式。
早期紀錄的方式,以簡單的Google document或Word方式紀錄與說明 WebAPI,記錄範例如
下:
方法:GET
參數格式:String
參數名稱:Id
回傳資料格式:JSON
回傳資料內容:{ "name" : "duran" }
這種紀錄方式有些缺點:
1.人工撰寫文件:非常花費時間。
2.文字記錄錯誤:因為人工輸入,運氣不好可能因為錯字花費很多時間。
3.無法即時測試:Get可能方便測試,輸入網址即可測試,如果是Post呢? 如果有10個參數呢?
如果超長JSON呢?
4.難以紀錄歷程:問題比較小,使用版本控管軟體可以解決這個問題。
5.文件不夠詳細:可能又要找WebAPI開發者討論,花費時間。
今天這篇主要簡單介紹swashbuckle,一個整合ApiExplorer and Swagger/swagger-ui,容易安裝、
容易維護WebAPI與可以進行測試的好用套件。
這篇文章將同時發佈在點部落與個人blogger
Install Package:
Step.1 開啟Visual Studio,點選New Project...
Open Visual Studio, Click New Project...
Step.2 選擇"ASP .NET 4 Web Application", 輸入專案名稱"SwaggerDemo"
Select "ASP .NET 4 Web Application", Enter "SwaggerDemo" in Project Name textbox
Step.3 選擇Web API
Select Web API
Step.4 選擇 TOOLS >> NuGet Package Manager >> Manage NuGet Packages for Solution...
Select TOOLS >> NuGet Package Manager >> Manage NuGet Packages for Solution...
Step.5 輸入swashbuckle進行搜尋,點選Install安裝"swashbuckle - Swagger for WebApi"
Enter "swashbuckle" in search box, and click Install button to install
"swashbuckle - Swagger for WebApi"
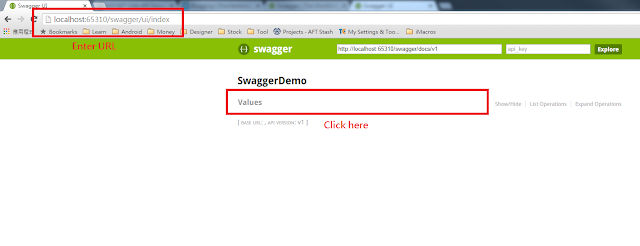
Step.6 啟動專案,瀏覽器上輸入網址"http://localhost:xxxxx/swagger/" (xxxxx是port)
Start Project, and enter url "http://localhost:xxxxx/swagger/" on browser (xxxxx is port)
Step 7.你會看到Values WebAPI所有的服務,如下圖:
You can see all web service of "Values WebAPI":
Step.8 展開"/api/Values",點選"Try it out" , 你將會看到測試結果
Expand "/api/Values", click "Try it out", you will see the result
Step.8 展開"/api/Values/{Id}",輸入資料並點選"Try it out" , 你將會看到測試結果
Expand "/api/Values", Enter parameters and click "Try it out", you will see the result
SwaggerReponse:
您可以加入SwaggerReponse Annotations 表示回應呈現訊息(Reponse Message)
You can add SwaggerReponse Annotations for Reponse Message
[SwaggerResponse(HttpStatusCode.OK, @"retrun vaule", typeof(bool))]
[SwaggerResponse(HttpStatusCode.InternalServerError, @"Server error", typeof(bool))]
[SwaggerResponse(HttpStatusCode.MethodNotAllowed, @"Invalid input", typeof(bool))]
XmlComments:
您可以藉由xml comments來讓API 文件更詳細。
You can make the API doucment completely by xml comments
Step.1 右鍵點選solution >> properties
Right click solution >> properties
Step.2 在"Build"頁面,勾選"XML doucmentation"並輸入路徑"App_Data\SwaggerDemo.XML"
In Build tab, Check "XML doucmentation" and enter "App_Data\SwaggerDemo.XML" in
path textbox
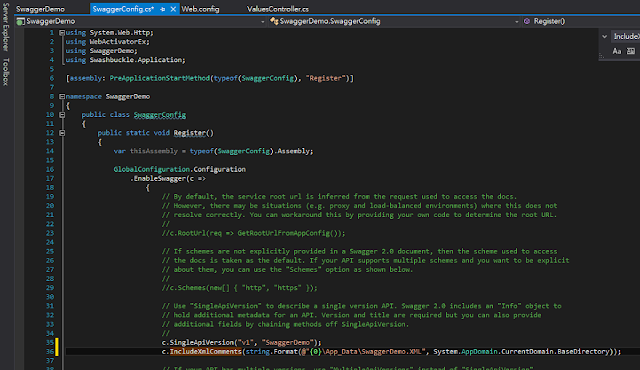
Step.3 開啟App_Start\SwaggerConfig.cs,輸入下列指令
Open App_Start\SwaggerConfig.cs,add the code as shown
c.IncludeXmlComments(string.Format(@"{0}\App_Data\SwaggerDemo.XML", System.AppDomain.CurrentDomain.BaseDirectory));
Step.4 加入xml comments
Add xml comments
Step.5 執行專案
Start Project
範例程式下載:
https://dl.dropboxusercontent.com/u/13585157/SwaggerDemo.zip
參考資料:
http://swagger.io/
http://www.wmpratt.com/swagger-and-asp-net-web-api-part-1/


