這篇是過去初學Asp .Net MVC過程中的筆記,設定連線字串、使用code first產生localDB
的流程,提供給大家參考。
若有錯誤請不吝指教,謝謝!
目錄
建立範本專案
(Visual Studio 版本不同畫面有些差異,本篇文章使用Visual Studio 2015)
Step 1. 開啟 Visual Studio 2013/2015, 選擇檔案(file) -> 新增(new) -> 新專案(new project)
選擇web -> ASP.Net Web Application, 輸入專案名稱,點確定。

Step 2. 選擇MVC專案,點選確定,即建立一個範本專案。

設定 Connection String
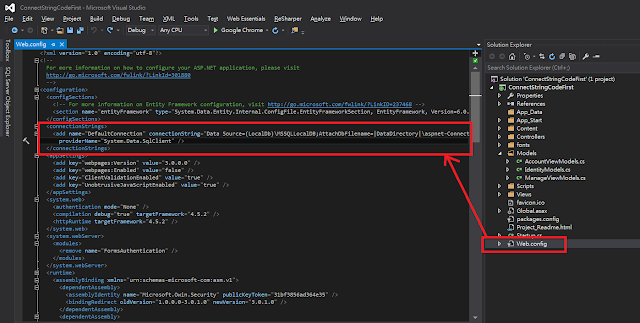
Step 2.輸入連線字串內容如下:
<add name="StudentDbContext" connectionString="Data Source=(LocalDB)\v11.0;AttachDbFilename=|DataDirectory|\Student.mdf;Integrated Security=True" providerName="System.Data.SqlClient" />
這組連線字串之後會產生一份LocalDB,位於App_Data資料夾內,檔案名稱為Student.mdf
2018/3/19 更新:若您的版本較新,請使用下列連線字串
<add name="StudentDbContext" connectionString="Data Source=(LocalDB)\MSSQLLocalDB;AttachDbFilename=|DataDirectory|\Student.mdf;Integrated Security=True" providerName="System.Data.SqlClient" />
建立 DbContext
Step 1.我們新增一個cs檔案,名字為StudentModels.cs於Models資料夾下,這是一個DbContext
內容如下:

Step 2. DbContext的名稱必須與connectionString中設定的相同

執行 database migration 指令
Step 1. 接下來,我們必須產生資料庫。
我們選擇工具(Tools) -> NuGet Package Manager -> Package Manager Console
叫出 Package Manager Console

Step 2. 輸入
enable-magrations
若您的專案中有兩個連線字串,系統會提醒您指令。
輸入
Enable-Migrations -ContextTypeName ConnectStringCodeFirst.Models.StudentDbContext
Step 3. 執行完成後,會產生Magrations的資料夾,產生一個Configuration.cs檔案。
Step 4. 接著輸入下列指令,產生第一次資料庫變更記錄:
add-migration 變更名稱
add-migration InitialCreate
指令執行完成,產生一個 "時間戳記 + InitialCreate.cs檔案,內容記錄著資料變更記錄。
Step 5. 接著輸入下列指令,將內容更新到資料庫
update-database
檢視資料庫
Step.1 檢視(View) -> Server Exploer
Step.2 展開Data Connections、展開StudentDbContext 進行資料庫連線
Step 3.展開table,我們可以看見StudentProfile與_MigrationHistory資料表。
_MigrationHistory是記錄資料庫變更歷程的資料表。
更新 database
Step 1.當我們需要變更資料表欄位、類型或增加資料表,我們一樣可以於DbContext內
進行修改,如下圖所示,我們建立另一個Score資料表。
Step 2. 輸入指令
add-migration addScoreTable
執行完成後,也會產生一個 "時間戳記"+addScoreTable.cs的檔案,記錄變更歷程。
Step 3. 輸入指令,更新資料庫。
update-database
結論
Code first對於開發者而言是非常快速與方便的流程,除了本篇建立資料表與欄位外,也
可以自行撰寫資料內容,當需要重新產生資料庫時,快速產生測試資料。
但是有幾個問題,個人常常遇到:
1.多人共同開發的過程中,必須注意執行migration先後與merge先後,否則可能發生產生
資料庫錯誤,而必須重新整理migration (重做migration)。
2.當發佈專案的時候,必須搬移資料庫,需要重新整理資料庫內容到正式資料庫上,過程
中可能發生許多資料問題,需要去整理。
這篇提供給大家參考。
範例程式
https://github.com/matsurigoto/MvcLocalDbCodeFirst.git
參考資料
http://www.asp.net/mvc/overview/getting-started/introduction/creating-a-connection-string
http://www.asp.net/mvc/overview/getting-started/getting-started-with-ef-using-mvc/migrations-and-deployment-with-the-entity-framework-in-an-asp-net-mvc-application
上一篇:Entity framework database first with localdb
下一篇:Linq、Lambda 與 System.Linq.Enumerable 方法
本篇文章內容歡迎分享,轉載與使用圖文請來信告知並註明出處。
