本篇將介紹如何自訂事件在SharePoint的表單中,
並將事件註冊入SharePoint內,
第一部份先透過自己寫程式的方式註冊入SharePoint
第二部分介紹輕鬆使用 SharePoint Tips Utility Pack 工具來註冊dll入SharePoint中
好久不見的 SharePoint 開發,又出現了,今天跟大家介紹一下如何註冊事件到 SharePoint,
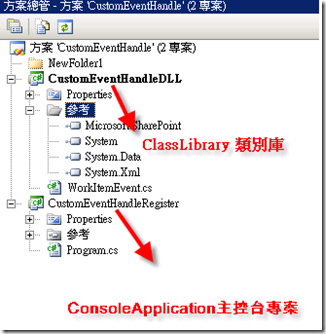
Step1.我們介紹透過自己寫程式的方式,先開啟一個方案,方案內請做兩個專案,
一個是 ClassLibrary 類別庫專案 (用來做註冊進去的事件)
一個是 ConsoleApplicaion 主控台專案 (程式化註冊進去的方式)
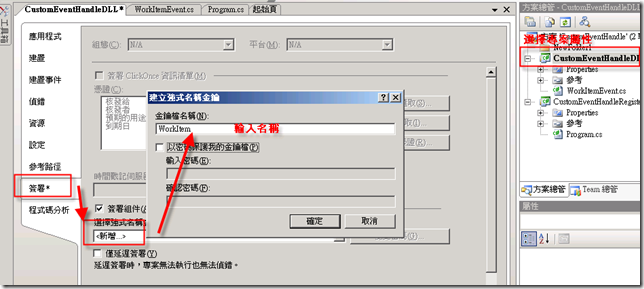
Step2.為ClassLibrary 專案建立簽署的Strong Name
Step3.就是寫程式,在這邊一開始,我們先針對 ItemDeleting 事件,
這邊做一各補充說明,你可以從三個Class繼承下來,來決定你要處理的事件
Event Types 有以下三種 (該列表引用於 Brian Wilson's Blog)
Microsoft.SharePoint.SPWebEventReceiver : "Site Level"
Microsoft.SharePoint.SPListEventReceiver : "List Level"
Microsoft.SharePoint.SPItemEventReceiver : "List Item Level"
本篇文章將針對 SPItemEventReceiver 來做說明及範例
而 SPItemEventReceiver 的事件列表 請參閱 WSS 3.0 SDK 文件 或 Brian Wilson's Blog
接下來在ClassLibrary 的 class 加入以下程式
在以下程式中,我們繼承了 SPItemEventReceiver 並Override ItemDeleting 事件
using System.Collections.Generic;
using System.Text;
using Microsoft.SharePoint;
namespace CustomEventHandleDLL
{
class WorkItemEvent
{
//先繼承 SPItemEventReceiver
public class ItemEvent : SPItemEventReceiver
{
public override void ItemAdded(SPItemEventProperties properties)
{
SPListItem list = properties.ListItem;
list[new Guid("fa564e0f-0c70-4ab9-b863-0177e6ddd247")] =
list[new Guid("fa564e0f-0c70-4ab9-b863-0177e6ddd247")].ToString() + "Added";
list.Update();
}
// override ItemDeleting 事件
public override void ItemDeleting(SPItemEventProperties properties)
{
properties.Cancel = true;
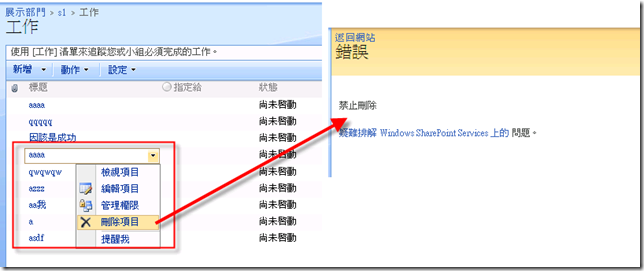
properties.ErrorMessage = "禁止刪除";
}
}
}
}
Step4. 先Bulid該ClassLibary 並下載 Reflector for .NET
再做註冊前,必須瞭解該 .dll 的 Assembly 相關資料,啟動 Reflector.NET 開啟CustomEventHandleDLL.dll
就會看到以下資訊 將 Name 資訊,COPY下來。

將Assembly資訊貼入以下程式碼
using System.Collections.Generic;
using System.Text;
using Microsoft.SharePoint;
namespace CustomEventHandleRegister
{
    class Program
    {
        static void Main(string[] args)
        {

                //要開啟的site
                SPSite site = new SPSite("http://cms/sites/Demo/");
                //哪一個表單
                SPList list = site.OpenWeb("s1").Lists["工作"];
                ////註冊事件進去 事件需一個一個註冊
                ////(事件類型,AssemblyName,命名空間)
                list.EventReceivers.Add(SPEventReceiverType.ItemDeleting,
 "CustomEventHandleDLL, Version=1.0.0.0, Culture=neutral, PublicKeyToken=7c15f0e93cb0ffca", "CustomEventHandleDLL.WorkItemEvent");


        }
    }
}
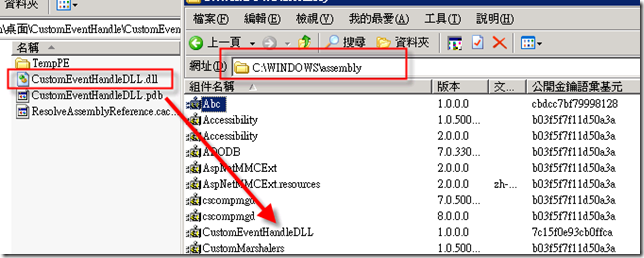
Step5. 最重要的步驟將你的.dll註冊至 GAC 裡面,這邊Dotjum用了一個偷懶的方法,用資料夾直接COPY進去
C:\WINDOWS\assembly 但真正還是要gacutil.exe 比較正統。
Step6.執行剛剛註冊專案內的 .exe
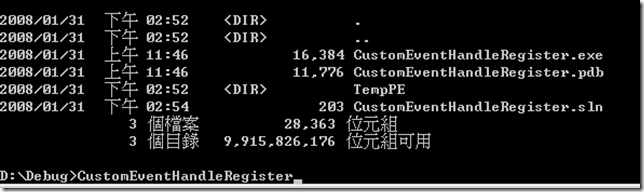
完成上述步驟,事件就已經註冊進去。
到WEB站台就可以測試事件是否成功 ,本範例中就刪除項目做自訂事件。
所以呢~只要能夠掌握事件,想要在SharePoint加入時,把資料再轉拋到別的系統,就可以透過事件的方式來處理。
剛剛在 Step4 這邊,以說明如果你是多個事件,就要一個一個註冊進去,這時在就麻煩了點,
所以呢,Dotjum這邊剛剛上述的註冊範例,是要給大家瞭解一下怎麼自己DIY進去,
如果要快速一點呢,就要透過已經寫好的工具,Dotjum目前使用這套 SharePoint Tips Utility Pack
來做相關SharePoint的註冊,這套工具是Dotjum之前聽 林煌章老師研討會 介紹的,
怎麼使用呢 ,下載下來後,執行起來 依照下圖
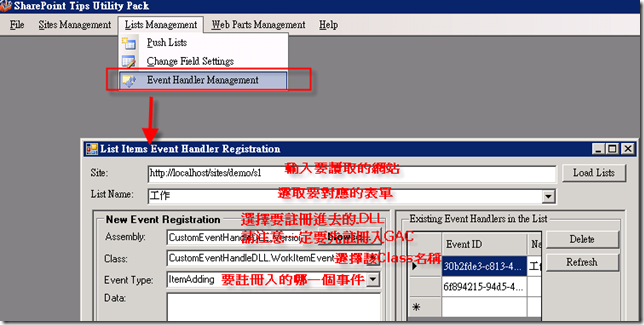
按下Register! 就這樣,輕輕鬆鬆就完成註冊一個事件進去了~
這樣就比較輕鬆能夠註冊你要的事件,透過 SharePoint Tips Utility Pack 也可以去快速的瞭解,
該列表下的內容及欄位名稱,下一篇我們在詳細說明這一方面功能及開發小技巧。
參考
學會操作 SPSite SPWebApplication SPWebTemplateCollection 用程式新增、修改網站
Microsoft Office SharePoint Server 2007 實戰手冊 特別感謝 Well 的指導
Brian Wilson's Blog
完整範例下載 CustomEventHandle.rar