Windows 10 UWP 1 of N : New Technology choose, New controls and XAML Performance
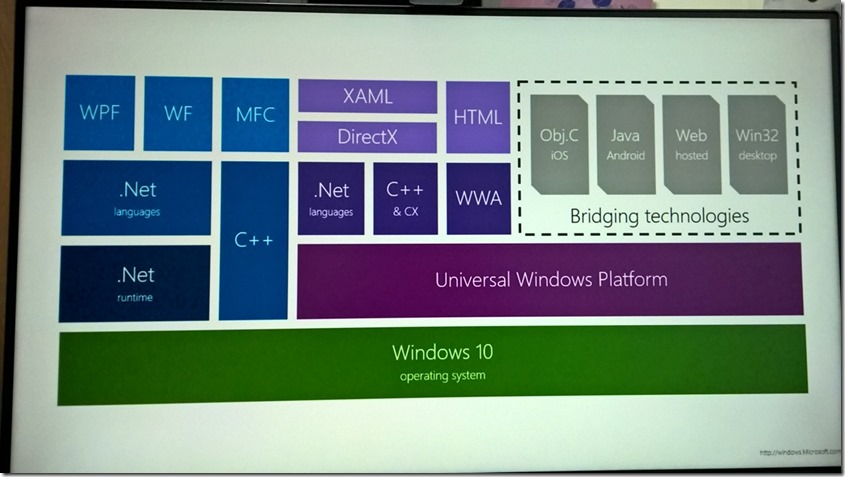
今年Build 2015宣布新版本的UAP也就是UWP( Universal Windows App )!所謂的UWP到底是甚麼東西呢!?
以下的圖片來說明UAP和UWP的差異。
在8.1的時候並沒有所謂的Bridging technologies,現在MSFT以各個技術特性來開發對應的language或平台轉換到Windows 10 的UWP系統。
1. SplitView Control
大俠愛吃漢堡包!這個Control能夠符合MSFT的Navigation design pattern. 基本上就是一個Pane配合一個Content的形式呈現的Control,這個控制項繼承自Control屬於Panel的一種。
  <SplitView.Pane>
    singleObject
  </SplitView.Pane
</SplitView>
有以下重點屬性
| Properties | Type | Description |
| CompactPanelLength | Double | Width of Compact mode value |
| Content | UIElemnt | Main Panel of SplitView |
| DisplayMode | Enum | SplitViewDisplayMode Overlay, Inline, CompactOverlay, CompactInline |
| IsPaneOpen | Boolean | Get where the pane is open or not. |
| OpenPaneLength | Double | When pane is open width. |
| Pane | UIElemnt | pane for splitview |
| PanePlacement | Enum | SplitViewPanePlacement Left, Right |
        <Grid.RowDefinitions>
            <RowDefinition Height="50"/>
            <RowDefinition Height="*"/>
        </Grid.RowDefinitions>
        <ToggleButton x:Name="toggleBtn" Grid.Row="0">
            <FontIcon FontFamily="Segoe MDL2 Assets" Glyph="U+E700"/>
        </ToggleButton>
        <SplitView Grid.Row="1" PanePlacement="Left"
                   IsPaneOpen="{Binding ElementName=toggleBtn, Path=IsChecked}"
                   OpenPaneLength="{StaticResource HambergerOpen}"
                   CompactPaneLength="{StaticResource HambergerCompact}"
                   DisplayMode="CompactInline">
            <SplitView.Pane>
                <ListView>

                </ListView>
            </SplitView.Pane>
            <SplitView.Content>
                <Grid>

                </Grid>
            </SplitView.Content>
        </SplitView>
    </Grid>
如上範例就是使用ToggleButton開啟/關閉SplitView的Pane!而Pane包含個ListView,點選該Item就可以實作SplitView的Content的內容!
2. VSM trigger ( Visual States Manager trigger )
Visual Status manager 是在WPF就出現的玩意~用處是把視覺特效可以直接寫在XAML上,當然用Blend更能加快開發視覺特效。
常見的VSM如下
            <VisualStateGroup>
                <VisualState x:Name="MapControlView">
                    <Storyboard>
                        <ObjectAnimationUsingKeyFrames Storyboard.TargetName="MapControl" Storyboard.TargetProperty="Visibility">
                            <DiscreteObjectKeyFrame KeyTime="0" Value="Visible"/>
                        </ObjectAnimationUsingKeyFrames>
                        <ObjectAnimationUsingKeyFrames Storyboard.TargetName="ListViewModeGrid" Storyboard.TargetProperty="Visibility">
                            <DiscreteObjectKeyFrame KeyTime="0" Value="Collapsed"/>
                        </ObjectAnimationUsingKeyFrames>
                        <ObjectAnimationUsingKeyFrames Storyboard.TargetName="AreaCbx" Storyboard.TargetProperty="Visibility">
                            <DiscreteObjectKeyFrame KeyTime="0" Value="Collapsed"/>
                        </ObjectAnimationUsingKeyFrames>
                        <ObjectAnimationUsingKeyFrames Storyboard.TargetName="TypeCbx" Storyboard.TargetProperty="Visibility">
                            <DiscreteObjectKeyFrame KeyTime="0" Value="Collapsed"/>
                        </ObjectAnimationUsingKeyFrames>
                    </Storyboard>
                </VisualState>
                <VisualState x:Name="ListControlView">
                    <Storyboard>
                        <ObjectAnimationUsingKeyFrames Storyboard.TargetName="MapControl" Storyboard.TargetProperty="Visibility">
                            <DiscreteObjectKeyFrame KeyTime="0" Value="Collapsed"/>
                        </ObjectAnimationUsingKeyFrames>
                        <ObjectAnimationUsingKeyFrames Storyboard.TargetName="ListViewModeGrid" Storyboard.TargetProperty="Visibility">
                            <DiscreteObjectKeyFrame KeyTime="0" Value="Visible"/>
                        </ObjectAnimationUsingKeyFrames>
                        <ObjectAnimationUsingKeyFrames Storyboard.TargetName="AreaCbx" Storyboard.TargetProperty="Visibility">
                            <DiscreteObjectKeyFrame KeyTime="0" Value="Collapsed"/>
                        </ObjectAnimationUsingKeyFrames>
                        <ObjectAnimationUsingKeyFrames Storyboard.TargetName="TypeCbx" Storyboard.TargetProperty="Visibility">
                            <DiscreteObjectKeyFrame KeyTime="0" Value="Collapsed"/>
                        </ObjectAnimationUsingKeyFrames>
                    </Storyboard>
                </VisualState>
                <VisualState x:Name="ListControlSearchView">
                    <Storyboard>
                        <ObjectAnimationUsingKeyFrames Storyboard.TargetName="MapControl" Storyboard.TargetProperty="Visibility">
                            <DiscreteObjectKeyFrame KeyTime="0" Value="Collapsed"/>
                        </ObjectAnimationUsingKeyFrames>
                        <ObjectAnimationUsingKeyFrames Storyboard.TargetName="ListViewModeGrid" Storyboard.TargetProperty="Visibility">
                            <DiscreteObjectKeyFrame KeyTime="0" Value="Visible"/>
                        </ObjectAnimationUsingKeyFrames>
                        <ObjectAnimationUsingKeyFrames Storyboard.TargetName="AreaCbx" Storyboard.TargetProperty="Visibility">
                            <DiscreteObjectKeyFrame KeyTime="0" Value="Visible"/>
                        </ObjectAnimationUsingKeyFrames>
                        <ObjectAnimationUsingKeyFrames Storyboard.TargetName="TypeCbx" Storyboard.TargetProperty="Visibility">
                            <DiscreteObjectKeyFrame KeyTime="0" Value="Visible"/>
                        </ObjectAnimationUsingKeyFrames>
                    </Storyboard>
                </VisualState>
            </VisualStateGroup>
        </VisualStateManager.VisualStateGroups>
簡單來說就是可以做多個State使用Storyboard包起來! 然後再C#的程式碼
可以直接呼叫VSM並使用GoToState來切換在XAML上寫好的VisualState!在Build上介紹了Setter這個寫法可以直接切換藉由StateTrigger如下所示
        <Grid.RowDefinitions>
            <RowDefinition Height="Auto"/>
            <RowDefinition Height="*"/>
        </Grid.RowDefinitions>

        <Rectangle x:Name="Rec1" Width="80" Height="80" Fill="Green"/>

        <VisualStateManager.VisualStateGroups>
            <VisualStateGroup x:Name="WindowsSizeStates">
                <VisualState x:Name="WidState">
                    <VisualState.StateTriggers>
                        <AdaptiveTrigger MinWindowWidth="720"/>
                    </VisualState.StateTriggers>
                    <VisualState.Setters>
                        <Setter Target="Rec1.Fill" Value="Red"/>
                    </VisualState.Setters>
                </VisualState>
            </VisualStateGroup>
        </VisualStateManager.VisualStateGroups>
    </Grid>
使用AdaptiveTrigger就可以抓到目前Frame的Size藉此來變更UI的Property,在720的寬度以下時將會把Rectangle的Fill調整成Red。
AdaptiveTrigger是一個非常好用的XAML VSM功能!完全不需要在C#寫上Event去抓取Size的變更。
說到Trigger就一定想要自己客製化Trigger!只需要實作Class並繼承StateTriggerBase就可以!步驟如下
1. 實作Class並繼承StateTriggerBase
2. 將想要的行為加上EventHanddler並設定好條件
3. 條件成立時呼叫 SetActive ( Condiction )就可以將該Trigger觸發了
MainPage的XAML
    x:Name="rootFrame"
    x:Class="App1.MainPage"
    xmlns="http://schemas.microsoft.com/winfx/2006/xaml/presentation"
    xmlns:x="http://schemas.microsoft.com/winfx/2006/xaml"
    xmlns:local="using:App1"
    xmlns:d="http://schemas.microsoft.com/expression/blend/2008"
    xmlns:mc="http://schemas.openxmlformats.org/markup-compatibility/2006"
    xmlns:triggers="using:App1.Triggers"
    mc:Ignorable="d">

    <Grid Background="Black" HorizontalAlignment="Center" VerticalAlignment="Center">
        <Grid.RowDefinitions>
            <RowDefinition Height="Auto"/>
            <RowDefinition Height="*"/>
        </Grid.RowDefinitions>

        <Rectangle x:Name="Rec1" Width="80" Height="80" Fill="Green"/>

        <VisualStateManager.VisualStateGroups>
            <VisualStateGroup x:Name="WindowsSizeStates">
                <VisualState x:Name="CustomState">
                    <VisualState.StateTriggers>
                        <triggers:PressTrigger targetElement="{x:Bind Rec1}" windowsWidth="400"/>
                    </VisualState.StateTriggers>
                    <VisualState.Setters>
                        <Setter Target="Rec1.Fill" Value="White"/>
                    </VisualState.Setters>
                </VisualState>
            </VisualStateGroup>
        </VisualStateManager.VisualStateGroups>
    </Grid>
</Page>
實作的Trigger
using System.Collections.Generic;
using System.Linq;
using System.Text;
using System.Threading.Tasks;
using Windows.UI.Xaml;
using Windows.UI.Xaml.Input;

namespace App1.Triggers
{
    public class PressTrigger : StateTriggerBase
    {
        private double _windowsWidth;
        public double windowsWidth
        {
            get { return _windowsWidth; }
            set { _windowsWidth = value; }
        }

        private FrameworkElement _targetElement;
        public FrameworkElement targetElement
        {
            get { return _targetElement; }
            set
            {
                _targetElement = value;
                targetElement.AddHandler(UIElement.PointerPressedEvent, new PointerEventHandler(EventHandler), true);
            }
        }

        private void EventHandler(object sender, PointerRoutedEventArgs e)
        {
            SetActive(Window.Current.CoreWindow.Bounds.Width > _windowsWidth);
        }
    }
}
當視窗大小大於所設定的windowsWidth並PressDown該UIElement就會觸發該Trigger
3. RelativePanel
沒錯!這個新的Panel就像是在Android有的相對式容器~這個Layout有以下幾個重點屬性
Attach properties |
Type |
Value |
|
|
Boolean |
|
|
|
|
|
|
|
|
|
|
|
|
|
|
|
|
|
|
|
|
|
|
|
|
|
|
|
|
|
|
|
|
|
|
|
|
|
簡單來說這個新的容器就是能讓Layout更加簡易化( 依然是要看Code怎麼寫~LOL )
    <TextBox x:Name="textBox1" RelativePanel.AlignLeftWithPanel="True"/>
    <Button Content="Submit" RelativePanel.Below="textBox1"/>
</RelativePanel>
UWP 效能調整重點!Top 10 Performance! used by internal MS teams
1. Embrace the Zen of Performance
The fastest code is the code you don`t run!
也就是功能最小化,把最主要的核心完成就好!比如說Calendar(行事曆),這支APP就只是用來看日期相關的資訊!比如家人的生日、明日的行程!簡而言之越多的功能就是越差的效能!
2. Define the problem and set a target
定義效能調教點以及調整目標!
|
|
|
|
|
|
|
|
|
3. Convert to a Universal Windows app
從Store APP或Phone App轉換成UWP!因為UWP有很多新的API來輔助開發人員更加調整效能,如XMAL語法有 x:Bind…等其他語法。
4. Profile your application
Visual Studio 2015 有新版本的Performance tool用來分析效能!
5. Defer work on startup
簡單來說就是在初始化App的時候實作載入畫面的資訊,以及資料載入順序調整!ExtensionSplashScreen的實作以及資料載入的優先順序。
6. Reduce number of elements
減少使用的element!參考Guildline來說就是避免使用不需要的style以及template。
之前在8.1的時候有ContainerContentChanging 來分段式的載入資料!而在UWP則是使用x : DeferLoadStrategy 達到分段載入,但不同的是ContainerContentChanging 是個Event用在ListViewBase( ListView/GridView )上面;x : DeferLoadStrategy則是將一個大的Visual Tree 不先初始化在XAML上。
x : DeferLoadStrategy 使用FindName("Put Element Name Here")的方式讓該Control再呼叫FindName的時候再進行載入的動作!
7. Use virtualization
在ListViewBase的物件(ListView/GridView)可以使用虛擬化的方式讓Item更快便render。
8. Optimize databinding
簡易化DataTemplates使用越少的elements越快!配合x:Bind在DataBinding上!x : Bind使在Compiled期間就可以產生出來的!
特色如下:1. 強型別!2. 具可除錯性!3. 最佳化初始化以及記憶體配置!...等
附加性最佳化
使用 x : Phase使用 ContainerContentChanging 事件
9. Optimize your images
減少使用的Image的Height和Width!如果不行就使用DecodePixelHeight 和 DecodePixelWidth
10. Optimize text rendering
Windows 10 text redering 50% faster!(預設值)
在App.xaml.cs中 OnLaunched有這麼一行Code
這行將會把文字的Foreground調整成Green讓視覺上可以直接看出哪邊的UIElement的Text無法被效能監控。
但是使用如下的功能將會關閉加速render的功能!
1. CharaterSpacing
2. Typogrphy
3. LineStackingStregy = BaseliuneToBaseline/MaxHeight
4. IsTextSelectionEnabled = true
***以上Code以及說明都有可能隨者Windows 10 的版本有所調整!***
參考資料
Build 2015 2-629 What`s New in XAML for Universal Windows Apps
Build 2015 3-698 XAML Performance: Techniques for Maximizing Universal Windows App Experiences Built With XAML
下次再分享Windows 10 的新技術拉~
