Windows 10 UWP 5 of N : Application Life Management
不論甚麼平台應用程式都會有生命週期,那..生命週期之所以重要就是要妥善的利用系統資源如:CPU、RAM、Network、Battery Power...等。
那麼在Windows 10 UWP應用程式的生命週期又有怎樣的變化呢?
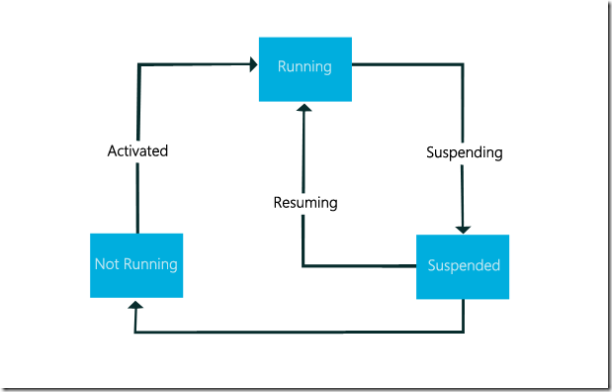
一樣的是總有三種狀態:
- Running
- Suspended
- Not Running
public App()
{
	this.InitializeComponent();
	this.Suspending += OnSuspending;
	this.Resuming += OnResuming;
}
一開始APP都會是在Not Running的狀態! 接著App會先進行InitializeComponent初始化整體App的核心元件,然後會進入到OnLaunched的事件然後才會由Not Running的狀態轉換到 Running的狀態!
接者當User切換到別的APP的時候將會觸發 Suspending的事件然後在Suspending的事件中可以使用如下Code達到儲存資料的功能
private void OnSuspending(object sender, SuspendingEventArgs e)
{
    var deferral = e.SuspendingOperation.GetDeferral();
	//TODO: Save application state and stop any background activity
	deferral.Complete();
}
呼叫GetDeferral來給予多餘時間進行儲存的機制但Deferral只給予大約5秒鐘的時間進行資料儲存!
在Windows 10 UWP上在Foreground execution可以呼叫Extended Execution來稍微延長儲存的時間!
private async void OnSuspending(object sender, SuspendingEventArgs e)
{
        var deferral = e.SuspendingOperation.GetDeferral();
        using (var session = new ExtendedExecutionSession())
        {
        session.Reason = ExtendedExecutionReason.SavingData;
        session.Description = "Save data to cloud!";
        session.Revoked += Session_Revoked;
        var result = await session.RequestExtensionAsync();
		if (result == ExtendedExecutionResult.Allowed)
		{
			await SaveDataCloudAsync();
		}
	}
	deferral.Complete();
}
以下是幾點關於ExtendedExecutionSession的重點
| 屬性 | 型別 | 說明 |
| Reason | Enum |
Unspecified LocationTracking (必填屬性,目前只有三種) |
| Description | String | 說明字串 |
| PercentProgress | uInt32 | 百分比進度 |
| 方法 | 說明 |
| RequestExetensionAsync | 向系統要求更多時間(約3秒延遲被Suspended) |
| Dispose | 釋放掉Session,建議使用Using包起來就好。 |
| 事件 | 說明 |
| Revoked | 給予小於1秒的時間清除session或其他資源釋放。 |
呼叫完成RequestExetensionAsync會給予Allow或著Denied!基本上一律會給予Allow的。
如果要測試Application life cycle在Visual Studio的Toolbar上開啟Debug location就可以找到
然後再執行APP的Debug的時候就可以展開Lifecycle的選項。
進去Suspend的時候就可以額外要求多餘的等待時間!
當然一樣的是如果超過約3秒的時間將會一樣被系統強制關閉!這個機制依然會參考系統的忙碌狀況,在不同硬體裝置上會有所差異。
APP如果被Suspended之後可以依然執行的唯一方法就是Background Execution
像是Trigger base Background Tasks就是APP註冊這些Trigger就可以被觸發當Trigger被啟動的時候。
例如:
- Push notification
- Geofencing
- BLE device
- Timer
- App Services
基本上與之前Universal App 8.1 時期差不多!多了不少的Trigger並將Phone以及Store的Trigger做整合。
原先Windows Store 8.1有以下的Triggers
- SystemTrigger
- TimeTrigger
- MaintenanceTrigger
- DeviceUseTrigger
- DeviceServicingTrigger
- PushNotificationTrigger
在Windows Phone 8.1有以下的Triggers
- CachedFileUpdaterTrigger
- DeviceConnectionChangeTrigger
- GattCharacteristicNotificationTrigger
- RfcommConnectionTrigger
- LocationTrigger
然後以下是Windows 10新增的Trigger
- AppointmentStoreNotificationTrigger
- ContactStoreNotificationTrigger
- BluetoothLEAdvertisementWarcherTrigger
- BluetoothLEAdvertisementPublisherTrigger
- DeviceWatcherTrigger
- ActivitySensorTrigger
- SensorDataThresholdTrigger
- ToastNotificationHistoryChangedTrigger
- ToastNotificationActionTrigger
- ApplicationTrigger
- SocketActivityTrigger
接者複習一下Trigger八~
假設需要一個TimerTrigger回報背景下載進度可以用以下方式來測試。
先是開啟一專案,在UWP的專案類型只有
- Blank
- Class Library
- Windows Runtime Component
- Unit Test App
- Download Windows Universal Tools
選擇Runtime專案類型並在Reference加入該Project
將Component專案加入APP專案後打開Manifest檔案,建議使用XML的編輯器開啟並加如以下Code
<Extensions>
	<Extension Category="windows.backgroundTasks" EntryPoint="SampleComponet.BackgroundTask.TimerTask">
        <BackgroundTasks>
        	<Task Type="timer"/>
    	</BackgroundTasks>
	</Extension>
</Extensions>
在Application的程式碼區段!EntryPoint就是該Component的NameSpace以及使用的TriggerTask的名稱所組合的路徑。
接著在Application中註冊BackgroundTrigger
private async void RegisterBackgroundTasks(String taskName, Type taskType, IBackgroundTrigger triggerInstance, IBackgroundCondition triggerCondiction = null)
        {
            if (BackgroundExecutionManager.GetAccessStatus() != BackgroundAccessStatus.Denied)
            {
                var backgroundAccessStatus = await BackgroundExecutionManager.RequestAccessAsync();
                foreach (var task in BackgroundTaskRegistration.AllTasks)
                {
                    if (task.Value.Name == taskName)
                    {
                        task.Value.Unregister(true);
                    }
                }
            }

            var backgroundTaskBuilder = new BackgroundTaskBuilder();
            backgroundTaskBuilder.Name = taskName;
            backgroundTaskBuilder.TaskEntryPoint = taskType.FullName;
            backgroundTaskBuilder.SetTrigger(triggerInstance);
            if (triggerCondiction != null)
                backgroundTaskBuilder.AddCondition(triggerCondiction);
            var taskRegistration = backgroundTaskBuilder.Register();
            System.Diagnostics.Debug.WriteLine(string.Format("{0} is registed!", taskRegistration.Name));
        }
一開始先必須將之前的BackgroundTask解除註冊在進行新的Trigger的註冊!
接者在去Component的Trigger實作IBackgroundTask
public sealed class TimerTask : IBackgroundTask
    {
        public void Run(IBackgroundTaskInstance taskInstance)
        {
            taskInstance.Canceled += TaskInstance_Canceled;
#if DEBUG
            ShowToast("WTF");
#endif
        }

        private void TaskInstance_Canceled(IBackgroundTaskInstance sender, BackgroundTaskCancellationReason reason)
        {

        }

        private void ShowToast(String toastMessage)
        {
            var toastTemplate = ToastTemplateType.ToastText01;
            XmlDocument toastXml = ToastNotificationManager.GetTemplateContent(toastTemplate);
            var toastTextElements = toastXml.GetElementsByTagName("text");
            toastTextElements[0].AppendChild(toastXml.CreateTextNode(toastMessage));
            var toast = new ToastNotification(toastXml);
            ToastNotificationManager.CreateToastNotifier().Show(toast);
        }
    }
BackgroundTaskInstance就是觸發的Task而且支援Deferral的機制處裡一些非同步的方法!
簡單測試BackgroundTask的方式就是一樣在Debug location的Tool中找到ALM的選單,然後切換到BackgroundTask的Class檔就會出現該trigger的選項出現
這樣就可以測試BackgroundTask的功能了!
Universal Windows App上的Background Task以資源管理分成以下兩類
| 類型 | 記憶體使用(MB) | 執行時間 | CPU | 使否會售電池管理影響 |
| Default | 16 | 30 secs | 10% | 是 |
| Long-Running ( Opportunistic ) | 16 | 無限 | 10% | 是 |
預設的Background Task都擁有25秒的執行時間和5秒的取消時間!當然這些執行的時間會受系統資源多寡影響。
ApplicationTrigger, MaintenanceTrigger, DeviceUseTrigger 都是Opportunistic的BackgroundTask.
然後介紹一下In-Process的Background Task。
預設的BackgroundTask的實際執行exe和Background Task的exe使兩個不同的exe檔案所以是不同的Process而記憶體的使用也是分開的!而在UWP有InProc的Background Task就是將App的exe和BackgroundTask的exe綁在同一個process下並且共享記憶體區塊!
使用InProc的BackgroundTask只需要在Manifest檔案的 Extension做以下變更。
<Extension Category="windows.backgroundTasks" EntryPoint="SampleComponet.BackgroundTask.TimerTask" Executable="App1.exe">
	<BackgroundTasks>
		<Task Type="timer"/>
	</BackgroundTasks>
</Extension>
加上Executable並給上執行的App的exe名稱就可以和Foreground Application在同一Process下執行。
***以上Code以及說明都有可能隨著Windows 10 的版本以及Visual Studio 2015版本有所調整!***
參考資料 Build 3-626 Windows App Lifecycle ( From Activation & Suspension to Background Execution and Multitasking )
下次再分享Windows 10 的新技術拉~


