如何在UWP中使用EF 7並使用.Net環境輕量的SQL資料庫! [EF 7.0 + SQLite on UWP]
好久沒有寫Blog了,今天來介紹一下EntityFramework 7 + UWP + SQLite + UWP。在UWP的框架下並沒有原生的Database可以使用,而SQLite算是較為輕量且也有在其他平台都有支援。
EntifyFramework則是可以使用Linq + OOP的方式存取資料庫的好套件,然而在EF7則是變成只能用Code First開發。
Demo環境是Windows 10 10586.164 + VS2015U1 + UWP 10586 SDK
先把幾個Nuget套件以及Reference加入到專案中,可以使用project.json或是採用GUI(在專案滑鼠右鍵可以管理Nuget套件)加入以下兩行的Jsom
"EntityFramework.Commands": "7.0.0-rc1-final",
"EntityFramework.Sqlite": "7.0.0-rc1-final",
目前EF的版本在Nuget上還是以Rc1-final作為結尾需要用到的是Commands以及Sqlite,Commands則是在使用Command來長出db的schema以及相關檔案!而SQLite則是和SQLite作為介接的EF。
然後在加入已經和VS一同安裝的Visual Studio C++ 2015 for Universal Windows Platform Apps.
接者就來寫Table的Model吧!以下用 " 部落格 -- 文章 " 的關係做資料庫!
public class ArticleModel : BaseModel
    {
        [Key]
        public int AritcleIndex { get; set; }

        private string _ArticleTitle;
        [Required]
        public string ArticleTitle
        {
            get { return _ArticleTitle; }
            set
            {
                if (_ArticleTitle != value)
                {
                    _ArticleTitle = value;
                    NotifyChanged();
                }
            }
        }


        private DateTime _CreateTime;
        [Required]
        public DateTime CreateTime
        {
            get { return _CreateTime; }
            set
            {
                if (_CreateTime != value)
                {
                    _CreateTime = value;
                    NotifyChanged();
                }
            }
        }

        private string _ArticleContent;

        public string ArticleContent
        {
            get { return _ArticleContent; }
            set
            {
                if (_ArticleContent != value)
                {
                    _ArticleContent = value;
                    NotifyChanged();
                }
            }
        }
以上就是Articale的Model並且設定ArticleIndex為Key。
然後加入BlogDbContext的檔案
public class BlogDbContext : DbContext
    {
        public DbSet<ArticleModel> Articles { get; set; }

        protected override void OnConfiguring(DbContextOptionsBuilder optionsBuilder)
        {
            var connectionString = "SampleDb.db";
            try
            {
                connectionString = Path.Combine(ApplicationData.Current.LocalFolder.Path, $"{connectionString}");
            }
            catch(InvalidOperationException ioEx)
            {

            }
            optionsBuilder.UseSqlite($"Data Source = {connectionString}");
        }

        protected override void OnModelCreating(ModelBuilder modelBuilder)
        {
            base.OnModelCreating(modelBuilder);
            //modelBuilder.Entity<ArticleModel>().Property(p => p.AritcleIndex).IsRequired();
        }
    }
這邊需要注意到的是要使用try-catch將ApplicationData.Current.LocalFolder.Path包起來!要不然會有Exception出現,然後在OnModelCreating的codeblock可以調整Model的一些屬性。
接者在App.xaml.cs的App建構子最後加上
using (var db = new BlogDbContext())
{
  db.Database.Migrate();
}
這樣db在APP執行的時候竟會執行Migrate的動作。
但是這樣只是先把Code的行為寫好,由於EF7已經變成CodeFirst的開發方式!所以需要在使用指令讓schema檔案長出來。
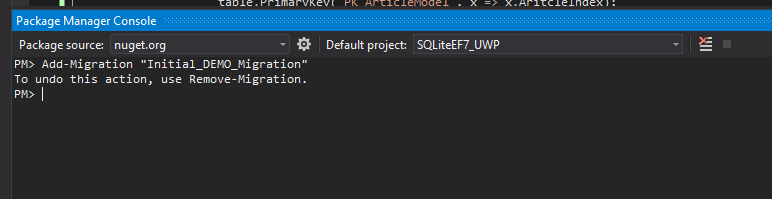
在Tools -> Nuget Package Manager -> Package Manager Console的視窗叫出後並打上一下指令
Add-Migration " DemoMigration "
如果成功就會長出Migration的資料夾以及相關cs檔!

而如果錯誤的話請把Migration的資料夾刪除並在Package Manager Console輸入以下指令
Remove-Migration
這樣就算是設定好SQLite以及EF7!接者使用正常的Linq + OOP (物件導向設計)來開發CRUD的資料庫功能!
***以上Code以及說明都有可能隨著Windows 10 的版本以及Visual Studio 2015版本有所調整!***
參考資料 MSDN, Windows Dev Center
下次再分享Windows 10 的新技術拉~