介紹在Creator update針對UWP的效能有那些小技巧
今天要介紹的是MSFT在2017年3月推出的Creator update(創作者更新)的UWP架構APP的UI效能調整的要點~
先從UI(XAML)的變更開始說起,重一開始(10240)的UWP就支援所謂的"延遲載入XAML"的特性也就是 DeferLoadStrategy 的XAML語法。
先說明一下 DeferralLoadStrategy 需要幾點注意特性
- 只能放在具有Name的Control上。
- 能使用的Control是UIElement和FlyoutBase。
- 不能放在Page、UserControl、DataTemplate的根上(也就是Page、UserControl、DataTemplate本身不能使用DeferLoadStrategy當以上元素是VisualTree。
- 在ResourceDictionary的元件不能使用。
- 在XamlReader.Load無法使用。
- 如果Parent的Element被移除會導致還沒有被Load的Element被移除掉。
所以要如何找到 Load Element(載入)呢?有以下幾點方式
- 使用FindName的方法。
- 使用GetTemplateChild的方法。
- 在VisualState裡面使用Setter和Storyboard可以找到
- 在任一Storyboard上參考到。
- 使用Binding資料繫結指定目標在Defer的Element上。
在Xaml的語法會變成如下所示
<TextBox x:Name="LazyTbx" x:DeferLoadStrategy="Lazy"/>
當Defer的控制項被載入的時候才會執行改元件的Loaded的事件並且把Binding的行為建立!
這個特性從UWP 10240開始直到15063開始有比較大的變化!先看看Xaml語法的變化如下
<TextBox x:Name="LazyTbx" x:Load="False"/>
這邊沒有看錯從Lazy(字串)變成使用True / False(Boolean)的方式了!所以可以動態的把Xaml element做Unload的操作啦!
這邊有趣的是 x:Load可以搭配 x:Bind的語法做強型別的方式來操作是否要Load / UnLoad在Xaml的Element而使用x:Load也具有如上的特性
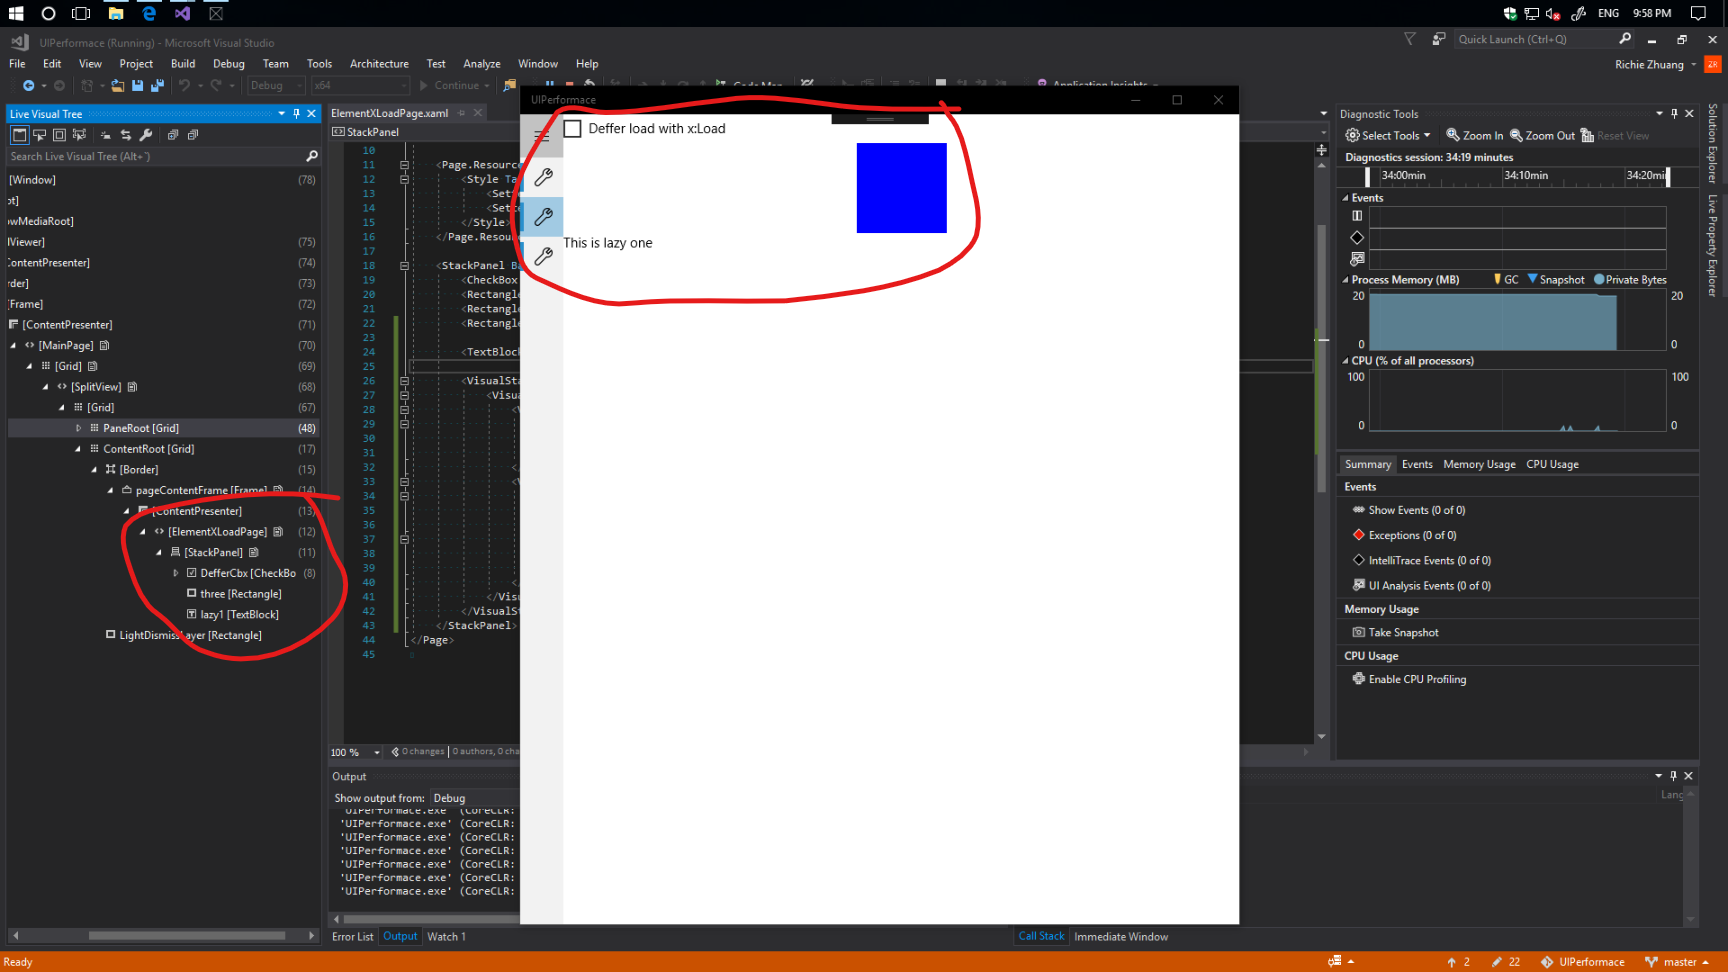 這邊可以看到Live Visual Tree只有Load三個Element
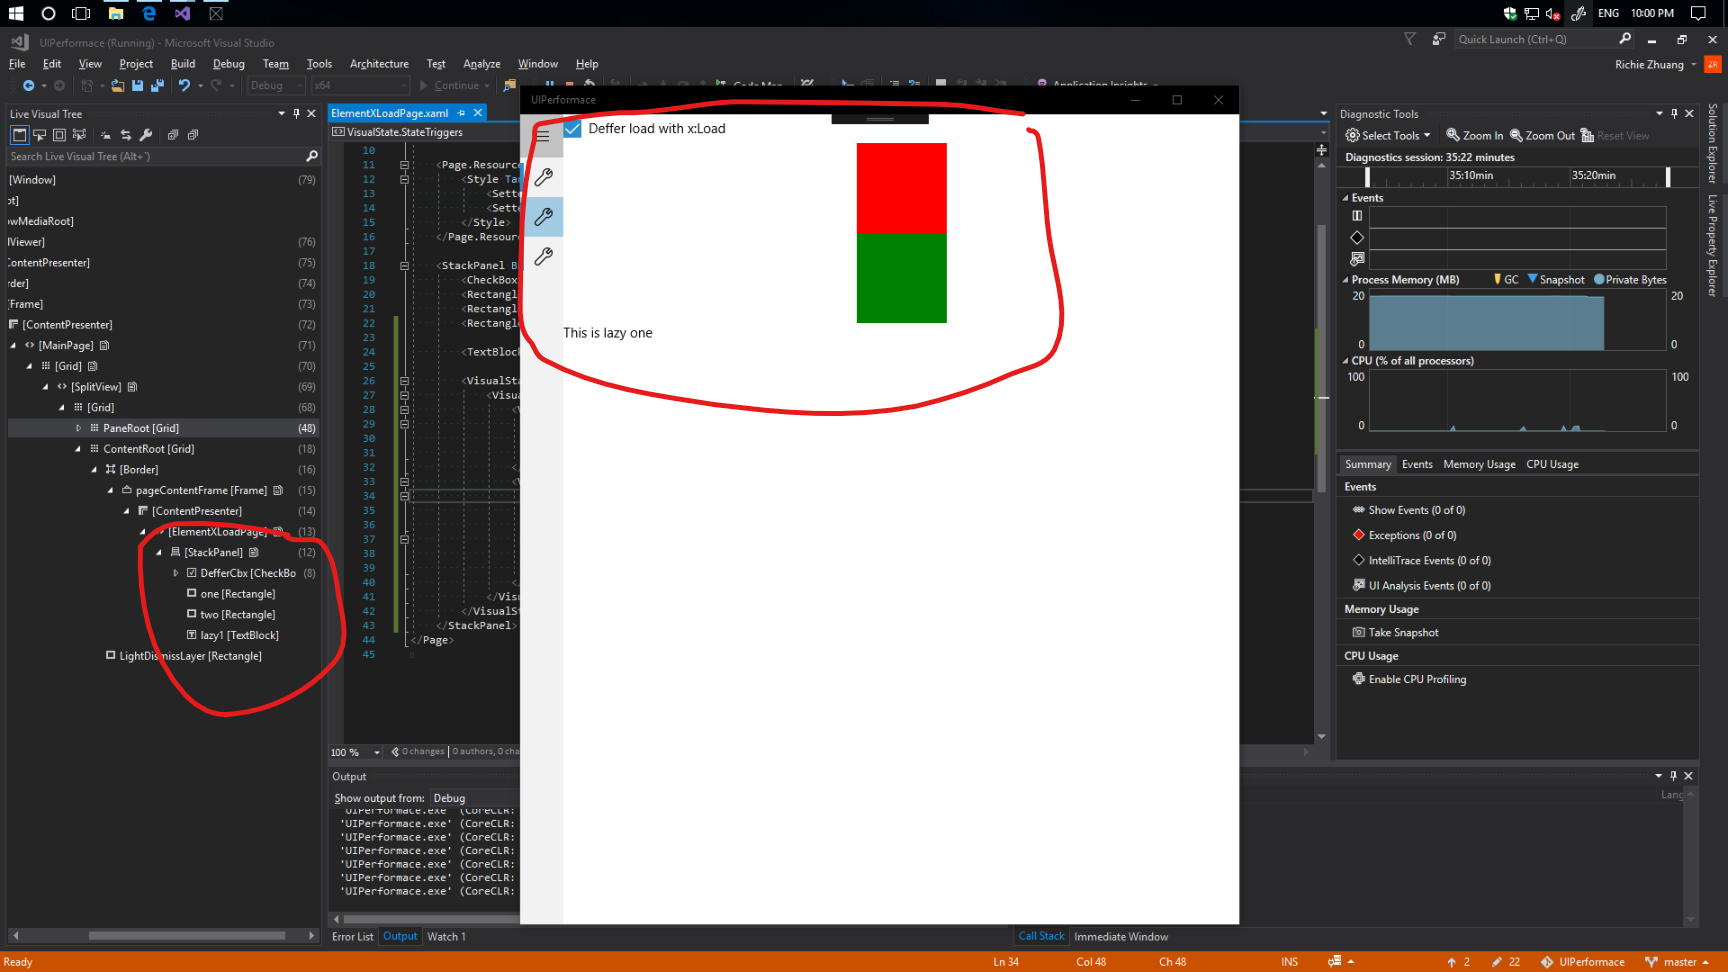 按下CheckBox之後Visual Tree的Element變更,將three的Rectangle作Unload然後把one和two的Rectangle作Load的行為
XAML Code如下
<Page
    x:Class="UIPerformace.Views.ElementXLoadPage"
    xmlns="http://schemas.microsoft.com/winfx/2006/xaml/presentation"
    xmlns:x="http://schemas.microsoft.com/winfx/2006/xaml"
    xmlns:local="using:UIPerformace.Views"
    xmlns:d="http://schemas.microsoft.com/expression/blend/2008"
    xmlns:mc="http://schemas.openxmlformats.org/markup-compatibility/2006"
    mc:Ignorable="d"
    DataContext="{x:Bind ElementXLoadPageVM}">

    <Page.Resources>
        <Style TargetType="Rectangle">
            <Setter Property="Width" Value="100"/>
            <Setter Property="Height" Value="100"/>
        </Style>
    </Page.Resources>

    <StackPanel Background="{ThemeResource ApplicationPageBackgroundThemeBrush}">
        <CheckBox x:Name="DefferCbx" Content="Deffer load with x:Load" Click="{x:Bind ElementXLoadPageVM.DefferLoad}"/>
        <Rectangle x:Name="one" x:Load="{x:Bind ElementXLoadPageVM.IsLoad, Mode=OneWay}" Fill="Red" />
        <Rectangle x:Name="two" x:Load="{x:Bind (x:Boolean)DefferCbx.IsChecked, Mode=OneWay}" Fill="Green"/>
        <Rectangle x:Name="three" x:Load="{x:Bind ElementXLoadPageVM.Reverse(DefferCbx.IsChecked), Mode=OneWay}" Fill="Blue"/>

        <TextBlock x:Name="lazy1" x:Load="False" Text="This is lazy one"/>
    </StackPanel>
</Page>
C# 的ViewModel如下
public class ElementXLoadPageViewModel : BinableBase
    {
        private bool _isLoad;

        public bool IsLoad
        {
            get { return _isLoad; }
            set { SetValue(ref _isLoad, value); }
        }

        public ElementXLoadPageViewModel()
        {

        }

        public void DefferLoad(object sender, Windows.UI.Xaml.RoutedEventArgs e)
        {
            IsLoad = !IsLoad;
        }

        public bool Reverse(bool? parameter)
        {
            return !parameter.GetValueOrDefault();
        }
    }
在Unload的Element方式有如下
- 使用 x:Bind 的方式傳回 Ture或False。
- 在Page或UserControl的Code behind的Code使用UnloadObject。
- 使用 Windows.UI.Xaml.Markup.XamlMarkupHelper.UnloadObject 來Unload。
參考 Microsoft Docs 聯結有更加完整的說明。
介紹完 x:Load的XAML新語法之後接者是影像處理的部分,在XAML的部分基本上很簡單的做法就是直接使用Image在XAML上並給予ImageSource的方式讓XAML自動作Decode和Render的行為。所以基本上會如下的XAML Code所示
<Page
    x:Class="UIPerformace.Views.ImageLoadPage"
    xmlns="http://schemas.microsoft.com/winfx/2006/xaml/presentation"
    xmlns:x="http://schemas.microsoft.com/winfx/2006/xaml"
    xmlns:local="using:UIPerformace.Views"
    xmlns:d="http://schemas.microsoft.com/expression/blend/2008"
    xmlns:mc="http://schemas.openxmlformats.org/markup-compatibility/2006"
    xmlns:brushes="using:UIPerformace.Brushes"
    mc:Ignorable="d">

    <StackPanel Background="{ThemeResource ApplicationPageBackgroundThemeBrush}">

        <Image x:Name="BitmapImg" Stretch="Uniform" Width="256" Height="256">
          <Image.Source>
            <BitmapImage DecodePixelHeight="256" DecodePixelWidth="256" UriSource="ms-appx:///Assets/8K_Image.png"/>
          </Image.Source>
        </Image>
        <Image Stretch="Uniform" Width="256" Height="256" Source="ms-appx:///Assets/aperture-science.svg"/>

    </StackPanel>
</Page>
影像載入在UWP上還可以使用更加進階的Win2D + Visual layer來加速Image decode的效能,先來看看如何使用Win2D + Visual layer來載入影像八
先使在Nuget package上面取得 Win2D.uwp 的Package,這邊使用的版本是1.21.0,建立的UWP專案要從10586之後的版本才有支援Visual layer。接者直接來看XAML Code八!
<Page
    x:Class="UIPerformace.Views.ImageLoadPage"
    xmlns="http://schemas.microsoft.com/winfx/2006/xaml/presentation"
    xmlns:x="http://schemas.microsoft.com/winfx/2006/xaml"
    xmlns:local="using:UIPerformace.Views"
    xmlns:d="http://schemas.microsoft.com/expression/blend/2008"
    xmlns:mc="http://schemas.openxmlformats.org/markup-compatibility/2006"
    mc:Ignorable="d">

    <StackPanel Background="{ThemeResource ApplicationPageBackgroundThemeBrush}">
        <CheckBox Content="Use composition image" Click="CheckBox_Click"/>
        <Border x:Name="visualBorder" Width="200" Height="200"/>
    </StackPanel>
</Page>
然後是C# Code部分
private async Task ManualDrawImageAsync()
        {
// Step1
            _compositor = ElementCompositionPreview.GetElementVisual(this)?.Compositor;
            //_compositor = Window.Current.Compositor;
            _visual = _compositor?.CreateSpriteVisual();
            _visual.Size = new System.Numerics.Vector2(100.0f, 100.0f);
            ElementCompositionPreview.SetElementChildVisual(visualBorder, _visual);
// Step2
            _canvasDevice = new CanvasDevice();
            _canvasDevice.DeviceLost += _canvasDevice_DeviceLost;
// Step3
            _graphicDevice = CanvasComposition.CreateCompositionGraphicsDevice(_compositor, _canvasDevice);
            _graphicDevice.RenderingDeviceReplaced += _graphicDevice_RenderingDeviceReplaced;
// Step4
            using (var bitmap = await CanvasBitmap.LoadAsync(_canvasDevice, new URI("ms-appx:///Assets/8Kimgage.png")))
            {
                _drawingSurface = _graphicDevice.CreateDrawingSurface(bitmap.Size, Windows.Graphics.DirectX.DirectXPixelFormat.B8G8R8A8UIntNormalized, Windows.Graphics.DirectX.DirectXAlphaMode.Premultiplied);
// Step5
                using (var session = CanvasComposition.CreateDrawingSession(_drawingSurface))
                {
                    session.DrawImage(bitmap);
                }
            }
// Step6
            _visual.Brush = _compositor?.CreateSurfaceBrush(_drawingSurface);
        }

private Compositor _compositor;
private SpriteVisual _visual;
private CanvasDevice _canvasDevice;
private CompositionGraphicsDevice _graphicDevice;
private CompositionDrawingSurface _drawingSurface;
這邊的流程會比較複雜,步驟如下
- 先是取得Compositor在Creator update之前需要用ElementCompositionPreview來抓取但是在Creator update可以從Window上面取得(就是註解的那行)接者建立SpriteVisual並且給予Size然後將SpriteVisual放上XAML定義的Border。
- 然後建立CanvasDevice,這個物件是在Win2D裡面。主要這個物件是負責建立圖形資源所以一般情況使用 CanvasControl 在XAML的互動。然後這個物件具有處理GPU無法取得的事件( DeviceLost ),在什麼樣的情況會使GPU無法被OS取得像是GPU Driver更新、GPU切換(比如Surface book等裝置具有與CPU整合的GPU和獨立的GPU)。
- 然後還要再使用 CanvasComposition來建立GraphicDevice,這個行為會把 UWP的Visual layer和GPU作連結換句話說可以藉此取得GPU裝置的硬體資源,當然這並非是直接存取到GPU。然後還要處理渲染裝置變更的事件 ( RenderingDeviceReplaced )也就是GPU如果變更之後成功切換會觸發~
- 接者在建立CanvasBitmap用來產生2D的像素矩陣圖形再用CompositionGraphicDevice來建立CompositionDrawingSurface這個物件就是Direct2D、Direct3D中繪圖會需要使用到的Surface。然後再設定這個Surface的Pixel格式和阿法值的屬性。
- 建立繪圖的Session並且把bitmap輸入到該session。
- 最後就是使用Compositor產生 Surface的筆刷放到visual裡面。
說真的裡面很多流程和設定值必須瞭解到Direct2D或Direct3D才能比較好理解... 但是在Creator update中有了更加簡單的方式如下C# Code
private void AutoLoadImage()
        {
            _compositor = Window.Current.Compositor;
            _visual = _compositor?.CreateSpriteVisual();
            _visual.Size = new Vector2(100.0f,100.0f);
            ElementCompositionPreview.SetElementChildVisual(visualBorder, _visual);

            var imageSurface = LoadedImageSurface.StartLoadFromUri(new Uri("ms-appx:///Assets/8kimage.png"));
            _visual.Brush = _compositor.CreateSurfaceBrush(imageSurface);
        }
沒看錯只需要用 LoadedImageSurface 這個物件就可以直接建立起 Direct2D的Surface來載入圖片!
最後有介紹到關於Composition API的微調~ 在之前Creator update之前建立Visual layer的物件的時候會必須設定Size(這邊會是Vector2 向量單位)作為讓DX 做Render的依據!但是在Creator update之後加入了兩個新的Property
- RelativeSizeAdjustment
- RelativeOffsetAdjustment
這兩個Property是用來與建立Visaul的Parent Object的Size做關聯的屬性,之前在處理SizeChange的時候Visual的變化使用SizeChange的Event來做處理;要不就是使用Expression Animation的方式建立animation來更新Visual的大小。
讓我們直接看看Sample code八
XAML code如下
<Grid Background="{ThemeResource ApplicationPageBackgroundThemeBrush}">
        <Grid.RowDefinitions>
            <RowDefinition Height="*"/>
            <RowDefinition Height="Auto"/>
        </Grid.RowDefinitions>
        <Grid x:Name="rootGrid">
            <Grid.Resources>
                <Style TargetType="TextBlock">
                    <Setter Property="HorizontalAlignment" Value="Center"/>
                    <Setter Property="VerticalAlignment" Value="Center"/>
                </Style>
            </Grid.Resources>
            <Grid.ColumnDefinitions>
                <ColumnDefinition Width="*"/>
                <ColumnDefinition Width="*"/>
                <ColumnDefinition Width="*"/>
            </Grid.ColumnDefinitions>
            <Grid.RowDefinitions>
                <RowDefinition Height="*"/>
                <RowDefinition Height="*"/>
                <RowDefinition Height="*"/>
            </Grid.RowDefinitions>
            <TextBlock Grid.Row="0" Grid.Column="0" Text="0, 0"/>
            <TextBlock Grid.Row="0" Grid.Column="1" Text="0, 1"/>
            <TextBlock Grid.Row="0" Grid.Column="2" Text="0, 2"/>
            <TextBlock Grid.Row="1" Grid.Column="0" Text="1, 0"/>
            <TextBlock Grid.Row="1" Grid.Column="1" Text="1, 1"/>
            <TextBlock Grid.Row="1" Grid.Column="2" Text="1, 2"/>
            <TextBlock Grid.Row="2" Grid.Column="0" Text="2, 0"/>
            <TextBlock Grid.Row="2" Grid.Column="1" Text="2, 1"/>
            <TextBlock Grid.Row="2" Grid.Column="2" Text="2, 2"/>
        </Grid>
        <StackPanel Grid.Row="1" Orientation="Vertical">
            <Button x:Name="oldBtn" Content="old way" Margin="10" Click="Button_Click"/>
            <Button x:Name="newBtn" Content="new way" Margin="10" Click="Button_Click"/>
        </StackPanel>
    </Grid>
C# code如下
private void CreateRootVisual()
        {
            compositor = Window.Current.Compositor;
            rootVisual = compositor.CreateContainerVisual();
            ElementCompositionPreview.SetElementChildVisual(rootGrid, rootVisual);
            var sizeAnimation = compositor.CreateExpressionAnimation("Vector2(rootGrid.Size.X, rootGrid.Size.Y)");
            sizeAnimation.SetReferenceParameter(nameof(rootGrid), ElementCompositionPreview.GetElementVisual(rootGrid));
            rootVisual.StartAnimation("Size", sizeAnimation);
        }
這邊先做些前置作業,先設定好compositor和rootVisual並且把rootVisual設定到rootGrid(XAML物件)然後建立個sizeAnimation來同步rootVisual和rootGrid的Size!
接著來看看Old school的code八~
private void OldSchool(int i, int j)
        {
            var block = compositor.CreateSpriteVisual();
            block.Opacity = i * opacityRate + j * opacityRate;
            block.Brush = compositor.CreateColorBrush(Windows.UI.Colors.Red);
            var sizeAnimation = compositor.CreateExpressionAnimation($"Vector2(rootVisual.Size.X / {colSize}, rootVisual.Size.Y / {rowSize})");
            sizeAnimation.SetReferenceParameter(nameof(rootVisual), rootVisual);
            var positionAnimation = compositor.CreateExpressionAnimation($"Vector3(block.Size.X * {j}, block.Size.Y * {i}, 0)");
            positionAnimation.SetReferenceParameter(nameof(block), block);

            rootVisual.Children.InsertAtBottom(block);
            block.StartAnimation("Size", sizeAnimation);
            block.StartAnimation("Offset", positionAnimation);
        }
這邊我直接建立的是紅色的 spritevisua,然後建立sizeAnimation、positionAnimation來讓 spriteVisual的Size和Postition offset能夠適應Window SizeChange的狀況。
那麼New school的方式如下Code
private void NewSchool(int i, int j)
        {
            var block = compositor.CreateSpriteVisual();
            block.Opacity = i * opacityRate + j * opacityRate;
            block.Brush = compositor.CreateColorBrush(Windows.UI.Colors.Blue);
            block.RelativeSizeAdjustment = new System.Numerics.Vector2(1.0f / colSize, 1.0f / rowSize);
            block.RelativeOffsetAdjustment = new System.Numerics.Vector3(j * 1.0f / colSize, i * 1.0f / rowSize, 0);
            rootVisual.Children.InsertAtBottom(block);
        }
這邊直接可以設定在RelativeSizeAdjustment和RelativeOffsetAdjustment上!
結語
UWP的UI上的特性可以適應不同解析度和不同輸入裝置的特性是最大的特性!如何建立流暢又漂亮的UI需要花時間研究研究阿~
***以上Code以及說明都有可能隨著Windows 10 的版本以及Visual Studio 版本有所調整!***
參考資料 Microsoft Docs
下次再分享Windows 10 的新技術拉~