XAML Island 掛載 UWP Xaml Control的技術!讓傳統桌上型程式也能使用 UWP 控制項~ 更加配合系統Style
今天來分享個之前的技術 XAML Island 因為之前都沒有好好的使用到,這個技術簡單來說就是把 UWP UI Control 能夠放入到 Win32 的應用程式中!今天我們一步步的來操作如何把玩 XAML Island~
開發環境
- Windows 10 (建議使用比較新的版本,先前有發現關於某些 XAML的問題
- Visual Studio 2019
程式碼Demo
基本上只要從 新版本的專案都可以使用到新的SDK Style的專案檔,讓我們看看細部CSPROJ的內容。
以下是 WPF的專案
<Project Sdk="Microsoft.NET.Sdk">

	<PropertyGroup>
		<TargetFrameworks>netcoreapp3.1</TargetFrameworks>
		<LangVersion>latest</LangVersion>
		<UseWPF>true</UseWPF>
		<!--<UseWinForms>true</UseWinForms>-->
		<OutputType>WinExe</OutputType>
		<ApplicationManifest>app.manifest</ApplicationManifest>
	</PropertyGroup>

	<ItemGroup>
		<PackageReference Include="Microsoft.Toolkit.Wpf.UI.Controls" Version="6.1.2" />
		<PackageReference Include="Microsoft.Toolkit.Wpf.UI.XamlHost" Version="6.1.2" />
	</ItemGroup>

</Project>
如果把 UseWinForms 的部分拿掉就可以使用 WinForms 的控制項,但是這邊需要特別注意關於 PackageReference 的部分。對於比較不需要混合使用 Wpf, WinForms 的 App 參考使用的 nuget package 也會不同喔!來解說一下這兩個 package 的差異
Microsoft.Toolkit.Wpf.UI.Controls
這個 Package 可以使用 一些轉換過的UI Control! 有支援的如下
- InkCanvas
- InkToolBar
- MediaPlayerElement
- MapControl
這邊要注意的是 轉換過 這個名詞是因為以上四個控制項的 Namespace 都經過調整,跟原先的UWP的會有差異之外也會有些限制!
Microsoft.Toolkit.Wpf.UI.XamlHost
這個 Package可以使用的是 WindowsXamlHost 在XAML 上,這個控制項算是個載體可以掛載UWP原生支援的任何 UI Control 也就是來自 Windows.UI.Xaml 的控制項都可以掛載進去。
需要特別注意的是一定需要加入 app.manifest檔案。 要不然會出現錯誤喔!
如下是 app.manifest 的檔案內容,基本上要設定 DPI aware 也是在這個地方設定喔!
<?xml version="1.0" encoding="utf-8"?>
<assembly manifestVersion="1.0" xmlns="urn:schemas-microsoft-com:asm.v1">
	<assemblyIdentity version="1.0.0.0" name="MyApplication.app"/>
	<trustInfo xmlns="urn:schemas-microsoft-com:asm.v2">
		<security>
			<requestedPrivileges xmlns="urn:schemas-microsoft-com:asm.v3">
				<!-- UAC Manifest Options
             If you want to change the Windows User Account Control level replace the
             requestedExecutionLevel node with one of the following.

        <requestedExecutionLevel  level="asInvoker" uiAccess="false" />
        <requestedExecutionLevel  level="requireAdministrator" uiAccess="false" />
        <requestedExecutionLevel  level="highestAvailable" uiAccess="false" />

            Specifying requestedExecutionLevel element will disable file and registry virtualization.
            Remove this element if your application requires this virtualization for backwards
            compatibility.
        -->
				<requestedExecutionLevel level="asInvoker" uiAccess="false" />
			</requestedPrivileges>
		</security>
	</trustInfo>

	<compatibility xmlns="urn:schemas-microsoft-com:compatibility.v1">
		<application>
			<!-- A list of the Windows versions that this application has been tested on
           and is designed to work with. Uncomment the appropriate elements
           and Windows will automatically select the most compatible environment. -->

			<!-- Windows Vista -->
			<!--<supportedOS Id="{e2011457-1546-43c5-a5fe-008deee3d3f0}" />-->

			<!-- Windows 7 -->
			<!--<supportedOS Id="{35138b9a-5d96-4fbd-8e2d-a2440225f93a}" />-->

			<!-- Windows 8 -->
			<!--<supportedOS Id="{4a2f28e3-53b9-4441-ba9c-d69d4a4a6e38}" />-->

			<!-- Windows 8.1 -->
			<!--<supportedOS Id="{1f676c76-80e1-4239-95bb-83d0f6d0da78}" />-->

			<!-- Windows 10 -->
			<maxversiontested Id="10.0.18362.0"/>
			<supportedOS Id="{8e0f7a12-bfb3-4fe8-b9a5-48fd50a15a9a}" />

		</application>
	</compatibility>

	<!-- Indicates that the application is DPI-aware and will not be automatically scaled by Windows at higher
       DPIs. Windows Presentation Foundation (WPF) applications are automatically DPI-aware and do not need
       to opt in. Windows Forms applications targeting .NET Framework 4.6 that opt into this setting, should
       also set the 'EnableWindowsFormsHighDpiAutoResizing' setting to 'true' in their app.config. -->
	<!--
  <application xmlns="urn:schemas-microsoft-com:asm.v3">
    <windowsSettings>
      <dpiAware xmlns="http://schemas.microsoft.com/SMI/2005/WindowsSettings">true</dpiAware>
    </windowsSettings>
  </application>
  -->

	<!-- Enable themes for Windows common controls and dialogs (Windows XP and later) -->
	<!--
  <dependency>
    <dependentAssembly>
      <assemblyIdentity
          type="win32"
          name="Microsoft.Windows.Common-Controls"
          version="6.0.0.0"
          processorArchitecture="*"
          publicKeyToken="6595b64144ccf1df"
          language="*"
        />
    </dependentAssembly>
  </dependency>
  -->

</assembly>
把Windows10 的項目中的 supportedOS 的 Element 取消註解並加上 maxversiontested的 Element 這樣就不會出現錯誤了。
接者就來看看如何使用XAML Island,以下是 MainWindow.xaml檔案
<Window
    x:Class="WpfApp4.MainWindow"
    xmlns="http://schemas.microsoft.com/winfx/2006/xaml/presentation"
    xmlns:x="http://schemas.microsoft.com/winfx/2006/xaml"
    xmlns:d="http://schemas.microsoft.com/expression/blend/2008"
    xmlns:host="clr-namespace:Microsoft.Toolkit.Wpf.UI.XamlHost;assembly=Microsoft.Toolkit.Wpf.UI.XamlHost"
    xmlns:local="clr-namespace:WpfApp4"
    xmlns:mc="http://schemas.openxmlformats.org/markup-compatibility/2006"
    Title="MainWindow"
    Width="800"
    Height="450"
    mc:Ignorable="d">

    <Window.DataContext>
        <local:MainWindowViewModel />
    </Window.DataContext>

    <Grid x:Name="LayoutRoot">
        <host:WindowsXamlHost
            x:Name="HostControl"
            ChildChanged="WindowsXamlHost_ChildChanged"
            InitialTypeName="Windows.UI.Xaml.Controls.Button" />
    </Grid>
</Window>
這邊需要注意的是需要加入 xmlns 的命名空間就可找到 WindowsXamlHost 的控制項,需要把完整的型別放在 InitialTypeName 的屬性!當WindowsXamlHost載入好UI Control 就會觸發 ChildChanged 的事件委派,接著就可以來針對該物件進行進階的物件初始化設定。
以下是 MainWindow.xaml.cs
using System;
using System.Collections.Generic;
using System.Linq;
using System.Text;
using System.Threading.Tasks;
using System.Windows;
using System.Windows.Controls;
using System.Windows.Data;
using System.Windows.Documents;
using System.Windows.Input;
using System.Windows.Media;
using System.Windows.Media.Imaging;
using System.Windows.Shapes;

namespace WpfApp4
{
	/// <summary>
	/// Interaction logic for MainWindow.xaml
	/// </summary>
	public partial class MainWindow : Window
	{
		public MainWindow()
		{
			InitializeComponent();
		}

		private void WindowsXamlHost_ChildChanged(object sender, EventArgs e)
		{
			if (sender is not Microsoft.Toolkit.Wpf.UI.XamlHost.WindowsXamlHost host)
			{
				System.Diagnostics.Debug.WriteLine("What the hell.....");
				return;
			}

			if (host.Child is Windows.UI.Xaml.Controls.Button btn)
			{
				btn.Content = "Im the UWP Button";
				var binding = new Windows.UI.Xaml.Data.Binding()
				{
					Path = new Windows.UI.Xaml.PropertyPath("ExecuteButton"),
					Mode = Windows.UI.Xaml.Data.BindingMode.OneWay,
					Source = DataContext
				};
				btn.SetBinding(Windows.UI.Xaml.Controls.Button.CommandProperty, binding);
			}
		}
	}
}
這邊我有加入了簡單的MVVM框架,然後使用 C# 建立 Binding 也可以直接使用在 XAML Island上! 基本上最麻煩就是不能直接使用XAML語法建立Binding.... 當然XAML也就是把物件標籤化的方式~但是真的習慣很不好改XD
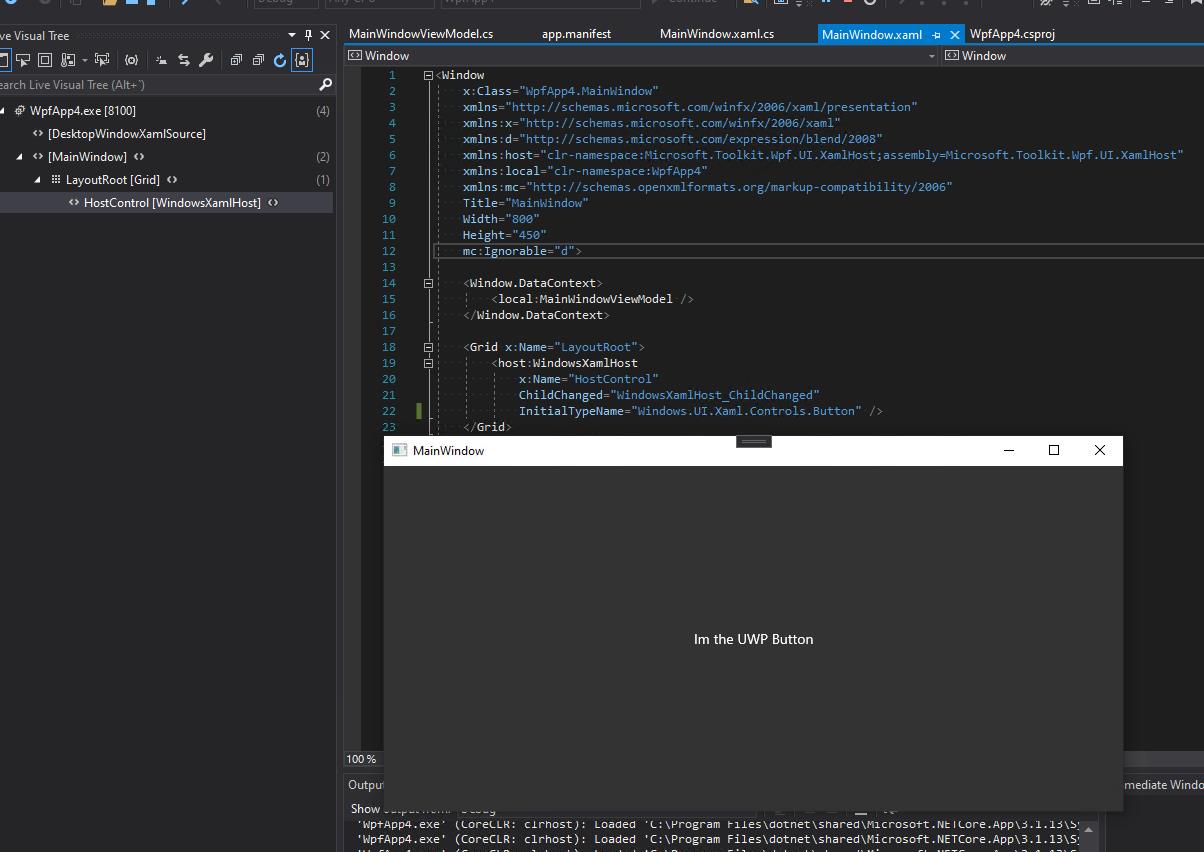
執行結果如下,可以打開 Live Visual Tree 可以看到有個 WindowsXamlHost 就是這個會去載入UWP 的Control
以上就是如何簡單讓 UWP的UI Control 嵌入到傳統桌面應用程式~ 面對後續微軟打算把 WinUI 抽象成單純的UI框架結構不在相依UWP的部分!後續關於Xaml island以及WinUI等相關資訊就等下篇再說吧~
總結
Xaml island 可以將UWP UI Control 便利的帶到Win32 frameworks 但是依然有所謂的 Air Space 的問題( Technology Regions Overview - WPF .NET Framework | Microsoft Docs ) 基本上如果要整合最好對於混用框架要注意很多關於DPI、AirSpace….等問題做好準備再進行規劃。
***以上Code以及說明都有可能隨著Windows 10 的版本以及Visual Studio 版本有所調整!***
參考資料 Microsoft Docs,Windows Blogs for developer
下次再分享Windows 10 的新技術拉~