介紹如何使用 MSIX的檔案格式來建立 Extension ( Adds-on)的實際流程,如何讓程式更加模組化的設計喔~
前言
這篇來介紹實際如何把 MSIX 也能有跟 UWP一樣的 Extension( Adds-on )的功能,先前有一篇寫到Xbox Gamebar extension (這篇) 其實就是類似這樣的概念,而在更之前也有寫過 UWP 版本的Extension介紹 (這篇)。這邊我用 .NET 5.0以及WPF作為Sample~
實際操作
開發環境
- Windows 10 latest
- Visual Studio 2019
- Workload 選項
- UWP workload
- .NET desktop workload
- Workload 選項
- MSIX Packaging Tool
這次會一次使用上 MSIX Packaging Tool 以及 Visual Studio 2019,原因後續會說明。
本來在 .NET 的生態系中就有所謂的 Extension 的概念~由 DllLoad的方式載入不同的實作功能來達到。開啟 Visual Studio 2019後建立兩個 .NET Standard 的專案,然後再建立 .NET 5的WPF應用程式和Windows Application Packaging專案
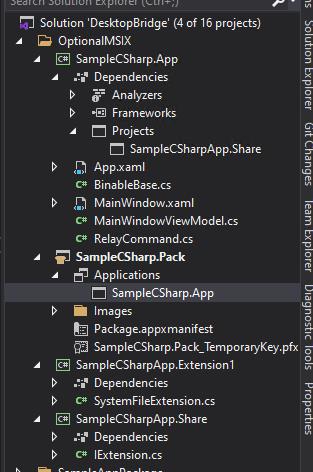
SampleCSharpApp.Share 裡面只放 Interface,而SampleCSharpApp.Extension1只放實作。然後 SampleCSharp.App是 WPF的專案,最後SampleCSharp.Pack則是Windows Application Packaging 的專案。然後我這邊設計了個簡單的介面
提供擴充的介面 IExtension.cs
	public interface IExtension
	{
		string Name { get; }

		Task<bool> ExecuteAsync(string message, string filePath);
	}
然後實作的 SystemFileExtension.cs
public class SystemFileExtension : IExtension
	{
		public string Name => "HelloWorldExtension";

		public async Task<bool> ExecuteAsync(string message, string filePath)
		{
			if (string.IsNullOrEmpty(message) || string.IsNullOrWhiteSpace(message))
			{
				throw new ArgumentNullException(nameof(message));
			}

			if (string.IsNullOrEmpty(filePath) || string.IsNullOrWhiteSpace(filePath))
			{
				throw new ArgumentNullException(nameof(filePath));
			}

			try
			{
				if (File.Exists(filePath))
				{
					File.Delete(filePath);
				}

				var messageBytes = Encoding.UTF8.GetBytes(message);
				using var fileStream = File.Create(filePath);
				await fileStream.WriteAsync(messageBytes, 0, messageBytes.Length);
				await fileStream.FlushAsync();
				return true;
			}
			catch (Exception ex)
			{
				System.Diagnostics.Debug.WriteLine(ex.ToString());
				throw;
			}
		}
	}
這邊是個簡單地把 string寫到 file的程式~
然後 WPF的主程式不直接加入 Extension的專案因為我們要設計成能夠掛載 Extension 的架構。
接著我在 WPF專案寫了個簡單的MVVM,有些細節就別怪我懶惰拉~這邊有提到我用 WPF和 .NET 5這邊我調整了一下 csproj 專案檔的結構如下
<Project Sdk="Microsoft.NET.Sdk.WindowsDesktop">
	<PropertyGroup>
		<OutputType>WinExe</OutputType>
		<TargetFramework>net5.0-windows10.0.19041.0</TargetFramework>
		<LangVersion>latest</LangVersion>
		<RuntimeIdentifiers>win10-x64;win10-x86</RuntimeIdentifiers>
		<Platforms>x64;x86</Platforms>
		<UseWPF>true</UseWPF>
	</PropertyGroup>

	<ItemGroup>
		<ProjectReference Include="..\SampleCSharpApp.Share\SampleCSharpApp.Share.csproj" />
	</ItemGroup>
</Project>
MainWindow.xaml
<Window
    x:Class="SampleCSharp.App.MainWindow"
    xmlns="http://schemas.microsoft.com/winfx/2006/xaml/presentation"
    xmlns:x="http://schemas.microsoft.com/winfx/2006/xaml"
    xmlns:d="http://schemas.microsoft.com/expression/blend/2008"
    xmlns:local="clr-namespace:SampleCSharp.App"
    xmlns:mc="http://schemas.openxmlformats.org/markup-compatibility/2006"
    Title="MainWindow"
    Width="800"
    Height="450"
    mc:Ignorable="d">

    <Window.DataContext>
        <local:MainWindowViewModel />
    </Window.DataContext>

    <Grid x:Name="LayoutRoot">
        <Grid.RowDefinitions>
            <RowDefinition Height="Auto" />
            <RowDefinition Height="*" />
        </Grid.RowDefinitions>
        <StackPanel>
            <Button Command="{Binding GetExtensiosCommand}" Content="Refresh extension list" />
        </StackPanel>
        <ListView Grid.Row="1" ItemsSource="{Binding Extensions}">
            <ListView.ItemTemplate>
                <DataTemplate>
                    <DockPanel>
                        <TextBlock Text="{Binding Name}" />
                    </DockPanel>
                </DataTemplate>
            </ListView.ItemTemplate>
        </ListView>
    </Grid>
</Window>
MainWindowViewModel.cs
using Windows.ApplicationModel;

public class MainWindowViewModel : BinableBase
	{
		public IList<SampleCSharpApp.Share.IExtension> Extensions { get; }

		public ICommand GetExtensiosCommand { get; }

		public MainWindowViewModel()
		{
			Extensions = new ObservableCollection<SampleCSharpApp.Share.IExtension>();

			GetExtensiosCommand = new RelayCommand(async () => await GetExtensionsAsync());
		}

		private async Task GetExtensionsAsync()
		{
			if (!Package.Current.Dependencies.Any())
			{
				return;
			}

			foreach (var dependencyin Package.Current.Dependencies)
			{
				if (dependency.Id.Name.Contains("Extension") && dependency.IsOptional )
				{
					var file = await dependency.InstalledLocation.GetFileAsync("SampleCSharpApp.Extension1.dll");
					LoadAssembly(file.Path);
				}
			}
		}

		private void LoadAssembly(string filePath)
		{
			var loadedAssembly = Assembly.LoadFile(System.IO.Path.GetFullPath(filePath));
			foreach (var innerType in loadedAssembly.GetTypes().Where(i => i.IsClass))
			{
				if (innerType.GetInterfaces().Contains(typeof(SampleCSharpApp.Share.IExtension)))
				{
					Extensions.Add((SampleCSharpApp.Share.IExtension)Activator.CreateInstance(innerType));
				}
			}
		}
	}
這邊有我使用了 Windows Runtime的API 就是可以從 Package的結構(也就是MSIX的封裝)取得屬於相依在這個MSIX檔的其他MSIX檔,也就是在 GetExtensionsAsync內然後再丟給 LoadAssembly去做 .NET 透過 Reflection 來做到把套件載入到主要程式中。 說破了就是強大的 Reflection來把 DLL內的型別做成物件~
接下來可以用 SampleCSharp.Pack的 Windows Application Packaging project 來發佈打包成 MSIX檔案~這邊看一下主程式的 Package.appxmanifest
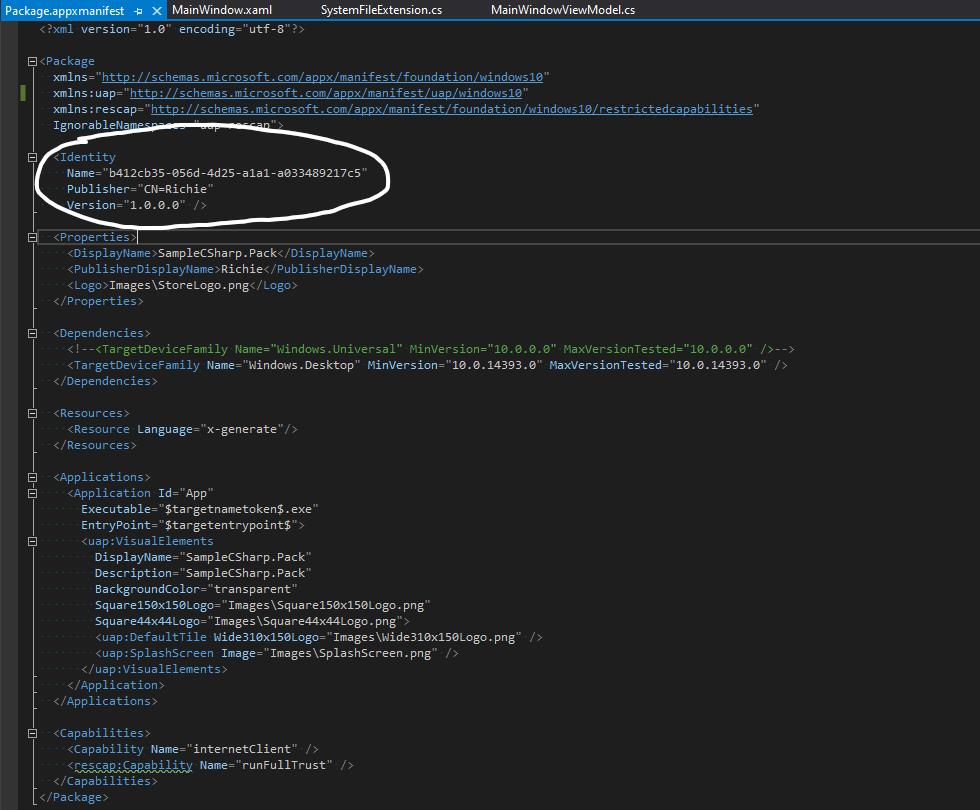
這邊要特別注意的就是 Identity內的 Name就是這個MSIX的ID喔!要記起來等等會用到~
然後這邊就準備要把 Extension的DLL進行MSIX的封裝了~這邊不用 Windows Application Packaging Project 因為該專案類型一定要有 Exe 作為起始的專案!所以這個就不符合我們想要做成MSIX的流程,這時候就是使用 MSIX Packaging Tool了~使用 MSIX Packaging tool的流程請參考MSIX系列的第一篇。重點就是把 Extension編譯好的DLL們打包進去!
我們這邊用 MSIX Packaging Tool來看一下結構
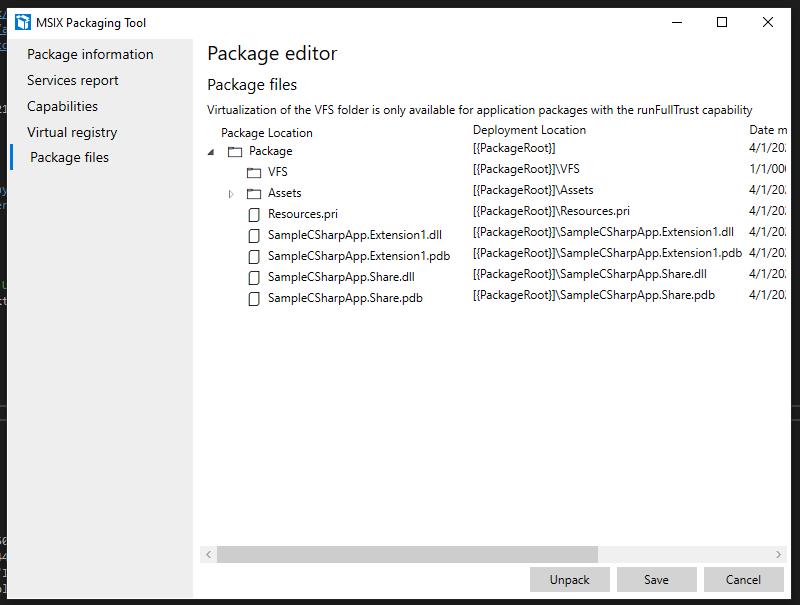
基本上就是把 DLL放進去,而 Assets只是MSIX的相關圖片檔案並沒有跟我們程式碼有關的檔案。
接著重點就是要調整Extension這包的 Manifest了喔!請看下方Manifest xml
<?xml version="1.0" encoding="utf-8"?>
<Package
xmlns="http://schemas.microsoft.com/appx/manifest/foundation/windows10"
xmlns:uap4="http://schemas.microsoft.com/appx/manifest/uap/windows10/4"
IgnorableNamespaces="uap4">
  <!--Package created by MSIX Packaging Tool version: 1.2020.1219.0-->
  <Identity Name="Extension" Publisher="CN=Richie" Version="1.0.0.0" ProcessorArchitecture="x64" />
  <Properties>
    <DisplayName>SampleCSharp Extension</DisplayName>
    <PublisherDisplayName>DevRichie</PublisherDisplayName>
    <Description>None</Description>
    <Logo>Assets\StoreLogo.png</Logo>
  </Properties>
  <Resources>
    <Resource Language="en-us" />
  </Resources>
  <Dependencies>
    <TargetDeviceFamily Name="Windows.Desktop" MinVersion="10.0.17763.0" MaxVersionTested="10.0.19041.1" />
    <uap4:MainPackageDependency Name="b412cb35-056d-4d25-a1a1-a033489217c5" />
  </Dependencies>
</Package>
重點就是在 xmlns加入 uap4的宣告並且在 Dependencies裡面加入 uap4:MainPackageDepedency的元素並把 Name屬性放入主程式MSIX內的ID,然後還要注意的是把Capabilities要拿掉。因為套件所使用的權限會跟著主程式的 Manifest宣告
然後把兩個 MSIX都安裝起來後來看看使否正常,進到 Settings的應用程式列表看看
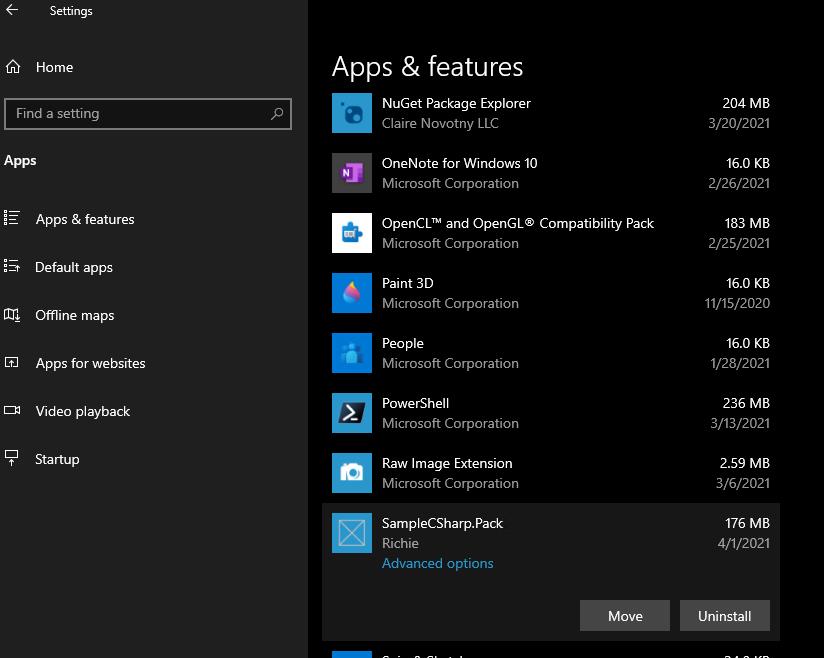
點開 進階選項 就可以看到
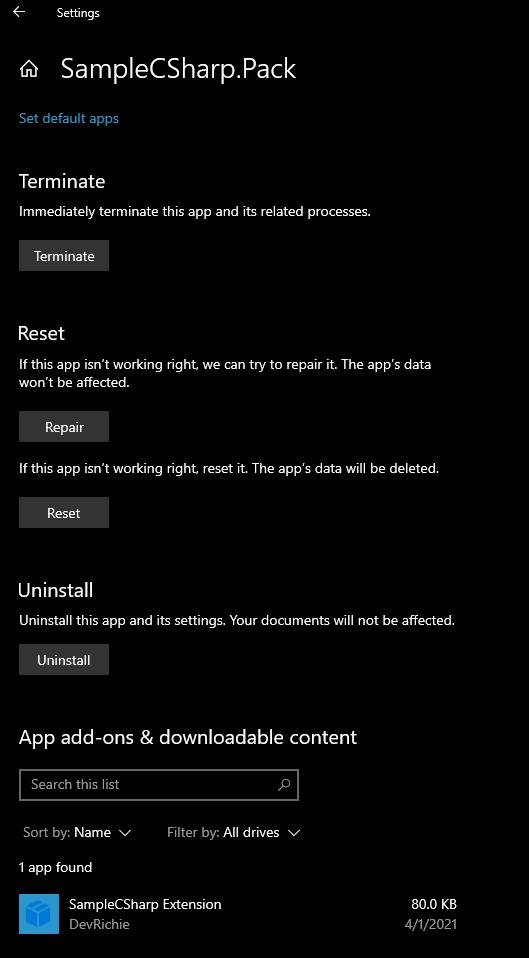
打包好的 adds-on的列表就會出現拉~
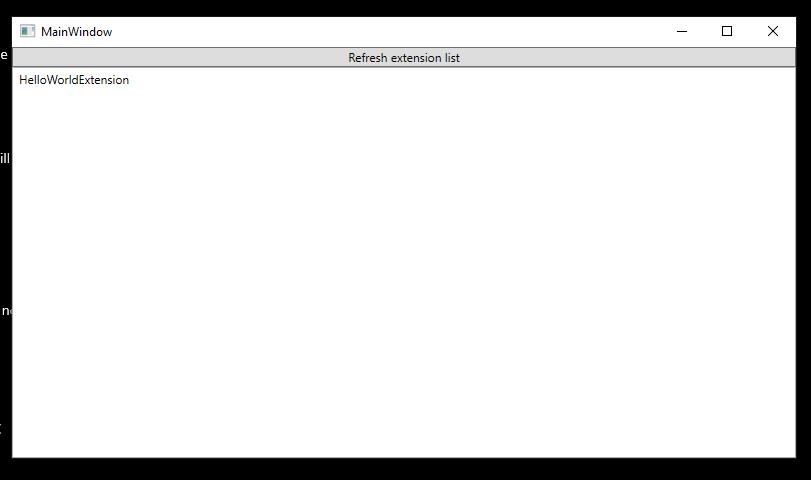
這邊就是程式執行起來的樣子
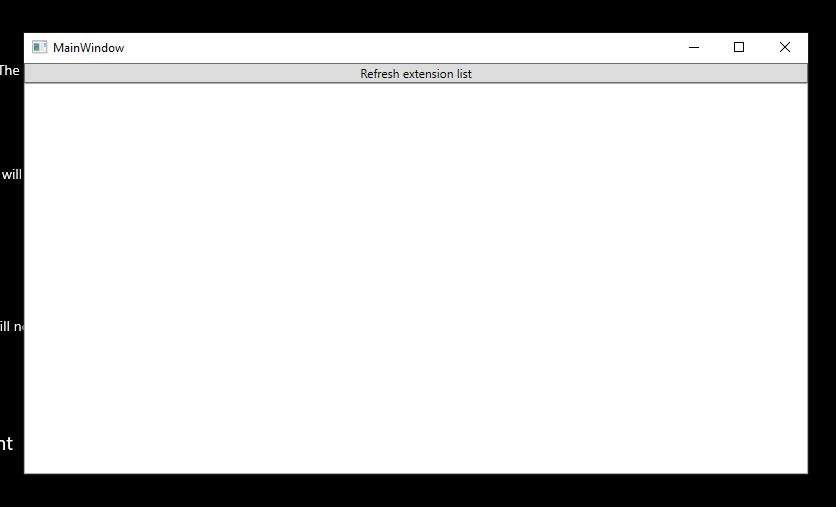
然後按下 Refresh extension list的 Button就會出現拉~
總結
使用與UWP相似的架構概念可以讓Win32的安全性更加提升,也讓整體Windows App享有從封裝層就有Extension的概念並統一UWP或是MSIX Win32可以更加一致的使用新版Settings的相關功能。
***以上Code以及說明都有可能隨著Windows 10 的版本以及Visual Studio 版本有所調整!***
參考資料 Microsoft Docs,Windows Blogs for developer
下次再分享Windows 10 的新技術拉~