利用 react.js 的 dva 框架來撰寫 TodoList。
最近寫太多 Angular 了,該是換換別的框架的時候了!
讓我們快快樂樂學 React + redux + AntD 吧!
其實一部分是因為接下來要接手的專案是用 react 所開發的
所以不得不來熟悉一下QQ
一、前言
現階段如果要學習 React 一定會很頭痛,
除了要學 React 還有 redux
然後 redux 後來又有很多種組件:redux-saga、redux-observable ... 等等。
自己也是新手剛入坑,這麼多種也不知該如何開始,
經詢問朋友意見想法後,推薦這次要介紹的輕量框架- dva
沒錯! 這個 dva 跟你所想到的 dva 是有關連的!(原因官方有提到)
目前官方也已經到了 2.x 版本。
本篇文章將透過簡單的 TodoList 來實現 reactjs + redux,
在 style 的部分選擇搭配了 Ant Design,這是由「螞蟻設計」針對 React 所開發的一個組件風格。

其實原本是想改搭配 Material-UI,但由於他使用上設定以及參數有點複雜繁瑣,

加上近期終於要推出穩定的 v1版本,所以決定先不使用,待觀察之後版本。
![]()
二、框架安裝與建立
首先進行框架全域安裝,可以從官方的 GettingStarted 看到安裝流程:
npm install -g dva-cli
利用 dva 指令建立新的專案,其實這邊跟 Angular、Vue 一樣很熟悉。
在文件中的 --demo 是載入官方所提供的範例專案。
dva new myapp --demo
在此我們不使用範例專案,請不要輸入 --demo,建立一個名為 myapp 的空專案。
dva new myapp
安裝完畢後就可以看到成功訊息:
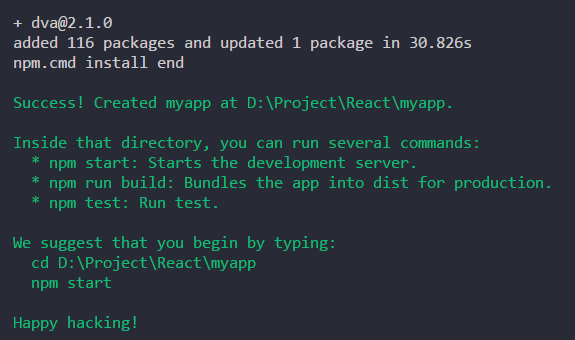
- Happy hacking!
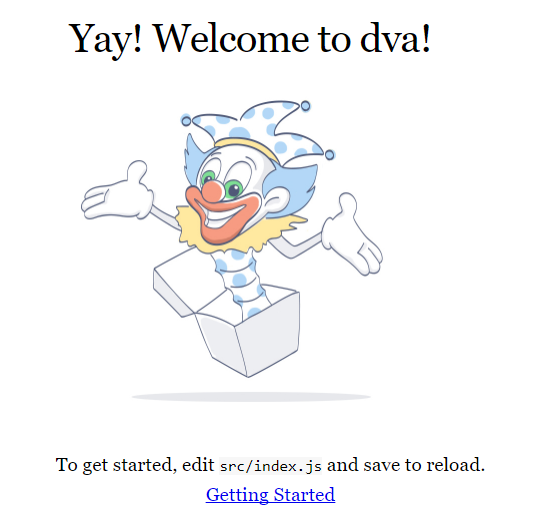
進入專案並執行,預設是 8000 Port。
cd myapp
npm start

這時候會自動開啟網頁:http://localhost:8000/#/
如果有成功,就會看到一隻小丑了(我以為會是 dva,大概是怕版權問題吧)
三、架構說明
首先看一下目錄結構:
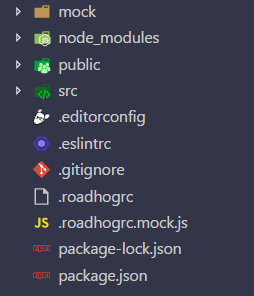
- mock:這邊我們暫時不會用到,最簡單的解釋就是實作 fetch 時所使用的 fake data。
- public:公用檔案放置區。
- src:主程式目錄。
- roadhogrc:預設配置提供環境測試與建構,如果有興趣可以查看 roadhog。
展開 src 後:
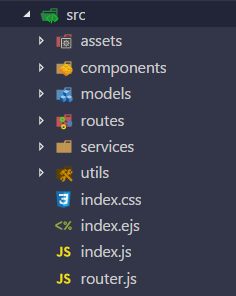
- assets:靜態檔案放置區。
- components:組件。
- models:redux 的 model 。
- routes:路由。
- router.js:路由起始程式。
- service:可以想成 Angular 的 Service 服務,用來處理對外 api fetch 的接口。
- utils:經由 service 後向 server 取得資料的處理過程。
- index.js:dva 主程式進入點。
- index.ejs:這是由 ejs 樣板所建立的,把它當作 html 就可。
四、Ant Design 安裝
首先安裝套件。
npm install antd --save
為了能在專案中引入並透過 Babel 編譯好相關檔案,
需安裝 babel-plugin-import。
npm install babel-plugin-import --save
接著在 .roadhogrc 引入 antd,
透過 extraBabelPlugins 載入外部檔案。
{
  "entry": "src/index.js",
  "extraBabelPlugins": [
    "syntax-dynamic-import",
    "transform-runtime",
    [
      "import",
      {
        "libraryName": "antd",
        "style": true
      }
    ]
  ],
  "env": {
    "development": {
      "extraBabelPlugins": [
        "dva-hmr",
        "transform-runtime"
      ]
    },
    "production": {
      "extraBabelPlugins": [
        "transform-runtime"
      ]
    }
  }
}
如果要在檔案內使用,直接 import 就可使用,範例如下:
import { Button, Input, Checkbox } from 'antd';
五、TodoList
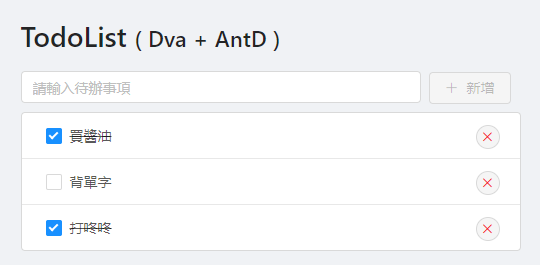
接下來要實作一個簡易的 todolist,以下畫面是實作結果畫面:
目錄:
I、表單與表頭
首先引入 antd 中的 Layout。
routes / IndexPage.js
import { Layout } from 'antd';
編輯主畫面,修改 return 的內容:
routes / IndexPage.js
function IndexPage() {
  return (
    <Layout className={styles.layout}>
      <h1>TodoList <small>( Dva + AntD )</small></h1>
    </Layout>
  );
}
修改樣式。
routes / IndexPage.css
.layout {
    margin: 3rem auto;
    max-width: 500px;
}
然後到根樣式表,加入一點背景顏色。
src / index.css
html,
body,
 :global(#root) {
    height: 100%;
    background-color: #F0F2F5;
}
畫面結果:

II、Stateless 與 ES6 寫法
在這邊出現了我們以往沒看過的寫法:
routes / IndexPage.js
import React from 'react';
import { connect } from 'dva';
import { Layout } from 'antd';
import styles from './IndexPage.css';

function IndexPage() {
  return (
    <Layout className={styles.layout}>
      <h1>TodoList <small>( Dva + AntD )</small></h1>
    </Layout>
  );
}

IndexPage.propTypes = {
};

export default connect()(IndexPage);
如果你有淺淺接觸過 React 應該會對以下這種 ES6寫法 比較熟悉:
class IndexPage extends React.Component {

  constructor(props, context) {
    super(props, context);
  }

  render() {

    const props = this.props;

    return (
        <div></div>
    );
  }

}
dva 框架採用了 Stateless 寫法,
詳細可以看這篇 dva - 咨询关于react生命周期事件写在哪里的问题?
或是從 React 官方查看 Components and Props
由於自己不太習慣,因此將原本的寫法改成 ES6 寫法:
routes / IndexPage.js
import React from 'react';
import {connect} from 'dva';
import {Layout} from 'antd';
import styles from './IndexPage.css';

class IndexPage extends React.Component {

  constructor(props, context) {
    super(props, context);
  }

  render() {

    return (
      <Layout className={styles.layout}>
        <h1>TodoList
          <small>( Dva + AntD )</small>
        </h1>
      </Layout>
    );
  }
}

export default connect()(IndexPage);
在這邊我們先不需要設定 propTypes
因此將以下此行拿掉:
IndexPage.propTypes = {};
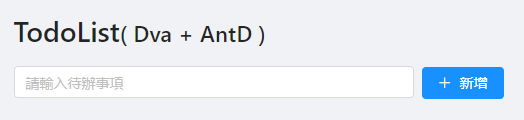
III、輸入代辦文字方塊
接下來我們利用 ButtonInput,
提供輸入待辦文字輸入以及新增的按鈕。
首先引入組件:
routes / IndexPage.js
import {Layout, Button, Input} from 'antd';
在 Layout 組件中,提供了 Header Sider Content Footer,
在這邊我們僅需要用到Content。
routes / IndexPage.js
const {Content} = Layout;
將ButtonInput包在Content中,相關屬性可參考 AntD:Button、Input。
routes / IndexPage.js
<Layout className={styles.layout}>
  <h1>TodoList
    <small>( Dva + AntD )</small>
  </h1>
  <Content>
    <Input placeholder="請輸入待辦事項"/>
    <Button type="primary" icon="plus">新增</Button>
  </Content>
</Layout>
然後將 Input 寬度調整一下:
routes / IndexPage.css
.layout input[type='text'] {
  width: 80%;
  margin-right: 0.5rem;
}
結果如下:
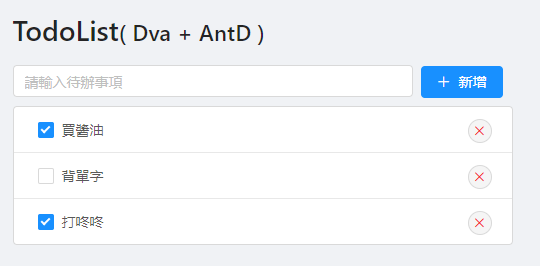
IV、清單列表
引入所需元件,相關屬性可參考 AntD:List、Checkbox。
import {Layout, Button, Input, List, Checkbox} from 'antd';
List:將待辦項目列出。Checkbox:提供項目核取。
在上方 constructor 內建立假資料:
routes / IndexPage.js
constructor(props, context) {
  super(props, context);
  this.state = {
    list: [
      {
        name: '買醬油',
        status: true
      }, {
        name: '背單字',
        status: false
      }, {
        name: '打咚咚',
        status: true
      }
    ]
  }
}
最外層使用 List ,而每個項目則使用 List.Item ,
把 Checkbox 和 Button 包起來。
routes / IndexPage.js
<Layout className={styles.layout}>
  <h1>TodoList
    <small>( Dva + AntD )</small>
  </h1>
  <Content>
    <Input placeholder="請輸入待辦事項" />
    <Button type="primary" icon="plus">新增</Button>
    <List
      className={styles.list}
      bordered
      dataSource={this.state.list}
      renderItem={(item, index) => (
        <List.Item>
          <Checkbox
            className={(item.status ? styles.check : ' l')}
            checked={item.status}
          >{item.name}</Checkbox>
          <Button
            className={styles.btndel}
            type="danger"
            size="small"
            shape="circle"
            icon="cross" />
        </List.Item>
      )} />
  </Content>
</Layout>
然後補上一點樣式:
routes / IndexPage.css
.layout .list {
  margin-top: 0.5rem;
  background-color: #fff;
}

.layout .btndel {
  position: absolute;
  right: 20px;
}

.layout .check {
  text-decoration: line-through;
}
預覽結果:
V、改使用 Redux model
接下來要實作新增項目,首先我們要先引入 redux,
在 index.js 中可以看到預設幫我們註解了:
src / index.js
// 3. Model
// app.model(require('./models/example'));
將註解移除:
app.model(require('./models/example'));
然後將我們的假資料改寫至 models 的 state 中:
models / example.js
state: {
  list: [{
      name: '買醬油',
      status: true,
    },
    {
      name: '背單字',
      status: false,
    },
    {
      name: '打咚咚',
      status: true,
    },
  ],
},
然後從 IndexPage.js 中取得 redux 的資料:
routes / IndexPage.js
constructor(props, context) {
  super(props, context);
  this.dispatch = props.dispatch;
}
在 render() 中取得從父層傳遞的 props:
const props = this.props;
別忘了資料繫結的 dataSource 也要改:
dataSource={props.list}
然後最下方要補上回傳 redux 回傳值:
routes / IndexPage.js
function mapStateToProps(state) {
  return {
    list: state.example.list,
  };
}

export default connect(mapStateToProps)(IndexPage);
- example:為 example.js 的 namespace
這時候畫面應該是跟原本一樣的,並不會改變。
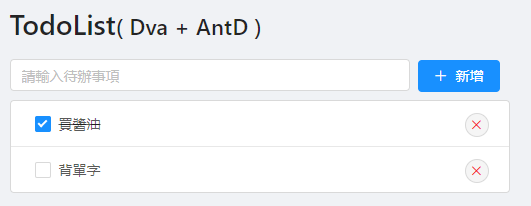
VI、新增項目
接著在 constructor 新增 state,用來儲存欲新增的項目:
routes / IndexPage.js
constructor(props, context) {
  super(props, context);
  this.dispatch = props.dispatch;
  this.state = {
    item: '',
  };
}
然後把Input新增 value 以及 onChange 事件:
routes / IndexPage.js
<Input placeholder="請輸入待辦事項"
  value={this.state.item}
  onChange={(e) => { this.setState({ item: e.target.value }); }}
/>
- onChange:當輸入內容時,會將取得的值設置到 this.state。
再來是 Button onClick 事件:
routes / IndexPage.js
<Button type="primary" icon="plus"
  onClick={() => {
    props.dispatch({ type: 'example/add', item: { name: this.state.item, status: false } });
    this.setState({ item: '' });
  }}
>新增</Button>
- onClick:執行 example 中 add 的方法,其參數 item 包含:name 與 status。
- this.setState:新增後將內容清空。
再來就是寫 add 的方法了!
打開 example.js ,在 reducers 新增 add
在這邊為了方便操作陣列,使用了 Lodash。
npm install lodash -S
安裝後並引入:
import _ from 'lodash';
models / example.js
reducers: {
  add(state, { item }) {
    return {
      ...state,
      list: _.concat(state.list, [item]),
    };
  },
},
concat:陣列合併然後回傳新的陣列,可參考官方文件 concat。
回到畫面輸入任意內容就可新增了,預覽結果:

VII、勾選項目
為了能夠勾選項目,我們必須實作 onChange 事件,
當勾選的時候,讓該項目的 status 變成 true。
routes / IndexPage.js
<Checkbox
  className={(item.status ? styles.check : ' l')}
  checked={item.status}
  onChange={(e) => {
    props.dispatch({ type: 'example/check', index, value: e.target.checked });
  }}
>{item.name}</Checkbox>
- onChange:當點擊的時候會執行 example 中的 check 事件,並將索引以及值傳遞過去。
在 reducers 內新增 check 事件:
models / example.js
check(state, { index, value }) {
  const newState = _.clone(state.list);
  newState[index].status = value;
  return {
    ...state,
    list: newState,
  };
},
- clone:複製一份新的物件,詳細可至 Lodash 查看。
VIII、刪除項目
有了新增有了勾選,接下來是刪除。
routes / IndexPage.js
<Button
  className={styles.btndel}
  type="danger" size="small" shape="circle" icon="cross"
  onClick={() => {
    props.dispatch({ type: 'example/delete', index });
  }}
/>
- onClick:當點擊的時候會執行 example 中的 delete 事件,並將索引傳遞過去。
在 reducers 內新增 delete 事件:
models / example.js
delete(state, { index }) {
  return {
    ...state,
    list: _.filter(state.list, (item, i) => !_.isEqual(index, i)),
  };
},
- filter:回傳索引值不等於 index 的新物件,詳細可至 Lodash 查看。
完成後點選刪除試試:
六、完整範例
以上就完成了簡單的 TodoList,
完整的專案提供在小弟的 Github 上 React-dva-TodoList。
Clone:
git clone https://github.com/explooosion/React-dva-TodoList.git
Install:
cd React-dva-TodoList
npm install
Run:
npm start
想建置靜態網頁,利用 build 就可以產出:
npm run build
如果覺得文章不錯,不妨給個 ✩✩ 鼓勵八~
![]()
有勘誤之處,不吝指教。ob'_'ov
