快棄坑 React、Vue、Angular 吧~~疑?
在變化快速的前端戰場上,隨時都有萌新出現。
身為前端工程師的你,是否能夠「輕鬆駕馭」並且能夠「轉換自如」呢?
冒號上括弧。
一、前言
最近在 github 的 Following 中看到 hyperapp,
感覺很有趣,於是忍不住被抓走惹玩了幾天。
介紹框架

這是一套基於 ES6 的微型的前端框架,強調「Minimal」、「Pragmatic」、「Standalone」。
該怎麼說呢 ... 如果你使用過三大前端框架,
你會發現跟他們都很像,變來變去,其實都差不多。
Hyperapp 主要拆成三大塊:
- state:資料的狀態,你可以想像成 redux 的 store 或是 model
- actions:各種事件方法等等,這跟 vuex 的 action 很像
- view:組件的組成,當然也是 Virtual DOM
官方範例程式(try it online):
import { h, app } from 'hyperapp'
const state = {
  count: 0
}

const actions = {
  down: value => state => ({ count: state.count - value }),
  up: value => state => ({ count: state.count + value })
}

const view = (state, actions) => (
  <div>
    <h1>{state.count}</h1>
    <button onclick={() => actions.down(1)}>-</button>
    <button onclick={() => actions.up(1)}>+</button>
  </div>
)

app(state, actions, view, document.body)
環境準備
hyperapp 目前十分萌新,尚未有所謂的 boilerplate,官方也很歡迎各種的 PR。
要賺 PR 快趁現在(X
開發環境建議使用 ES6,因此可搭配 webpack ,
如果你沒有個人常用基於 webpack 的樣板,可以試試使用 webpack-es6-boilerplate,
這是筆者修改來自 @jluccisano 的樣板專案,歡迎使用~
下載專案
git clone https://github.com/explooosion/webpack-es6-boilerplate.git
安裝套件
yarn install
// or
npm install
啟動專案
yarn start
// or
npm start
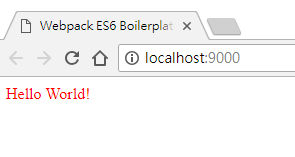
瀏覽網頁
編輯器準備
由於使用 JSX,如果你是使用 Visual Studio Code,
建議安裝 Babel ES6/ES7,然後將語言模式選擇為:JavaScript React

然後你的 file icon 有很高機率變成 react 的形狀 ...
![]()
二、Hello World - codepen
接下來一起把專案變成 hyperapp 的形狀吧!!
首先安裝 hyperapp 以及 jsx 的轉換工具 babel-plugin-transform-react-jsx
yarn add hyperapp -S
yarn add babel-plugin-transform-react-jsx -S
[.babelrc]
引入 jsx 的編譯套件
{
  "presets": ["env", "es2015", "stage-0"],
  "plugins": [
    ["transform-react-jsx", {
      "pragma": "h"
    }]
  ]
}
[index.js]
請清空檔案內容然後引入 hyperapp。
import { h, app } from 'hyperapp'
在 hyperapp 中,組件 entry point 需綁入 state﹑actions﹑view,
因此我們先任意給變數讓他綁進去。
const state = {}
const actions = {}
const view = (state, actions) => (
    <div>
        <h1>Hello World</h1>
    </div>
)
接著我們將 entry point 指定到 id 為 app 的元素上:
app(state, actions, view, document.querySelector('#app'))
[index.html]
別忘了在 html 中新增一個 id 為 app 的元素,否則就綁定不到了:
<!DOCTYPE html>
<html lang="en">

<head>
  <meta charset="UTF-8">
  <meta name="viewport" content="width=device-width, initial-scale=1.0">
  <meta http-equiv="X-UA-Compatible" content="ie=edge">
  <title>Webpack ES6 Boilerplate</title>
</head>

<body>
  <div id="app"></div>
</body>

</html>
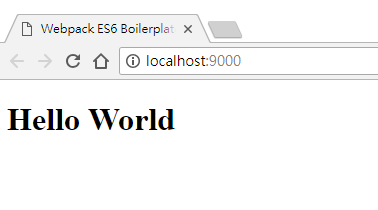
這時候啟動專案
yarn start
就可以看到 Hello World 嚕!
三、組件剖析
View
view 負責組件的視圖,各種即將要渲染的元素,
你可能會覺得,這個寫法很眼熟 ...
[index.js]
const view = (state, actions) => (
    <div>
        <h1>Hello World</h1>
    </div>
)
其實也可以寫成:
const view = (state, actions) => {
    return (
        <div>
            <h1>Hello World</h1>
        </div>
    )
}
更可以寫成:
const view = function fn(state, actions) {
    return (
        <div>
            <h1>Hello World</h1>
        </div>
    )
}
或是省略 function name:
const view = function (state, actions) {
    return (
        <div>
            <h1>Hello World</h1>
        </div>
    )
}
而前面的 state 跟 actions 就是傳入的值,
分別存放變數的狀態與事件。
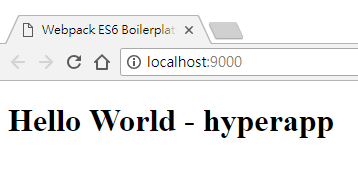
State - codepen
state 主要儲存各種變數,狀態等等。
[index.js]
比如我們初始一個變數 name 內容為 hyperapp
const state = {
    name: 'hyperapp',
}
然後在 view 中取出顯示:
const view = (state, actions) => (
    <div>
        <h1>Hello World - {state.name}</h1>
    </div>
)
這時候就可以看到畫面多了 hyperapp。
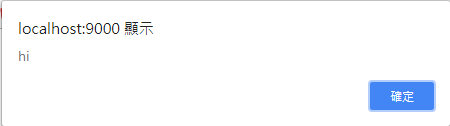
Actions - codepen
actions 儲存各種方法事件等,以提供我們調用,
[index.js]
例如我們定義一個按鈕的 click 事件:greet
const actions = {
    greet: () => alert('hi')
}
然後在 view 中補上按鈕,而 onclick 就是原生的事件,
- 你並不需要寫什麼 onClick(React)、v-on:click(Vue)、(click)(Angular)等等之類
(戰框架 77777
const view = (state, actions) => (
    <div>
        <h1>Hello World - {state.name}</h1>
        <button type="button" onclick={actions.greet}>Greet</button>
    </div>
)
試著按按鈕就會噴訊息了!
因此其實展開後如下,其實跟 vue - method event 是一樣的:
const actions = {
    greet: function () {
        alert('hi')
    }
}
實戰練習 : 按鈕事件 Actions 改變 State - codepen
[index.js]
如果你想要在按鈕的事件中,更改 state 的值,可以這麼做:
const actions = {
    greet: state => ({ name: 'hehe' })
}
在每個 actions 中,皆可以將 state 傳入,然後返回新的 state,
而原本的展開式如下:
const actions = {
    greet: function (state) {
        return ({ name: 'hehe' })
    }
}
實戰練習 : 文字輸入事件 Actions 改變 State - codepen
[index.js]
如果希望當我們輸入文字的時候,改變 state,可以這麼做:
const actions = {
    greet: state => ({ name: 'hehe' }),
    update: name => state => ({ name: name })
}

const view = (state, actions) => (
    <div>
        <h1>Hello World - {state.name}</h1>
        <button type="button" onclick={actions.greet}>Greet</button>
        <input type="text"
            value={state.name}
            oninput={e => actions.update(e.target.value)}
        />
    </div>
)
看一下瀏覽器,輸入點什麼給他看看~
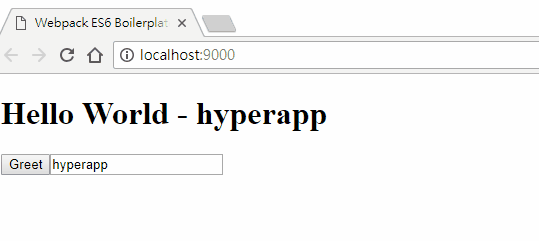
我們利用 oninput 去觸發輸入時的事件 actions.update,
而 oninput 是 hyperapp 所提供的,
在 update 事件中,其實用了兩次 return,原本的展開式如下:
const actions = {
    greet: state => ({ name: 'hehe' }),
    // update: name => state => ({ name: name })
    update: function fn(name) {
        return function fn(state) {
            return ({ name: name })
        }
    }
}
看出來了嗎~ 所以其實傳遞進去的變數 name 是可以更改命名的,例如:myvalue。
const actions = {
    greet: state => ({ name: 'hehe' }),
    update: myvalue => state => ({ name: myvalue })
}
實戰練習 : 解構賦值(Destructuring Assignment) - codepen
這個在 React 中很常用到,同為 JSX 的 hyperapp 也當然如此,
如果讀者不熟悉,我們可以來練習試試看。
[index.js]
這個範例建立姓名與訊息變數在 state 中,
並且在按鈕觸發的時候將文字更新到變數中。
const state = {
name: '',
message: '',
}
const actions = {
set: ({ name, msg }) => state => ({ name: name, message: msg })
}
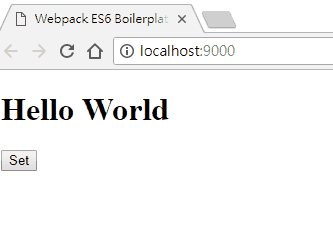
const view = (state, actions) => (
<div>
<h1>Hello World</h1>
<h2>{state.message} {state.name}</h2>
<button type="button"
onclick={() => actions.set({
name: 'Robby',
msg: 'Hi'
})}
>Set</button>
</div>
)
畫面如下:
在這邊可以發現,在 set 事件中,傳入了兩個參數,
在這邊利用解構的方式 ({ name, msg }) 將參數取出,
如果不使用解構的方式,則需要寫成:
const actions = {
    set: props => state => ({ name: props.name, message: props.msg })
}
超級展開後如下:
const actions = {
    // set: props => state => ({ name: props.name, message: props.msg })
    set: function fn(props) {
        return function fn(state) {
            return ({
                name: props.name,
                message: props.msg,
            })
        }
    }
}
或是:
const actions = {
    // set: props => state => ({ name: props.name, message: props.msg })
    set: function (props) {
        return function (state) {
            return ({
                name: props.name,
                message: props.msg,
            })
        }
    }
}
好!到這我想大家都亂了(X
這篇就先講到這,如果有興趣,
也可以看看筆者基於 hyperapp 所做出來的 boilerplate 以及 dashboard 展示:
有勘誤之處,不吝指教。ob'_'ov
