【Windows 8 App】多媒體開發------【圖像】
【Image和ImageBrush】
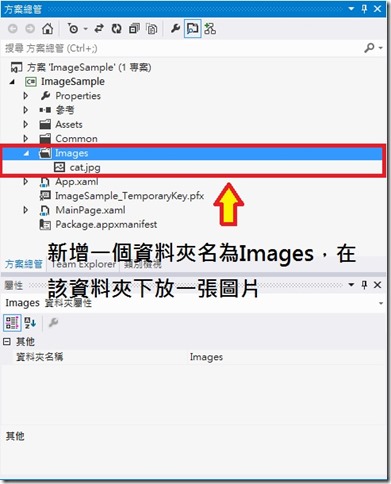
首先建立一個空白的應用程式(XAML),並命名ImageSample,然後在專案下新增一個Images的資料夾
在Images資料夾下添加一張照片
在方案總管中開啟【MainPage.xaml】,然後在Grid元素中新增一個Image的控制項,並輸入以下程式碼
<Page
     x:Class="ImageSample.MainPage"
     xmlns="http://schemas.microsoft.com/winfx/2006/xaml/presentation"
     xmlns:x="http://schemas.microsoft.com/winfx/2006/xaml"
    xmlns:local="using:ImageSample"
    xmlns:d="http://schemas.microsoft.com/expression/blend/2008"
    xmlns:mc="http://schemas.openxmlformats.org/markup-compatibility/2006"
    mc:Ignorable="d">

    <Grid Background="{StaticResource ApplicationPageBackgroundThemeBrush}">
        <Image HorizontalAlignment="Left" Height="748" VerticalAlignment="Top" Width="1346" Source="Images/cat.jpg" Margin="10,10,0,0"/>
    </Grid>
</Page>
然後就會顯示下面的畫面
這是Image的部分
那我們繼續介紹ImageBrush
我們將剛剛的專案刪掉,重新新增一個ImageBrushSample專案,一樣新增一個資料夾,然後在該資料夾下放一張圖片
完成後,開啟【MainPage.xaml】,然後在Grid元素中新增一個Ellipse元素,然後在Ellipse元素中的Ellipse.Fill屬性裡面使用ImageBrush控制項的ImageSource指定要顯示的圖片位址
程式碼如下
<Page
    x:Class="ImageSample.MainPage"
    xmlns="http://schemas.microsoft.com/winfx/2006/xaml/presentation"
    xmlns:x="http://schemas.microsoft.com/winfx/2006/xaml"
    xmlns:local="using:ImageSample"
    xmlns:d="http://schemas.microsoft.com/expression/blend/2008"
    xmlns:mc="http://schemas.openxmlformats.org/markup-compatibility/2006"
    mc:Ignorable="d">

    <Grid Background="{StaticResource ApplicationPageBackgroundThemeBrush}">
        <Ellipse HorizontalAlignment="Left" Height="748" Margin="10,10,0,0" VerticalAlignment="Top" Width="1346">
            <Ellipse.Fill>
                <ImageBrush ImageSource="Images/cat.jpg" />
            </Ellipse.Fill>
        </Ellipse>
    </Grid>
</Page>
程式碼輸入完後會顯示的畫面
介紹一下【Image和ImageBrush】的常用屬性:
- Source屬性:圖片的位址,也可以是網路位址。
- Opacity屬性:圖片不透明度,值範圍0.0 ~ 1.0 ,值越小越透明,值越大越不透明。
- Clip屬性:這是可以精確裁減圖片的屬性。
- Stretch屬性:圖片的呈現狀態,有這四種,None、Uniform、UniformTofill、Fill 四種。
然後Stretch屬性下的四種狀態表示意義:
- None:表示圖片不會延伸填充溢出的部分。
- Uniform:表示圖片將按比例延伸來適應輸出尺寸,寬與高的比例不會被改變,預設值。
- UniformToFill:表示圖片將按比例延伸至完全填充輸出區域,寬與高的比例不會被改變。
- Fill:表示圖片將按比例延伸來適應輸出尺寸,原始的寬與高不會保存,所以有可能會扭曲圖片。
我們來實作Stretch屬性的四種狀態
新增一個專案,【ImageStretch】,在ImageStretch專案下新增一個資料夾,並放入一張圖片
然後開啟【MainPage.xaml】,在Grid中放一個Image控制項和似的Button控制項
之後就來寫程式碼,程式碼如下:
<Page
    x:Class="ImageSample.MainPage"
    xmlns="http://schemas.microsoft.com/winfx/2006/xaml/presentation"
    xmlns:x="http://schemas.microsoft.com/winfx/2006/xaml"
    xmlns:local="using:ImageSample"
    xmlns:d="http://schemas.microsoft.com/expression/blend/2008"
    xmlns:mc="http://schemas.openxmlformats.org/markup-compatibility/2006"
    mc:Ignorable="d">
    <Grid Background="{StaticResource ApplicationPageBackgroundThemeBrush}">
        <!--<Image x:Name="CatImage" HorizontalAlignment="Left" Height="392" Margin="10,10,0,0" VerticalAlignment="Top" Width="618" Source="Images/cat.jpg"/>-->
        <Button x:Name="None" Content="None" HorizontalAlignment="Left" Margin="1107,38,0,0" VerticalAlignment="Top" Height="112" Width="226" FontSize="30" Click="None_Click"/>
        <Button x:Name="Uniform" Content="Uniform" HorizontalAlignment="Left" Margin="1107,230,0,0" VerticalAlignment="Top" Height="112" Width="226" FontSize="30" Click="Uniform_Click"/>
        <Button x:Name="UniformToFill" Content="UniformToFill" HorizontalAlignment="Left" Margin="1107,428,0,0" VerticalAlignment="Top" Height="112" Width="226" FontSize="30" Click="UniformToFill_Click"/>
        <Button x:Name="Fill" Content="Fill" HorizontalAlignment="Left" Margin="1107,606,0,0" VerticalAlignment="Top" Height="112" Width="226" FontSize="30" Click="Fill_Click"/>
        <Image x:Name="CatImage" HorizontalAlignment="Left" Height="680" Margin="10,38,0,0" VerticalAlignment="Top" Width="1077" Source="Images/cat.jpg"/>
    </Grid>
</Page>
然後再到【MainPage.xaml.cs】中寫Click的幾行程式碼,完整程式碼如下:
using System;
using System.Collections.Generic;
using System.IO;
using System.Linq;
using Windows.Foundation;
using Windows.Foundation.Collections;
using Windows.UI.Xaml;
using Windows.UI.Xaml.Controls;
using Windows.UI.Xaml.Controls.Primitives;
using Windows.UI.Xaml.Data;
using Windows.UI.Xaml.Input;
using Windows.UI.Xaml.Media;
using Windows.UI.Xaml.Navigation;

namespace ImageSample
{
    public sealed partial class MainPage : Page
    {
        public MainPage()
        {
            this.InitializeComponent();
        }
        protected override void OnNavigatedTo(NavigationEventArgs e)
        {
        }
        private void None_Click(object sender, RoutedEventArgs e)
        {
            CatImage.Stretch = Stretch.None;
        }
        private void Uniform_Click(object sender, RoutedEventArgs e)
        {
            CatImage.Stretch = Stretch.Uniform;
        }
        private void UniformToFill_Click(object sender, RoutedEventArgs e)
        {
        CatImage.Stretch = Stretch.UniformToFill;
        }
        private void Fill_Click(object sender, RoutedEventArgs e)
        {
            CatImage.Stretch = Stretch.Fill;
        }
    }
}
顯示的畫面,請各位把程式碼輸入進去就會知道囉!!


