[Windows 8 App]圖形-----【輪廓樣式】
我們在上一篇介紹【Geometry】有提到Stroke和StrokeThickness,
【Geometry】參考網址:http://www.dotblogs.com.tw/frank12690/archive/2013/11/20/130508.aspx
我們在這邊將進一步地介紹輪廓樣式,如何讓圖形變得更美觀
- 線的兩端效果
在畫線的時後,使用【StrokeStartLineCap】和【StrokeEndLineCap】,這是改變線的起始端和末端
這兩個屬性的可選值有:【Flat】、【Round】、【Square】、【Triangle】
Flat:沒有特殊效果,屬性的默認值
Round:線的末端產生半圓
Square:線的末端產生矩形
Triangle:線的末端產生等腰直角三角形
我們來實作個範例:
首先新增一個空白專案,取名為【LineCapPage】,開啟【MainPage.xaml】
程式碼如下:
<Page
    x:Class="LineCapPage.MainPage"
    xmlns="http://schemas.microsoft.com/winfx/2006/xaml/presentation"
    xmlns:x="http://schemas.microsoft.com/winfx/2006/xaml"
    xmlns:local="using:LineCapPage"
    xmlns:d="http://schemas.microsoft.com/expression/blend/2008"
    xmlns:mc="http://schemas.openxmlformats.org/markup-compatibility/2006"
    mc:Ignorable="d">

    <Grid Background="{StaticResource ApplicationPageBackgroundThemeBrush}">
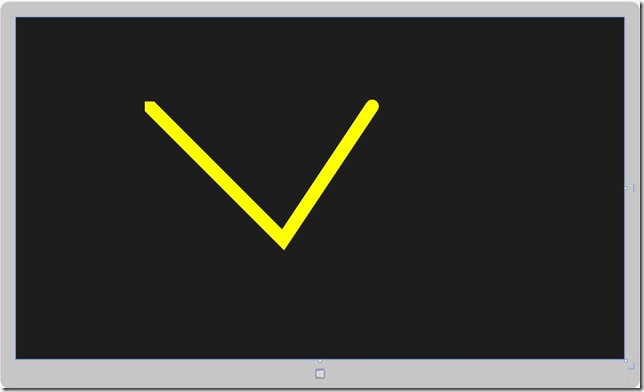
        <Polyline Stroke="Yellow" StrokeThickness="30" StrokeStartLineCap="Triangle" StrokeEndLineCap="Round" Points="300,200 600,500 800,200" >
        </Polyline>
    </Grid>
</Page>
我們來解析一下這行程式碼:
<Polyline Stroke="Yellow" StrokeThickness="30" StrokeStartLineCap="Triangle" StrokeEndLineCap="Round" Points="300,200 600,500 800,200">
Stroke="Yellow" 線條顏色
StrokeThickness="30" 線條的粗細
StrokeStartLineCap="Triangle" 線條的起始端(左邊),Triangle等腰三角形
StrokeEndLineCap="Round" 線條的末端(右邊),Round半圓形
Points="300,200 600,500 800,200"
300:表示起始端(左邊)離左邊螢幕的距離
200:表示起始端(左邊)離上邊螢幕的距離
600:表示交叉點(中間)離左邊螢幕的距離
500:表示交叉點(中間)離上邊螢幕的距離
800:表示末端(右邊)離左邊螢幕的距離
200:表示末端(右邊)離上邊螢幕的距離
設計畫面:我設計了一個黃色勝利標誌
這時有人應該會有人覺得【Flat】和【Square】的差別差在哪裡?
沒關係,看這邊看這邊~
我們會用範例實作給各位看【Flat】和【Square】的差別
新增一個空白專案,取名為【FlatSquarePage】,開啟【MainPage.xaml】
程式碼如下:
<Page
    x:Class="FlatSquarePage.MainPage"
    xmlns="http://schemas.microsoft.com/winfx/2006/xaml/presentation"
    xmlns:x="http://schemas.microsoft.com/winfx/2006/xaml"
    xmlns:local="using:FlatSquarePage"
    xmlns:d="http://schemas.microsoft.com/expression/blend/2008"
    xmlns:mc="http://schemas.openxmlformats.org/markup-compatibility/2006"
    mc:Ignorable="d">

    <Grid Background="{StaticResource ApplicationPageBackgroundThemeBrush}">
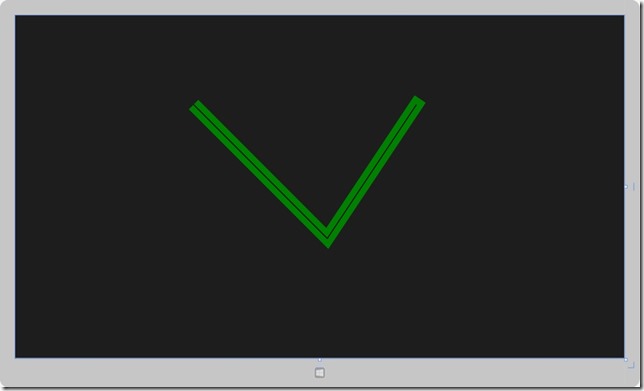
        <Polyline Stroke="Green" StrokeThickness="30" StrokeStartLineCap="Square" StrokeEndLineCap="Flat" Points="900,200 700,500,400,200"></Polyline>
        <Polyline Stroke="Black" StrokeThickness="2" Points="900,200 700,500,400,200"></Polyline>
    </Grid>
</Page>
設計畫面:
有發現【Flat】和【Square】的差別嗎??
看仔細一點,【Flat】和【Square】的末端,【Square】是右方,裡頭的線並沒延展到底,【Flat】的是左方,線有延伸到底
主要是【Square】綠色線會在最末端的地方,再多添加一塊矩形,所以黑色線才沒有延伸到底,這就是【Flat】和【Square】的差別
- 圖形的轉角效果
有沒有發現,我上面的二個範例轉角處,是不是都尖的,這並不是絕對,這可以有其他的選擇
這裡將作這部分的介紹
轉角是使用【StrokeLineJoin】設定屬性效果
StrokeLineJoin可選值:【Miter】、【Bevel】、【Round】
Miter:這就是上面範例的轉角,這是屬性的默認值
Bevel:這是使用斜角頂點來做轉角
Round:這是使用圓角頂點來做轉角
我們來透過下面的範例看轉角的效果
新增一個空白專案,取名為【FlatSquarePage】,開啟【MainPage.xaml】
程式碼如下:
<Page
    x:Class="StrokeLineJoinPage.MainPage"
    xmlns="http://schemas.microsoft.com/winfx/2006/xaml/presentation"
    xmlns:x="http://schemas.microsoft.com/winfx/2006/xaml"
    xmlns:local="using:StrokeLineJoinPage"
    xmlns:d="http://schemas.microsoft.com/expression/blend/2008"
    xmlns:mc="http://schemas.openxmlformats.org/markup-compatibility/2006"
    mc:Ignorable="d">

    <Grid Background="{StaticResource ApplicationPageBackgroundThemeBrush}">
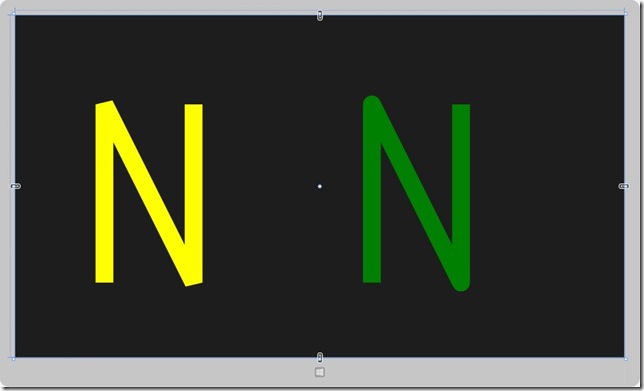
        <Polyline Stroke="Yellow" StrokeThickness="40" Points="200,600 200,200 400,600 400,200" StrokeLineJoin="Bevel"></Polyline>
        <Polyline Stroke="Green" StrokeThickness="40" Points="800,600 800,200 1000,600 1000,200" StrokeLineJoin="Round"></Polyline>
    </Grid>
</Page>
解析這行程式碼:
<Polyline Stroke="Yellow" StrokeThickness="40" Points="200,600 200,200 400,600 400,200" StrokeLineJoin="Bevel"></Polyline>
Stroke="Yellow" 線條的顏色
StrokeThickness="40" 線條的粗細
StrokeLineJoin="Bevel" 線條與線條間的轉角
Points="900,100 900,500 600,100 600,500"
200:起始端離左邊螢幕的距離
600:起始端離上邊螢幕的距離
200:交叉點離左邊螢幕的距離
200:交叉點離上邊螢幕的距離
400:交叉點離左邊螢幕的距離
600:交叉點離上邊螢幕的距離
400:末端離左邊螢幕的距離
200:末端離上邊螢幕的距離
解析這行程式碼:
<Polyline Stroke="Green" StrokeThickness="40" Points="800,600 800,200 1000,600 1000,200" StrokeLineJoin="Round"></Polyline>
這行和上面的差別就差在一個是斜角一個是圓角
設計的畫面:
- 虛線樣式
使用【StrokeDashArray】可以讓實線變成虛線,並且使用【StrokeDashCap】可以調整虛線兩端的效果,我們來做個範例!!
新增一個空白專案,取名為【StrokeDashArrayPage】,開啟【MainPage.xaml】
程式碼如下:
<Page
    x:Class="StrokeDashArrayPage.MainPage"
    xmlns="http://schemas.microsoft.com/winfx/2006/xaml/presentation"
    xmlns:x="http://schemas.microsoft.com/winfx/2006/xaml"
    xmlns:local="using:StrokeDashArrayPage"
    xmlns:d="http://schemas.microsoft.com/expression/blend/2008"
    xmlns:mc="http://schemas.openxmlformats.org/markup-compatibility/2006"
    mc:Ignorable="d">
    <Grid Background="{StaticResource ApplicationPageBackgroundThemeBrush}">
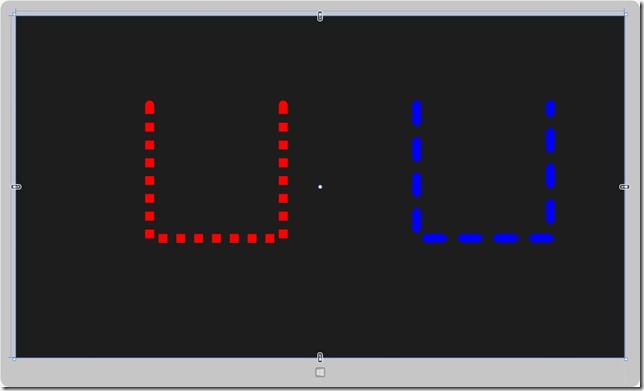
        <Polyline Stroke="Red" StrokeThickness="20" StrokeStartLineCap="Round" StrokeEndLineCap="Round" Points="300,200 300,500 600,500 600,200" StrokeDashArray="1 1"></Polyline>
        <Polyline Stroke="Blue" StrokeThickness="20" StrokeStartLineCap="Round" StrokeEndLineCap="Round" StrokeDashCap="Triangle" Points="900,200 900,500 1200,500 1200,200" StrokeDashArray="2 2"></Polyline>
    </Grid>
</Page>
程式碼解析:
左邊紅色U形
<Polyline Stroke="Red" StrokeThickness="20" StrokeStartLineCap="Round" StrokeEndLineCap="Round" Points="300,200 300,500 600,500 600,200" StrokeDashArray="1 1"></Polyline>
Stroke="Red" :線條顏色
StrokeThickness="10" :線條粗細
StrokeStartLineCap="Round" :線條的起始端圖形
StrokeEndLineCap="Round" :線條的末端圖形
StrokeDashArray="1 1" :前面的 1 表示線的寬度,後面的 1 表示長度為前面 1 的倍數為間隙
Points="300,200 300,500 600,500 600,200"
300:起始端離左邊螢幕的距離
200 :起始端離上邊螢幕的距離
300:左交叉點離左邊螢幕的距離
500:左交叉點離上邊螢幕的距離
600:右交叉點離左邊螢幕的距離
500:右交叉點離上邊螢幕的距離
600:末端離左邊螢幕的距離
200:末端離上邊螢幕的距離
右邊藍色U形
<Polyline Stroke="Blue" StrokeThickness="20" StrokeStartLineCap="Round" StrokeEndLineCap="Round" StrokeDashCap="Triangle" Points="900,200 900,500 1200,500 1200,200" StrokeDashArray="2 2"></Polyline>
與紅色U形的主要差別
StrokeDashCap="Triangle":虛線兩端的圖形效果
設計畫面:


