[Windows 8 App]Setting Charm
這次介紹在專案中的【App.xaml.cs】裡設置Setting Charm
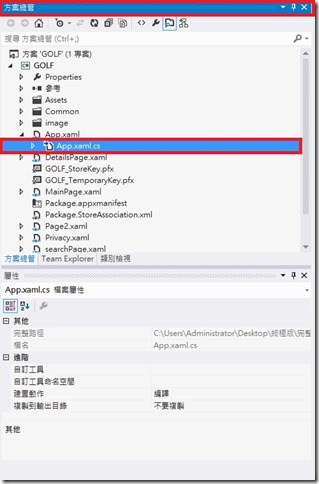
首先開啟專案,開啟在【方案總管】裡的【App.xaml.cs】
在前端using部分
需要using 兩行程式碼
第一:using Windows.UI.ApplicationSettings;
第二:using Windows.UI.Popups;
找到 sealed partial class App : Application{} 這裡面新增以下程式碼即可
private void OnCommandsRequested(SettingsPane sender, SettingsPaneCommandsRequestedEventArgs args)
        {
            UICommandInvokedHandler handler =
                     new UICommandInvokedHandler(onSettingsCommand);

            SettingsCommand privacy1Command =
                     new SettingsCommand("privacystatementPage", "隱私權原則", handler);

            args.Request.ApplicationCommands.Add(privacy1Command);
        }
        async void onSettingsCommand(IUICommand command)
        {
            SettingsCommand settingsCommand = (SettingsCommand)command;
            if (settingsCommand.Id.ToString().Equals("privacystatementPage"))
            {
                var success =
                     await Windows.System.Launcher.LaunchUriAsync(
                             new Uri(@"http://frank12690.pixnet.net/blog/post/23883682"));
            }
        }
看到最後一行的
await Windows.System.Launcher.LaunchUriAsync(new Uri(@"http://frank12690.pixnet.net/blog/post/23883682"));
紅色底線換成你所宣告的隱私權
然後,還有一行需要新增
找到下面的protected override void OnLaunched(LaunchActivatedEventArgs args)之後
在protected override void OnLaunched(LaunchActivatedEventArgs args)
{
……
……
SettingsPane.GetForCurrentView().CommandsRequested += OnCommandsRequested;
}
新增紅色那行程式碼
以下是初始的【App.xaml.cs】設置【Setting Charm】後的程式碼:
using System;
using System.Collections.Generic;
using System.IO;
using System.Linq;
using Windows.ApplicationModel;
using Windows.ApplicationModel.Activation;
using Windows.Foundation;
using Windows.Foundation.Collections;
using Windows.UI.ApplicationSettings;
using Windows.UI.Popups;
using Windows.UI.Xaml;
using Windows.UI.Xaml.Controls;
using Windows.UI.Xaml.Controls.Primitives;
using Windows.UI.Xaml.Data;
using Windows.UI.Xaml.Input;
using Windows.UI.Xaml.Media;
using Windows.UI.Xaml.Navigation;

// 空白應用程式範本已記錄在 http://go.microsoft.com/fwlink/?LinkId=234227

namespace App1
{
    /// <summary>
    /// 提供應用程式專屬行為以補充預設的應用程式類別。
    /// </summary>
    sealed partial class App : Application
    {
        /// <summary>
        /// 初始化單一應用程式物件。這是第一行執行之撰寫程式碼,
        /// 而且其邏輯相當於 main() 或 WinMain()。
        /// </summary>
        public App()
        {
            this.InitializeComponent();
            this.Suspending += OnSuspending;
        }

        /// <summary>
        /// 在應用程式由使用者正常啟動時叫用。其他進入點
        /// 將在啟動應用程式以開啟特定檔案時使用,以顯示
        /// 搜尋結果等。
        /// </summary>
        /// <param name="args">關於啟動要求和處理序的詳細資料。</param>
        protected override void OnLaunched(LaunchActivatedEventArgs args)
        {
            Frame rootFrame = Window.Current.Content as Frame;

            // 當視窗已經有內容時,不重複應用程式初始化,
            // 只確定視窗是作用中
            if (rootFrame == null)
            {
                // 建立框架做為巡覽內容,並巡覽至第一頁
                rootFrame = new Frame();

                if (args.PreviousExecutionState == ApplicationExecutionState.Terminated)
                {
                    //TODO: 從之前暫停的應用程式載入狀態
                }

                // 將框架放在目前視窗中
                Window.Current.Content = rootFrame;
            }

            if (rootFrame.Content == null)
            {
                // 在巡覽堆疊未還原時,巡覽至第一頁,
                // 設定新的頁面,方式是透過傳遞必要資訊做為巡覽
                // 參數
                if (!rootFrame.Navigate(typeof(MainPage), args.Arguments))
                {
                    throw new Exception("Failed to create initial page");
                }
            }
            // 確定目前視窗是作用中
            Window.Current.Activate();
            SettingsPane.GetForCurrentView().CommandsRequested += OnCommandsRequested;
        }

        /// <summary>
        /// 在應用程式暫停執行時叫用。應用程式狀態會儲存起來,
        /// 但不知道應用程式即將結束或繼續,而且仍將記憶體
        /// 的內容保持不變。
        /// </summary>
        /// <param name="sender">暫停之要求的來源。</param>
        /// <param name="e">有關暫停之要求的詳細資料。</param>
        private void OnSuspending(object sender, SuspendingEventArgs e)
        {
            var deferral = e.SuspendingOperation.GetDeferral();
            //TODO: 儲存應用程式狀態,並停止任何背景活動
            deferral.Complete();
        }
        private void OnCommandsRequested(SettingsPane sender, SettingsPaneCommandsRequestedEventArgs args)
        {
            UICommandInvokedHandler handler =
                     new UICommandInvokedHandler(onSettingsCommand);

            SettingsCommand privacy1Command =
                     new SettingsCommand("privacystatementPage", "隱私權原則", handler);

            args.Request.ApplicationCommands.Add(privacy1Command);
        }
        async void onSettingsCommand(IUICommand command)
        {
            SettingsCommand settingsCommand = (SettingsCommand)command;
            if (settingsCommand.Id.ToString().Equals("privacystatementPage"))
            {
                var success =
                     await Windows.System.Launcher.LaunchUriAsync(
                             new Uri(@"http://frank12690.pixnet.net/blog/post/23883682"));
            }
        }
    }
}
參考來源:http://blogs.msdn.com/b/mengtsai/archive/2013/01/02/50-windows-store-app.aspx
