K8S by Ubuntu 16.04
一、規格配備
| OS | IP | CPU | RAM | HDD | Docker | |
| Master | Ubuntu 16.04.6 LTS | 192.168.10.10 | 2C | 2G | 20G | 18.09.7 |
| Node1 | Ubuntu 16.04.6 LTS | 192.168.10.11 | 2C | 2G | 20G | 18.09.7 |
| Node2 | Ubuntu 16.04.6 LTS | 192.168.10.12 | 2C | 2G | 20G | 18.09.7 |
註:這只是測試用,所以基本配備很低
二、 前置作業
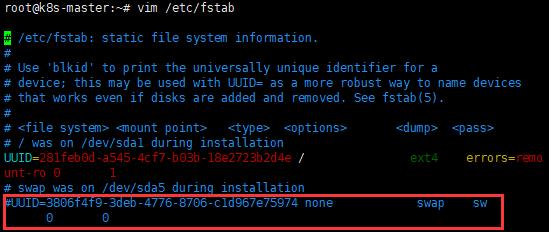
1. 關閉 swap
A. 指令
swapoff -a

B. vim /etc/fstab
2. vim /etc/hosts

3. Docker安裝
A. 安裝相關工具
apt-get update && apt-get install -y apt-transport-https curl

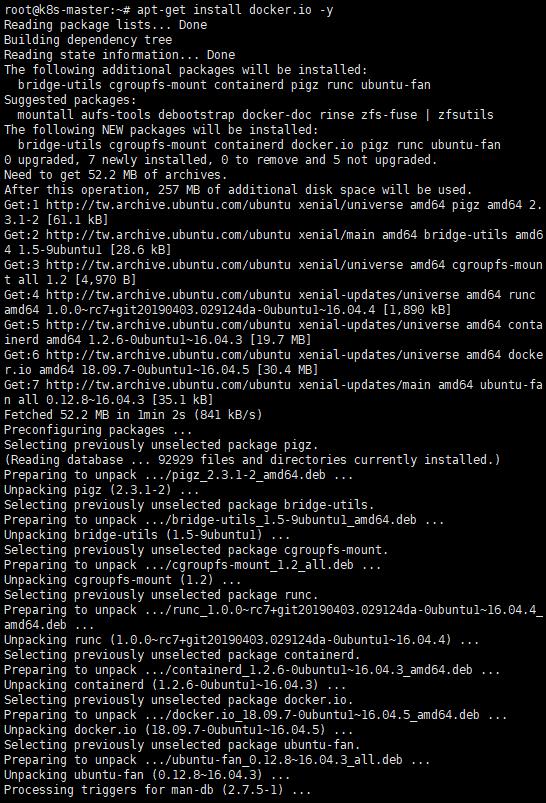
B. 安裝Docker
apt-get install docker.io -y
C. 查看版本
docker version

D. 啟動服務
a. systemctl enable docker
b. systemctl start docker
c. systemctl status docker

三、kubectl、kubelet、kubeadm安裝
1. apt-key
curl -s https://packages.cloud.google.com/apt/doc/apt-key.gpg | apt-key add -
註:有時在安裝時可能會報錯,若出現錯誤時,可以執行此指令後,再重新安裝

![]()
2. kubernetes.list
cat <<EOF >/etc/apt/sources.list.d/kubernetes.list
deb http://apt.kubernetes.io/ kubernetes-xenial main
EOF
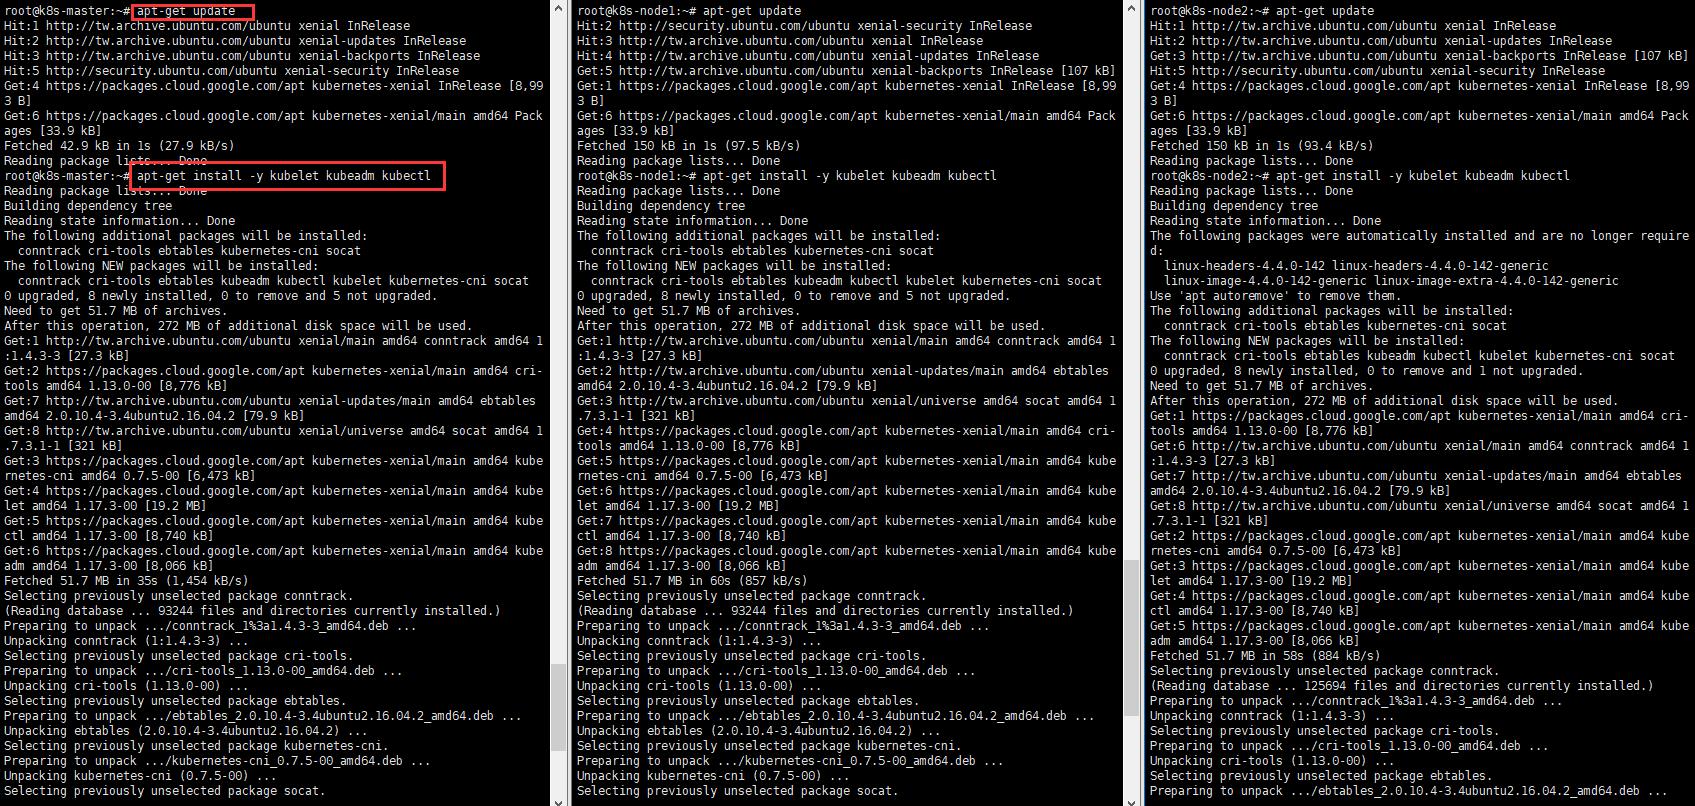
3. 安裝
apt-get update
apt-get install -y kubelet kubeadm kubectl
4. 開機啟用
systemctl enable kubelet
四、Master配置
1. Profile
export KUBECONFIG=/etc/kubernetes/admin.conf

2. 重新加載
systemctl daemon-reload
3. 初始化
kubeadm init --pod-network-cidr=10.244.0.0/16 --apiserver-advertise-address=192.168.10.10 --kubernetes-version=v1.17.3 --ignore-preflight-errors=swap
註:完成後,最下方會出現加入Master Cluster需要的命令
root@k8s-master:~# kubeadm init --pod-network-cidr=10.244.0.0/16 --apiserver-advertise-address=192.168.10.10 --kubernetes-version=v1.17.3 --ignore-preflight-errors=swap
W0225 15:48:18.969368    6699 validation.go:28] Cannot validate kube-proxy config - no validator is available
W0225 15:48:18.969421    6699 validation.go:28] Cannot validate kubelet config - no validator is available
[init] Using Kubernetes version: v1.17.3
[preflight] Running pre-flight checks
	[WARNING IsDockerSystemdCheck]: detected "cgroupfs" as the Docker cgroup driver. The recommended driver is "systemd". Please follow the guide at https://kubernetes.io/docs/setup/cri/
[preflight] Pulling images required for setting up a Kubernetes cluster
[preflight] This might take a minute or two, depending on the speed of your internet connection
[preflight] You can also perform this action in beforehand using 'kubeadm config images pull'
[kubelet-start] Writing kubelet environment file with flags to file "/var/lib/kubelet/kubeadm-flags.env"
[kubelet-start] Writing kubelet configuration to file "/var/lib/kubelet/config.yaml"
[kubelet-start] Starting the kubelet
[certs] Using certificateDir folder "/etc/kubernetes/pki"
[certs] Generating "ca" certificate and key
[certs] Generating "apiserver" certificate and key
[certs] apiserver serving cert is signed for DNS names [k8s-master kubernetes kubernetes.default kubernetes.default.svc kubernetes.default.svc.cluster.local] and IPs [10.96.0.1 192.168.10.10]
[certs] Generating "apiserver-kubelet-client" certificate and key
[certs] Generating "front-proxy-ca" certificate and key
[certs] Generating "front-proxy-client" certificate and key
[certs] Generating "etcd/ca" certificate and key
[certs] Generating "etcd/server" certificate and key
[certs] etcd/server serving cert is signed for DNS names [k8s-master localhost] and IPs [192.168.10.10 127.0.0.1 ::1]
[certs] Generating "etcd/peer" certificate and key
[certs] etcd/peer serving cert is signed for DNS names [k8s-master localhost] and IPs [192.168.10.10 127.0.0.1 ::1]
[certs] Generating "etcd/healthcheck-client" certificate and key
[certs] Generating "apiserver-etcd-client" certificate and key
[certs] Generating "sa" key and public key
[kubeconfig] Using kubeconfig folder "/etc/kubernetes"
[kubeconfig] Writing "admin.conf" kubeconfig file
[kubeconfig] Writing "kubelet.conf" kubeconfig file
[kubeconfig] Writing "controller-manager.conf" kubeconfig file
[kubeconfig] Writing "scheduler.conf" kubeconfig file
[control-plane] Using manifest folder "/etc/kubernetes/manifests"
[control-plane] Creating static Pod manifest for "kube-apiserver"
[control-plane] Creating static Pod manifest for "kube-controller-manager"
W0225 15:50:23.423196    6699 manifests.go:214] the default kube-apiserver authorization-mode is "Node,RBAC"; using "Node,RBAC"
[control-plane] Creating static Pod manifest for "kube-scheduler"
W0225 15:50:23.424446    6699 manifests.go:214] the default kube-apiserver authorization-mode is "Node,RBAC"; using "Node,RBAC"
[etcd] Creating static Pod manifest for local etcd in "/etc/kubernetes/manifests"
[wait-control-plane] Waiting for the kubelet to boot up the control plane as static Pods from directory "/etc/kubernetes/manifests". This can take up to 4m0s
[apiclient] All control plane components are healthy after 15.004940 seconds
[upload-config] Storing the configuration used in ConfigMap "kubeadm-config" in the "kube-system" Namespace
[kubelet] Creating a ConfigMap "kubelet-config-1.17" in namespace kube-system with the configuration for the kubelets in the cluster
[upload-certs] Skipping phase. Please see --upload-certs
[mark-control-plane] Marking the node k8s-master as control-plane by adding the label "node-role.kubernetes.io/master=''"
[mark-control-plane] Marking the node k8s-master as control-plane by adding the taints [node-role.kubernetes.io/master:NoSchedule]
[bootstrap-token] Using token: 2lzzrv.ui8185z75ijhthbu
[bootstrap-token] Configuring bootstrap tokens, cluster-info ConfigMap, RBAC Roles
[bootstrap-token] configured RBAC rules to allow Node Bootstrap tokens to post CSRs in order for nodes to get long term certificate credentials
[bootstrap-token] configured RBAC rules to allow the csrapprover controller automatically approve CSRs from a Node Bootstrap Token
[bootstrap-token] configured RBAC rules to allow certificate rotation for all node client certificates in the cluster
[bootstrap-token] Creating the "cluster-info" ConfigMap in the "kube-public" namespace
[kubelet-finalize] Updating "/etc/kubernetes/kubelet.conf" to point to a rotatable kubelet client certificate and key
[addons] Applied essential addon: CoreDNS
[addons] Applied essential addon: kube-proxy

Your Kubernetes control-plane has initialized successfully!

To start using your cluster, you need to run the following as a regular user:

  mkdir -p $HOME/.kube
  sudo cp -i /etc/kubernetes/admin.conf $HOME/.kube/config
  sudo chown $(id -u):$(id -g) $HOME/.kube/config

You should now deploy a pod network to the cluster.
Run "kubectl apply -f [podnetwork].yaml" with one of the options listed at:
  https://kubernetes.io/docs/concepts/cluster-administration/addons/

Then you can join any number of worker nodes by running the following on each as root:

kubeadm join 192.168.10.10:6443 --token 2lzzrv.ui8185z75ijhthbu \
    --discovery-token-ca-cert-hash sha256:a7150266c76bfca384aaf002a8681429afdb59acabdbf0d7f268254d68eb4356
註:如果沒有出現『Your Kubernetes control-plane has initialized successfully!』的訊息,
重新檢查上面所有的步驟,再重新執行一次
A. --pod-network-cidr
配置節點中的pod的可用IP Address,此為內部IP
B. --apiserver-advertise-address
Master的IP address
C. --kubernetes-version
可使用kubectl version查看

4. 查看kubelet狀態
systemctl status kubelet
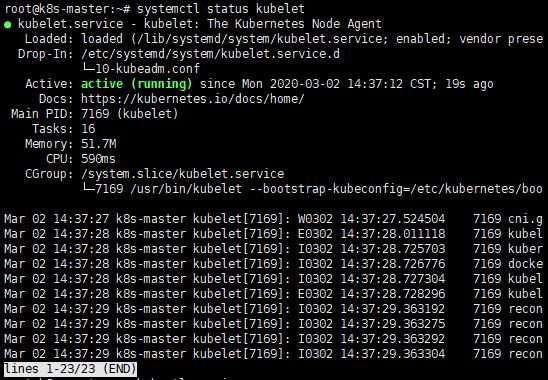
註:在初始化後,kubelet才能正常啟動,若在初始化前就嘗試讓kubelet啟動的話,通常會失敗,
而接下來要解決就需要花很多時間
5. 查看節點
kubectl get nodes
![]()
註:狀態出現『NotReady』,是因為網路尚未配置
6. 網路配置
kubectl apply -f https://raw.githubusercontent.com/coreos/flannel/master/Documentation/kube-flannel.yml

註:網路配置後,過段時間再執行『kubectl get nodes』,就可以發現狀態為『Ready』
![]()
五、Node配置
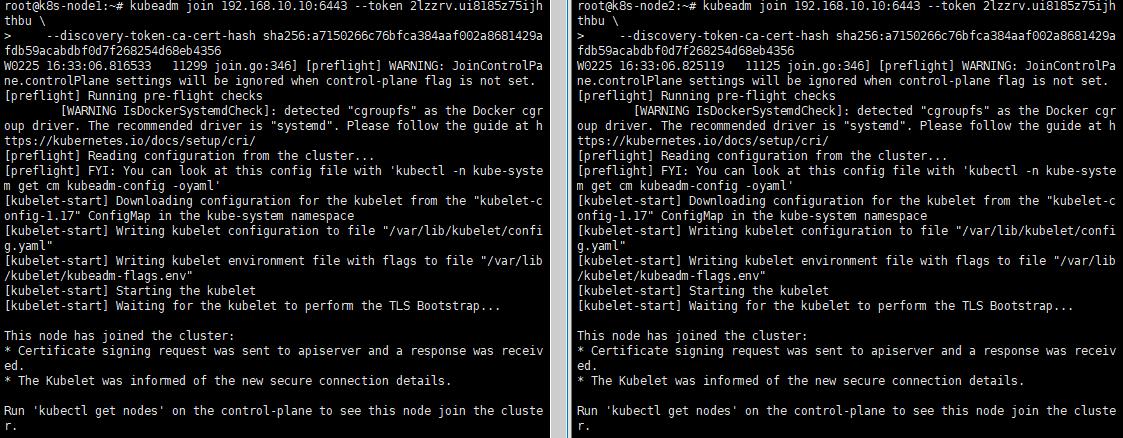
1. 加入Cluster
kubeadm join 192.168.10.10:6443 --token token_name --discovery-token-ca-cert-hash token-ca-cert-hash_name
2. 查看節點狀態
kubectl get nodes

3. 查看Pod狀態
kubectl get pod --all-namespaces
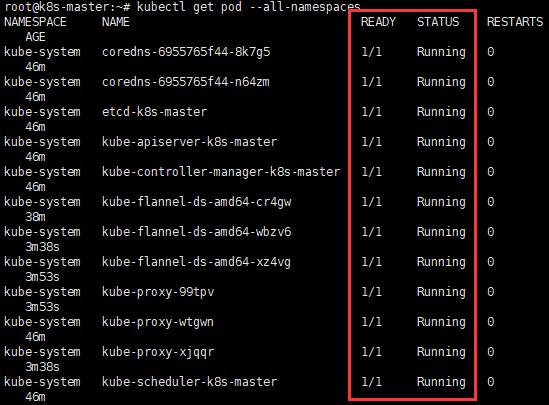
註:若部分服務沒有正常啟動,一般原因為缺少Images,需要手動下載,在Master下載即可。
docker pull registry.cn-hangzhou.aliyuncs.com/google_containers/kube-controller-manager:v1.17.3
docker pull registry.cn-hangzhou.aliyuncs.com/google_containers/kube-scheduler:v1.17.3
docker pull registry.cn-hangzhou.aliyuncs.com/google_containers/kube-proxy:v1.17.3
docker pull registry.cn-hangzhou.aliyuncs.com/google_containers/pause:3.1
docker pull registry.cn-hangzhou.aliyuncs.com/google_containers/etcd:3.4.3-0
docker pull registry.cn-hangzhou.aliyuncs.com/google_containers/coredns:1.6.5
docker pull registry.cn-hangzhou.aliyuncs.com/google_containers/kube-apiserver:v1.17.3


docker tag registry.cn-hangzhou.aliyuncs.com/google_containers/kube-controller-manager:v1.17.3 k8s.gcr.io/kube-controller-manager:v1.17.3
docker tag registry.cn-hangzhou.aliyuncs.com/google_containers/kube-scheduler:v1.17.3 k8s.gcr.io/kube-scheduler:v1.17.3
docker tag registry.cn-hangzhou.aliyuncs.com/google_containers/kube-proxy:v1.17.3 k8s.gcr.io/kube-proxy:v1.17.3
docker tag registry.cn-hangzhou.aliyuncs.com/google_containers/pause:3.1 k8s.gcr.io/pause:3.1
docker tag registry.cn-hangzhou.aliyuncs.com/google_containers/etcd:3.4.3-0 k8s.gcr.io/etcd:3.4.3-0
docker tag registry.cn-hangzhou.aliyuncs.com/google_containers/coredns:1.6.5 k8s.gcr.io/coredns:1.6.5
docker tag registry.cn-hangzhou.aliyuncs.com/google_containers/kube-apiserver:v1.17.3 k8s.gcr.io/kube-apiserver:v1.17.3
4. 佈署結果檢查
kubectl get cs

六、應用佈署
1. MySQL
A. mysql-rc.yaml
apiVersion: v1
kind: ReplicationController
metadata:
  name: mysql-rc
  labels:
    name: mysql-rc
spec:
  replicas: 1
  selector:
    name: mysql-pod
  template:
    metadata:
      labels:
        name: mysql-pod
    spec:
      containers:
      - name: mysql
        image: mysql
        imagePullPolicy: IfNotPresent
        ports:
        - containerPort: 3306
        env:
        - name: MYSQL_ROOT_PASSWORD
          value: "password"
B. mysql-svc.yaml
apiVersion: v1
kind: Service
metadata:
  name: mysql-svc
  labels:
    name: mysql-svc
spec:
  type: NodePort
  ports:
  - port: 3306
    protocol: TCP
    targetPort: 3306
    name: http
    nodePort: 30000
  selector:
    name: mysql-pod
C. 安裝
執行文件,下載MySQL Images並執行mysqlr容器
a. kubectl create -f mysql-rc.yaml
![]()
b. kubectl create -f mysql-svc.yaml
![]()
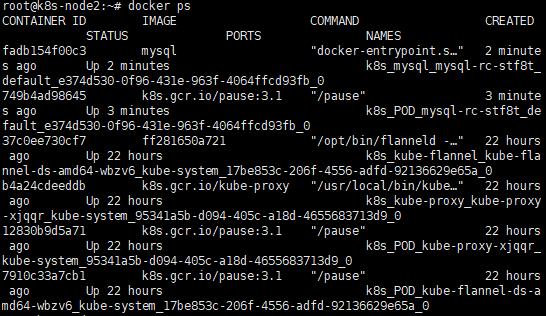
c. 查看狀態
docker ps,可在其中一台Node看到
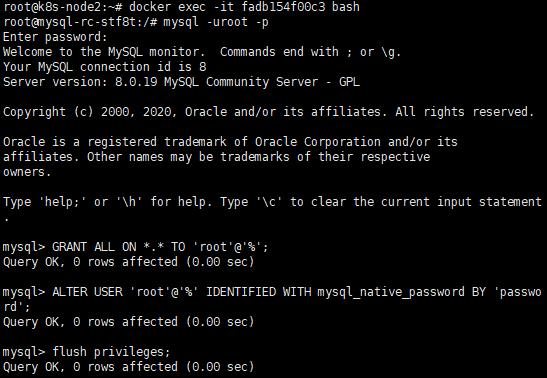
D. 開啟遠端連線權限
a. docker exec -it container_id bash
b. mysql -uroot -p
c. GRANT ALL ON *.* TO 'root'@'%';
d. ALTER USER 'root'@'%' IDENTIFIED WITH mysql_native_password BY 'password';
e. flush privileges;
E. 登入測試
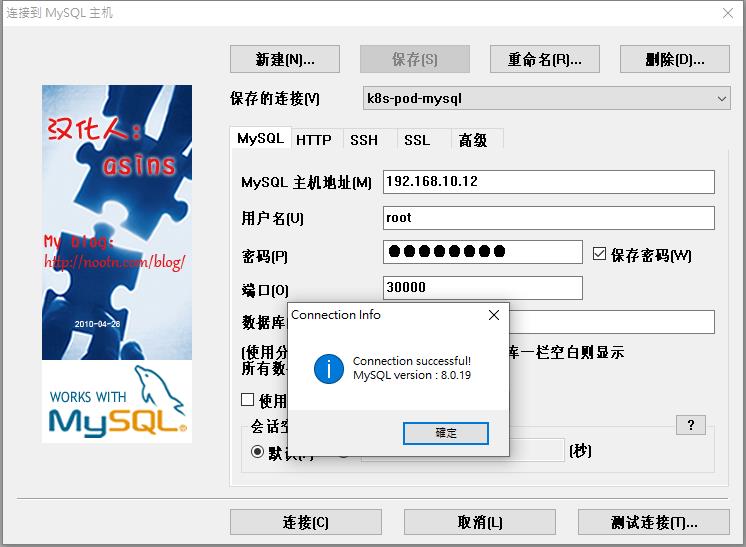

2. JAVA應用
A. 創建deployment
a. demo_deployment.yaml
使用deployment方式佈署java應用,應用名稱為demo,可透過docker pull wangchunfa/demo下載,
為一Spring boot應用,外部端口為8771
apiVersion: apps/v1
kind: Deployment
metadata:
  name: demo-deployment
spec:
  replicas: 1
  selector:
    matchLabels:
      app: demo
  template:
    metadata:
      labels:
        app: demo
    spec:
      containers:
      - name: wangcf-demo
        image: wangchunfa/demo:latest
        ports:
        - containerPort: 8771
註:apiVersion:apps/v1
1.1.6版本之前 apiVsersion:extensions/v1beta1
2.1.6版本到1.9版本之間:apps/v1beta1
3.1.9版本之後:apps/v1
b. kubectl create -f demo_deployment.yaml --record
![]()
c. kubectl get deployment
佈署後,查看狀態,需等待一段時間才能完成
![]()
d. kubectl get rs
![]()
e. kubectl get pods -o wide
注意IP列,顯示的是內部Pod網路的IP地址,不是Node的喔

f. 測試
curl http://10.244.1.3:8771/api/v1/product/find?id=2
![]()
B. 其他命令應用
a. 擴大rs副本
kubectl scale deployment demo-deployment --replicas 2

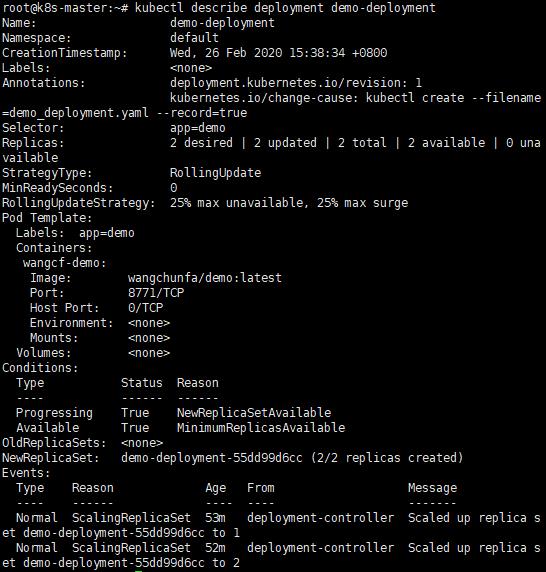
b. 查看deployment
kubectl describe deployment demo-deployment
c. 查看歷史紀錄
kubectl rollout history deployment/demo-deployment

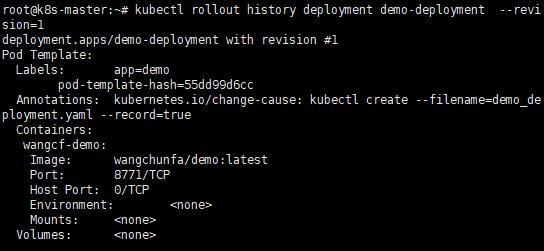
d. 查看單個revision的詳細訊息
kubectl rollout history deployment demo-deployment --revision=1
e. 刪除deployment
kubectl delete deployment demo-deployment
![]()
f. K8S Deployment命令
3. Dashboard安裝
A. 下載官方文檔
wget https://raw.githubusercontent.com/kubernetes/dashboard/v2.0.0-beta8/aio/deploy/recommended.yaml
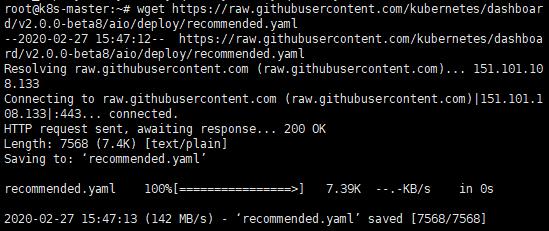
註:官方文檔網址
B. 編輯文檔
# Copyright 2017 The Kubernetes Authors.
#
# Licensed under the Apache License, Version 2.0 (the "License");
# you may not use this file except in compliance with the License.
# You may obtain a copy of the License at
#
#     http://www.apache.org/licenses/LICENSE-2.0
#
# Unless required by applicable law or agreed to in writing, software
# distributed under the License is distributed on an "AS IS" BASIS,
# WITHOUT WARRANTIES OR CONDITIONS OF ANY KIND, either express or implied.
# See the License for the specific language governing permissions and
# limitations under the License.

apiVersion: v1
kind: Namespace
metadata:
  name: kubernetes-dashboard

---

apiVersion: v1
kind: ServiceAccount
metadata:
  labels:
    k8s-app: kubernetes-dashboard
  name: kubernetes-dashboard
  namespace: kubernetes-dashboard

---

kind: Service
apiVersion: v1
metadata:
  labels:
    k8s-app: kubernetes-dashboard
  name: kubernetes-dashboard
  namespace: kubernetes-dashboard
spec:
  type: NodePort #新增
  ports:
    - port: 443
      nodePort: 30001   #新增,不設置則為隨機
      targetPort: 8443
  selector:
    k8s-app: kubernetes-dashboard

---

apiVersion: v1
kind: Secret
metadata:
  labels:
    k8s-app: kubernetes-dashboard
  name: kubernetes-dashboard-certs  #此名字與產憑證用的名字一樣,所以更改需注意
  namespace: kubernetes-dashboard
type: Opaque

---

apiVersion: v1
kind: Secret
metadata:
  labels:
    k8s-app: kubernetes-dashboard
  name: kubernetes-dashboard-csrf
  namespace: kubernetes-dashboard
type: Opaque
data:
  csrf: ""

---

apiVersion: v1
kind: Secret
metadata:
  labels:
    k8s-app: kubernetes-dashboard
  name: kubernetes-dashboard-key-holder
  namespace: kubernetes-dashboard
type: Opaque

---

kind: ConfigMap
apiVersion: v1
metadata:
  labels:
    k8s-app: kubernetes-dashboard
  name: kubernetes-dashboard-settings
  namespace: kubernetes-dashboard

---

kind: Role
apiVersion: rbac.authorization.k8s.io/v1
metadata:
  labels:
    k8s-app: kubernetes-dashboard
  name: kubernetes-dashboard
  namespace: kubernetes-dashboard
rules:
  # Allow Dashboard to get, update and delete Dashboard exclusive secrets.
  - apiGroups: [""]
    resources: ["secrets"]
    resourceNames: ["kubernetes-dashboard-key-holder", "kubernetes-dashboard-certs", "kubernetes-dashboard-csrf"]
    verbs: ["get", "update", "delete"]
    # Allow Dashboard to get and update 'kubernetes-dashboard-settings' config map.
  - apiGroups: [""]
    resources: ["configmaps"]
    resourceNames: ["kubernetes-dashboard-settings"]
    verbs: ["get", "update"]
    # Allow Dashboard to get metrics.
  - apiGroups: [""]
    resources: ["services"]
    resourceNames: ["heapster", "dashboard-metrics-scraper"]
    verbs: ["proxy"]
  - apiGroups: [""]
    resources: ["services/proxy"]
    resourceNames: ["heapster", "http:heapster:", "https:heapster:", "dashboard-metrics-scraper", "http:dashboard-metrics-scraper"]
    verbs: ["get"]

---

kind: ClusterRole
apiVersion: rbac.authorization.k8s.io/v1
metadata:
  labels:
    k8s-app: kubernetes-dashboard
  name: kubernetes-dashboard
rules:
  # Allow Metrics Scraper to get metrics from the Metrics server
  - apiGroups: ["metrics.k8s.io"]
    resources: ["pods", "nodes"]
    verbs: ["get", "list", "watch"]

---

apiVersion: rbac.authorization.k8s.io/v1
kind: RoleBinding
metadata:
  labels:
    k8s-app: kubernetes-dashboard
  name: kubernetes-dashboard
  namespace: kubernetes-dashboard
roleRef:
  apiGroup: rbac.authorization.k8s.io
  kind: Role
  name: kubernetes-dashboard
subjects:
  - kind: ServiceAccount
    name: kubernetes-dashboard
    namespace: kubernetes-dashboard

---

apiVersion: rbac.authorization.k8s.io/v1
kind: ClusterRoleBinding
metadata:
  name: kubernetes-dashboard
roleRef:
  apiGroup: rbac.authorization.k8s.io
  kind: ClusterRole
  name: kubernetes-dashboard
subjects:
  - kind: ServiceAccount
    name: kubernetes-dashboard
    namespace: kubernetes-dashboard

---

kind: Deployment
apiVersion: apps/v1
metadata:
  labels:
    k8s-app: kubernetes-dashboard
  name: kubernetes-dashboard
  namespace: kubernetes-dashboard
spec:
  replicas: 1
  revisionHistoryLimit: 10
  selector:
    matchLabels:
      k8s-app: kubernetes-dashboard
  template:
    metadata:
      labels:
        k8s-app: kubernetes-dashboard
    spec:
      nodeSelector:
        type: master    #佈署在哪一個節點的選擇器,根據需求指定
      containers:
        - name: kubernetes-dashboard
          image: kubernetesui/dashboard:v2.0.0-beta8
          #imagePullPolicy: Always
          imagePullPolicy: IfNotPresent #若本地不存在再下載
          ports:
            - containerPort: 8443
              protocol: TCP
          args:
            - --auto-generate-certificates
            - --namespace=kubernetes-dashboard
            # Uncomment the following line to manually specify Kubernetes API server Host
            # If not specified, Dashboard will attempt to auto discover the API server and connect
            # to it. Uncomment only if the default does not work.
            # - --apiserver-host=http://my-address:port
          volumeMounts:
            - name: kubernetes-dashboard-certs
              mountPath: /certs
              # Create on-disk volume to store exec logs
            - mountPath: /tmp
              name: tmp-volume
          livenessProbe:
            httpGet:
              scheme: HTTPS
              path: /
              port: 8443
            initialDelaySeconds: 30
            timeoutSeconds: 30
          securityContext:
            allowPrivilegeEscalation: false
            readOnlyRootFilesystem: true
            runAsUser: 1001
            runAsGroup: 2001
      volumes:
        - name: kubernetes-dashboard-certs
          secret:
            secretName: kubernetes-dashboard-certs
        - name: tmp-volume
          emptyDir: {}
      serviceAccountName: kubernetes-dashboard
      nodeSelector:
        "beta.kubernetes.io/os": linux
      # Comment the following tolerations if Dashboard must not be deployed on master
      tolerations:
        - key: node-role.kubernetes.io/master
          effect: NoSchedule

---

kind: Service
apiVersion: v1
metadata:
  labels:
    k8s-app: dashboard-metrics-scraper
  name: dashboard-metrics-scraper
  namespace: kubernetes-dashboard
spec:
  ports:
    - port: 8000
      targetPort: 8000
  selector:
    k8s-app: dashboard-metrics-scraper

---

kind: Deployment
apiVersion: apps/v1
metadata:
  labels:
    k8s-app: dashboard-metrics-scraper
  name: dashboard-metrics-scraper
  namespace: kubernetes-dashboard
spec:
  replicas: 1
  revisionHistoryLimit: 10
  selector:
    matchLabels:
      k8s-app: dashboard-metrics-scraper
  template:
    metadata:
      labels:
        k8s-app: dashboard-metrics-scraper
      annotations:
        seccomp.security.alpha.kubernetes.io/pod: 'runtime/default'
    spec:
      containers:
        - name: dashboard-metrics-scraper
          image: kubernetesui/metrics-scraper:v1.0.1
          ports:
            - containerPort: 8000
              protocol: TCP
          livenessProbe:
            httpGet:
              scheme: HTTP
              path: /
              port: 8000
            initialDelaySeconds: 30
            timeoutSeconds: 30
          volumeMounts:
          - mountPath: /tmp
            name: tmp-volume
          securityContext:
            allowPrivilegeEscalation: false
            readOnlyRootFilesystem: true
            runAsUser: 1001
            runAsGroup: 2001
      serviceAccountName: kubernetes-dashboard
      nodeSelector:
        "beta.kubernetes.io/os": linux
      # Comment the following tolerations if Dashboard must not be deployed on master
      tolerations:
        - key: node-role.kubernetes.io/master
          effect: NoSchedule
      volumes:
        - name: tmp-volume
          emptyDir: {}
C. 憑證
a. 新增資料夾放置憑證
mkdir key && cd key
b. 查看NameSpace
kubectl get namespaces

c. 創建NameSpace
kubectl create namespace kubernetes-dashboard
![]()
d. 產出憑證
openssl genrsa -out dashboard.key 2048

openssl req -days 36000 -new -out dashboard.csr -key dashboard.key -subj '/CN=**192.168.10.10**'

openssl x509 -req -in dashboard.csr -signkey dashboard.key -out dashboard.crt
e. 使用憑證創建Secret
kubectl create secret generic kubernetes-dashboard-certs --from-file=dashboard.key --from-file=dashboard.crt -n kubernetes-dashboard

D. 下載 Image
docker pull kubernetesui/dashboard:v2.0.0-beta8

E. 啟動
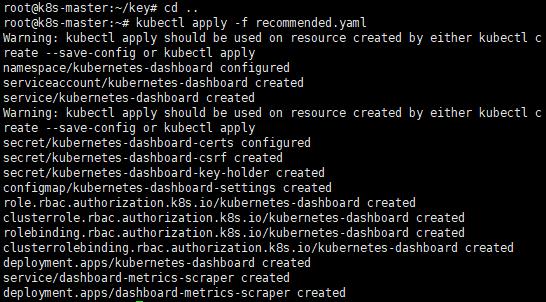
kubectl apply -f recommended.yaml
F. 檢查Pod和Service狀態
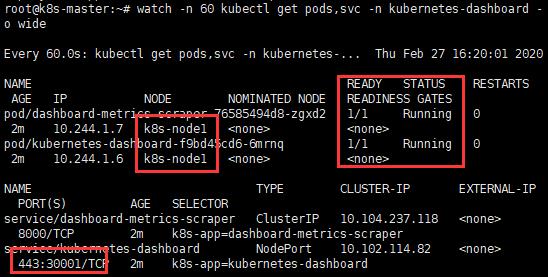
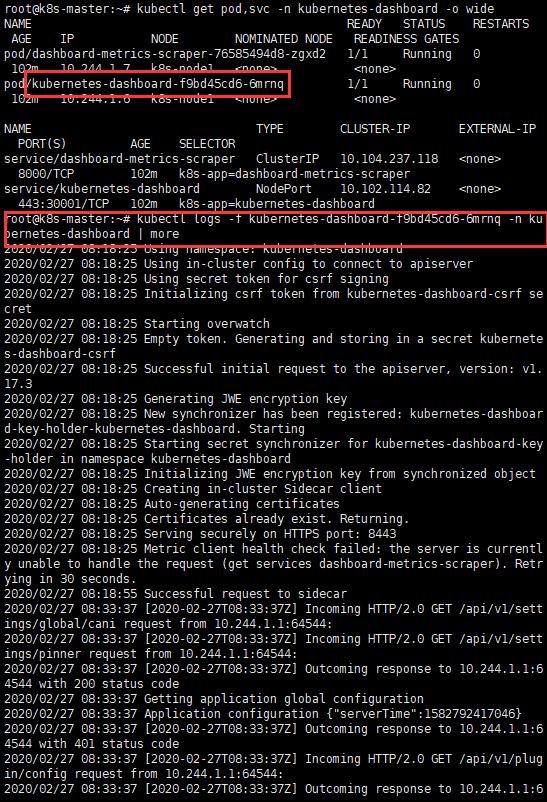
kubectl get pods,svc -n kubernetes-dashboard -o wide
G. 瀏覽器訪問
https://master_ip:30001 or https://node1_ip:30001
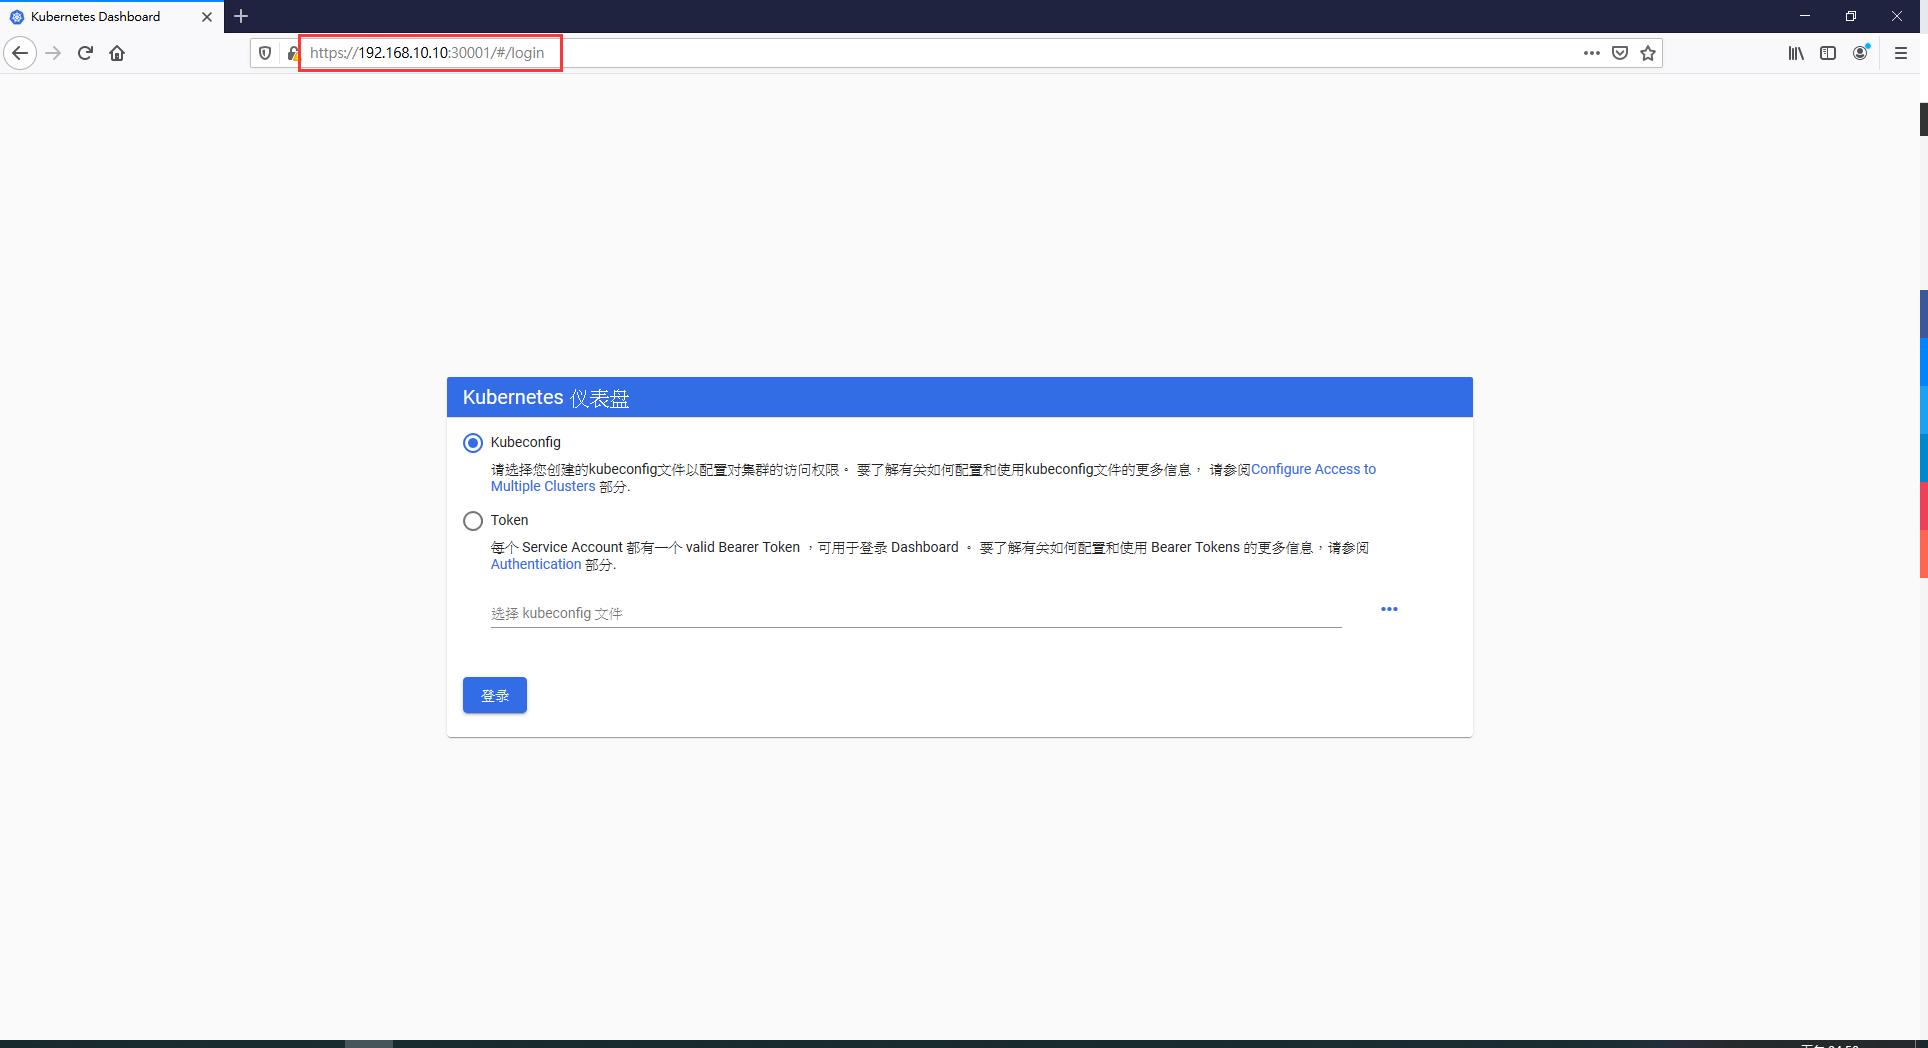
註:Browser用Firefox
H. 預設用戶登入
a. 查看ServiceAccount和Secrets
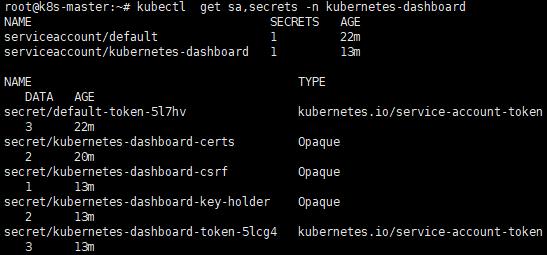
kubectl get sa,secrets -n kubernetes-dashboard
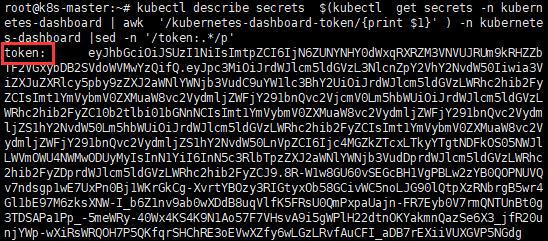
b. 查看Token
kubectl describe secrets $(kubectl get secrets -n kubernetes-dashboard | awk '/kubernetes-dashboard-token/{print $1}' ) -n kubernetes-dashboard |sed -n '/token:.*/p'
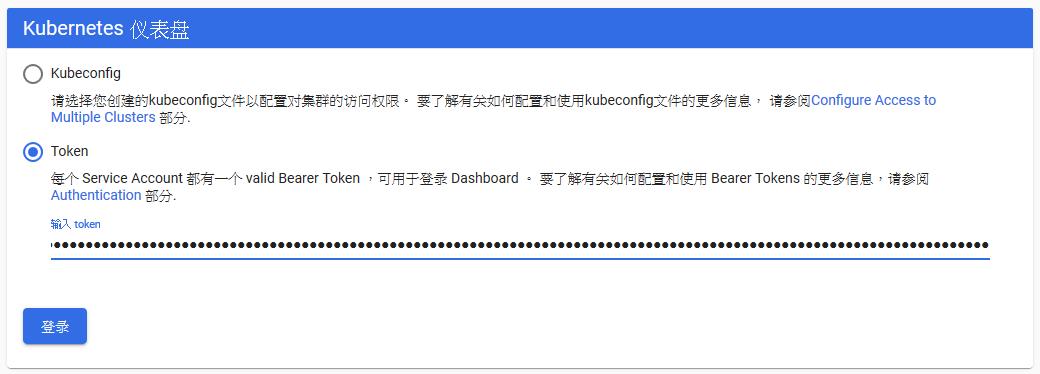
c. 登入
I. 權限
a. 預設用戶權限不足

b. 新增管理者用戶:yaml
i. vim create-admin.yaml
apiVersion: v1
kind: ServiceAccount
metadata:
  name: admin-user
  namespace: kubernetes-dashboard

---

apiVersion: rbac.authorization.k8s.io/v1
kind: ClusterRoleBinding
metadata:
  name: admin-user
roleRef:
  apiGroup: rbac.authorization.k8s.io
  kind: ClusterRole
  name: cluster-admin
subjects:
- kind: ServiceAccount
  name: admin-user
  namespace: kubernetes-dashboard
ii. kubectl apply -f create-admin.yaml
![]()
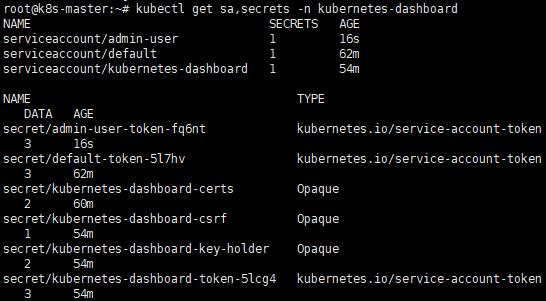
iii. 查看sa、secret
kubectl get sa,secrets -n kubernetes-dashboard
c. 新增管理者用戶:指令
i. 新增sa
kubectl create serviceaccount dashboard-admin -n kubernetes-dashboard
![]()
ii. sa綁定cluster管理員
kubectl create clusterrolebinding dashboard-cluster-admin --clusterrole=cluster-admin --serviceaccount=kubernetes-dashboard:dashboard-admin

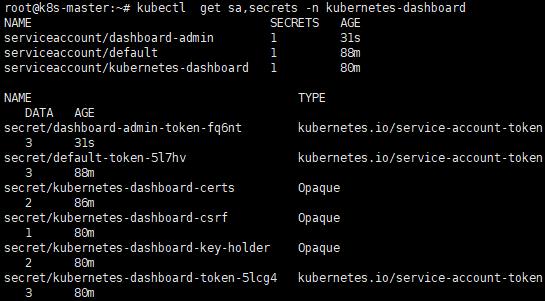
iii. 查看sa、secret
kubectl get sa,secrets -n kubernetes-dashboard
iiii. 查看Token
kubectl describe secrets dashboard-admin-token-name -n kubernetes-dashboard
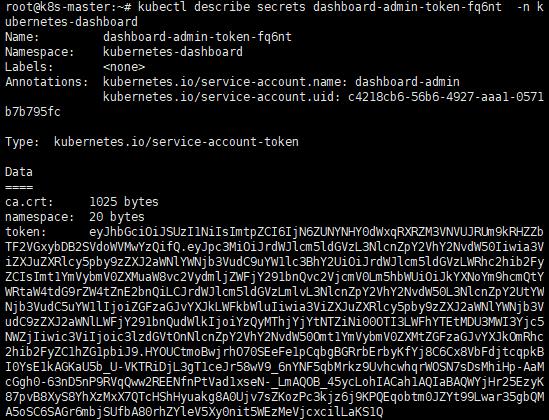
J. 重新登入
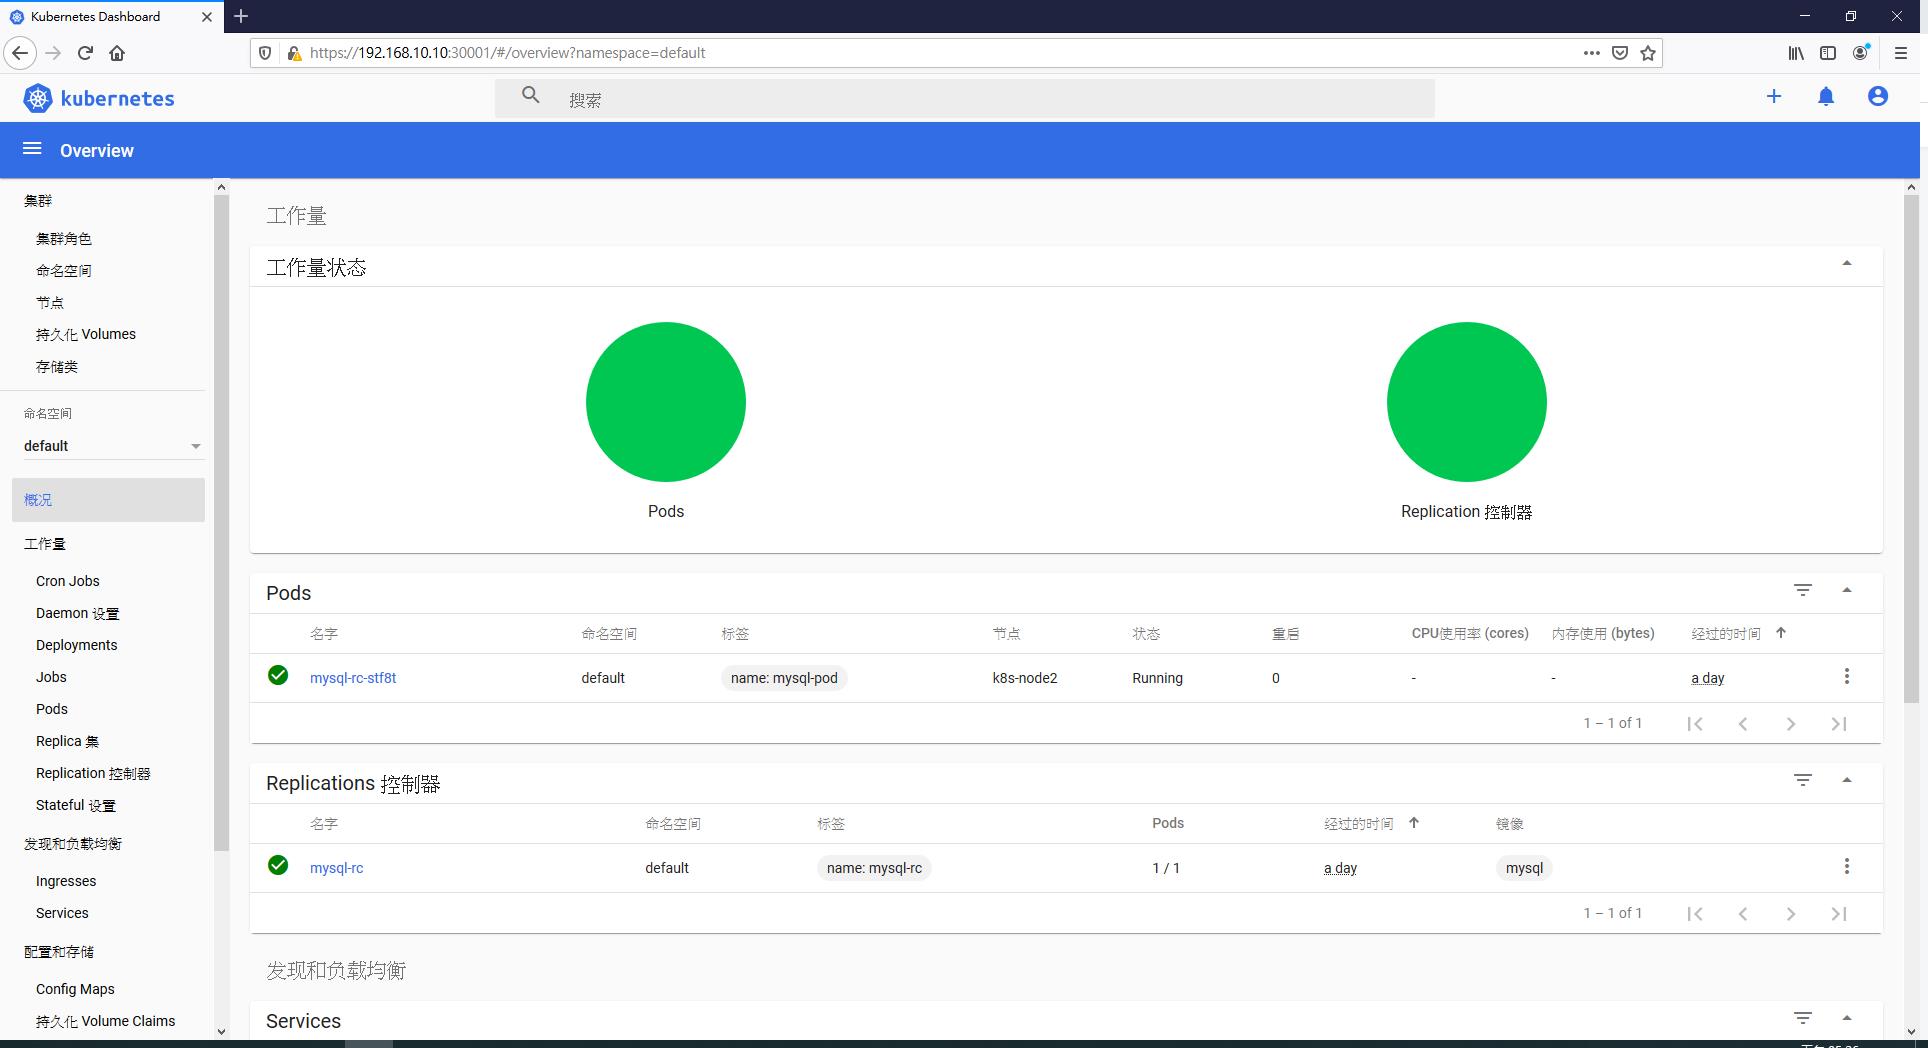
K. 查看Log
kubectl logs -f kubernetes-dashboard-pod-NAME -n kubernetes-dashboard
七、建置佈署影片
1. K8S building and mysql deployment
2. JAVA Deployment
3. Deployment其他命令應用
4. Deploy Dashboard
八、參考資料
1. https://ithelp.ithome.com.tw/users/20107062/ironman/1244
2. https://blog.csdn.net/weixin_38070561/article/details/82982710
3. https://www.cnblogs.com/yangwenhuan/p/11484859.html
4. https://www.cnblogs.com/yangwenhuan/p/11488209.html
5. https://www.jianshu.com/p/3caccaf8aed1
6. https://www.jianshu.com/p/24319d8ee501
7. https://www.jianshu.com/p/436fe9433fac
8. https://www.jianshu.com/p/058262a73f8f
9. http://blog.sina.com.cn/s/blog_560e31000102z81d.html
10. https://blog.51cto.com/yangzhiming/2433380
11. https://www.jianshu.com/p/67083a454fcc
12. https://learnku.com/articles/29209
13. https://blog.csdn.net/qq_35720307/article/details/87724172
14. https://www.cnblogs.com/xiangyu5945/p/11059698.html
15. https://www.jianshu.com/p/249decc6684d
16. https://www.jianshu.com/p/f2d4dd4d1fb1
17. https://www.jianshu.com/p/132319e795ae
18. https://www.jianshu.com/p/8d60ce1587e1
19. https://www.jianshu.com/p/80c88ae38396
20. https://learnku.com/articles/31878
21. https://rickhw.github.io/2019/03/17/Container/Install-K8s-with-Kubeadm/#%E5%AE%89%E8%A3%9D-Kubernetes-Cluster
22. https://godleon.github.io/blog/Kubernetes/k8s-Deploy-and-Access-Dashboard/
23. https://kknews.cc/code/6pe356v.html
24. https://kknews.cc/zh-tw/code/xr28e6o.html
25. https://rickhw.github.io/2019/03/17/Container/Install-K8s-with-Kubeadm/
26. https://kubernetes.feisky.xyz/setup/k8s-hard-way/07-bootstrapping-etcd
27. https://blog.51cto.com/14143894/2428545
28. https://www.twblogs.net/a/5cac24a8bd9eee59d33381b2
29. https://blog.csdn.net/nklinsirui/article/details/80583971
30. https://www.cnblogs.com/zoulixiang/p/9910337.html
31. https://blog.csdn.net/wangchunfa122/article/details/86529406
32. https://blog.csdn.net/solaraceboy/article/details/83308339
33. https://blog.csdn.net/wangchunfa122/article/details/85495871
34. https://blog.csdn.net/zz_aiytag/article/details/103874977/
35. https://www.jianshu.com/p/f7ebd54ed0d1
36. https://kubernetes.io/docs/tasks/access-application-cluster/web-ui-dashboard/
37. https://blog.csdn.net/zzq900503/article/details/81710319