一般我們在撰寫Windows Store App 或是 Windows Phone App時很常使用Grid來排版應用程式的畫面,因為Grid可以明確地將應用程式畫面切割,如此一來我們可以得到較美觀的畫面,但是若我們在撰寫APP時需要顯示許多不固定個數或是不固定的資料呈現方式時,該怎麼辦呢?!這時就可以透過動態產生Grid來排版。
本篇文章將引導您使用程式碼動態產生Grid。
一般我們在撰寫Windows Store App 或是 Windows Phone App時很常使用Grid來排版應用程式的畫面,因為Grid可以明確地將應用程式畫面切割,如此一來我們可以得到較美觀的畫面,但是若我們在撰寫APP時需要顯示許多不固定個數或是不固定的資料呈現方式時,該怎麼辦呢?!這時就可以透過動態產生Grid來排版。
本篇文章將引導您使用程式碼動態產生Grid。
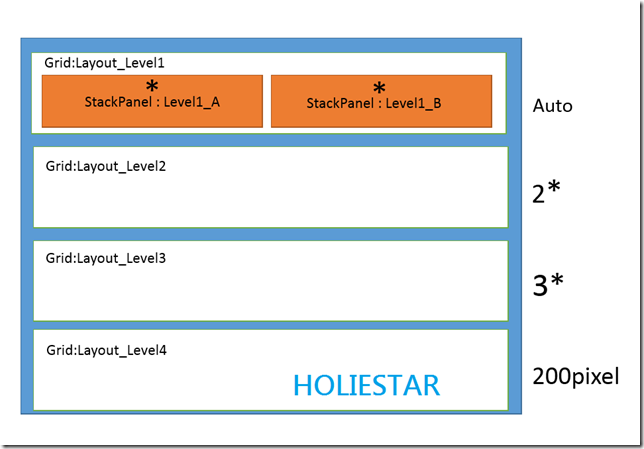
假設我們想要排版排成像這個樣子:
首先這是我們常在Xaml中排版所用的方法
1: <Grid x:Name="LayoutRoot" Background="Transparent">
2: <Grid.RowDefinitions>
3: <RowDefinition Height="Auto"/>
4: <RowDefinition Height="2*"/>
5: <RowDefinition Height="3*"/>
6: <RowDefinition Height="200"/>
7: </Grid.RowDefinitions>
8: <Grid x:Name="Layout_Level1" Grid.Row="0">
9: <Grid.ColumnDefinitions>
10: <ColumnDefinition Width="*"/>
11: <ColumnDefinition Width="*"/>
12: </Grid.ColumnDefinitions>
13: <StackPanel x:Name="Level1_A" Grid.Column="0"/>
14: <StackPanel x:Name="Level1_B" Grid.Column="1"/>
15: </Grid>
16: <StackPanel x:Name="Layout_Level2" Grid.Row="1" />
17: <StackPanel x:Name="Layout_Level3" Grid.Row="2" />
18: <StackPanel x:Name="Layout_Level4" Grid.Row="3" />
19: </Grid>
在C#產生動態程式碼時,有一點非常重要,因為我們會指定某個控制項的Grid.row或Grid.Column,
我們必須先Set.Row之後再把開控制將加入倒Grid底下,在C#中應該這樣寫 :
1: Grid Layout_Root=new Grid();
2: Layout_Root.RowDefinitions.Add(new RowDefinition() { Height = new GridLength(1,GridUnitType.Auto) });//切割Grid
3: Layout_Root.RowDefinitions.Add(new RowDefinition() { Height = new GridLength(2, GridUnitType.Star) });//切割Grid
4: Layout_Root.RowDefinitions.Add(new RowDefinition() { Height = new GridLength(3,GridUnitType.Star) });//切割Grid
5: Layout_Root.RowDefinitions.Add(new RowDefinition() { Height = new GridLength(200, GridUnitType.Pixel) });//切割Grid
6:
7: Grid Layout_Level1=new Grid();
8: Layout_Level1.ColumnDefinitions.Add(new ColumnDefinition() { Width = new GridLength(1,GridUnitType.Star) });//切割Grid
9: Layout_Level1.ColumnDefinitions.Add(new ColumnDefinition() { Width = new GridLength(2, GridUnitType.Star) });//切割Grid
10:
11: StackPanel Level1_A=new StackPanel();
12: StackPanel Level1_B=new StackPanel();
13:
14: Grid.SetColumn(Level1_A,0);//設定Grid.Column屬性
15: Grid.SetColumn(Level1_A,1);//設定Grid.Column屬性
16: Layout_Level1.Children.Add(Level1_A);//將Level1_A加入至Layout_Level1底下
17: Layout_Level1.Children.Add(Level1_B);//將Level1_B加入至Layout_Level1底下
18:
19: StackPanel Layout_Level2=new StackPanel();
20: StackPanel Layout_Level3=new StackPanel();
21: StackPanel Layout_Level4=new StackPanel();
22:
23: Grid.SetRow(Layout_Level1,0);//設定Grid.Row屬性
24: Grid.SetRow(Layout_Level2,1);//設定Grid.Row屬性
25: Grid.SetRow(Layout_Level3,2);//設定Grid.Row屬性
26: Grid.SetRow(Layout_Level4,3);//設定Grid.Row屬性
27:
28: Layout_Root.Children.Add(Layout_Level1);//將Layout_Level1加入至Layout_Root底下
29: Layout_Root.Children.Add(Layout_Level2);//將Layout_Level2加入至Layout_Root底下
30: Layout_Root.Children.Add(Layout_Level3);//將Layout_Level3加入至Layout_Root底下
31: Layout_Root.Children.Add(Layout_Level4);//將Layout_Level4加入至Layout_Root底下
如此一來我們就動態的產生Grid囉!
References : 建立Grid項目
文章中的敘述如有觀念不正確錯誤的部分,歡迎告知指正 謝謝
轉載請註明出處,並且附上本篇文章網址 ! 感謝。
SUKI
