一般我們在開發Windows Phone 時,會使用動態磚來呈現一些重要的訊息,讓使用的不用打開APP就可以看到重要的資訊,預設的FlipTile動態磚除了可以放文字以外,還可以放置圖片,我們個以換一個方始來想,不顯示文字,只放置圖片,如此一來動態磚的樣式我們就可以自己打造了,但是要如何動態的產生圖片呢?
本篇文章將引導您學會自定義FlipTile動態磚樣式,用Xaml創建動態磚樣式!
一般我們在開發Windows Phone 時,會使用動態磚來呈現一些重要的訊息,讓使用的不用打開APP就可以看到重要的資訊,預設的FlipTile動態磚除了可以放文字以外,還可以放置圖片,我們個以換一個方始來想,不顯示文字,只放置圖片,如此一來動態磚的樣式我們就可以自己打造了,但是要如何動態的產生圖片呢?
本篇文章將引導您學會自定義FlipTile動態磚樣式,用Xaml創建動態磚樣式!
首先在Windows Phone 的專案底下新增一個UserControl叫做Tile_View

然後把Tile_View.xaml打開編輯,根據需求放入Textblock或Image,
文字和圖片採用Binding的方式動態給予,稍等在程式碼裡面給定值,並訂定Tile_View的長與寬,
中型的動態磚大小是336x336。
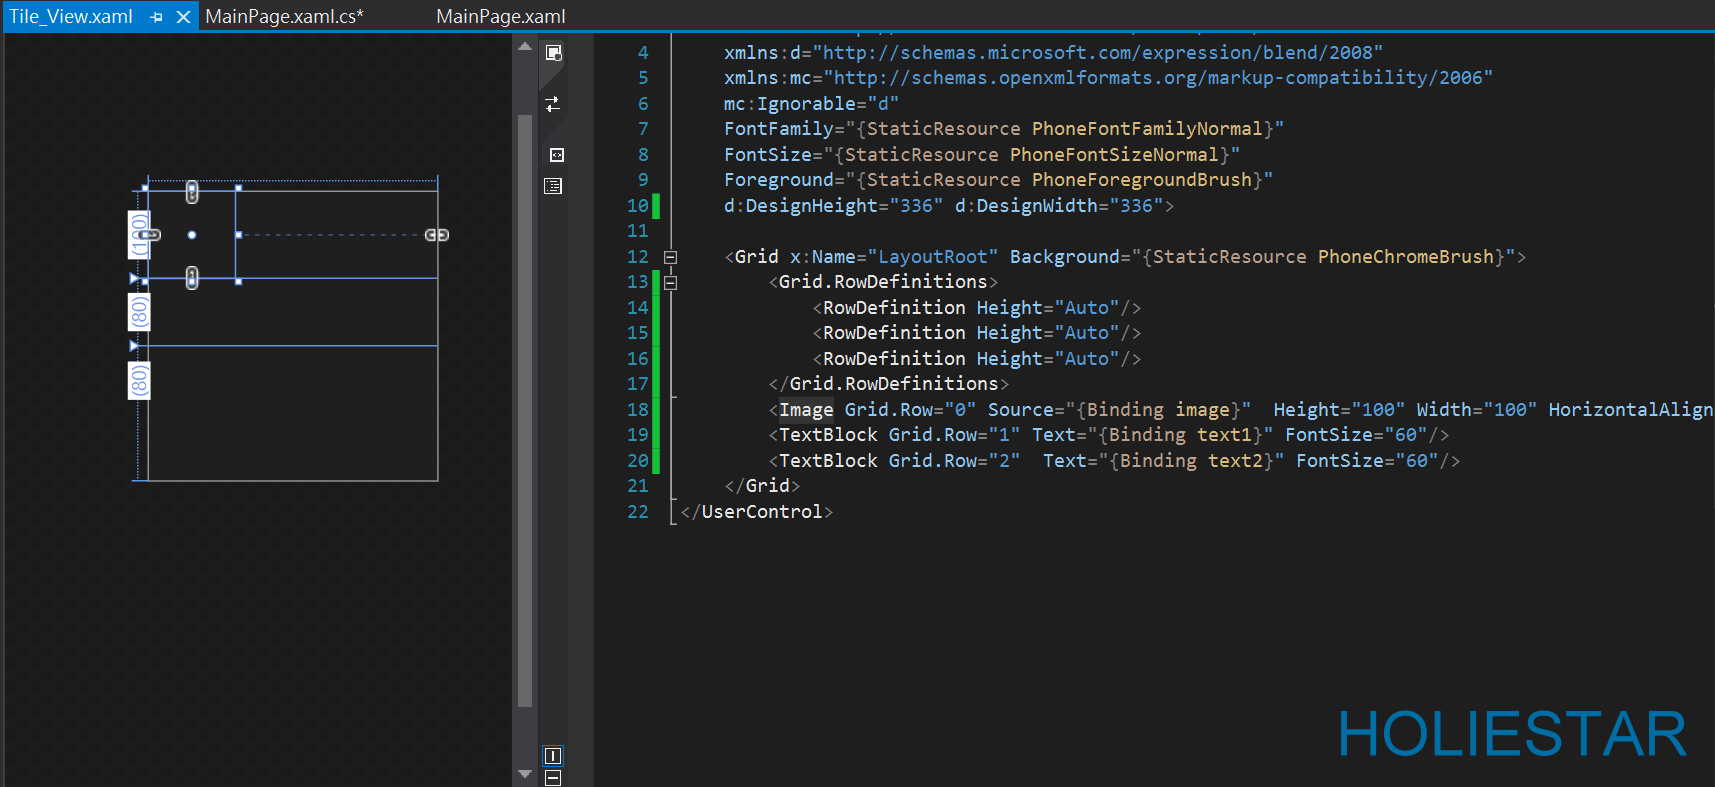
1: <UserControl x:Class="TileTest.Tile_View"
2: xmlns="http://schemas.microsoft.com/winfx/2006/xaml/presentation"
3: xmlns:x="http://schemas.microsoft.com/winfx/2006/xaml"
4: xmlns:d="http://schemas.microsoft.com/expression/blend/2008"
5: xmlns:mc="http://schemas.openxmlformats.org/markup-compatibility/2006"
6: mc:Ignorable="d"
7: FontFamily="{StaticResource PhoneFontFamilyNormal}"
8: FontSize="{StaticResource PhoneFontSizeNormal}"
9: Foreground="{StaticResource PhoneForegroundBrush}"
10: d:DesignHeight="336" d:DesignWidth="336">
11:
12: <Grid x:Name="LayoutRoot" Background="{StaticResource PhoneChromeBrush}">
13: <Grid.RowDefinitions>
14: <RowDefinition Height="Auto"/>
15: <RowDefinition Height="Auto"/>
16: <RowDefinition Height="Auto"/>
17: </Grid.RowDefinitions>
18: <Image Grid.Row="0" Source="{Binding image}" Height="60" Width="60" HorizontalAlignment="Left" />
19: <TextBlock Grid.Row="1" Text="{Binding text1}" FontSize="60"/>
20: <TextBlock Grid.Row="2" Text="{Binding text2}" FontSize="60"/>
21: </Grid>
22: </UserControl>
再來我們必須自定義一個類別,對應到剛剛Tile_View裏頭Binding要用的名稱,text1和text2
1: public class Tile_Data {
2: public BitmapImage image { set; get; }
3: public string text1 { set; get; }
4: public string text2 { set; get; }
5: }
首先先建立一個副程式將Writeable寫入IsolatedStorageFile中
1: //將WriteableBitmap寫入IsolatedStorageFile並回傳URI
2: private Uri Write_Bitmap_TO_Isolate(WriteableBitmap WriteBitmap, string FileName)
3: {
4: try
5: {
6:
7: using (IsolatedStorageFile tStorage = IsolatedStorageFile.GetUserStoreForApplication())
8: {
9: var isolatedStorage = IsolatedStorageFile.GetUserStoreForApplication();
10: //如果目標檔案已經存在,則刪除檔案
11: if (isolatedStorage.FileExists(FileName))
12: {
13: isolatedStorage.DeleteFile("/Shared/ShellContent/" + FileName);
14: Debug.WriteLine("目標檔案存在 刪除");
15: }
16: //創建檔案
17: IsolatedStorageFileStream fileStream = isolatedStorage.CreateFile("/Shared/ShellContent/" + FileName);
18: //寫入檔案
19: WriteBitmap.SaveJpeg(fileStream, WriteBitmap.PixelWidth, WriteBitmap.PixelHeight, 0, 100);
20: //關閉IO
21: fileStream.Close();
22: fileStream.Dispose();
23: tStorage.Dispose();
24:
25: }
26: //重組新的URI
27: return new Uri("isostore:/Shared/ShellContent/" + FileName, UriKind.RelativeOrAbsolute);
28: }
29: catch (Exception ex)
30: {
31: //發生意外回傳空的URI
32: string tMsg = ex.Message;
33: return new Uri(string.Empty, UriKind.Absolute);
34: }
35:
36: }
然後透過程式碼創建一個Tile_View,並指定DataContext把自定義個Class給DataContext用,再更新動態磚
1: //創建一個新的Tile_View
2: Tile_View tile_view = new Tile_View() ;
3: //給DataContext,這樣才會有資料
4: tile_view.DataContext = new Tile_Data() {
5: text1 = "這是",
6: text2 = "自訂動態磚",
7: image = new BitmapImage(new Uri("/Assets/ApplicationIcon.png", UriKind.RelativeOrAbsolute))
8: };
9: //更新配置並指定大小
10: tile_view.Measure(new Size(336, 336));
11: //放置子項目,以及判斷 UIElement 的大小
12: tile_view.Arrange(new Rect(0, 0, 336, 336));
13: //給定WriteableBitmap要繪製的的大小和控制項
14: WriteableBitmap UI_Image = new WriteableBitmap(336, 336);
15: UI_Image.Render(tile_view, null);
16: //繪製
17: UI_Image.Invalidate();
18: //將將WriteableBitmap寫入IsolatedStorageFile
19: Uri tile_image = Write_Bitmap_TO_Isolate(UI_Image,"tile_image");
20:
21: //判斷是否已經有被釘選到開始畫面了
22: ShellTile appTile = ShellTile.ActiveTiles.First();
23: if (appTile != null)
24: {
25: FlipTileData appTileData = new FlipTileData()
26: {
27: //標題可用可不用,不用的話用原本Xaml配置的就好了
28: Title = "",
29: //背景選用剛剛製作好的tile_image
30: BackgroundImage = tile_image,
31: //背面標題可用可不用,不用的話用原本Xaml配置的就好了
32: BackTitle = "",
33: //背面選用APP內的圖片,也可以自行創建另外的Xaml並繪製成圖片
34: BackBackgroundImage = new Uri("/Assets/Tiles/FlipCycleTileMedium.png", UriKind.RelativeOrAbsolute)
35: };
36: appTile.Update(appTileData);
37: }
測試前必須要先將動態磚定選到開始畫面上唷!! 結果如下 :

如此一來我們便學會了自定義FlipTile動態磚樣式,用Xaml創建動態磚樣式!
References :
C# Windows Phone 8 WP8,擷取UIElement轉換成WriteableBitmap並存入IsolatedStorageFile,解決控制項全部擠一起的問題。
文章中的敘述如有觀念不正確錯誤的部分,歡迎告知指正 謝謝
轉載請註明出處,並且附上本篇文章網址 ! 感謝。
