ABP (ASP.NET Boilerplate) 應用程式開發框架 新手教學 No.10 範例程式
介紹
在本文中,我們將看到使用以下框架開發的SaaS(多租戶)應用程序:
- ASP.NET Boilerplate作為應用程序框架。
- ASP.NET Core和ASP.NET Web API作為Web框架。
- 實體框架核心為ORM。
- Angular5作為SPA框架。
- Bootstrap作為HTML / CSS框架。
從模板創建應用程序
ASP.NET Boilerplate提供了模板,使項目啟動更容易。我們從https://aspnetboilerplate.com/Templates創建啟動模板
我選擇了ASP.NET Core 2.x,Angular並選中了“包括登錄,註冊,用戶,角色和租戶管理頁面”。它為我們創建了一個現成的工作解決方案,包括登錄頁面,導航和基於引導程序的佈局。下載並使用Visual Studio 2017+打開解決方案後,我們會看到包含單元測試項目的分層解決方案結構。
解決方案結構
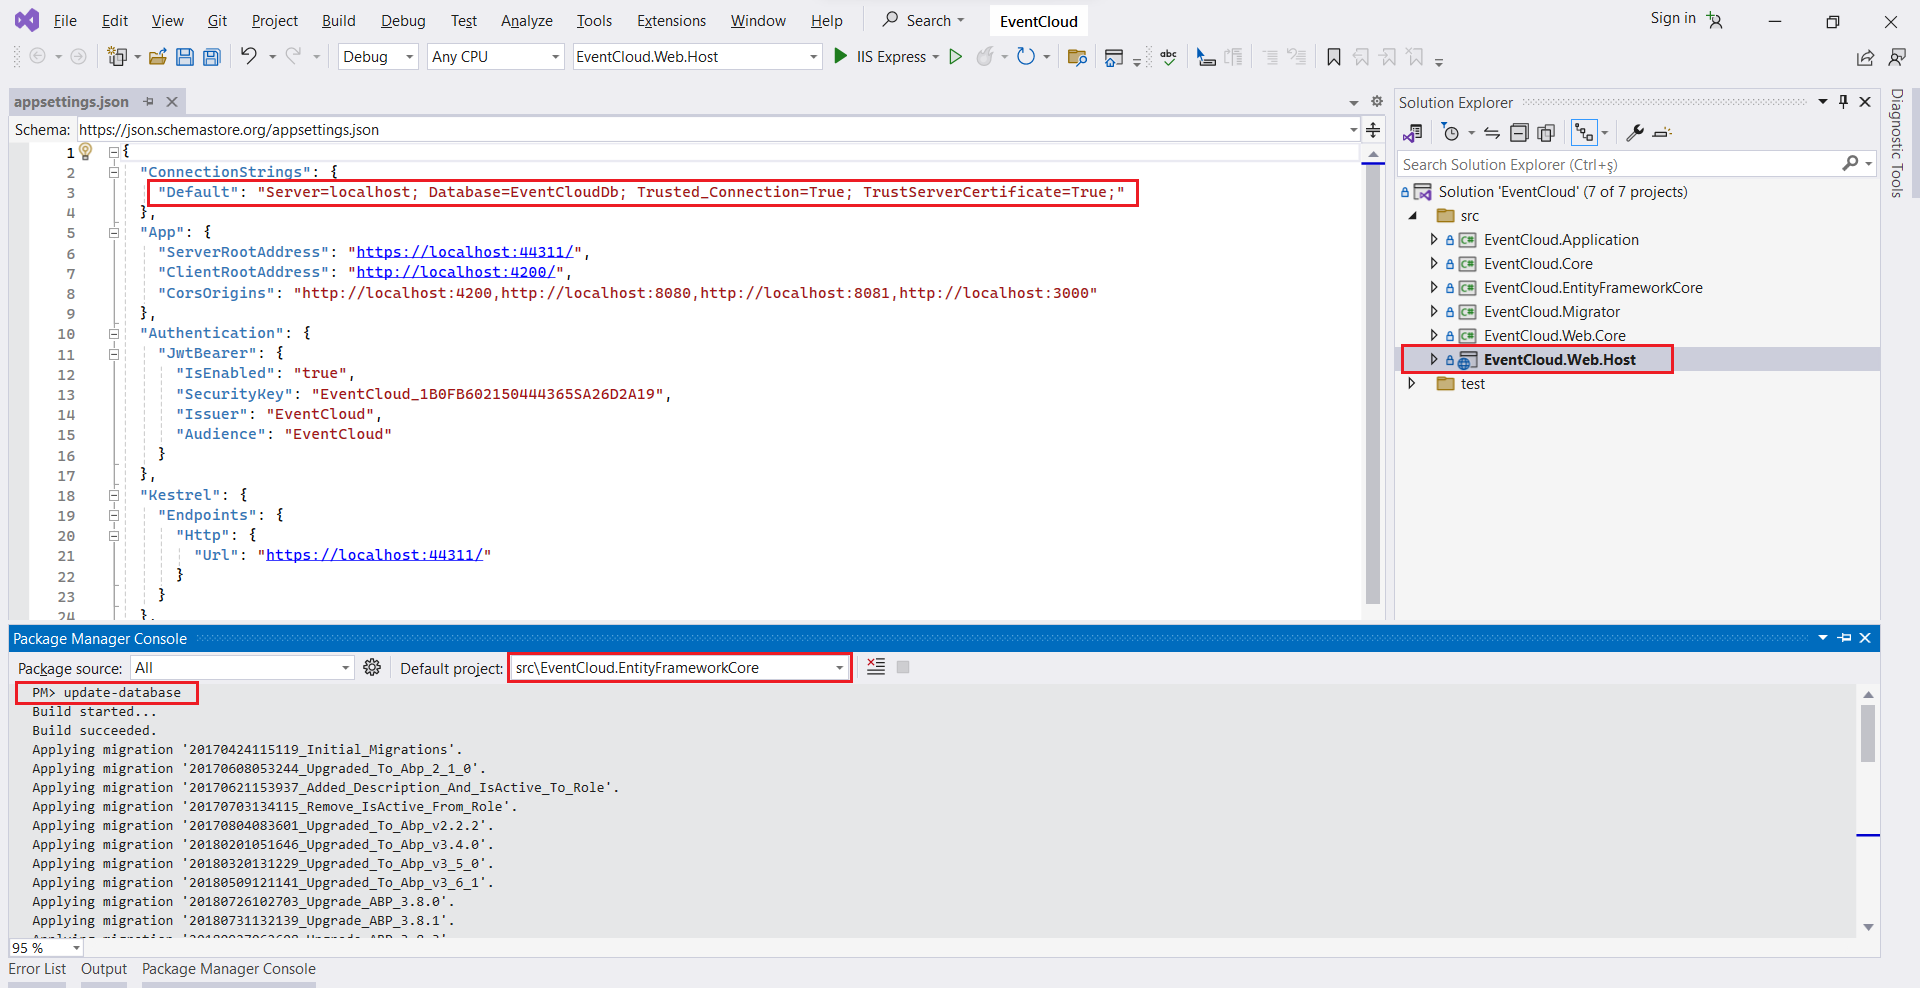
首先,我們選擇EventCloud.Host作為啟動項目。解決方案隨附Entity Framework Core Code-First Migrations。因此,(在恢復nuget包之後),我們打開包管理器控制台(PMC)並運行Update-Database命令來創建數據庫。(使用DOTNET提供的EF工具請參考 這裡)
軟件包管理器控制台的默認項目應該是EventCloud.EntityFrameworkCore(因為它包含遷移)。此命令在本地SQL Server中創建EventCloud數據庫(您可以在appsettings.json文件中更改連接字符串)。
 首先,我正在運行EventCloud.Host項目。我們將看到以下屏幕:
我們將使用Angular-CLI啟動Angular UI。以下是啟動Angular UI的步驟:(有問題參考 這篇)
- 在EventCloud / angular位置打開cmd
- 運行
yarn命令以安裝包 - 運行
npm start以運行應用程序
然後,當您瀏覽http:// localhost:4200時,我們將看到以下登錄頁面:
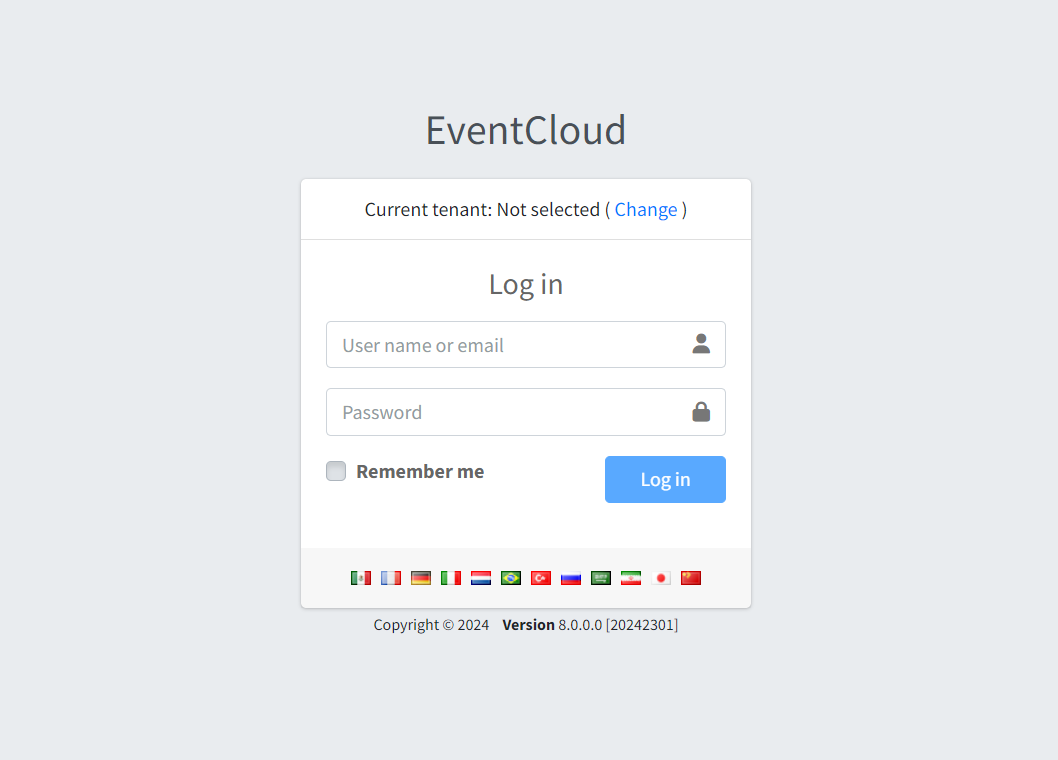
我們可以輸入Default作為租賃名稱,admin作為用戶名,輸入123qwe作為登錄密碼。
登錄後,我們會看到基於Bootstrap的Admin BSB Material Design佈局。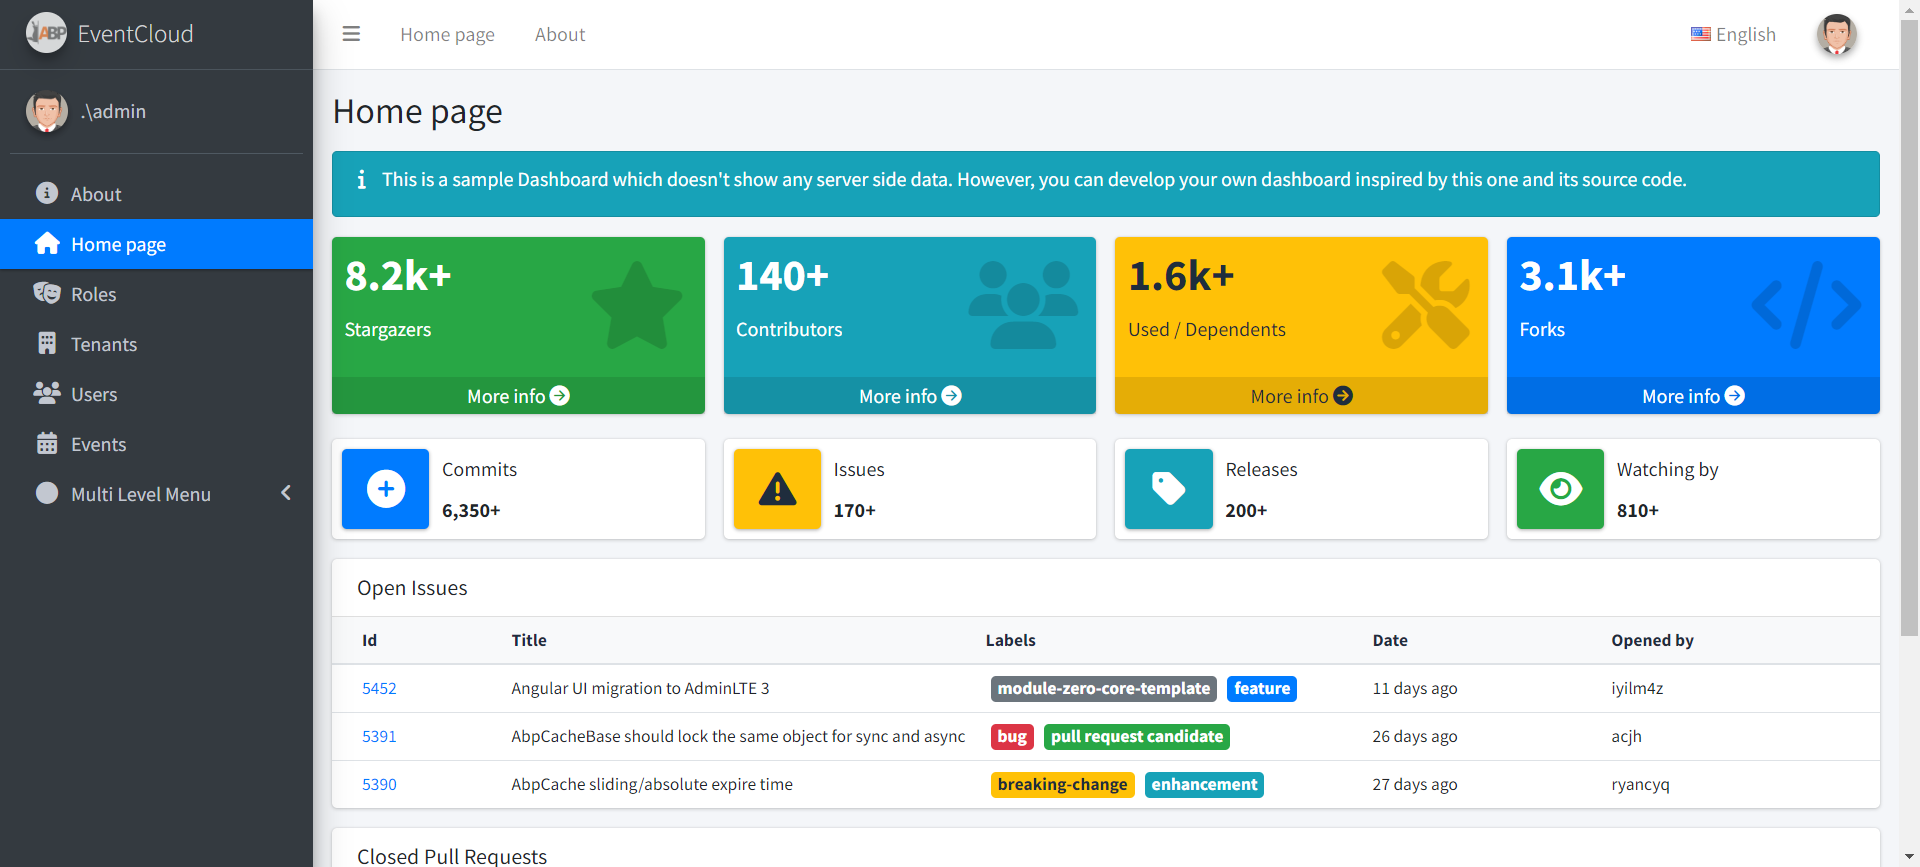
這是一個帶有動態菜單的本地化UI。角度佈局,路由和基礎架構正常運行。我把這個項目作為事件雲項目的基礎。
事件雲計劃
在本文中,我將展示項目的關鍵部分並進行解釋。因此,請下載示例項目,在Visual Studio 2017+中打開並在閱讀本文其餘部分之前運行遷移(確保在運行遷移之前沒有名為EventCloud的數據庫)。我將遵循一些DDD(域驅動設計)技術來創建域(業務)層和應用程序層。
Event Cloud是一個免費的SaaS(多租戶)應用程序。我們可以創建一個擁有自己的事件,用戶,角色的租戶......在創建,取消和註冊事件時應用了一些簡單的業務規則。
那麼,讓我們開始研究源代碼。
實體
實體是我們的域層的一部分,位於EventCloud.Core項目下。ASP.NET Boilerplate啟動模板附帶Tenant,User,Role ...實體,這些實體在大多數應用程序中都很常見。我們可以根據自己的需求定制它們。當然,我們可以添加我們的應用程序特定實體。
事件雲項目的基本實體是Event實體。
[Table("AppEvents")]
public class Event : FullAuditedEntity<Guid>, IMustHaveTenant
{
    public const int MaxTitleLength = 128;
    public const int MaxDescriptionLength = 2048;

    public virtual int TenantId { get; set; }

    [Required]
    [StringLength(MaxTitleLength)]
    public virtual string Title { get; protected set; }

    [StringLength(MaxDescriptionLength)]
    public virtual string Description { get; protected set; }

    public virtual DateTime Date { get; protected set; }

    public virtual bool IsCancelled { get; protected set; }

    /// <summary>
    /// Gets or sets the maximum registration count.
    /// 0: Unlimited.
    /// </summary>
    [Range(0, int.MaxValue)]
    public virtual int MaxRegistrationCount { get; protected set; }

    [ForeignKey("EventId")]
    public virtual ICollection<EventRegistration> Registrations { get; protected set; }

    /// <summary>
    /// We don't make constructor public and forcing to create events using <see cref="Create"/> method.
    /// But constructor can not be private since it's used by EntityFramework.
    /// Thats why we did it protected.
    /// </summary>
    protected Event()
    {

    }

    public static Event Create(int tenantId, string title, DateTime date, string description = null, int maxRegistrationCount = 0)
    {
        var @event = new Event
        {
            Id = Guid.NewGuid(),
            TenantId = tenantId,
            Title = title,
            Description = description,
            MaxRegistrationCount = maxRegistrationCount
        };

        @event.SetDate(date);

        @event.Registrations = new Collection<EventRegistration>();

        return @event;
    }

    public bool IsInPast()
    {
        return Date < Clock.Now;
    }

    public bool IsAllowedCancellationTimeEnded()
    {
        return Date.Subtract(Clock.Now).TotalHours <= 2.0; //2 hours can be defined as Event property and determined per event
    }

    public void ChangeDate(DateTime date)
    {
        if (date == Date)
        {
            return;
        }

        SetDate(date);

        DomainEvents.EventBus.Trigger(new EventDateChangedEvent(this));
    }

    internal void Cancel()
    {
        AssertNotInPast();
        IsCancelled = true;
    }

    private void SetDate(DateTime date)
    {
        AssertNotCancelled();

        if (date < Clock.Now)
        {
            throw new UserFriendlyException("Can not set an event's date in the past!");
        }

        if (date <= Clock.Now.AddHours(3)) //3 can be configurable per tenant
        {
            throw new UserFriendlyException("Should set an event's date 3 hours before at least!");
        }

        Date = date;

        DomainEvents.EventBus.Trigger(new EventDateChangedEvent(this));
    }

    private void AssertNotInPast()
    {
        if (IsInPast())
        {
            throw new UserFriendlyException("This event was in the past");
        }
    }

    private void AssertNotCancelled()
    {
        if (IsCancelled)
        {
            throw new UserFriendlyException("This event is canceled!");
        }
    }
}
事件實體不僅僅獲取/設置屬性。實際上,它沒有公共制定者,制定者受到保護。它有一些域邏輯。必須由Event實體本身更改所有屬性,以確保執行域邏輯。
事件實體的構造函數也受到保護。因此,創建事件的唯一方法是Event.Create方法(它們通常可以是私有的,但私有setter與Entity Framework Core不兼容,因為Entity Framework Core在從數據庫檢索實體時無法設置私有)。
事件實現,IMustHaveTenant接口。這是ASP.NET Boilerplate(ABP)框架的接口,並確保此實體是每個租戶。這是多租戶所必需的。因此,不同的租戶將有不同的事件,不能看到彼此的事件。ABP自動過濾當前租戶的實體。
事件類繼承FullAuditedEntity包含創建,修改和刪除審計列。FullAuditedEntity也實現ISoftDelete,因此無法從數據庫中刪除事件。刪除它們時會將其標記為已刪除。查詢數據庫時,ABP會自動過濾(隱藏)已刪除的實體。
在DDD中,實體具有域(業務)邏輯。我們有一些簡單的業務規則,當您檢查實體時可以輕鬆理解這些規則。
我們申請的第二個實體是 EventRegistration
[Table("AppEventRegistrations")]
public class EventRegistration : CreationAuditedEntity, IMustHaveTenant
{
    public int TenantId { get; set; }

    [ForeignKey("EventId")]
    public virtual Event Event { get; protected set; }
    public virtual Guid EventId { get; protected set; }

    [ForeignKey("UserId")]
    public virtual User User { get; protected set; }
    public virtual long UserId { get; protected set; }

    /// <summary>
    /// We don't make constructor public and forcing to create registrations using <see cref="CreateAsync"/> method.
    /// But constructor can not be private since it's used by EntityFramework.
    /// Thats why we did it protected.
    /// </summary>
    protected EventRegistration()
    {

    }

    public static async Task<EventRegistration> CreateAsync(Event @event, User user, IEventRegistrationPolicy registrationPolicy)
    {
        await registrationPolicy.CheckRegistrationAttemptAsync(@event, user);

        return new EventRegistration
        {
            TenantId = @event.TenantId,
            EventId = @event.Id,
            Event = @event,
            UserId = @user.Id,
            User = user
        };
    }

    public async Task CancelAsync(IRepository<EventRegistration> repository)
    {
        if (repository == null) { throw new ArgumentNullException("repository"); }

        if (Event.IsInPast())
        {
            throw new UserFriendlyException("Can not cancel event which is in the past!");
        }

        if (Event.IsAllowedCancellationTimeEnded())
        {
            throw new UserFriendlyException("It's too late to cancel your registration!");
        }

        await repository.DeleteAsync(this);
    }
}
與之類似Event,我們有一個靜態創建方法。創建新EventRegistration的唯一方法是使用此CreateAsync方法。它獲取事件,用戶和註冊政策。它檢查給定用戶是否可以使用registrationPolicy.CheckRegistrationAttemptAsync方法註冊事件。如果給定用戶無法註冊給定事件,則此方法拋出異常。通過這樣的設計,我們確保在創建註冊時應用所有業務規則。沒有使用註冊政策,無法創建註冊。
有關實體的更多信息,請參閱實體文檔。
其中 registrationPolicy.CheckRegistrationAttemptAsync 定義在介面 IEventRegistrationPolicy
活動登記政策
EventRegistrationPolicy class定義如下:
public class EventRegistrationPolicy : IEventRegistrationPolicy
{
    private readonly IRepository<EventRegistration> _eventRegistrationRepository;
    private readonly ISettingManager _settingManager;

    public EventRegistrationPolicy(
        IRepository<EventRegistration> eventRegistrationRepository,
        ISettingManager settingManager
        )
    {
        _eventRegistrationRepository = eventRegistrationRepository;
        _settingManager = settingManager;
    }

    public async Task CheckRegistrationAttemptAsync(Event @event, User user)
    {
        if (@event == null) { throw new ArgumentNullException("event"); }
        if (user == null) { throw new ArgumentNullException("user"); }

        CheckEventDate(@event);
        await CheckEventRegistrationFrequencyAsync(user);
    }

    private static void CheckEventDate(Event @event)
    {
        if (@event.IsInPast())
        {
            throw new UserFriendlyException("Can not register event in the past!");
        }
    }

    private async Task CheckEventRegistrationFrequencyAsync(User user)
    {
        var oneMonthAgo = Clock.Now.AddDays(-30);
        var maxAllowedEventRegistrationCountInLast30DaysPerUser = await _settingManager.GetSettingValueAsync<int>(AppSettingNames.MaxAllowedEventRegistrationCountInLast30DaysPerUser);
        if (maxAllowedEventRegistrationCountInLast30DaysPerUser > 0)
        {
            var registrationCountInLast30Days = await _eventRegistrationRepository.CountAsync(r => r.UserId == user.Id && r.CreationTime >= oneMonthAgo);
            if (registrationCountInLast30Days > maxAllowedEventRegistrationCountInLast30DaysPerUser)
            {
                throw new UserFriendlyException(string.Format("Can not register to more than {0}", maxAllowedEventRegistrationCountInLast30DaysPerUser));
            }
        }
    }
}
這是我們域名的重要組成部分。創建事件註冊時我們有兩個規則:
- 用戶無法註冊過去的活動。
- 用戶可以在30天內註冊最大事件數。所以,我們有註冊頻率限制。
事件管理器
EventManager實現事件的業務(域)邏輯。應使用此類執行所有事件操作。它的定義如下:
public class EventManager : IEventManager
{
    public IEventBus EventBus { get; set; }

    private readonly IEventRegistrationPolicy _registrationPolicy;
    private readonly IRepository<EventRegistration> _eventRegistrationRepository;
    private readonly IRepository<Event, Guid> _eventRepository;

    public EventManager(
        IEventRegistrationPolicy registrationPolicy,
        IRepository<EventRegistration> eventRegistrationRepository,
        IRepository<Event, Guid> eventRepository)
    {
        _registrationPolicy = registrationPolicy;
        _eventRegistrationRepository = eventRegistrationRepository;
        _eventRepository = eventRepository;

        EventBus = NullEventBus.Instance;
    }

    public async Task<Event> GetAsync(Guid id)
    {
        var @event = await _eventRepository.FirstOrDefaultAsync(id);
        if (@event == null)
        {
            throw new UserFriendlyException("Could not found the event, maybe it's deleted!");
        }

        return @event;
    }

    public async Task CreateAsync(Event @event)
    {
        await _eventRepository.InsertAsync(@event);
    }

    public void Cancel(Event @event)
    {
        @event.Cancel();
        EventBus.Trigger(new EventCancelledEvent(@event));
    }

    public async Task<EventRegistration> RegisterAsync(Event @event, User user)
    {
        return await _eventRegistrationRepository.InsertAsync(
            await EventRegistration.CreateAsync(@event, user, _registrationPolicy)
            );
    }

    public async Task CancelRegistrationAsync(Event @event, User user)
    {
        var registration = await _eventRegistrationRepository.FirstOrDefaultAsync(r => r.EventId == @event.Id && r.UserId == user.Id);
        if (registration == null)
        {
            //No need to cancel since there is no such a registration
            return;
        }

        await registration.CancelAsync(_eventRegistrationRepository);
    }

    public async Task<IReadOnlyList<User>> GetRegisteredUsersAsync(Event @event)
    {
        return await _eventRegistrationRepository
            .GetAll()
            .Include(registration => registration.User)
            .Where(registration => registration.EventId == @event.Id)
            .Select(registration => registration.User)
            .ToListAsync();
    }
}
它執行域邏輯並觸發所需的事件。
有關域服務的更多信息,請參閱域服務文檔。
域事件
我們可能希望在應用程序中的某些狀態更改上定義和触發某些特定於域的事件。我定義了2個特定於域的事件:
- EventCancelledEvent:取消事件時觸發。它是在
EventManager.Cancel方法中觸發的。 - EventDateChangedEvent:在事件發生更改時觸發。它是在
Event.ChangeDate方法中觸發的。
我們處理這些事件並通知相關用戶這些更改。此外,我處理EntityCreatedEventDate<Event>(這是一個預定義的ABP事件並自動觸發)。
要處理事件,我們應該定義一個事件處理程序類。我定義EventUserEmailer了在需要時向用戶發送電子郵件:
public class EventUserEmailer :
        IEventHandler<EntityCreatedEventData<Event>>,
        IEventHandler<EventDateChangedEvent>,
        IEventHandler<EventCancelledEvent>,
        ITransientDependency
{
    public ILogger Logger { get; set; }

    private readonly IEventManager _eventManager;
    private readonly UserManager _userManager;

    public EventUserEmailer(
        UserManager userManager,
        IEventManager eventManager)
    {
        _userManager = userManager;
        _eventManager = eventManager;

        Logger = NullLogger.Instance;
    }

    [UnitOfWork]
    public virtual void HandleEvent(EntityCreatedEventData<Event> eventData)
    {
        //TODO: Send email to all tenant users as a notification

        var users = _userManager
            .Users
            .Where(u => u.TenantId == eventData.Entity.TenantId)
            .ToList();

        foreach (var user in users)
        {
            var message = string.Format("Hey! There is a new event '{0}' on {1}! Want to register?", eventData.Entity.Title, eventData.Entity.Date);
            Logger.Debug(string.Format("TODO: Send email to {0} -> {1}", user.EmailAddress, message));
        }
    }

    public void HandleEvent(EventDateChangedEvent eventData)
    {
        //TODO: Send email to all registered users!

        var registeredUsers = AsyncHelper.RunSync(() => _eventManager.GetRegisteredUsersAsync(eventData.Entity));
        foreach (var user in registeredUsers)
        {
            var message = eventData.Entity.Title + " event's date is changed! New date is: " + eventData.Entity.Date;
            Logger.Debug(string.Format("TODO: Send email to {0} -> {1}", user.EmailAddress, message));
        }
    }

    public void HandleEvent(EventCancelledEvent eventData)
    {
        //TODO: Send email to all registered users!

        var registeredUsers = AsyncHelper.RunSync(() => _eventManager.GetRegisteredUsersAsync(eventData.Entity));
        foreach (var user in registeredUsers)
        {
            var message = eventData.Entity.Title + " event is canceled!";
            Logger.Debug(string.Format("TODO: Send email to {0} -> {1}", user.EmailAddress, message));
        }
    }
}
我們可以處理不同類中的相同事件或同一類中的不同事件(如本示例中所示)。在這裡,我們處理這些事件並向相關用戶發送電子郵件作為通知(實際上未實施電子郵件以使示例應用程序更簡單)。事件處理程序應該實現IEventHandler<event-type>接口。當相關事件發生時,ABP自動調用處理程序。
有關域事件的更多信息,請參閱EventBus文檔。
應用服務
應用程序服務使用域層來實現應用程序的用例(通常由表示層使用)。EventAppService執行事件的應用程序邏輯。
[AbpAuthorize]
public class EventAppService : EventCloudAppServiceBase, IEventAppService
{
    private readonly IEventManager _eventManager;
    private readonly IRepository<Event, Guid> _eventRepository;

    public EventAppService(
        IEventManager eventManager,
        IRepository<Event, Guid> eventRepository)
    {
        _eventManager = eventManager;
        _eventRepository = eventRepository;
    }

    public async Task<ListResultDto<EventListDto>> GetListAsync(GetEventListInput input)
    {
        var events = await _eventRepository
            .GetAll()
            .Include(e => e.Registrations)
            .WhereIf(!input.IncludeCanceledEvents, e => !e.IsCancelled)
            .OrderByDescending(e => e.CreationTime)
            .Take(64)
            .ToListAsync();

        return new ListResultDto<EventListDto>(events.MapTo<List<EventListDto>>());
    }

    public async Task<EventDetailOutput> GetDetailAsync(EntityDto<Guid> input)
    {
        var @event = await _eventRepository
            .GetAll()
            .Include(e => e.Registrations)
            .ThenInclude(r => r.User)
            .Where(e => e.Id == input.Id)
            .FirstOrDefaultAsync();

        if (@event == null)
        {
            throw new UserFriendlyException("Could not found the event, maybe it's deleted.");
        }

        return @event.MapTo<EventDetailOutput>();
    }

    public async Task CreateAsync(CreateEventInput input)
    {
        var @event = Event.Create(AbpSession.GetTenantId(), input.Title, input.Date, input.Description, input.MaxRegistrationCount);
        await _eventManager.CreateAsync(@event);
    }

    public async Task CancelAsync(EntityDto<Guid> input)
    {
        var @event = await _eventManager.GetAsync(input.Id);
        _eventManager.Cancel(@event);
    }

    public async Task<EventRegisterOutput> RegisterAsync(EntityDto<Guid> input)
    {
        var registration = await RegisterAndSaveAsync(
            await _eventManager.GetAsync(input.Id),
            await GetCurrentUserAsync()
            );

        return new EventRegisterOutput
        {
            RegistrationId = registration.Id
        };
    }

    public async Task CancelRegistrationAsync(EntityDto<Guid> input)
    {
        await _eventManager.CancelRegistrationAsync(
            await _eventManager.GetAsync(input.Id),
            await GetCurrentUserAsync()
            );
    }

    private async Task<EventRegistration> RegisterAndSaveAsync(Event @event, User user)
    {
        var registration = await _eventManager.RegisterAsync(@event, user);
        await CurrentUnitOfWork.SaveChangesAsync();
        return registration;
    }
}
如您所見,應用程序服務本身並未實現域邏輯。它只使用實體和域服務(EventManager)來執行用例。
有關應用程序服務的更多信息,請參閱應用程序服
表達層
此應用程序的表示層是使用Angular作為SPA 構建的。
活動列表
當我們登錄應用程序時,我們首先看到一個事件列表:
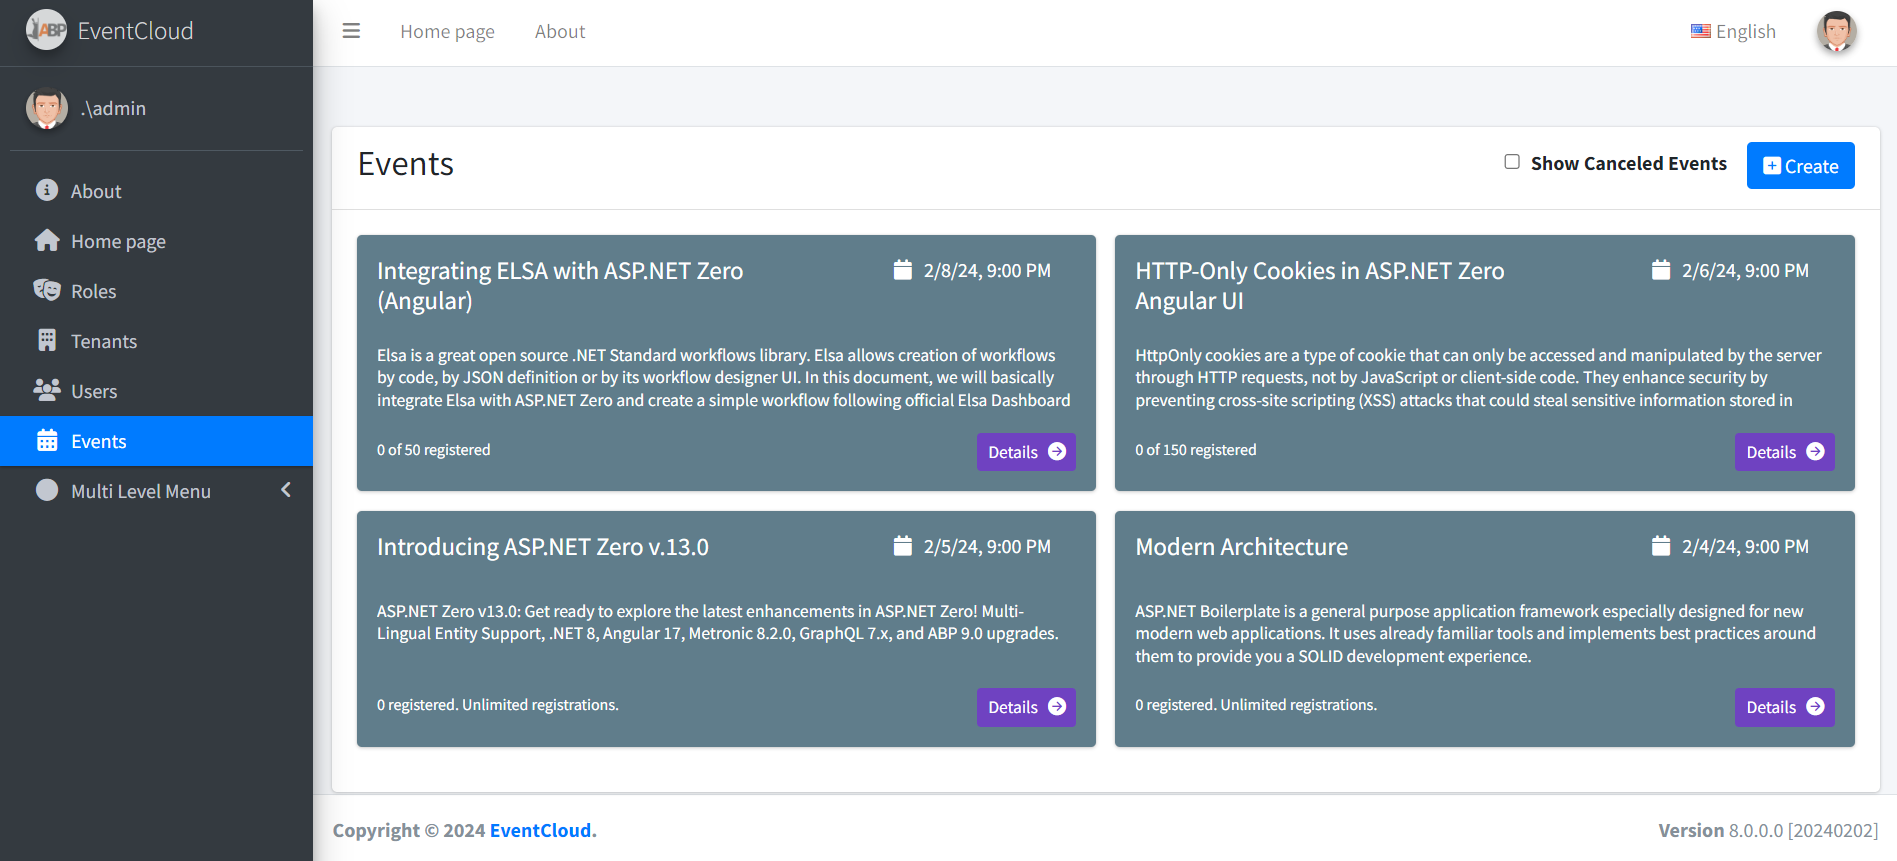 我們直接
我們直接EventAppService用來獲取事件列表。以下是要創建此頁面的events.component.ts:
import { Component, Injector, ViewChild } from '@angular/core';
import { appModuleAnimation } from '@shared/animations/routerTransition';
import { EventServiceProxy, EventListDto, ListResultDtoOfEventListDto, EntityDtoOfGuid } from '@shared/service-proxies/service-proxies';
import { PagedListingComponentBase, PagedRequestDto } from 'shared/paged-listing-component-base';
import { CreateEventComponent } from 'app/events/create-event/create-event.component';

@Component({
    templateUrl: './events.component.html',
    animations: [appModuleAnimation()]
})
export class EventsComponent extends PagedListingComponentBase<EventListDto> {

    @ViewChild('createEventModal') createEventModal: CreateEventComponent;

    active: boolean = false;
    events: EventListDto[] = [];
    includeCanceledEvents:boolean=false;

    constructor(
        injector: Injector,
        private _eventService: EventServiceProxy
    ) {
        super(injector);
    }

    protected list(request: PagedRequestDto, pageNumber: number, finishedCallback: Function): void {
        this.loadEvent();
        finishedCallback();
    }

    protected delete(event: EntityDtoOfGuid): void {
        abp.message.confirm(
            'Are you sure you want to cancel this event?',
            (result: boolean) => {
                if (result) {
                    this._eventService.cancelAsync(event)
                        .subscribe(() => {
                            abp.notify.info('Event is deleted');
                            this.refresh();
                        });
                }
            }
        );
    }

    includeCanceledEventsCheckboxChanged() {
        this.loadEvent();
    };

    // Show Modals
    createEvent(): void {
        this.createEventModal.show();
    }

    loadEvent() {
        this._eventService.getListAsync(this.includeCanceledEvents)
            .subscribe((result: ListResultDtoOfEventListDto) => {
                this.events = result.items;
            });
    }
}
我們注入EventServiceProxy到events.component.ts組件。我們使用了ABP的動態web api層功能。它自動和動態地創建所需的Web API控制器和Angular服務。因此,我們可以使用應用程序服務方法,如調用常規的打字稿函數。所以,要調用EventAppService.GetListAsyncC#方法,我們簡單的調用_eventService.getListAsynctypescript函數。
當用戶點擊“+新事件”按鈕(觸發createEvent功能)時,我們還會打開一個“新事件”模式(對話框)。我不會詳細介紹Angular視圖,因為它們更簡單,您可以在源代碼中查看它。
活動詳情
當我們點擊某個活動的“詳細信息”按鈕時,我們會使用http://eventcloud.aspnetboilerplate.com/#/events/e9499e3e-35c0-492c-98ce-7e410461103f等網址查看活動詳情。GUID是事件的ID。
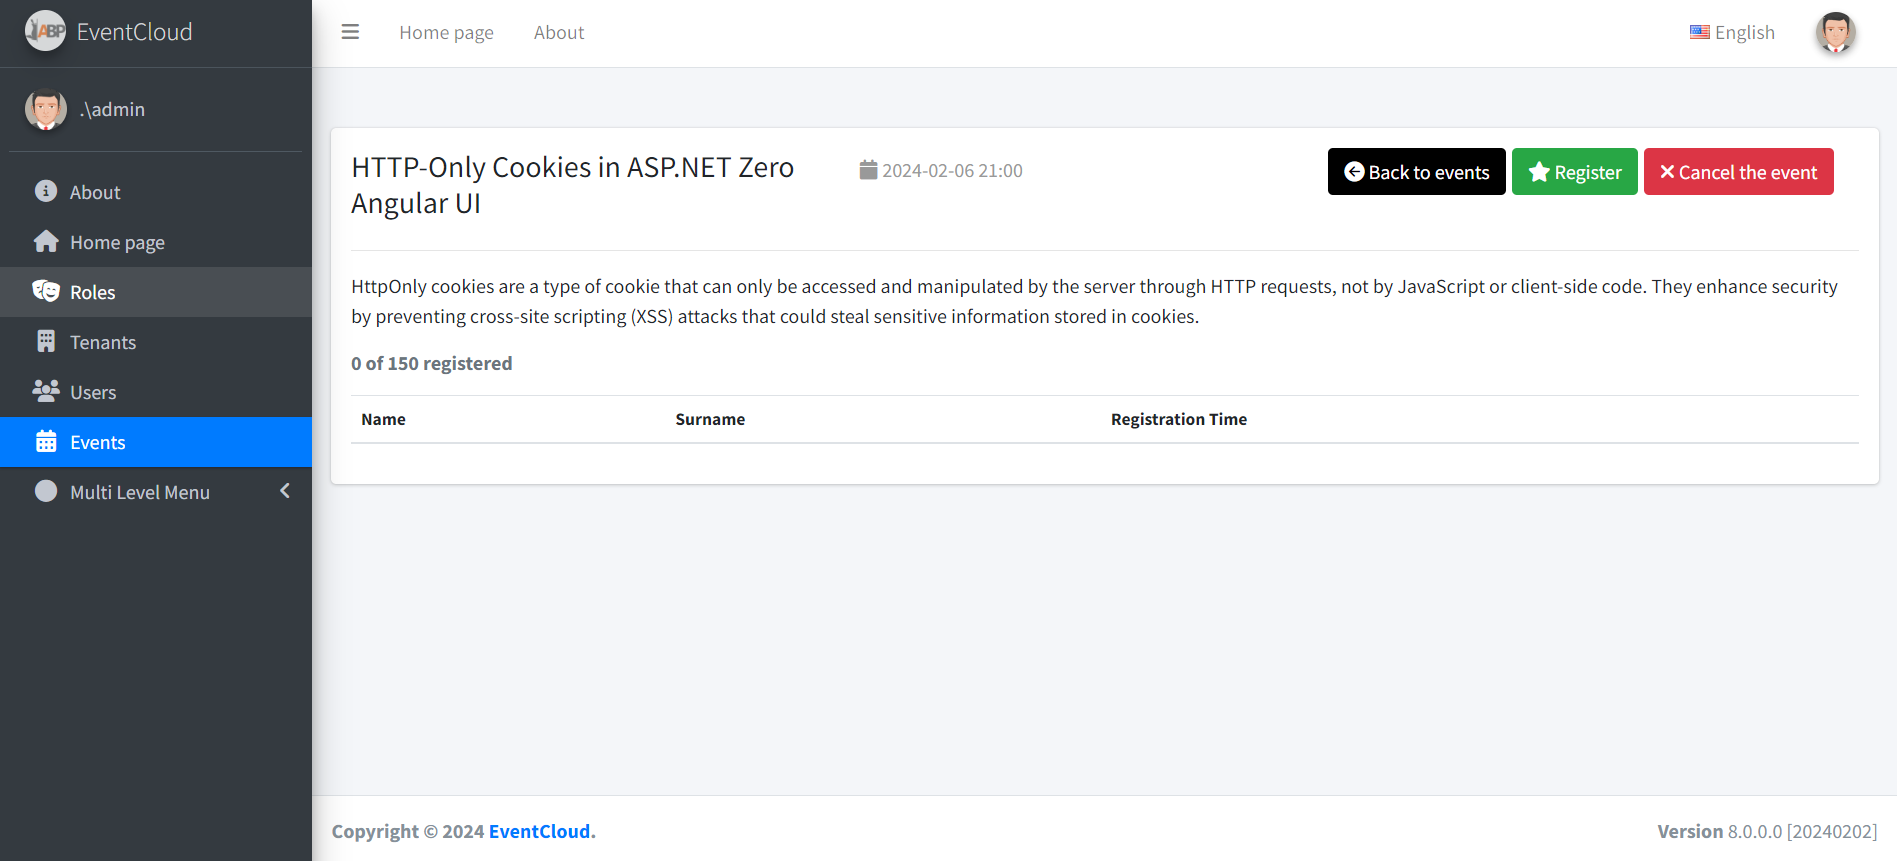
在這裡,我們會看到註冊用戶的活動詳情。我們可以註冊參加活動或取消註冊。此視圖的組件在event-detail.component.ts中定義,如下所示:
import { Component, OnInit, Injector } from '@angular/core';
import { appModuleAnimation } from '@shared/animations/routerTransition';
import { ActivatedRoute, Params, Router } from '@angular/router';
import { AppComponentBase } from '@shared/app-component-base';
import { EventDetailOutput, EventServiceProxy, EntityDtoOfGuid, EventRegisterOutput } from '@shared/service-proxies/service-proxies';

import * as _ from 'lodash';

@Component({
    templateUrl: './event-detail.component.html',
    animations: [appModuleAnimation()]
})

export class EventDetailComponent extends AppComponentBase implements OnInit {

    event: EventDetailOutput = new EventDetailOutput();
    eventId:string;

    constructor(
        injector: Injector,
        private _eventService: EventServiceProxy,
        private _router: Router,
        private _activatedRoute: ActivatedRoute
    ) {
        super(injector);
    }

    ngOnInit(): void {
        this._activatedRoute.params.subscribe((params: Params) => {
            this.eventId = params['eventId'];
            this.loadEvent();
        });
    }

    registerToEvent(): void {
        var input = new EntityDtoOfGuid();
        input.id = this.event.id;

        this._eventService.registerAsync(input)
            .subscribe((result: EventRegisterOutput) => {
                abp.notify.success('Successfully registered to event. Your registration id: ' + result.registrationId + ".");
                this.loadEvent();
            });
    };

    cancelRegistrationFromEvent(): void {
        var input = new EntityDtoOfGuid();
        input.id = this.event.id;

        this._eventService.cancelRegistrationAsync(input)
            .subscribe(() => {
                abp.notify.info('Canceled your registration.');
                this.loadEvent();
            });
    };

    cancelEvent(): void {
        var input = new EntityDtoOfGuid();
        input.id = this.event.id;

        this._eventService.cancelAsync(input)
            .subscribe(() => {
                abp.notify.info('Canceled the event.');
                this.backToEventsPage();
            });
    };

    isRegistered(): boolean {
        return _.some(this.event.registrations, { userId: abp.session.userId });
    };

    isEventCreator(): boolean {
        return this.event.creatorUserId === abp.session.userId;
    };

    loadEvent() {
        this._eventService.getDetailAsync(this.eventId)
            .subscribe((result: EventDetailOutput) => {
                this.event = result;
            });
    }

    backToEventsPage() {
        this._router.navigate(['app/events']);
    };
}
我們只是使用事件應用程序服務來執行操作。
主菜單
頂部菜單由ABP模板自動創建。我們在sidebar-nav.component.ts課堂上定義菜單項:
@Component({
    templateUrl: './sidebar-nav.component.html',
    selector: 'sidebar-nav',
    encapsulation: ViewEncapsulation.None
})
export class SideBarNavComponent extends AppComponentBase {

    menuItems: MenuItem[] = [
        new MenuItem(this.l("HomePage"), "", "home", "/app/home"),

        new MenuItem(this.l("Tenants"), "Pages.Tenants", "business", "/app/tenants"),
        new MenuItem(this.l("Users"), "Pages.Users", "people", "/app/users"),
        new MenuItem(this.l("Roles"), "Pages.Roles", "local_offer", "/app/roles"),
        new MenuItem(this.l("Events"), "Pages.Events", "event", "/app/events"),
        new MenuItem(this.l("About"), "", "info", "/app/about"),

...
角度路線
定義菜單僅在頁面上顯示。Angular有自己的路線系統。路由在app-routing-module.ts中定義,如下所示:
import { NgModule } from '@angular/core';
import { RouterModule } from '@angular/router';
import { AppComponent } from './app.component';
import { AppRouteGuard } from '@shared/auth/auth-route-guard';
import { HomeComponent } from './home/home.component';
import { AboutComponent } from './about/about.component';
import { UsersComponent } from './users/users.component';
import { TenantsComponent } from './tenants/tenants.component';
import { RolesComponent } from 'app/roles/roles.component';
import { EventsComponent } from 'app/events/events.component';
import { EventDetailComponent } from 'app/events/event-detail/event-detail.component';

@NgModule({
    imports: [
        RouterModule.forChild([
            {
                path: '',
                component: AppComponent,
                children: [
                    { path: 'home', component: HomeComponent, canActivate: [AppRouteGuard] },
                    { path: 'users', component: UsersComponent, data: { permission: 'Pages.Users' }, canActivate: [AppRouteGuard] },
                    { path: 'roles', component: RolesComponent, data: { permission: 'Pages.Roles' }, canActivate: [AppRouteGuard] },
                    { path: 'tenants', component: TenantsComponent, data: { permission: 'Pages.Tenants' }, canActivate: [AppRouteGuard] },
                    { path: 'events', component: EventsComponent, data: { permission: 'Pages.Events' }, canActivate: [AppRouteGuard] },
                    { path: 'events/:eventId', component: EventDetailComponent },
                    { path: 'about', component: AboutComponent }
                ]
            }
        ])
    ],
    exports: [RouterModule]
})
export class AppRoutingModule { }
單元和集成測試
ASP.NET Boilerplate提供了使單元和集成測試更容易的工具。您可以從項目的源代碼中找到所有測試代碼。在這裡,我將簡要介紹基本測試。解決方案包括EventAppService_Tests測試的類EventAppService。查看此課程的2個測試:
public class EventAppService_Tests : EventCloudTestBase
{
    private readonly IEventAppService _eventAppService;

    public EventAppService_Tests()
    {
        _eventAppService = Resolve<IEventAppService>();
    }

    [Fact]
    public async Task Should_Get_Test_Events()
    {
        var output = await _eventAppService.GetListAsync(new GetEventListInput());
        output.Items.Count.ShouldBe(1);
    }

    [Fact]
    public async Task Should_Create_Event()
    {
        //Arrange
        var eventTitle = Guid.NewGuid().ToString();

        //Act
        await _eventAppService.CreateAsync(new CreateEventInput
        {
            Title = eventTitle,
            Description = "A description",
            Date = Clock.Now.AddDays(2)
        });

        //Assert
        UsingDbContext(context =>
        {
            context.Events.FirstOrDefault(e => e.Title == eventTitle).ShouldNotBe(null);
        });
    }

    [Fact]
    public async Task Should_Not_Create_Events_In_The_Past()
    {
        //Arrange
        var eventTitle = Guid.NewGuid().ToString();

        //Act
        await Assert.ThrowsAsync<UserFriendlyException>(async () =>
        {
            await _eventAppService.CreateAsync(new CreateEventInput
            {
                Title = eventTitle,
                Description = "A description",
                Date = Clock.Now.AddDays(-1)
            });
        });
    }

    [Fact]
    public async Task Should_Cancel_Event()
    {
        //Act
        await _eventAppService.CancelAsync(new EntityDto<Guid>(GetTestEvent().Id));

        //Assert
        GetTestEvent().IsCancelled.ShouldBeTrue();
    }

    [Fact]
    public async Task Should_Register_To_Events()
    {
        //Arrange
        var testEvent = GetTestEvent();

        //Act
        var output = await _eventAppService.RegisterAsync(new EntityDto<Guid>(testEvent.Id));

        //Assert
        output.RegistrationId.ShouldBeGreaterThan(0);

        UsingDbContext(context =>
        {
            var currentUserId = AbpSession.GetUserId();
            var registration = context.EventRegistrations.FirstOrDefault(r => r.EventId == testEvent.Id && r.UserId == currentUserId);
            registration.ShouldNotBeNull();
        });
    }

    [Fact]
    public async Task Should_Cancel_Registration()
    {
        //Arrange
        var currentUserId = AbpSession.GetUserId();
        await UsingDbContext(async context =>
        {
            var testEvent = GetTestEvent(context);
            var currentUser = await context.Users.SingleAsync(u => u.Id == currentUserId);
            var testRegistration = await EventRegistration.CreateAsync(
                testEvent,
                currentUser,
                Substitute.For<IEventRegistrationPolicy>()
                );

            context.EventRegistrations.Add(testRegistration);
        });

        //Act
        await _eventAppService.CancelRegistrationAsync(new EntityDto<Guid>(GetTestEvent().Id));

        //Assert
        UsingDbContext(context =>
        {
            var testEvent = GetTestEvent(context);
            var testRegistration = context.EventRegistrations.FirstOrDefault(r => r.EventId == testEvent.Id && r.UserId == currentUserId);
            testRegistration.ShouldBeNull();
        });
    }

    private Event GetTestEvent()
    {
        return UsingDbContext(context => GetTestEvent(context));
    }

    private static Event GetTestEvent(EventCloudDbContext context)
    {
        return context.Events.Single(e => e.Title == TestDataBuilder.TestEventTitle);
    }
}
我們使用xUnit作為測試框架。在第一個測試中,我們只是創建一個事件並檢查數據庫是否在那裡。在第二次測試中,我們有意嘗試在過去創建一個事件。由於我們的業務規則不允許,我們應該在此處獲得例外。
通過這些測試,我們測試了從應用程序服務開始的所有內容,包括ASP.NET Boilerplate的所有方面(如驗證,工作單元等)。
基於令牌的認證
如果要從移動應用程序中使用API /應用程序服務,則可以像使用Angular客戶端一樣使用基於令牌的身份驗證機制。啟動模板包括JwtBearer令牌認證基礎結構。
我們將使用Postman(chrome擴展)來演示請求和響應。
認證
只需使用Context-Type =“application / json”標頭向http:// localhost:21021 / api / TokenAuth / Authenticate發送POST請求,如下所示: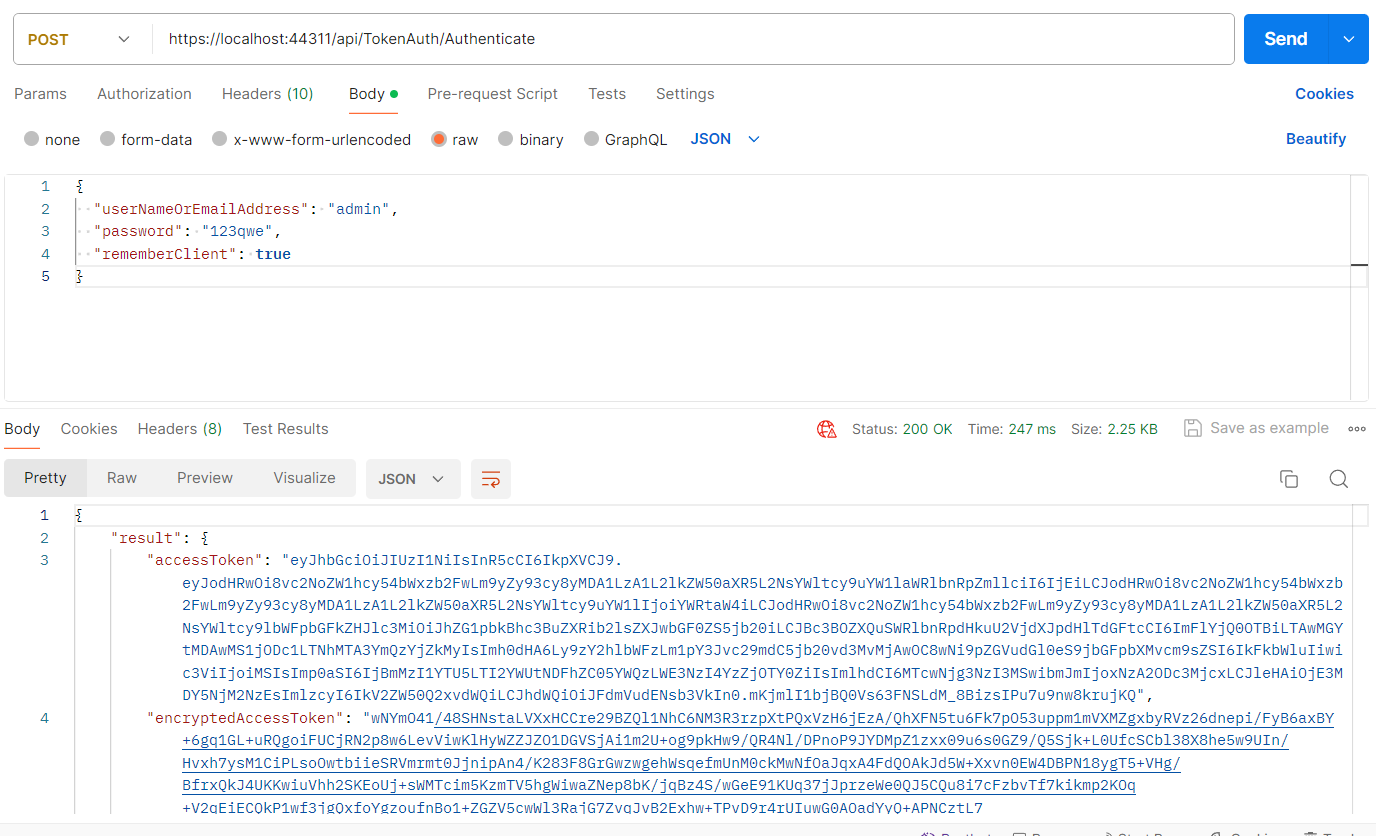
我們發送了一個JSON請求體,包括tenancyName,userNameOrEmailAddress和密碼。主機用戶不需要tenancyName。如上所示,返回JSON的result屬性包含令牌。我們可以保存它並用於下一個請求。
使用API
在驗證並獲取令牌後,我們可以使用它來調用任何授權的操作。所有應用程序服務都可以遠程使用。例如,我們可以使用用戶服務獲取用戶列表: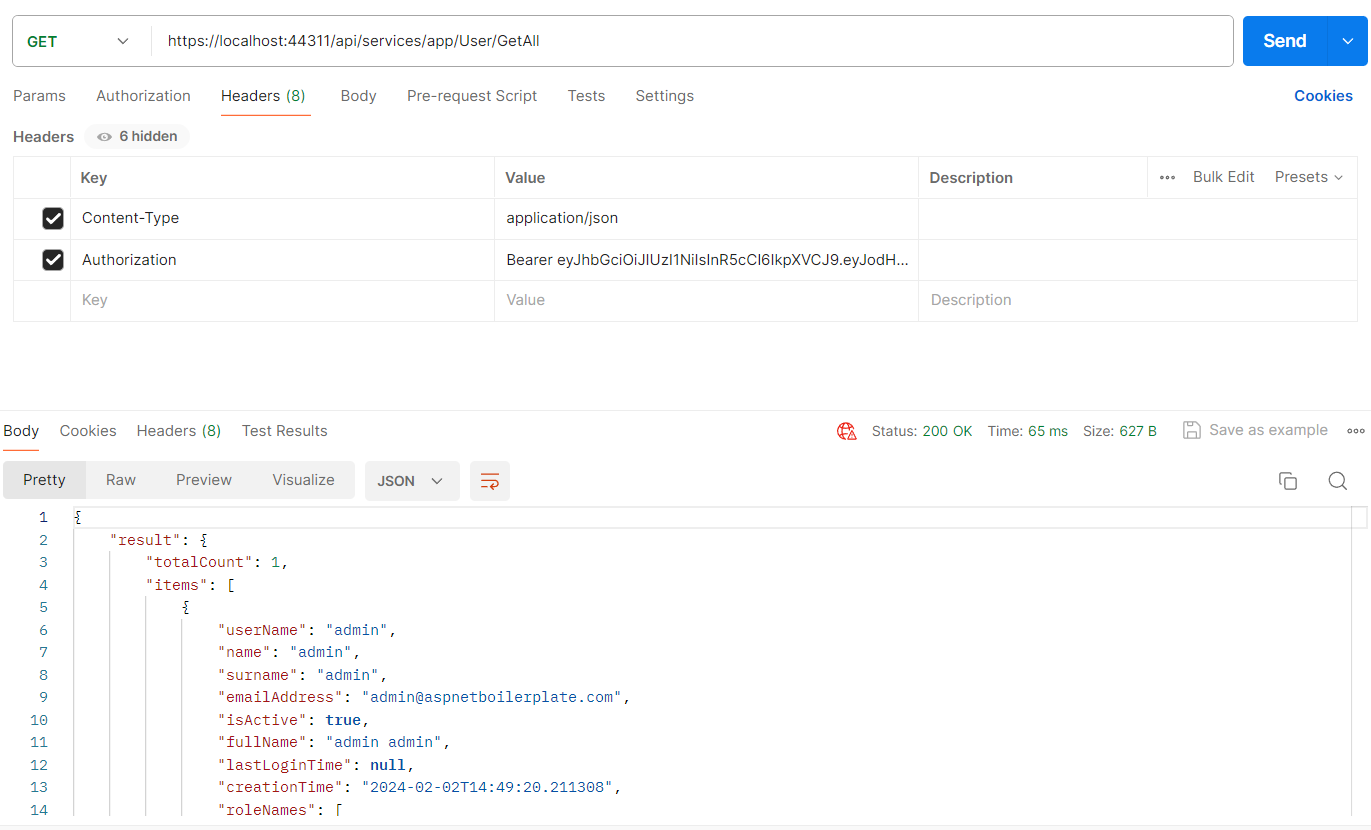
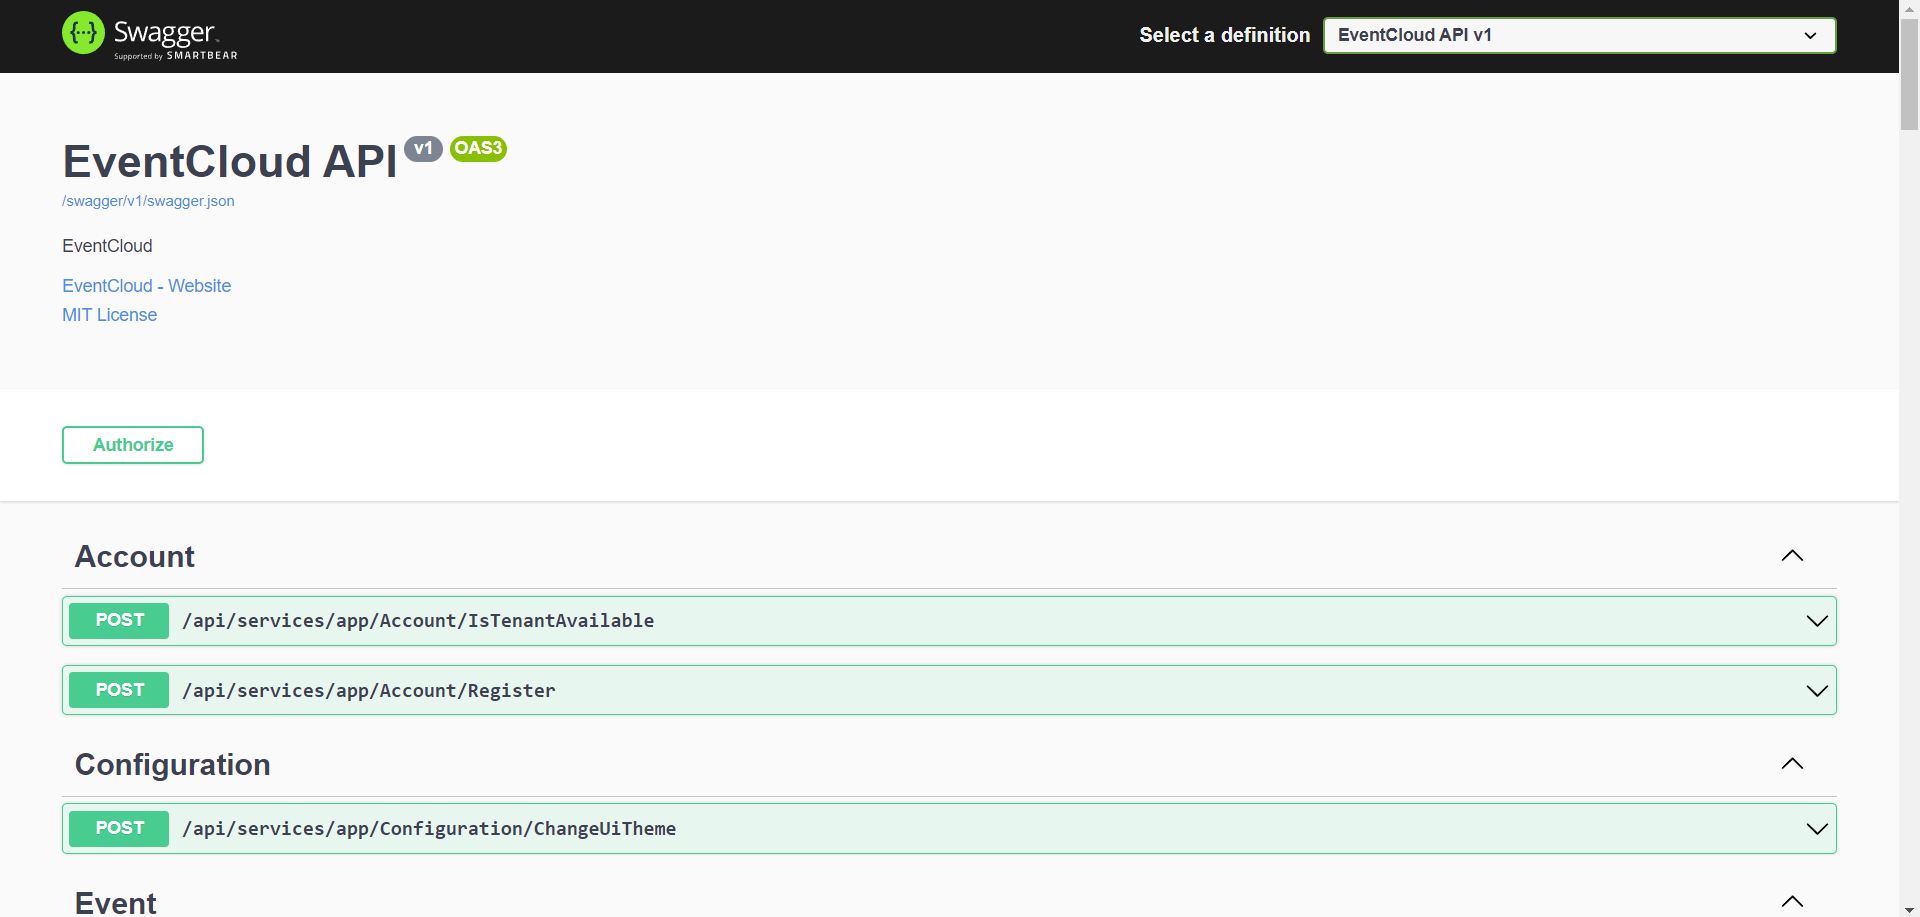
剛剛向http:// localhost:21021 / api / services / app / user / getAll發出了一個GET請求,其中Content-Type =“application / json”和Authorization =“Bearer [your -auth-token]”。UI上提供的所有功能也可用作API。
UI上幾乎所有可用的操作也可用作Web API(因為UI使用相同的Web API)並且可以輕鬆使用。
源代碼
您可以在此處獲取最新的源代碼事件雲源
參照:https://aspnetboilerplate.com/Pages/Documents/Articles/Developing-MultiTenant-SaaS-ASP.NET-CORE-Angular/index.html
