建立關聯
Web 應用程序開發教程 - 第 10 部分:書籍與作者的關係
關於本教程
在本系列教程中,您將構建一個名為Acme.BookStore. 此應用程序用於管理書籍及其作者的列表。它是使用以下技術開發的:
- Entity Framework Core作為 ORM 提供者。
- Angular作為 UI 框架。
本教程分為以下幾個部分;
- 第 1 部分:創建服務器端
- 第 2 部分:圖書列表頁面
- 第 3 部分:創建、更新和刪除書籍
- 第 4 部分:集成測試
- 第 5 部分:授權
- 第 6 部分:作者:領域層
- 第 7 部分:作者:數據庫集成
- 第 8 部分:作者:應用程序層
- 第 9 部分:作者:用戶界面
- 第 10 部分:書籍與作者的關係(本部分)
下載源代碼
本教程根據您的UI和數據庫首選項有多個版本。我們準備了幾個要下載的源代碼組合:
介紹
我們創造Book並Author為書商店應用程序的功能。但是,目前這些實體之間沒有任何關係。
在本教程中,我們將在和實體之間建立1 到 N 的關係。AuthorBook
添加與圖書實體的關係
// 雖然 DDD 規則是不建立導航屬性,但是在 EntityFramework Core 中,其實加導航屬性比較方便 (但在其他 ORM 就僅通過 id 引用其他聚合)
Books/Book.cs在Acme.BookStore.Domain項目中打開並向Book實體添加以下屬性:
public Guid AuthorId { get; set; }在本教程中,我們傾向於不向
Book類中的Author實體添加導航屬性(如public Author Author { get; set; })。這是由於遵循 DDD 最佳實踐(規則:僅通過 id 引用其他聚合)。但是,您可以添加這樣的導航屬性並為 EF Core 配置它。通過這種方式,您無需在與作者一起獲取書籍時編寫連接查詢(就像我們將在下面完成的那樣),這使您的應用程序代碼更簡單。
數據庫和數據遷移
// 開發環境可以直接在 PowerShell 執行 dotnet ef database drop來直接用最新版本來重建資料庫
向Book實體添加了一個新的必需屬性 AuthorId。但是,關於數據庫的現有書籍呢?他們目前沒有AuthorId,當我們嘗試運行應用程序時,這將是一個問題。
這是一個典型的遷移問題,決定取決於您的情況;
- 如果您尚未將應用程序發佈到生產環境中,您可以刪除數據庫中現有的書籍,甚至可以刪除開發環境中的整個數據庫。
- 您可以在數據遷移或種子階段以編程方式更新現有數據。
- 您可以在數據庫上手動處理它。
我們更喜歡刪除數據庫(您可以Drop-Database在包管理器控制台中運行),因為這只是一個示例項目,數據丟失並不重要。
由於本主題與 ABP 框架無關,因此我們不會深入了解所有場景。

更新 EF 核心映射
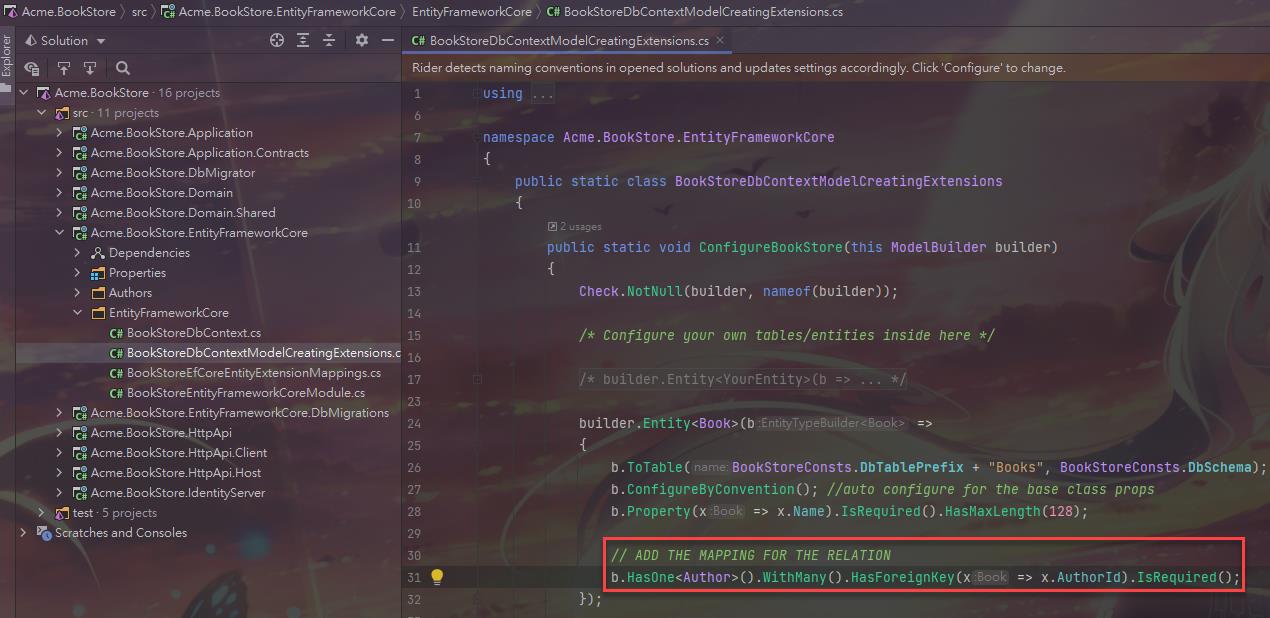
打開 Acme.BookStore.EntityFrameworkCore 項目 EntityFrameworkCore 文件夾下的 BookStoreDbContextModelCreatingExtensions 類,修改 builder.Entity<Book> 部分如下圖:
builder.Entity<Book>(b =>
{
    b.ToTable(BookStoreConsts.DbTablePrefix + "Books", BookStoreConsts.DbSchema);
    b.ConfigureByConvention(); //auto configure for the base class props
    b.Property(x => x.Name).IsRequired().HasMaxLength(128);

    // ADD THE MAPPING FOR THE RELATION
    b.HasOne<Author>().WithMany().HasForeignKey(x => x.AuthorId).IsRequired();
});
添加新的 EF Core 遷移
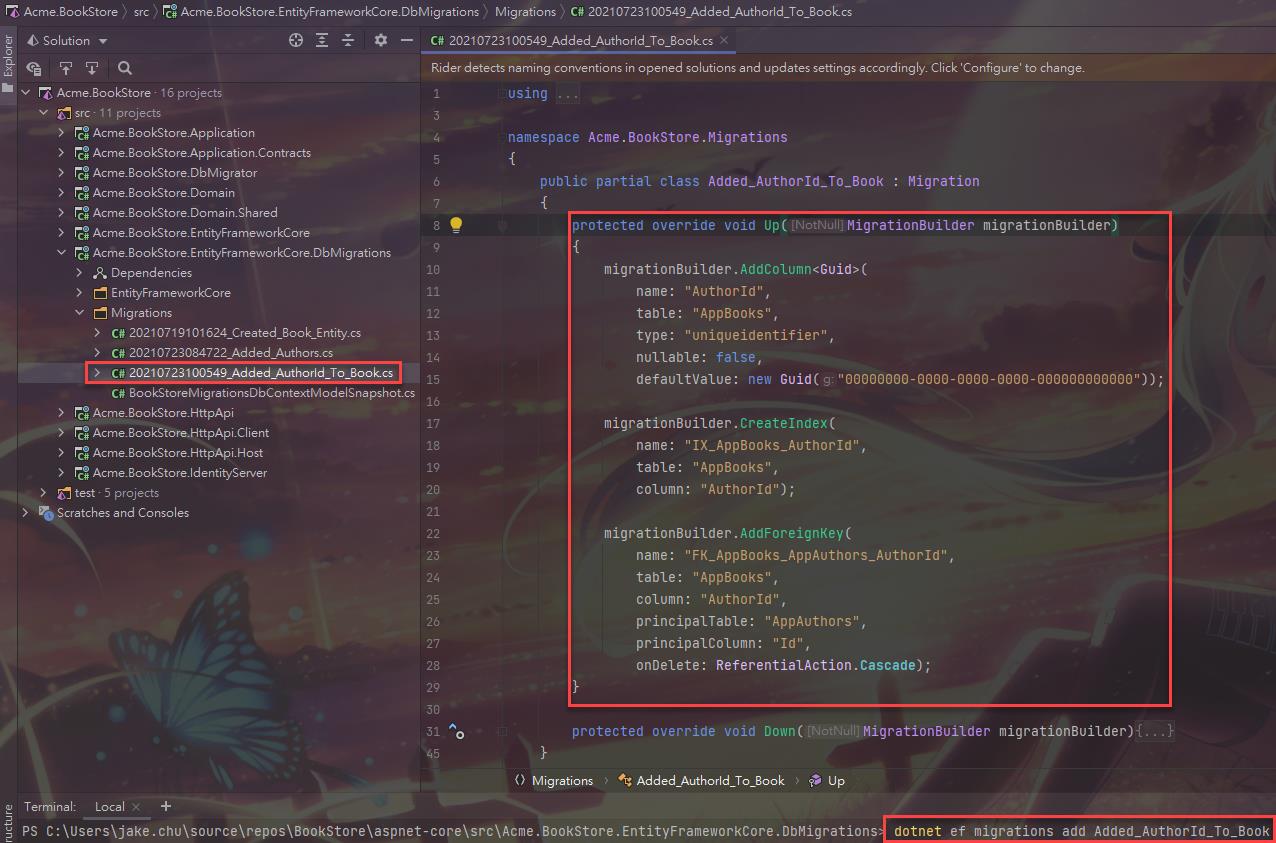
啟動解決方案配置為使用Entity Framework Core Code First Migrations。由於我們已經更改了數據庫映射配置,我們應該創建一個新的遷移並將更改應用於數據庫。
在Acme.BookStore.EntityFrameworkCore.DbMigrations項目目錄中打開命令行終端並鍵入以下命令:
dotnet ef migrations add Added_AuthorId_To_Book// 會自動生成以下類別
這應該在其Up方法中使用以下代碼創建一個新的遷移類:
migrationBuilder.AddColumn<Guid>(
    name: "AuthorId",
    table: "AppBooks",
    nullable: false,
    defaultValue: new Guid("00000000-0000-0000-0000-000000000000"));

migrationBuilder.CreateIndex(
    name: "IX_AppBooks_AuthorId",
    table: "AppBooks",
    column: "AuthorId");

migrationBuilder.AddForeignKey(
    name: "FK_AppBooks_AppAuthors_AuthorId",
    table: "AppBooks",
    column: "AuthorId",
    principalTable: "AppAuthors",
    principalColumn: "Id",
onDelete: ReferentialAction.Cascade);AuthorId向AppBooks表中添加一個字段。- 在
AuthorId字段上創建索引。 - 聲明
AppAuthors表的外鍵。
如果您使用的是 Visual Studio,您可能需要在包管理器控制台 (PMC) 中使用
Add-Migration Added_AuthorId_To_Book -c BookStoreMigrationsDbContext和Update-Database -c BookStoreMigrationsDbContext命令。在這種情況下,請確保是啟動項目並且是PMC 中的默認項目。Acme.BookStore.HttpApi.HostAcme.BookStore.EntityFrameworkCore.DbMigrations
更改數據播種機
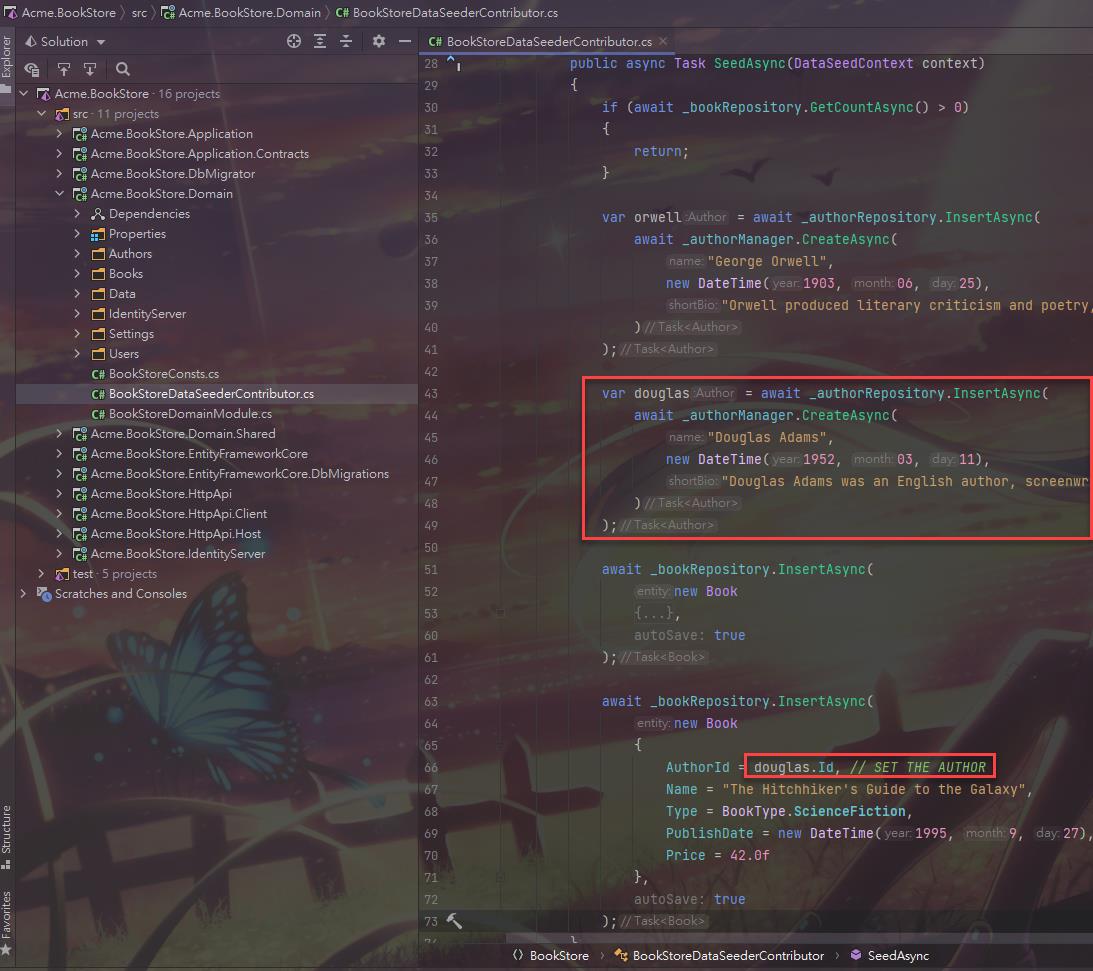
由於AuthorId是Book實體的必需屬性,因此當前的數據播種器代碼無法工作。在Acme.BookStore.Domain項目中打開BookStoreDataSeederContributor,修改如下:
using System;
using System.Threading.Tasks;
using Acme.BookStore.Authors;
using Acme.BookStore.Books;
using Volo.Abp.Data;
using Volo.Abp.DependencyInjection;
using Volo.Abp.Domain.Repositories;

namespace Acme.BookStore
{
    public class BookStoreDataSeederContributor
        : IDataSeedContributor, ITransientDependency
    {
        private readonly IRepository<Book, Guid> _bookRepository;
        private readonly IAuthorRepository _authorRepository;
        private readonly AuthorManager _authorManager;

        public BookStoreDataSeederContributor(
            IRepository<Book, Guid> bookRepository,
            IAuthorRepository authorRepository,
            AuthorManager authorManager)
        {
            _bookRepository = bookRepository;
            _authorRepository = authorRepository;
            _authorManager = authorManager;
        }

        public async Task SeedAsync(DataSeedContext context)
        {
            if (await _bookRepository.GetCountAsync() > 0)
            {
                return;
            }

            var orwell = await _authorRepository.InsertAsync(
                await _authorManager.CreateAsync(
                    "George Orwell",
                    new DateTime(1903, 06, 25),
                    "Orwell produced literary criticism and poetry, fiction and polemical journalism; and is best known for the allegorical novella Animal Farm (1945) and the dystopian novel Nineteen Eighty-Four (1949)."
                )
            );

            var douglas = await _authorRepository.InsertAsync(
                await _authorManager.CreateAsync(
                    "Douglas Adams",
                    new DateTime(1952, 03, 11),
                    "Douglas Adams was an English author, screenwriter, essayist, humorist, satirist and dramatist. Adams was an advocate for environmentalism and conservation, a lover of fast cars, technological innovation and the Apple Macintosh, and a self-proclaimed 'radical atheist'."
                )
            );

            await _bookRepository.InsertAsync(
                new Book
                {
                    AuthorId = orwell.Id, // SET THE AUTHOR
                    Name = "1984",
                    Type = BookType.Dystopia,
                    PublishDate = new DateTime(1949, 6, 8),
                    Price = 19.84f
                },
                autoSave: true
            );

            await _bookRepository.InsertAsync(
                new Book
                {
                    AuthorId = douglas.Id, // SET THE AUTHOR
                    Name = "The Hitchhiker's Guide to the Galaxy",
                    Type = BookType.ScienceFiction,
                    PublishDate = new DateTime(1995, 9, 27),
                    Price = 42.0f
                },
                autoSave: true
            );
        }
    }
}唯一的變化是我們設置AuthorId了Book實體的屬性。
在執行
DbMigrator. 有關更多信息,請參閱上面的數據庫和數據遷移部分。
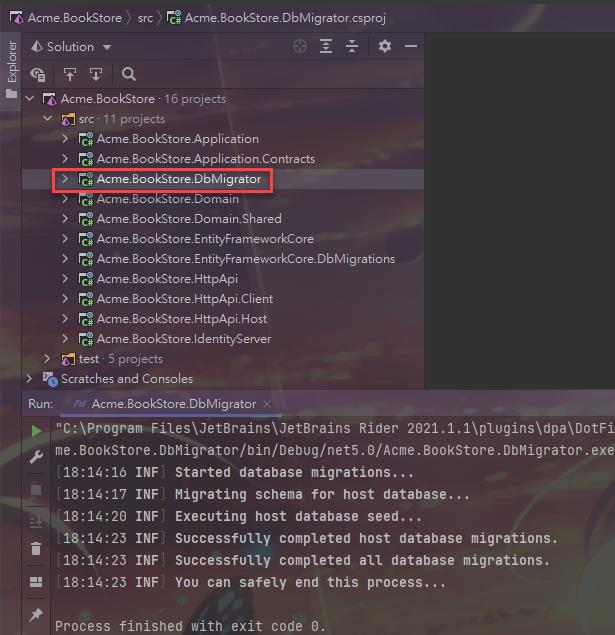
現在,您可以運行.DbMigrator控制台應用程序遷移的數據庫架構和種子的初始數據。
應用層
我們將更改BookAppService以支持作者關係。
數據傳輸對象
讓我們從 DTO 開始。
書Dto
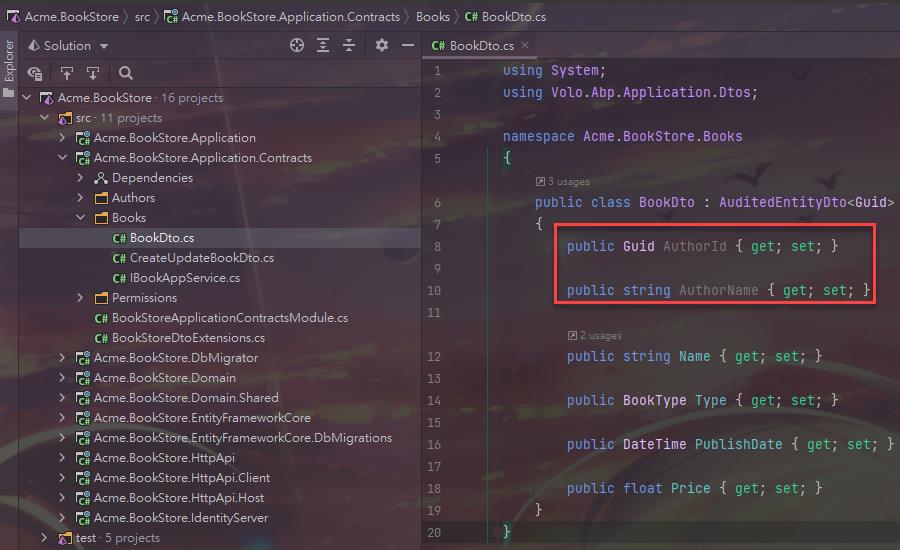
打開 Acme.BookStore.Application.Contracts 項目 Books 文件夾中的BookDto類並添加以下屬性:
public Guid AuthorId { get; set; }
public string AuthorName { get; set; }最後的BookDto課程應該如下:
using System;
using Volo.Abp.Application.Dtos;

namespace Acme.BookStore.Books
{
    public class BookDto : AuditedEntityDto<Guid>
    {
        public Guid AuthorId { get; set; }

        public string AuthorName { get; set; }

        public string Name { get; set; }

        public BookType Type { get; set; }

        public DateTime PublishDate { get; set; }

        public float Price { get; set; }
    }
}
創建更新書Dto
打開 Acme.BookStore.Application.Contracts 項目 Books 文件夾中的CreateUpdateBookDto類,添加一個屬性 AuthorId,如圖:
public Guid AuthorId { get; set; }作者查找Dto
在Acme.BookStore.Application.Contracts項目裡面的Books文件夾創建一個新的類AuthorLookupDto:
using System;
using Volo.Abp.Application.Dtos;

namespace Acme.BookStore.Books
{
    public class AuthorLookupDto : EntityDto<Guid>
    {
        public string Name { get; set; }
    }
}這將用於將添加到IBookAppService.
圖書應用服務
打開工程文件夾中的IBookAppService界面,添加一個新的方法,命名為,如下圖:BooksAcme.BookStore.Application.ContractsGetAuthorLookupAsync
using System;
using System.Threading.Tasks;
using Volo.Abp.Application.Dtos;
using Volo.Abp.Application.Services;

namespace Acme.BookStore.Books
{
    public interface IBookAppService :
        ICrudAppService< //Defines CRUD methods
            BookDto, //Used to show books
            Guid, //Primary key of the book entity
            PagedAndSortedResultRequestDto, //Used for paging/sorting
            CreateUpdateBookDto> //Used to create/update a book
    {
        // ADD the NEW METHOD
        Task<ListResultDto<AuthorLookupDto>> GetAuthorLookupAsync();
    }
}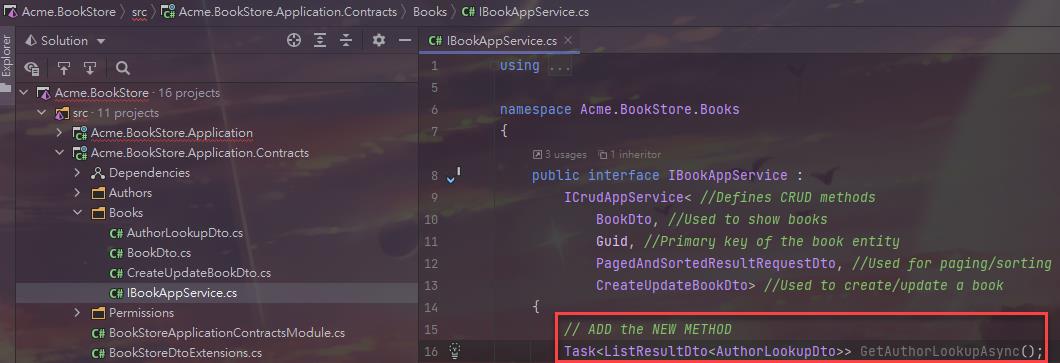
這個新方法將用於從 UI 獲取作者列表並填充下拉列表以選擇一本書的作者。
圖書應用服務
打開工程BookAppService所在Books文件夾中的界面,將Acme.BookStore.Application文件內容替換為如下代碼:
using System;
using System.Collections.Generic;
using System.Linq;
using System.Linq.Dynamic.Core;
using System.Threading.Tasks;
using Acme.BookStore.Authors;
using Acme.BookStore.Permissions;
using Microsoft.AspNetCore.Authorization;
using Volo.Abp.Application.Dtos;
using Volo.Abp.Application.Services;
using Volo.Abp.Domain.Entities;
using Volo.Abp.Domain.Repositories;

namespace Acme.BookStore.Books
{
    [Authorize(BookStorePermissions.Books.Default)]
    public class BookAppService :
        CrudAppService<
            Book, //The Book entity
            BookDto, //Used to show books
            Guid, //Primary key of the book entity
            PagedAndSortedResultRequestDto, //Used for paging/sorting
            CreateUpdateBookDto>, //Used to create/update a book
        IBookAppService //implement the IBookAppService
    {
        private readonly IAuthorRepository _authorRepository;

        public BookAppService(
            IRepository<Book, Guid> repository,
            IAuthorRepository authorRepository)
            : base(repository)
        {
            _authorRepository = authorRepository;
            GetPolicyName = BookStorePermissions.Books.Default;
            GetListPolicyName = BookStorePermissions.Books.Default;
            CreatePolicyName = BookStorePermissions.Books.Create;
            UpdatePolicyName = BookStorePermissions.Books.Edit;
            DeletePolicyName = BookStorePermissions.Books.Create;
        }

        public override async Task<BookDto> GetAsync(Guid id)
        {
            //Get the IQueryable<Book> from the repository
            var queryable = await Repository.GetQueryableAsync();

            //Prepare a query to join books and authors
            var query = from book in queryable
                join author in _authorRepository on book.AuthorId equals author.Id
                where book.Id == id
                select new { book, author };

            //Execute the query and get the book with author
            var queryResult = await AsyncExecuter.FirstOrDefaultAsync(query);
            if (queryResult == null)
            {
                throw new EntityNotFoundException(typeof(Book), id);
            }

            var bookDto = ObjectMapper.Map<Book, BookDto>(queryResult.book);
            bookDto.AuthorName = queryResult.author.Name;
            return bookDto;
        }

        public override async Task<PagedResultDto<BookDto>> GetListAsync(PagedAndSortedResultRequestDto input)
        {
            //Get the IQueryable<Book> from the repository
            var queryable = await Repository.GetQueryableAsync();

            //Prepare a query to join books and authors
            var query = from book in queryable
                join author in _authorRepository on book.AuthorId equals author.Id
                select new {book, author};

            //Paging
            query = query
                .OrderBy(NormalizeSorting(input.Sorting))
                .Skip(input.SkipCount)
                .Take(input.MaxResultCount);

            //Execute the query and get a list
            var queryResult = await AsyncExecuter.ToListAsync(query);

            //Convert the query result to a list of BookDto objects
            var bookDtos = queryResult.Select(x =>
            {
                var bookDto = ObjectMapper.Map<Book, BookDto>(x.book);
                bookDto.AuthorName = x.author.Name;
                return bookDto;
            }).ToList();

            //Get the total count with another query
            var totalCount = await Repository.GetCountAsync();

            return new PagedResultDto<BookDto>(
                totalCount,
                bookDtos
            );
        }

        public async Task<ListResultDto<AuthorLookupDto>> GetAuthorLookupAsync()
        {
            var authors = await _authorRepository.GetListAsync();

            return new ListResultDto<AuthorLookupDto>(
                ObjectMapper.Map<List<Author>, List<AuthorLookupDto>>(authors)
            );
        }

        private static string NormalizeSorting(string sorting)
        {
            if (sorting.IsNullOrEmpty())
            {
                return $"book.{nameof(Book.Name)}";
            }

            if (sorting.Contains("authorName", StringComparison.OrdinalIgnoreCase))
            {
                return sorting.Replace(
                    "authorName",
                    "author.Name",
                    StringComparison.OrdinalIgnoreCase
                );
            }

            return $"book.{sorting}";
        }
    }
}
讓我們看看我們所做的更改:
- 添加
[Authorize(BookStorePermissions.Books.Default)]以授權我們新添加/覆蓋的方法(請記住,當為類聲明時,authorize 屬性對類的所有方法都有效)。 - 注入
IAuthorRepository作者查詢。 - 重寫 base 的
GetAsync方法,該方法CrudAppService返回BookDto具有給定的單個對象id。- 使用簡單的 LINQ 表達式連接書籍和作者,並一起查詢給定書籍 ID。
- 用於
AsyncExecuter.FirstOrDefaultAsync(...)執行查詢並得到結果。這是一種使用異步 LINQ 擴展而不依賴於數據庫提供程序 API 的方法。查看存儲庫文檔以了解我們使用它的原因。 - 如果數據庫中不存在請求的書,則拋出
EntityNotFoundException結果HTTP 404(未找到)結果。 - 最後,
BookDto使用 來創建一個對象ObjectMapper,然後AuthorName手動分配。
- 覆蓋 base 的
GetListAsync方法,該方法CrudAppService返回書籍列表。邏輯與前面的方法類似,因此您可以輕鬆理解代碼。 - 創建了一個新方法:
GetAuthorLookupAsync. 這個簡單得到所有作者。UI 使用此方法填充下拉列表並在創建/編輯書籍時進行選擇和創作。
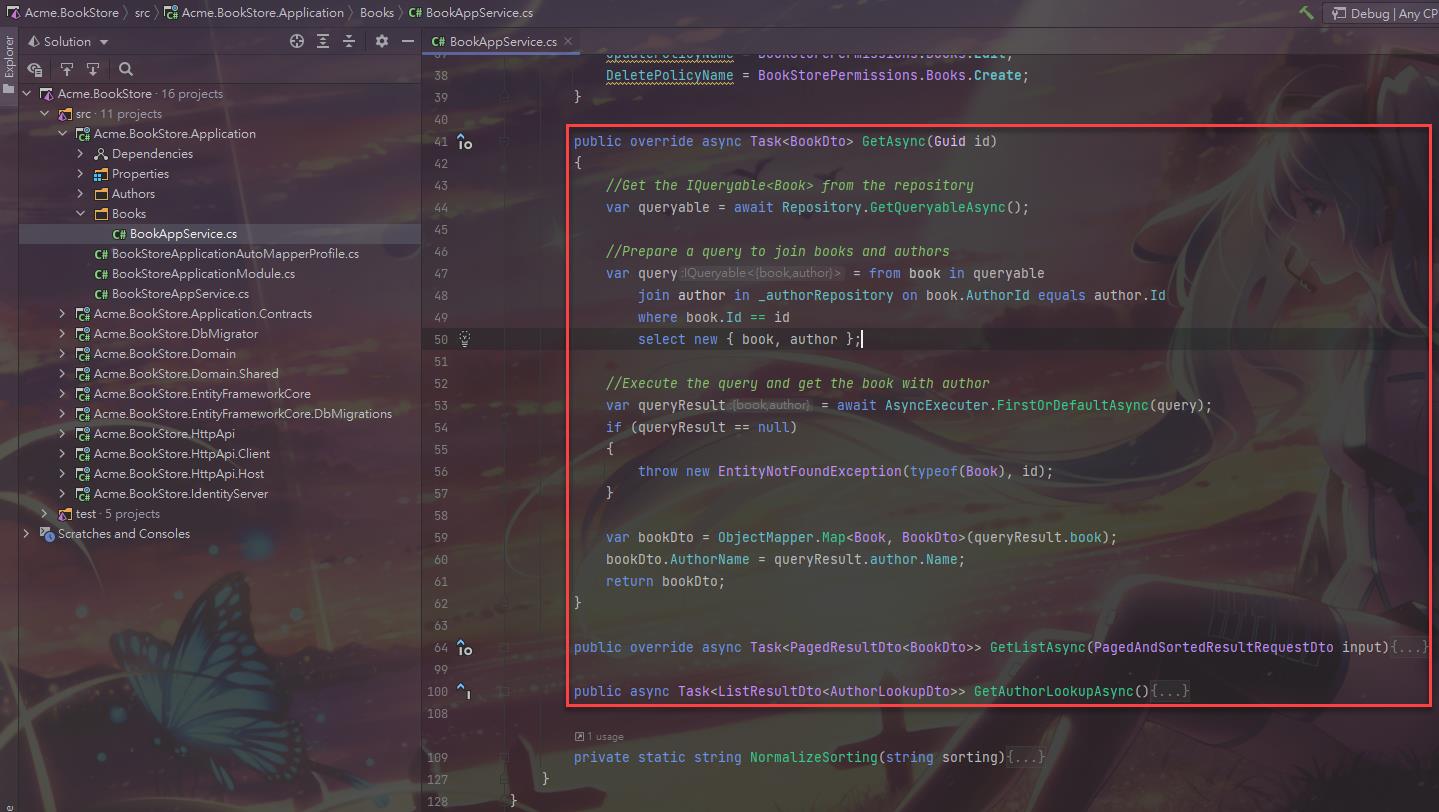
// 在 Book 實體定義導覽屬性 public Author Author { get; set; } 可以直接取得關聯實體資料Author.Name
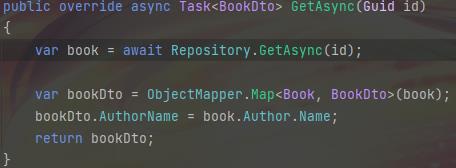
// 這邊體驗了一把單元測試的好處,照下方修改單元測試後,確實有正確拿到 AuthorName!
對像到對象映射配置
AuthorLookupDto在GetAuthorLookupAsync方法中引入了類和使用的對象映射。因此,我們需要BookStoreApplicationAutoMapperProfile.cs在Acme.BookStore.Application項目文件中添加一個新的映射定義:
CreateMap<Author, AuthorLookupDto>();單元測試
由於我們對BookAppService的修改導致單元測試會失敗。 打開 Acme.BookStore.Application.Tests項目Books文件夾中的 BookAppService_Tests ,修改內容如下:
using System;
using System.Linq;
using System.Threading.Tasks;
using Acme.BookStore.Authors;
using Shouldly;
using Volo.Abp.Application.Dtos;
using Volo.Abp.Validation;
using Xunit;

namespace Acme.BookStore.Books
{
    public class BookAppService_Tests : BookStoreApplicationTestBase
    {
        private readonly IBookAppService _bookAppService;
        private readonly IAuthorAppService _authorAppService;

        public BookAppService_Tests()
        {
            _bookAppService = GetRequiredService<IBookAppService>();
            _authorAppService = GetRequiredService<IAuthorAppService>();
        }

        [Fact]
        public async Task Should_Get_List_Of_Books()
        {
            //Act
            var result = await _bookAppService.GetListAsync(
                new PagedAndSortedResultRequestDto()
            );

            //Assert
            result.TotalCount.ShouldBeGreaterThan(0);
            result.Items.ShouldContain(b => b.Name == "1984" &&
                                       b.AuthorName == "George Orwell");
        }

        [Fact]
        public async Task Should_Create_A_Valid_Book()
        {
            var authors = await _authorAppService.GetListAsync(new GetAuthorListDto());
            var firstAuthor = authors.Items.First();

            //Act
            var result = await _bookAppService.CreateAsync(
                new CreateUpdateBookDto
                {
                    AuthorId = firstAuthor.Id,
                    Name = "New test book 42",
                    Price = 10,
                    PublishDate = System.DateTime.Now,
                    Type = BookType.ScienceFiction
                }
            );

            //Assert
            result.Id.ShouldNotBe(Guid.Empty);
            result.Name.ShouldBe("New test book 42");
        }

        [Fact]
        public async Task Should_Not_Create_A_Book_Without_Name()
        {
            var exception = await Assert.ThrowsAsync<AbpValidationException>(async () =>
            {
                await _bookAppService.CreateAsync(
                    new CreateUpdateBookDto
                    {
                        Name = "",
                        Price = 10,
                        PublishDate = DateTime.Now,
                        Type = BookType.ScienceFiction
                    }
                );
            });

            exception.ValidationErrors
                .ShouldContain(err => err.MemberNames.Any(m => m == "Name"));
        }
    }
}- 改變斷言條件在
Should_Get_List_Of_Books從b => b.Name == "1984"以b => b.Name == "1984" && b.AuthorName == "George Orwell"檢查,如果作者的名字充滿。 - 更改了在創建新書時
Should_Create_A_Valid_Book設置的方法AuthorId,因為它不再需要了。
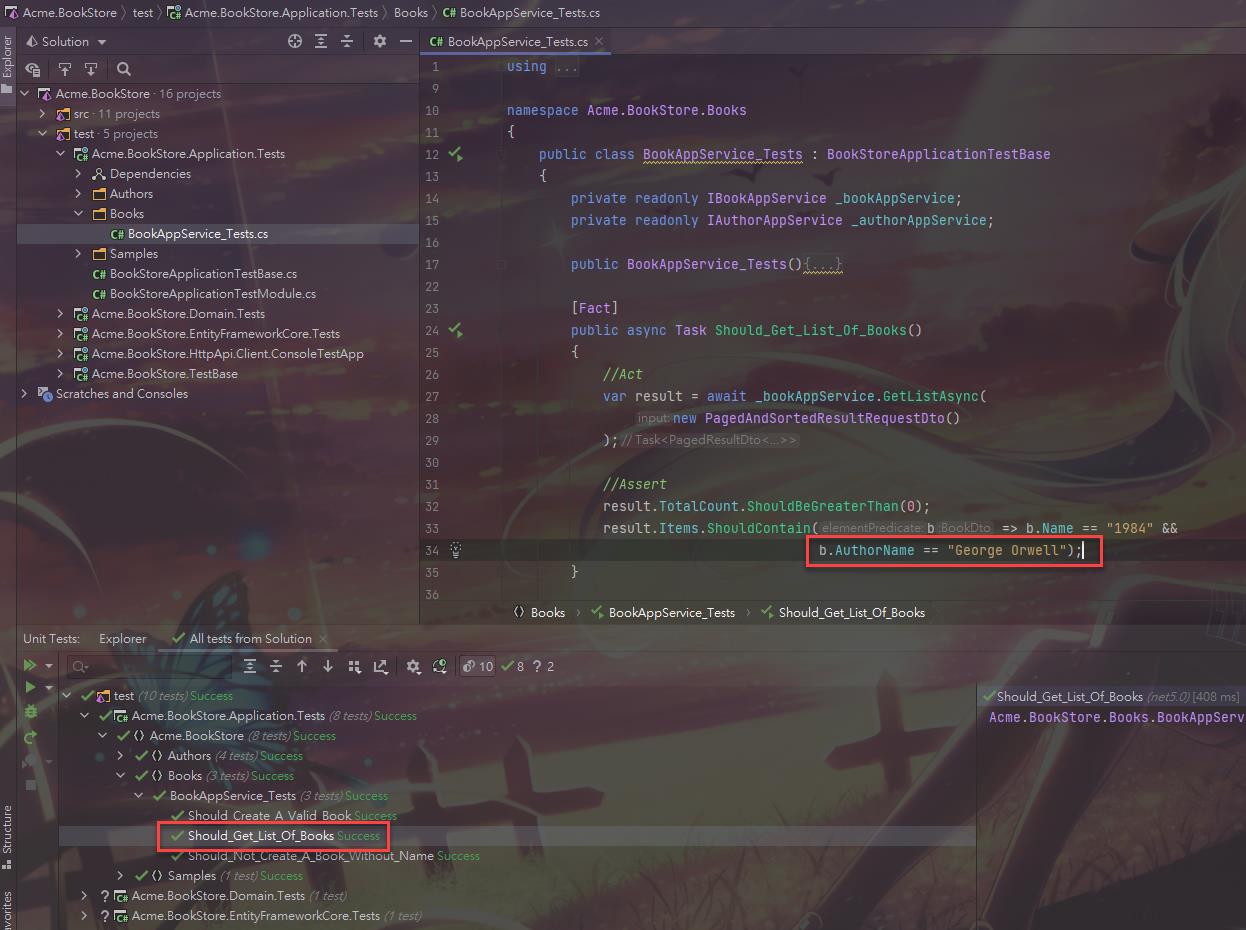
// 這邊改完尋覽屬性跑了一下上面的單元測試,成功通過測試,這樣 publish 的時候可以減少一些低級錯誤,離菜鳥又遠了一些吧!
public override async Task<BookDto> GetAsync(Guid id)
{
    var book = await Repository.GetAsync(id);
    var bookDto = ObjectMapper.Map<Book, BookDto>(book);
    bookDto.AuthorName = book.Author.Name;
    return bookDto;
}
// 以下前端部分快速帶過
用戶界面
服務代理生成
由於 HTTP API 已更改,您需要更新 Angular 客戶端服務代理。在運行generate-proxy命令之前,您的主機必須已啟動並正在運行。
在angular文件夾中運行以下命令(您可能需要停止 angular 應用程序):
abp generate-proxy此命令將更新文件/src/app/proxy/夾下的服務代理文件。
書單
圖書列表頁面更改是微不足道的。打開/src/app/book/book.component.html並在Name和Type列之間添加以下列定義:
<ngx-datatable-column
  [name]="'::Author' | abpLocalization"
  prop="authorName"
  [sortable]="false"
></ngx-datatable-column>當您運行應用程序時,您可以在表格上看到Author列:

創建/編輯表單
下一步是向創建/編輯表單添加作者選擇(下拉列表)。最終的 UI 將如下所示:
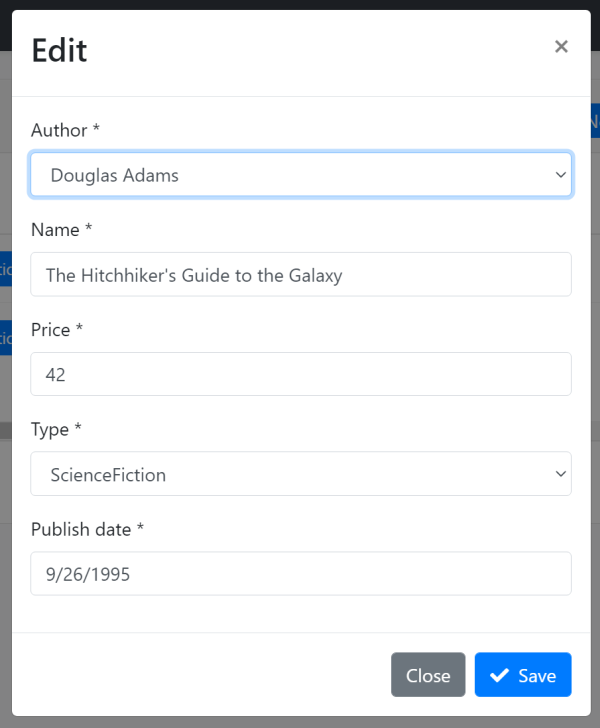
添加了作者下拉列表作為表單中的第一個元素。
打開/src/app/book/book.component.ts和修改內容如下圖:
import { ListService, PagedResultDto } from '@abp/ng.core';
import { Component, OnInit } from '@angular/core';
import { BookService, BookDto, bookTypeOptions, AuthorLookupDto } from '@proxy/books';
import { FormGroup, FormBuilder, Validators } from '@angular/forms';
import { NgbDateNativeAdapter, NgbDateAdapter } from '@ng-bootstrap/ng-bootstrap';
import { ConfirmationService, Confirmation } from '@abp/ng.theme.shared';
import { Observable } from 'rxjs';
import { map } from 'rxjs/operators';

@Component({
  selector: 'app-book',
  templateUrl: './book.component.html',
  styleUrls: ['./book.component.scss'],
  providers: [ListService, { provide: NgbDateAdapter, useClass: NgbDateNativeAdapter }],
})
export class BookComponent implements OnInit {
  book = { items: [], totalCount: 0 } as PagedResultDto<BookDto>;

  form: FormGroup;

  selectedBook = {} as BookDto;

  authors$: Observable<AuthorLookupDto[]>;

  bookTypes = bookTypeOptions;

  isModalOpen = false;

  constructor(
    public readonly list: ListService,
    private bookService: BookService,
    private fb: FormBuilder,
    private confirmation: ConfirmationService
  ) {
    this.authors$ = bookService.getAuthorLookup().pipe(map((r) => r.items));
  }

  ngOnInit() {
    const bookStreamCreator = (query) => this.bookService.getList(query);

    this.list.hookToQuery(bookStreamCreator).subscribe((response) => {
      this.book = response;
    });
  }

  createBook() {
    this.selectedBook = {} as BookDto;
    this.buildForm();
    this.isModalOpen = true;
  }

  editBook(id: string) {
    this.bookService.get(id).subscribe((book) => {
      this.selectedBook = book;
      this.buildForm();
      this.isModalOpen = true;
    });
  }

  buildForm() {
    this.form = this.fb.group({
      authorId: [this.selectedBook.authorId || null, Validators.required],
      name: [this.selectedBook.name || null, Validators.required],
      type: [this.selectedBook.type || null, Validators.required],
      publishDate: [
        this.selectedBook.publishDate ? new Date(this.selectedBook.publishDate) : null,
        Validators.required,
      ],
      price: [this.selectedBook.price || null, Validators.required],
    });
  }

  save() {
    if (this.form.invalid) {
      return;
    }

    const request = this.selectedBook.id
      ? this.bookService.update(this.selectedBook.id, this.form.value)
      : this.bookService.create(this.form.value);

    request.subscribe(() => {
      this.isModalOpen = false;
      this.form.reset();
      this.list.get();
    });
  }

  delete(id: string) {
    this.confirmation.warn('::AreYouSureToDelete', 'AbpAccount::AreYouSure').subscribe((status) => {
      if (status === Confirmation.Status.confirm) {
        this.bookService.delete(id).subscribe(() => this.list.get());
      }
    });
  }
}- 添加了
AuthorLookupDto,Observable和 的導入map。 - 後添加
authors$: Observable<AuthorLookupDto[]>;字段selectedBook。 - 添加
this.authors$ = bookService.getAuthorLookup().pipe(map((r) => r.items));到構造函數中。 - 添加
authorId: [this.selectedBook.authorId || null, Validators.required],到buildForm()函數中。
打開/src/app/book/book.component.html並在書名表單組之前添加以下表單組:
<div class="form-group">
  <label for="author-id">Author</label><span> * </span>
  <select class="form-control" id="author-id" formControlName="authorId">
    <option [ngValue]="null">Select author</option>
    <option [ngValue]="author.id" *ngFor="let author of authors$ | async">
      {{ author.name }}
    </option>
  </select>
</div>
就這樣。只需運行應用程序並嘗試創建或編輯作者。
// 完結,灑花!
