[PowerPivot][安裝2]安裝PowerPivot在已存在的SharePoint 2010
AD and BI Server not include only one Server Step:
Exits:
1. 需事先準備並安裝下列元件(同全新安裝內容)
2. 安裝SharePoint 2010選擇Server Farm
3. 設定SharePoint 2010完整性安裝
4. 建立New Server Farm
5. 選擇SharePoint 2010資料庫存放位置及存取帳號密碼.
6. 設定管理中心的服務連接PORT
7. 透過管理中心設定精靈設定相關服務
A. Secure Store Services
B. Excel Services .
C. PerformancePoint Services
D. Create site Collection.
8. 安裝SQ008 R2 選擇Analysis Services With SharePoint Integration Add Gemini service to Exit farm
(安裝前請先將下列內容產生XML後在安裝)
- Save the following text to a file named setup100.exe.config (no .txt extension):
<?xml version="1.0" encoding="utf-8" ?>
<configuration>
<runtime>
<disableCachingBindingFailures enabled="1" />
</runtime>
</configuration> - b. Copy the file to the folder: %ProgramFiles%\Microsoft SQL Server\100\Setup Bootstrap\SQLServer2008R2\x64\ and install PowerPivot for SharePoint.
9. 設定SharePoint 執行帳號及Secure Store Services密碼,SharePoint 管理中心連接PORT.
10. 預設SQL instance (預設為PowerPivot)請不要更改.
11. 設定Analysis Services 管理者帳號.
12. 安裝.
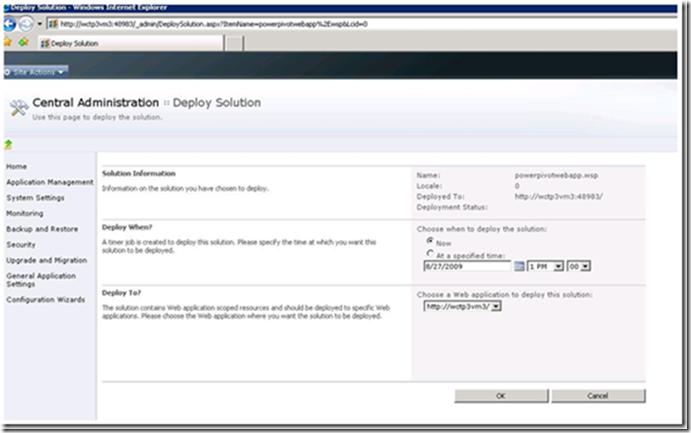
13. 佈署PowerPivotWebApplication solution至Site collection
A. 至管理中心的o System Settings -> Manage Farm Solutions -> PowerPivotWebApp.wsp -> Deploy solution.
B. 選擇 web application 佈署PowerPivotWebApp.wsp OK.
14. 建立 PowerPivot service application.
Central Admin -> Home -> Application Management -> Manage service applications-> New-> SQL Server Analysis Services Mid-Tier Service.
15. 選擇建立新的應用程式集區(new application pool.)
16. 選擇加入 Service Application 至預設服務群組,如果未設定請先勾選à點選 OK.
17. 啟用”PowerPivot Integration Site Collection Feature”
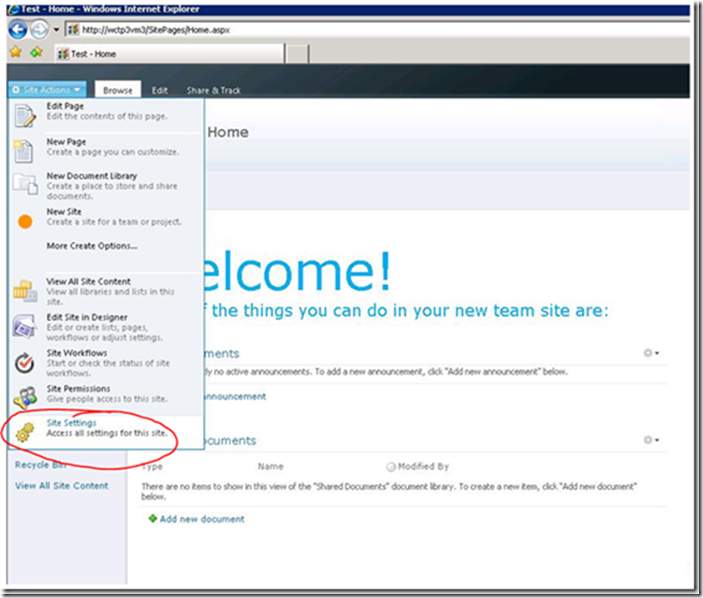
A. 開啟你的預設網站à點選Site Actions -> Site Settings -> Site collection Administration -> Site collection features.
B. 點選PowerPivot Integration Site Collection Feature Activate.
C. 如果其它網站也需要PowerPivot 功能你就必須啟用 Analysis Services Integration feature
18. 設定PowerPivot Unattended account(選項)
如果你需要允許使用者透過PowerPivot 服務帳戶排程更新資料.這個帳號是必須設定的:
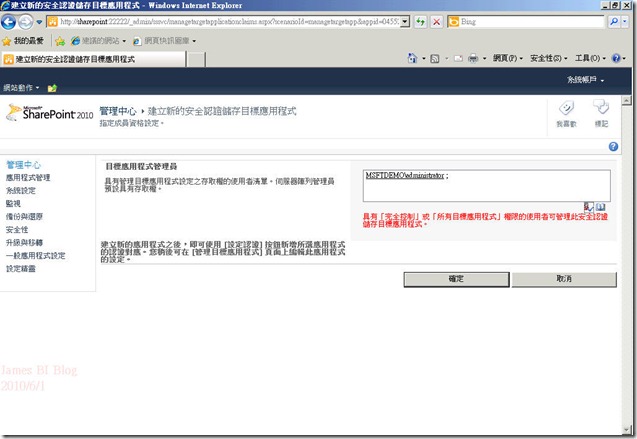
建立目地的Secure Store application ID
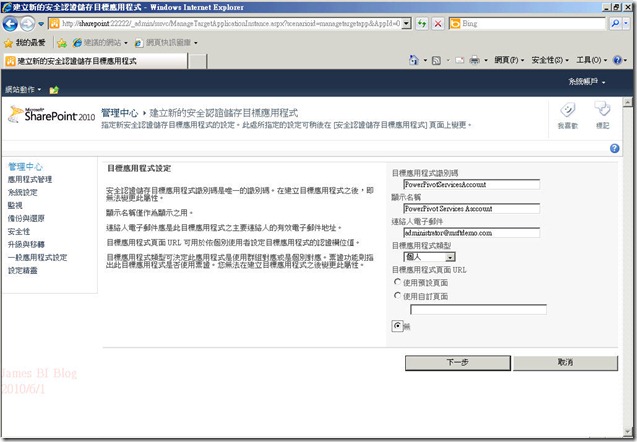
A. 至管理中心à Application Management > Manage Service Applications >Secure Store Service 點選 Manage
B. 點選 ribbon 上方的New
C. 在目地的應用程式設定頁面( Target Application Settings) 輸入目地應用程式ID(Target Application ID ) 及顯示名稱( Display name), email >點選 Next.
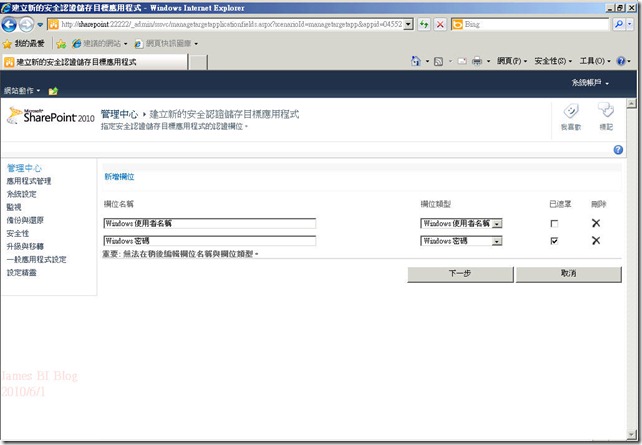
D. 在 Credentials Field 頁面,使用預設值 > Next.
E.在目地的應用程式管理者(Target Application Administrators )頁面輸入管理帳號.
F. 回到管理頁面 > Secure Store Service Application > 你應該會看到你剛才輸入的目地的應用程式ID.
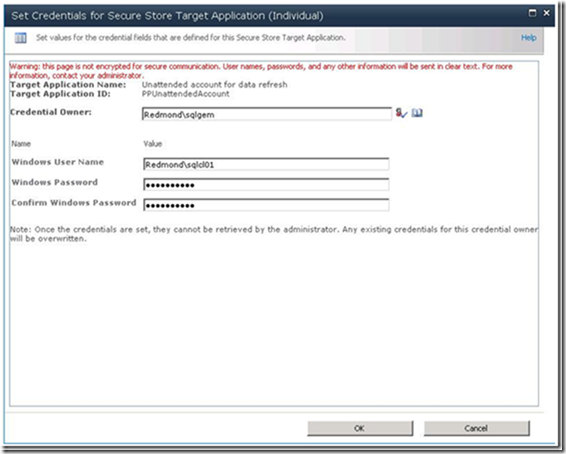
G. 在 credentials Ribbon上設定執行帳及密碼.
H.在設定(Set Credentials) 頁面,設定Credential Owner , 輸入PowerPivot服務帳戶. (The account you specified as an AS Administrator when you ran Analysis Services setup.)
I. 在 Windows User Name 及 password 欄位上輸入目地的應用程式管理者的帳號密碼.( This should be one of the users you specified in step e. or the farm administrator.)
之後將PowerPivot services tartget application ID.
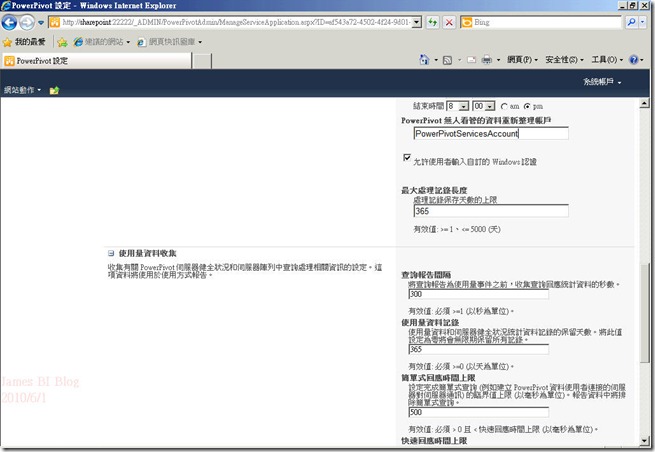
至PowerPivot 服務之中的設定PowerPivot Unattended account:
A. 瀏覽至 Application Management > Manage Service Applications,點選PowerPivot Service application > Manage .
B. 在頁面中點選 Configure Service Application Settings 至Data Refresh
B.輸入Target Application ID.>Unattended Account 欄位 >OK.
19. 設定 Microsoft ‘Geneva’ Claims to Windows Token Service
需要所有有使用EXCEL Services, PowerPivot 服務的SERVER上設定
A. 執行services.msc. 如果 Microsoft “Geneva” Claims to Windows Token Service 啟動時,請先停止.
B. 使用文字編輯器(NOTEPADE)設定檔案 \ProgramFiles\Microsoft Geneva Framework\ReferenceAssemblies\c2wtshost.exe.config XML 檔.
C. 覆蓋下列的資料至 <allowedCallers> XML 標籤:
<allowedCallers>
<add value="WSS_WPG" />
<!– <clear /> –>
<!– <add value="NT AUTHORITY\Network Service" /> –>
<!– <add value="NT AUTHORITY\Local Service" /> –>
<!– <add value="NT AUTHORITY\System" /> –>
<!– <add value="NT AUTHORITY\Authenticated Users" /> –>
</allowedCallers>
D. 存檔Save and close the file
E. 啟用 Microsoft “Geneva” Claims to Windows Token Service.
F. 重新啟用 IIS 輸入iisreset .
(19.RTM 更改為 Claims to Windows token Service 中文名稱為對Windows Token 服務宣告
對於 Excel Services 和 PowerPivot for SharePoint,需要對 Windows Token Service 的宣告。它會透過目前 SharePoint 使用者的 Windows 識別,用來建立外部資料來源的連線。此服務必須在啟用 Excel Services 或 PowerPivot for SharePoint 的每部 SharePoint 伺服器上執行。如果此服務尚未啟動,您必須立即將它啟動,以便讓 Excel Services 將經過驗證的要求轉送給 PowerPivot 系統服務。
- 在管理中心的 [系統設定] 中,按一下 [管理伺服器上的服務]。
- 啟動對 Windows Token Service 的宣告。
- 啟動 Excel Calculation Services。
- 啟動安全存放服務。
- 確認 SQL Server Analysis Services 和 SQL Server PowerPivot 系統服務都已啟動。
20. 啟用使用資料同步(data collection )及選擇目的資料同步
A.在管理中心首頁點選 Monitoring
B. 在 Monitoring 選擇點選 Configure usage 及 health data collection.
C. 點選 Enable usage data collection 選擇你想要監控的事件.如果你想啟用完整的PowerPivot Management Dashboard功能你必須啟用 PowerPivot events.
D. 點選 OK.
21. 設定檔案大小限制 (選項)
預設SharePoint 限制上傳大小為50MB ,Excel Services 為10MB .如果你想要加大檔案大小限制請在這設定
增加 Web Application 限制:
A. 至 SharePoint Central Administration > Application Management > Manage Web Applications.
B. 選擇(預設網站) SharePoint-80 及點選 General Settings -> 瀏覽到General Settings上方的 ribbon.
C. 變更 Maximum Upload Size 設定 MB 限制. (例如允許SharePoint 上傳大小 2047MB.)
增加Excel Services 限制:
A. 瀏覽 SharePoint Central Administration > Application Management > Manage Service Applications.
B. 選擇 Excel Service Application.
C. 點選 Ribbon > Manage.
D. 點選 Trusted File Locations >點選http:// (預設為全部網站都信任.若有其它信任都需要設定)
E. 在 Workbook 屬性, 設定 Maximum Workbook Size 屬性到 2000 及 Maximum Chart or Image Size 至 100 MB.
22. 安裝PowerPivot 使用者端及發佈
A. 安裝 Excel 2010 及 PowerPivot Add-in for Excel 2010, 使用Excel之中的PowerPivot Ribbon按鈕.
B. 佈署工作簿至Shared Documents
C. 在SharePoint 預設網站中的Shared Documents, 發佈此工作簿及Copy shortcut.
D. 開啟 SQL Server Management Studio, 點選 Connect > Analysis Services 及輸入 Server Name 選擇PowerPivot這個intance .
E. 點選連線.
連線後你可以看到你的excel 工作簿名稱.被發佈至此處.
參考網站:
http://powerpivotgeek.com/server-installation/existing-farm-install/
請大家永躍參與Facebook MSBI 粉思團:http://www.facebook.com/#!/group.php?gid=303757165010
