[.NET][實作篇] 實作專屬自己的 ASP.NET MVC Model Metadata 產生器
在開發 ASP.NET MVC 的 Models 時,在對 Model 做資料驗證時時常會發生某些惱人的事情:像是哪些欄位該設定 Required 或是欄位長度也要額外去定義,但有時候欄位一多對照起來可是見累人的事情,剛好前陣子在點部落看到 Gelis 前輩所寫的 架構設計好簡單系列(3) - 設計自己簡單的 ORM 平台 ,身為熱血的程式設計師,當下立刻有感而發馬上著手來寫一個可快速產生 ASP.NET MVC Model Metadata 的產生器,本篇分享一下筆者的實作經驗,供大家參考看看。
前言
在開發 ASP.NET MVC 的 Models 時,在對 Model 做資料驗證時時常會發生某些惱人的事情:像是哪些欄位該設定 Required 或是欄位長度也要額外去定義,但有時候欄位一多對照起來可是見累人的事情,剛好前陣子在點部落看到 Gelis 前輩所寫的 架構設計好簡單系列(3) - 設計自己簡單的 ORM 平台 ,身為熱血的程式設計師,當下立刻有感而發馬上著手來寫一個可快速產生 ASP.NET MVC Model Metadata 的產生器,本篇分享一下筆者的實作經驗,供大家參考看看。
ASP.NET MVC Metadata 產生器架構說明
在開始之前先簡單的說明一下該產生器會有那些功能:
1.可直接整合在 Visual Studio 中
2.可設定預設連線(記住連線帳號、密碼 … 等資訊)
3.可登入 SQL Server 並取得資料庫集合以及對應的資料表
要達到的需求為:開發人員能利用類似新增類別檔的方式來快速產生 Model 的 Metadata 文件。
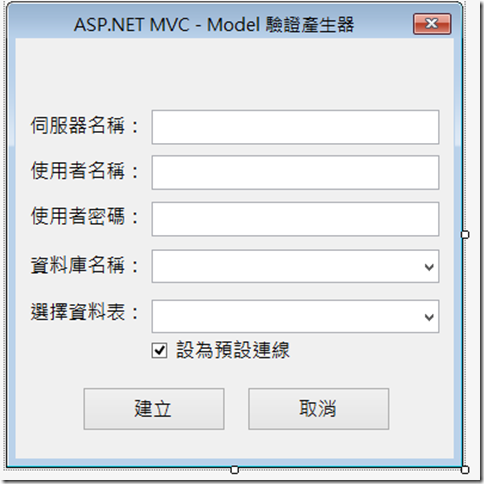
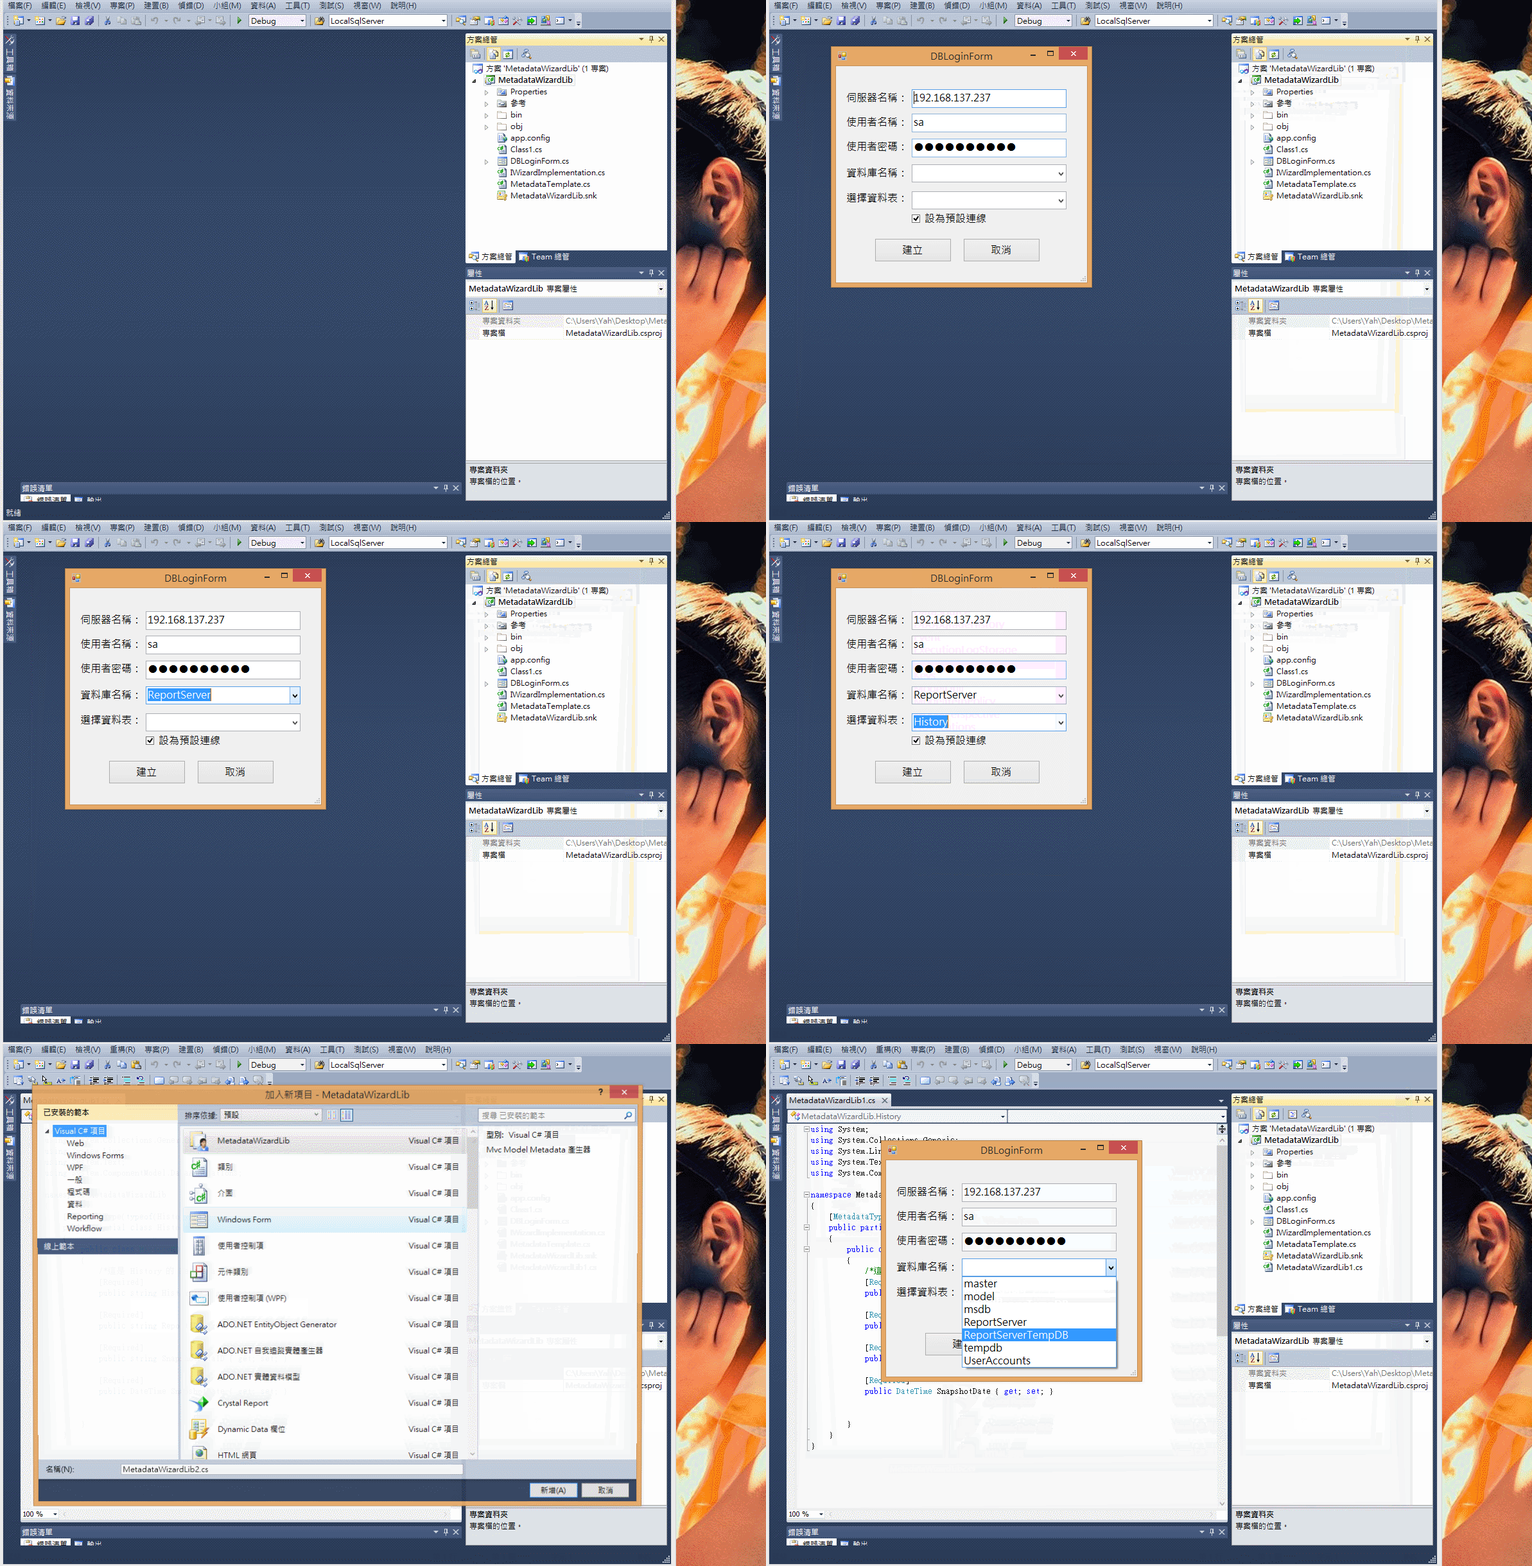
畫面大概會長這樣:
因為我們需要讓開發人員能快速的從 VS 內直接新增 Metadata 的檔案,並且連驗證的屬性都直接幫我們填好了,所以我們必須先設計一個項目範本精靈,然後動態的產生對應的欄位的驗證屬性,參考 gelis 前輩的文章以及 MSDN 的文章,如果要達成這個功能我們需要先實作 IWizard 這個介面的方法,來指定檔案產生時能自定義一些方法,而 MSDN 也有相關文章可以參考:
1.How to: Use Wizards with Project Templates
在 MSDN 提供的範例程式碼:
using System;
using System.Collections.Generic;
using Microsoft.VisualStudio.TemplateWizard;
using System.Windows.Forms;
using EnvDTE;
namespace CustomWizard
{
public class IWizardImplementation:IWizard
{
private UserInputForm inputForm;
private string customMessage;
// This method is called before opening any item that
// has the OpenInEditor attribute.
public void BeforeOpeningFile(ProjectItem projectItem)
{
}
public void ProjectFinishedGenerating(Project project)
{
}
// This method is only called for item templates,
// not for project templates.
public void ProjectItemFinishedGenerating(ProjectItem
projectItem)
{
}
// This method is called after the project is created.
public void RunFinished()
{
}
public void RunStarted(object automationObject,
Dictionary<string, string> replacementsDictionary,
WizardRunKind runKind, object[] customParams)
{
try
{
// Display a form to the user. The form collects
// input for the custom message.
inputForm = new UserInputForm();
inputForm.ShowDialog();
customMessage = inputForm.get_CustomMessage();
// Add custom parameters.
replacementsDictionary.Add("$custommessage$",
customMessage);
}
catch (Exception ex)
{
MessageBox.Show(ex.ToString());
}
}
// This method is only called for item templates,
// not for project templates.
public bool ShouldAddProjectItem(string filePath)
{
return true;
}
}
}
從範例中可以看出總共得實作六種方法,包誇:BeforeOpeningFile、ProjectFinishedGenerating、ProjectItemFinishedGeneratin、RunFinished、RunStarted、ShouldAddProjectItem,其中的 RunStarted 方法也是最關鍵的,它是當你在 Visual Studio 新增某個檔案後,第一個會觸發的事件,至於其他的方法的用途讀者可以再參考一下 MSDN 的文件:IWizard Interface
開始實作
步驟一
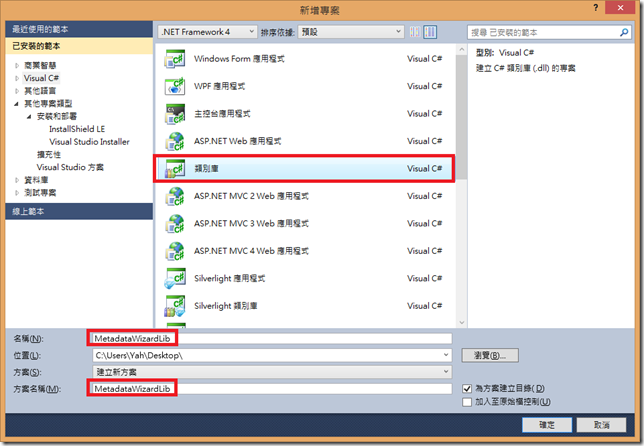
建立類別庫專案
步驟二
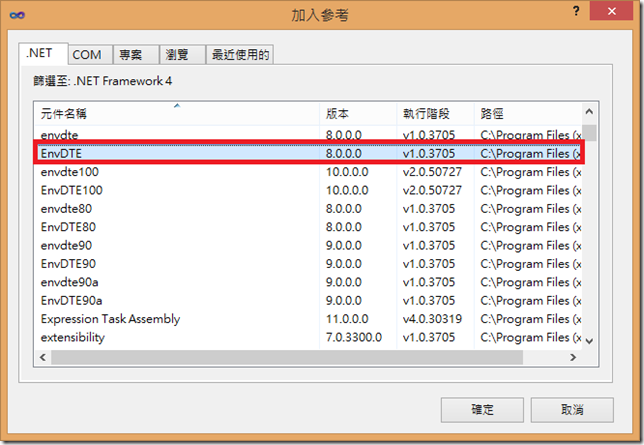
加入 EnvDTE 參考
加入 Microsoft.VisualStudio.TemplateWizardInterface 參考
步驟三
加入類別 IWizardImplementation.cs ,並實作 IWizard 介面
using System;
using System.Collections.Generic;
using System.Linq;
using System.Text;
using Microsoft.VisualStudio.TemplateWizard;
namespace MetadataWizardLib
{
public class IWizardImplementation : IWizard
{
public void BeforeOpeningFile(EnvDTE.ProjectItem projectItem)
{
}
public void ProjectFinishedGenerating(EnvDTE.Project project)
{
}
public void ProjectItemFinishedGenerating(EnvDTE.ProjectItem projectItem)
{
}
public void RunFinished()
{
}
public void RunStarted(object automationObject, Dictionary<string, string> replacementsDictionary, WizardRunKind runKind, object[] customParams)
{
}
public bool ShouldAddProjectItem(string filePath)
{
return true;
}
}
}
步驟四
(PS:在這個步驟你可以撰寫符合你需求的程式碼)
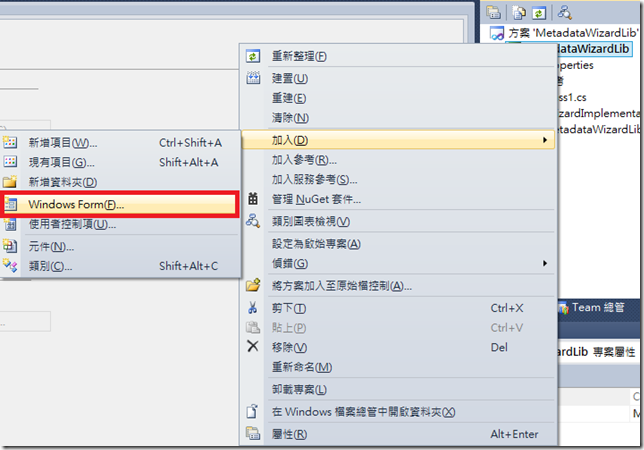
建立 Windows Form 表單(DBLoginForm.cs)
設計畫面
步驟五
撰寫取得所有資料庫的程式碼
這邊使用 SqlConnection 來跟資料庫做連線,並透過我們的「伺服器名稱」、「使用者名稱」、「使用者密碼」來動態替換掉連線字串,最後再透過 Select 方式來取得資料庫目前所有的資料庫名稱。
//宣告一個全域的連線物件
private SqlConnection cn = new SqlConnection();
/// <summary>
/// 取得所有資料庫
/// </summary>
/// <param name="sender"></param>
/// <param name="e"></param>
private void DBName_List_Enter(object sender, EventArgs e)
{
try
{
//取得連線
this.OnDBConnected();
//查詢字串
string queryString = "SELECT name FROM master.dbo.sysdatabases ORDER BY name;";
using (SqlCommand cmd = new SqlCommand(queryString, cn))
{
SqlDataReader reader = cmd.ExecuteReader();
//清空目前現有的DBName
DBName_List.Items.Clear();
while (reader.Read())
DBName_List.Items.Add(reader[0].ToString());
reader.Close();
}
//關閉連線
cn.Close();
}
catch (Exception ex)
{
MessageBox.Show("取得資料庫發生錯誤:" + ex.InnerException + ex.Message);
}
}
/// <summary>
/// 跟 SQL Server 進行連線
/// </summary>
private void OnDBConnected()
{
string connectionString = String.Format("Data Source={0};user id={1};password={2};multipleactiveresultsets=True;Connection Timeout=10"
, ServerName_txt.Text, Account_txt.Text, Password_txt.Text);
cn = new SqlConnection(connectionString);
cn.Open();
}
步驟六
撰寫取得某個資料庫裡所有資料表的程式碼
基本上這邊使用的方法跟取得資料庫的方法差不多,就不再多做說明了。
/// <summary>
/// 取得對應資料庫的所有資料表
/// </summary>
/// <param name="sender"></param>
/// <param name="e"></param>
private void Table_List_Enter(object sender, EventArgs e)
{
try
{
//開啟連線
this.OnDBConnected();
//等同於SQL語法的 USE DataBase;
cn.ChangeDatabase(DBName_List.SelectedItem.ToString());
string queryString = "SELECT name as tablename FROM sysobjects WHERE xtype = 'U' ORDER BY name;";
using (SqlCommand cmd = new SqlCommand(queryString, cn))
{
SqlDataReader reader = cmd.ExecuteReader();
//清空目前所有資料表項目
Table_List.Items.Clear();
while (reader.Read())
Table_List.Items.Add(reader[0].ToString());
reader.Close();
}
//關閉連線
cn.Close();
}
catch (Exception ex)
{
MessageBox.Show("取得資料表發生錯誤:" + ex.InnerException + ex.Message);
}
}
步驟七
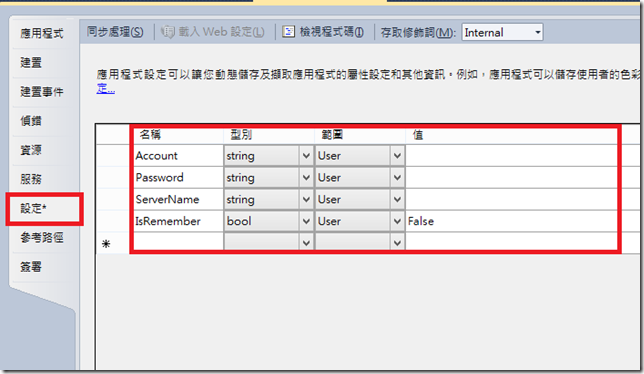
加入設定檔用來儲存「伺服器名稱」、「使用者名稱」、「使用者密碼」等資訊
並在 Form 的建構式中加入下列程式碼,讓表單跳出時會自動填入我們儲存在 Settings 中的資訊
public DBLoginForm()
{
if (Settings.Default.IsRemember)
{
ServerName_txt.Text = Settings.Default.ServerName;
Account_txt.Text = Settings.Default.Account;
Password_txt.Text = Settings.Default.Password;
IsDefault.Checked = true;
}
InitializeComponent();
}
步驟八
在撰寫取得 Table Schema 程式碼之前,我們先到 SQL 裡面模擬一下如何取得 Table 的 Schema 的查詢語法:
USE DataBase
SELECT * FROM INFORMATION_SCHEMA.COLUMNS
WHERE TABLE_NAME = N'TableName'
結果長這樣(PS:欄位太多了沒辦法把整個畫面截圖下來)
而在範例這邊我們就用 Required 和 StringLength 兩種驗證屬性來做就好,當產生文件時會自動加上對應的屬性,當然如果你有那些驗證是共用的你也可以在這邊只取回你想要的資訊, 而 SQL 這邊只需取回欄位名稱、長度、是否允許 NULL、資料型態等這幾個欄位就好,所以再稍微修改一下查詢語法:
--COLUMN_NAME 欄位名稱
--DATA_TYPE 資料型態
--CHARACTER_MAXIMUM_LENGTH 欄位最大長度
--IS_NULLABLE 是否允許NULL
USE Member
SELECT COLUMN_NAME,DATA_TYPE,CHARACTER_MAXIMUM_LENGTH,IS_NULLABLE FROM INFORMATION_SCHEMA.COLUMNS
WHERE TABLE_NAME = N'TableName'
步驟九
接著我們先加入資源檔,用來儲存等等要使用的字串,也可以讓我們的畫面更乾淨(一堆字串串起來看起來會很雜 XD)~
步驟十
再來我們加入 function,作用為讓 SQL 的資料型態轉成 C# 的資料型態名稱,當然 SQL 的資料型態不只這些,範例這邊只用了幾個比較常用的,如果你的資料型態有其他的可以再自行加入。
/// <summary>
/// 取得C#的資料型態名稱
/// </summary>
/// <param name="type">傳入SQL的資料型態</param>
/// <returns></returns>
private string GetDataType(string type)
{
switch (type.ToLower())
{
case "char":
case "nchar":
case "varchar":
case "nvarchar":
case "text":
return "string";
case "int":
return "int";
case "decimal":
return "decimal";
case "bit":
return "bool";
case "date":
case "datetime":
return "date";
}
//如果都找不到就用string代替
return "string";
}
}
步驟十一
這個步驟大概也是最重要的了,這邊我們要做的功能是:當我們按下確定後會透過字串串接的方式產生出我們在 Metadata 裡面的內容。
大概長得像這樣:
[Required]
public string Name {get;set;}
[StringLength(12, ErrorMessage="最多輸入{1}個字")]
public string Ename {get;set;}
//...bla..bla...bla
首先我們先宣告一個全域變數用來儲存我們的 Metadata 的內容
//用來儲存Metadata內容
private string TempContent;
撰寫按了確定按鈕的程式碼
/// <summary>
/// 產生Metadata內容
/// </summary>
/// <param name="sender"></param>
/// <param name="e"></param>
private void Connect_btn_Click(object sender, EventArgs e)
{
//開啟連線
this.OnDBConnected();
//改變使用的資料庫
cn.ChangeDatabase(DBName_List.SelectedItem.ToString());
//取得 Table Sechma 的查詢語法
string queryString = String.Format(Resources.QueryString, Table_List.SelectedItem.ToString());
using (SqlCommand cmd = new SqlCommand(queryString, cn))
{
SqlDataReader reader = cmd.ExecuteReader();
try
{
//在文件的開頭加入一行註解
TempContent = String.Format("/*這是 {0} 的 Metadata 文件*/\n", Table_List.SelectedItem.ToString());
while (reader.Read())
{
//是否允許NULL
if (reader["IS_NULLABLE"].ToString() == "NO")
TempContent += String.Format(Resources.Required) + Environment.NewLine;
if (!String.IsNullOrEmpty(reader["CHARACTER_MAXIMUM_LENGTH"].ToString()))
{
//等於-1 代表長度為 MAX
if (int.Parse(reader["CHARACTER_MAXIMUM_LENGTH"].ToString()) != -1)
TempContent += String.Format(Resources.StringLength, reader["CHARACTER_MAXIMUM_LENGTH"], "最多輸入{1}個字") + Environment.NewLine;
}
//設定宣告字串
TempContent += String.Format(Resources.DeclareString
, GetDataType(reader["DATA_TYPE"].ToString())
, reader["COLUMN_NAME"]
, "{ get; set; }") + Environment.NewLine + Environment.NewLine;
}
}
catch (Exception ex)
{
MessageBox.Show("產生Metadata內容失敗:" + ex.InnerException + ex.Message);
}
finally
{
//設定是否為預設連線
Settings.Default.IsRemember = IsDefault.Checked;
if (Settings.Default.IsRemember)
{
Settings.Default.ServerName = ServerName_txt.Text;
Settings.Default.Account = Account_txt.Text;
Settings.Default.Password = Password_txt.Text;
}
//釋放記憶體
cn.Close();
cn.Dispose();
reader.Close();
reader.Dispose();
this.Dispose();
}
}
}
步驟十二
接著我們在新增一段程式碼用來等等讓 IWizard 能取得我們產生好的 Metadata 的內容,以及取得當下選取的資料表的名稱
/// <summary>
/// 取得Metadata內容
/// </summary>
/// <returns></returns>
public string GetContent()
{
return TempContent;
}
/// <summary>
/// 取得選取的資料表名稱
/// </summary>
/// <returns></returns>
public string GetTableName()
{
return Table_List.SelectedItem.ToString();
}
步驟十三
接著我們回到實作 IWizard 的類別,在 RunStarted 中的第二個引數 Dictionary<string, string> replacementsDictionary 會將專案中所有的文字都儲存在這邊,所以允許我們使用 Replace 方法來變更檔案的內容,我們將程式碼修改為:
public void RunStarted(object automationObject, Dictionary<string, string> replacementsDictionary, WizardRunKind runKind, object[] customParams)
{
try
{
//建立表單
DBLoginForm dbLoginForm = new DBLoginForm();
//開啟表單
dbLoginForm.ShowDialog();
//取得Metadata的內容
string metadataMessage = dbLoginForm.GetContent();
string tableName = dbLoginForm.GetTableName();
//設定要取代的文字內容
replacementsDictionary.Add("$Table$", tableName);
replacementsDictionary.Add("$MetadataMessage$", metadataMessage);
}
catch (Exception ex)
{
MessageBox.Show("發生錯誤:" + ex.InnerException + ex.Message);
}
}
步驟十四
加入 System.ComponenModel.DataAnnotations 的參考
步驟十五
接著新增一個類別 MetadataTemplate.cs 來當作等等我們要作為範本的檔案,並修改程式碼為
using System;
using System.Collections.Generic;
using System.Linq;
using System.Text;
using System.ComponentModel.DataAnnotations;
namespace MetadataWizardLib
{
[MetadataType(typeof($Table$MD))]
public partial class $Table$
{
public class $Table$MD
{
$MetadataMessage$
}
}
}
相信聰明的你應該已經發現了,在前面 RunStarted 的地方在 replacementsDictionary 加入了 $MetadataMessage$ 、$Table$ 兩個參數,剛好就是對照過來這邊以 $ 開頭和結尾的變數名稱,而最後 VS 在產生範本時會呼叫 RunStarted 函數來取代掉這兩個參數。
步驟十六
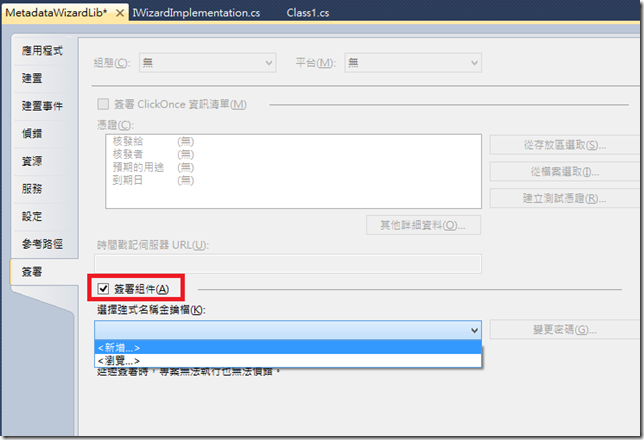
接著我們先在專案中加入強式名稱的簽署,因為此 DLL 必須要註冊到 GAC 中才能被 Visual Studio 叫用。
記得不要勾選「以密碼保護我的金鑰檔」,否則會建立個人資訊交換檔而非強式名稱金鑰檔。
步驟十七
接著我們先重新建置專案(注意:建置時 MetadataTemplate.cs 裡面的程式碼會出錯,所以先暫時註解掉,否則會建置不成功 )
並開啟 Visual Studio x64 Cross Tools 命令提示字元 (2010) ,將我們的 DLL 註冊到 GAC 中,指令為:
gacutil -i "C:\Users\Yah\Desktop\MetadataWizardLib\MetadataWizardLib\obj\Debug\MetadataWizardLib.dll"
步驟十八
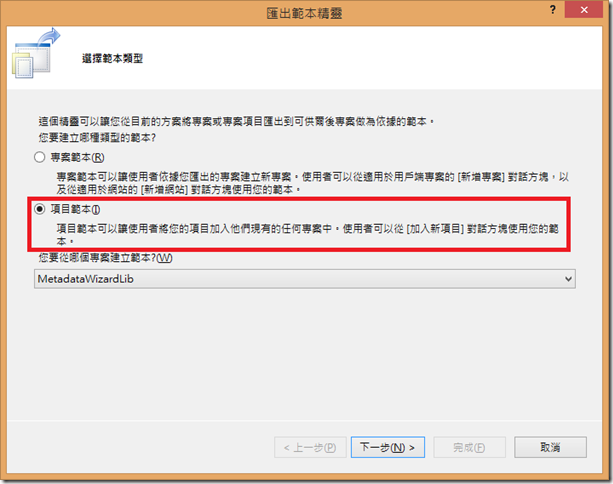
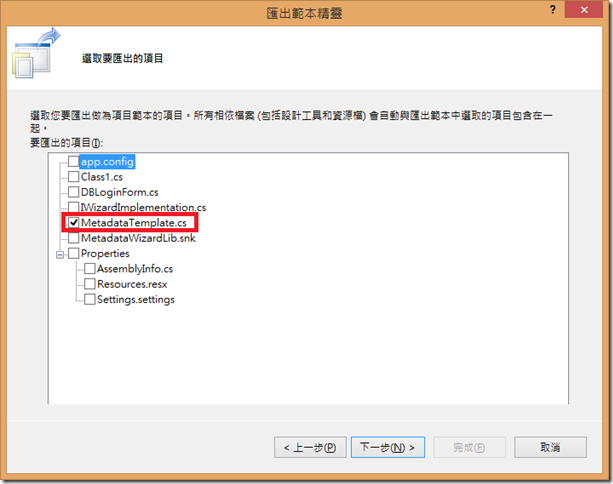
接著我們將剛剛的 MetadataTemplate.cs 建立為項目範本
選擇我們剛剛建立的 MetadataTemplate.cs 檔案
完成
步驟十九
建立範本後會產生一個壓縮檔,並將它解壓縮,修改 Visual Studio 幫我們產生的 MyTemplate.vstemplate 檔案
因為這邊我們需要用到 DLL 註冊在 GAC 中的組件資訊,所以我們在剛剛的 Visual Studio x64 Cross Tools 命令提示字元 (2010) 中在輸入指令:
gacutil -l MetadataWizardLib
並在 TemplateContent 下方 </VSTemplate> 之前加入 WizardExtension 敘述:
<WizardExtension>
<Assembly>
MetadataWizardLib, Version=1.0.0.0, Culture=neutral, PublicKeyToken=bedce34d18e94a82, processorArchitecture=MSIL
</Assembly>
<FullClassName>MetadataWizardLib.IWizardImplementation</FullClassName>
</WizardExtension>
注意:<Assembly></Assembly> 中的值須使用你自行註冊在 GAC 中的組件資訊,上面是筆者所產生的組件資訊。
步驟二十
修改後存檔並將檔案在壓回原本的 .zip 檔案中,並將壓縮檔複製到 C:\Users\[YourUserName]\Documents\Visual Studio 2010\Templates\ItemTemplates\ 底下。
最後將 Visual Studio 關閉再重新開啟 ~ 就能得到以下結果啦。
總結
呼 ~ 透過自定義項目範本精靈,能讓我們方便的自定義需要產生的檔案,而會用 ASP.NET MVC Metadata 產生器來當範例也是因為在實際開發時常常會因為對欄位名稱或是長度...等,開發人員時常需要花很多時間在這上面,透過自動產生的文件也能大大的降低錯誤率的發生,當然這個範例還是有很多美中不足的地方,結束的按鈕也還沒實作出來不過這部分就留給讀者們啦 ~ 最後也要感謝 gelis 前輩分享的文章,不然我也真不知道還有這個玩意 XD
Q & A
1.GAC 註冊後如果有再修改程式碼,記得要先將 DLL 從 GAC 中移除在重新註冊,並且記得要重開 Visual Studio 這樣才能抓到最新的註冊。
移除 GAC 指令:
gacutil -u MetadataWizardLib
2.修改 MyTemplate.vstemplate 後如果有重新壓縮記得是 .zip 而不是 .rar 檔案
3.在 IWizard 實作的方法記得加上 Try ... Catch 來取得例外,否則就算程式出錯也不會有反應
參考連結
新手發文,如有錯誤煩請告知,感謝。
如果喜歡我的文章請按推薦,有任何問題歡迎下面留言~~~
簽名:
學習這條路很廣,喜歡什麼技術不重要,重要的是你肯花時間去學習

