在WCF上,運用MTOM分批傳輸大量的資料,從Server端讀取圖檔,並在Client端顯示.
前幾篇有寫過,運作WSE 3.0的MTOM來做到檔案續傳的功能,內容也有提到WCF已將MTOM整個進去,這篇就是要介紹怎麼使用WCF的MTOM技術,來分次傳輸大量的資料,有人或許會問到,為什麼總是要分次,不能一次就把它給傳完嗎?不是只要去調整MaxReceivedMessageSize (預設值是65536) 就可以一次傳輸更大的量,但如果傳輸資料變大,不就每次都要去調整MaxReceivedMessageSize的值?而且Server端要改Client端的也要改,不是很費工?那就一次把它調的非常大就好了?那微軟何必去設定這個的限制,這個的限制主要是避免DoS型的攻擊,那麼要做到可以傳輸任意大小的資料量,又不要去調MaxReceivedMessageSize的值,其中一個方法就是分次取回.
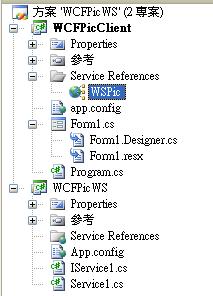
這次要用的Sample功能很簡單,Server端是WCF服務,Client端是Windows Form去呼叫WCF,傳輸的資料就是從WCF取得圖片資料,並顯示圖片出來.
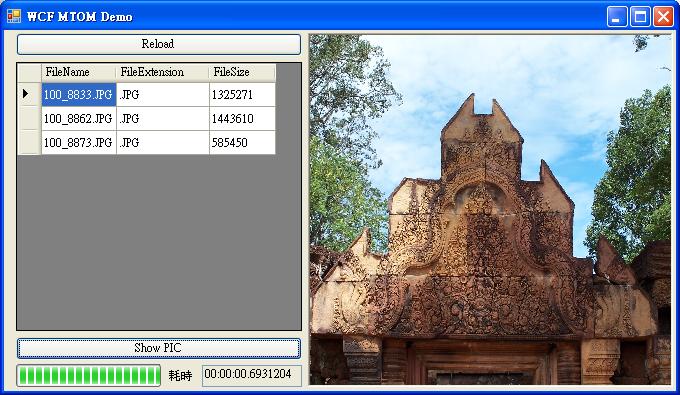
DataGrid裡的資料並不是重點,重點是在於右邊的圖片是怎麼從WCF分次取得.
在Service Contract部份,會有下列兩個Operation Contract
[ServiceContract]
public interface IService1
{
[OperationContract]
DataSet GetFileList();
[OperationContract]
byte[] GetPic(string FileName, int OffSet, int ChunkSize);
}
GetFileList就是很簡單的,將C:\PICDemo下有的檔案找出來,並將清單以DataSet的方式回傳.
{
    DataTable dt = new DataTable();
    dt.Columns.Add("FileName");
    dt.Columns.Add("FileExtension");
    dt.Columns.Add("FileSize");
    DirectoryInfo di = new DirectoryInfo("c:\\PICDemo");
    foreach (FileSystemInfo fsi in di.GetFileSystemInfos())
    {
        FileInfo fi = new FileInfo(fsi.FullName);
        DataRow dr = dt.NewRow();
        dr["FileName"] = fsi.Name; //取得檔案名稱
        dr["FileExtension"] = fsi.Extension; //取得副檔名
        dr["FileSize"] = fi.Length; //取得檔案大小
        dt.Rows.Add(dr);
    }
    DataSet ds = new DataSet();
    ds.Tables.Add(dt);
    return ds;
}
以上的部份看起來都很簡單,接下來是GetPic要怎麼去做.
/// 取得圖片資料
/// </summary>
/// <param name="FileName">欲下載的檔案名稱</param>
/// <param name="OffSet">位置</param>
/// <param name="ChunkSize"一次下次的資料量></param>
/// <returns>byte[]</returns>
public byte[] GetPic(string FileName, int OffSet, int ChunkSize)
{
    try
    {
        byte[] bt;
        using (FileStream fs = new FileStream(Path.Combine(@"c:\\PICDemo", FileName), FileMode.Open, FileAccess.Read, FileShare.ReadWrite))
        {
            fs.Seek(OffSet, SeekOrigin.Begin);

            if ((OffSet + ChunkSize) > fs.Length)
            {
                ChunkSize = Convert.ToInt32(fs.Length - OffSet);
            }
            if (ChunkSize <= 0)
            {
                bt = new byte[0];
                return bt;
            }
            bt = new byte[ChunkSize];
            fs.Read(bt, 0, ChunkSize);
            fs.Close();
        }
        return bt;
    }
    catch (Exception ex)
    {
        throw ex;
    }
}
以上如此的Code,就可以傳回指定位置開始的圖檔資料.看起來似乎沒做什麼,不過也沒錯,我們不用特別去做什麼.
Server端的程式碼都寫完了,接下來就是要設定Server端的app.Config.
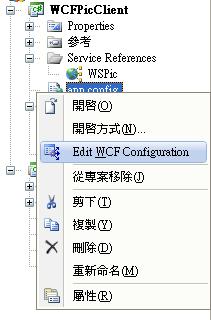
在app.config檔案按下右鍵,選擇Edit WCF Configuration
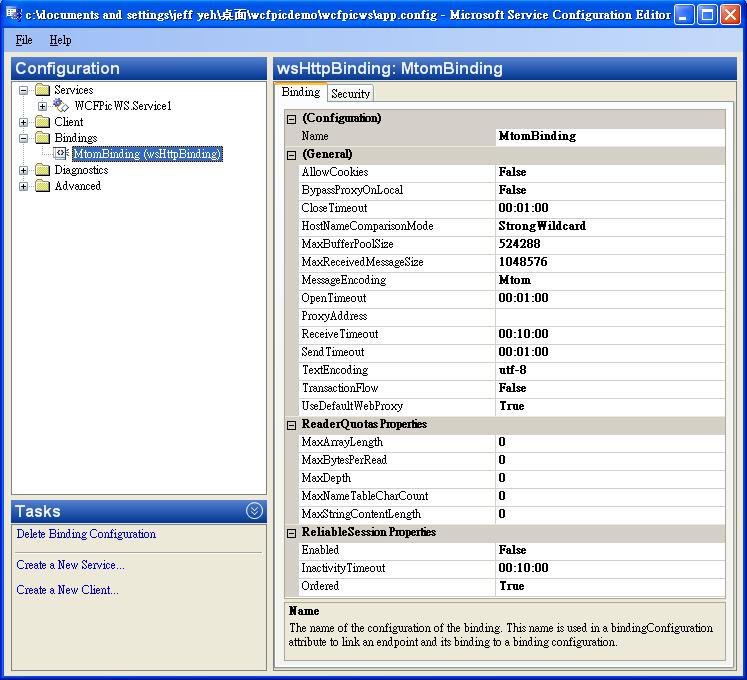
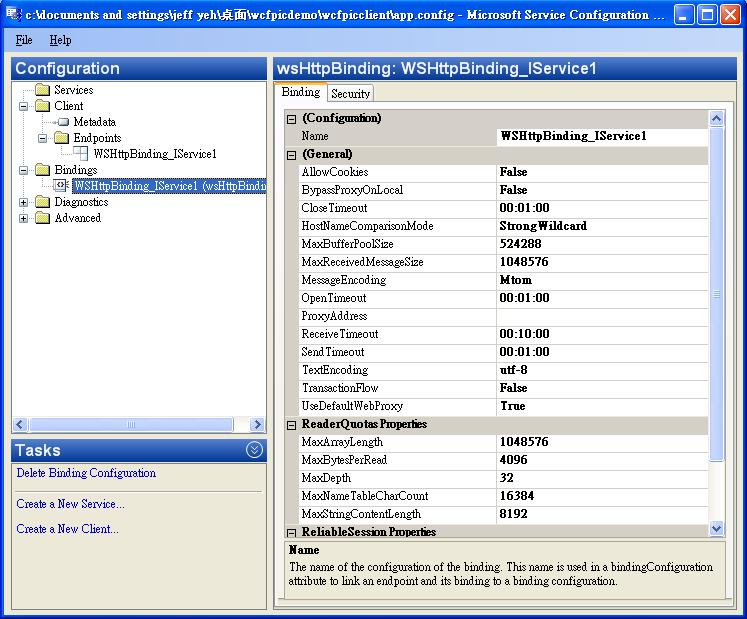
新增一個Bindings,命名為MtomBinding,,MessageEncoding設為Mtom,如此就可以使用Mtom的技術來傳輸了,不然預設是Text, MaxReceivedMessageSize在這個例子是設為1048576,當然還可以設更大,這個看個人
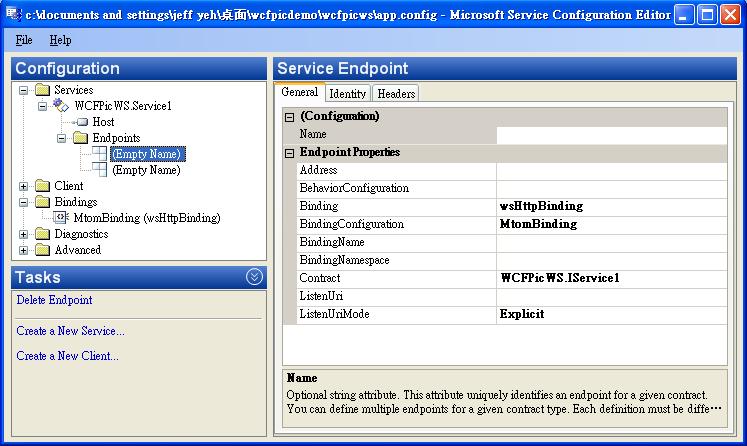
在Services.WCFPicWS.Service1.Endpoints底下設定,Binding為wsHttpBinding,BindingConfigration為MtomBinding.
以上就完成所有Server端的動作了.
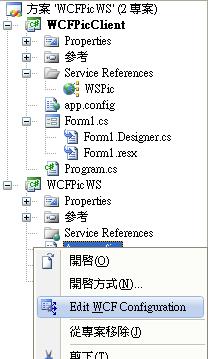
那麼Client端的Code,要怎麼樣去下傳圖片?首先當然是要把做好的WCF服務加入參考,以這個例子而言,我是命名為WSPic,加入後,就可以在Service References看到它.
下載檔案清單的部份,就不介紹了,有興趣的人可以看Sample Code,所以就直接講到圖檔怎麼分次去取回.
{
	if (gridList.Rows.Count == 0) return;
	this.Cursor = Cursors.WaitCursor;
	Stopwatch sw = new Stopwatch();
	sw.Start();//計時開始
	WSPic.Service1Client sc = new WCFPicClient.WSPic.Service1Client();
	//這時的sc.State=Created
	try
	{
		progressBar1.Value = 0;
		int OffSet = 0;
		int FileSize = Convert.ToInt32(gridList.CurrentRow.Cells[2].Value);//檔案大小

		//取得MaxReceivedMessageSize的設定值
		BindingElementCollection bec=sc.Endpoint.Binding.CreateBindingElements();
		TransportBindingElement tbe = bec.Find<TransportBindingElement>();

		int ChunkSize = Convert.ToInt32(tbe.MaxReceivedMessageSize * 0.7);
		//一次下載的量,MaxReceivedMessageSize*0.7的原因是它還含其它訊息,不可能百分之百都只放圖檔的byte[]
		int Rate = 0;
		string FileName = gridList.CurrentRow.Cells[0].Value.ToString();
		byte[] PicData=new byte[0];
		using (MemoryStream ms = new MemoryStream(FileSize))
		{
			string strErr = "";

			int RtyTimes = 0;//失敗重試次數
			int MaxRtyTimes = 3;//允許最多可重試次數
			do
			{
				try
				{
					PicData = sc.GetPic(FileName, OffSet, ChunkSize);//從Web Service取得圖檔資料
					//這時的sc.State=Opened
					ms.Write(PicData, 0, PicData.Length);
					//把從Web Service取回來的byte[] 寫到Memory Stream裡去.

					OffSet += ChunkSize;//已成功接收到,就將Offset移至下一個點

					Rate = Convert.ToInt32((OffSet * 100) / FileSize);//已完成傳輸百分比
					Rate = Rate > 100 ? 100 : Rate;//避免破百的情況發生
					progressBar1.Value = Rate;
				}
				catch (Exception ex)
				{
					strErr = ex.Message;//將錯誤訊息儲存起來
					if (RtyTimes == MaxRtyTimes)
					{//如果連續傳輸到最多可重試次數,就不傳了
						break;
					}
					else
					{//累加失敗次數
						RtyTimes++;
					}
				}
			}
			while (PicData.Length > 0);//讀到沒有資料為止

			picFromWS.Image = Image.FromStream(ms);//顯示圖檔
			if (strErr.Length > 0)
			{
				MessageBox.Show(strErr
								, string.Format("傳輸過程發生 {0} 次失敗", RtyTimes)
								, MessageBoxButtons.OK
								, RtyTimes == MaxRtyTimes ? MessageBoxIcon.Error : MessageBoxIcon.Warning
								//傳輸成功,但過程中有失贁過,Icon用Warning就好,傳輸失敗再用Error的Icon
								);
			}
		}
	}
	catch (Exception ex)
	{
		MessageBox.Show(ex.Message);
	}
	finally
	{
		if (sc.State == System.ServiceModel.CommunicationState.Opened || sc.State == System.ServiceModel.CommunicationState.Opening)
		{
			sc.Close();
			//這時的sc.State=Closed;
		}
		this.Cursor = Cursors.Default;
	}
	sw.Stop();//計時結束
	txtTime.Text = sw.Elapsed.ToString();
}
在Client端的App.config也同樣要用Edit WCF Configuration來設定.
在Bindings裡面設一個WSHttpBinding.MessageEncoding跟MaxReceivedMessageSize設定跟Server端一樣.
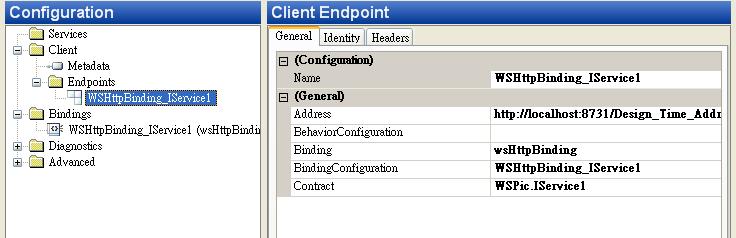
接下來在Endpoints設定,將BindingConfiguration設為上一步驟所設定的Bindings名稱.
這樣Client端的動作就做好了,從兩端的程式碼看來,內容完全沒有寫什麼跟Mtom有關的設定動作,除了從app.config取得MaxReceivedMessageSize,反而是在app.config設定Mtom就好了.
詳細的運作實際狀況,可以下載以下的Sample Code回去看,記得建個目錄C:\PICDemo,把圖檔放到這個目錄下即可.
範例 : WCFPicDemo.rar
.jpg)