Windows Server 2012 (Hyper-V 3) 好文分享之Getting Started with Hyper-V Replication(上)
Hyper-V Replication是微軟Hyper-V虛擬化技術的新功能,想要了解可以參考操作Windows Server 2012 Virtual Labs:Getting Started with Windows Server 2012 Hyper-V Replication
以下筆者有針對Windows Server 2012 Virtual Labs的Getting Started with Hyper-V Replication實作整理,您可以參考原文文件搭配筆者介紹去操作,那應該會很容易了解Hyper-V Replication到底是在做什麼。
下圖是此Windows Server 2012 Virtual Labs的環境介紹,環境內所有使用的密碼都是【 Password!】。
Exercise 1: Configure the Firewall to Allow Hyper-V Replication
此部分是告訴各位怎樣開啟Hyper-V Replica所要使用的連接埠,不過這裡使用的方式是HTTP,不是HTTPS,所以是開啟Hyper-V replica HTTP listener (TCP-In) rule。
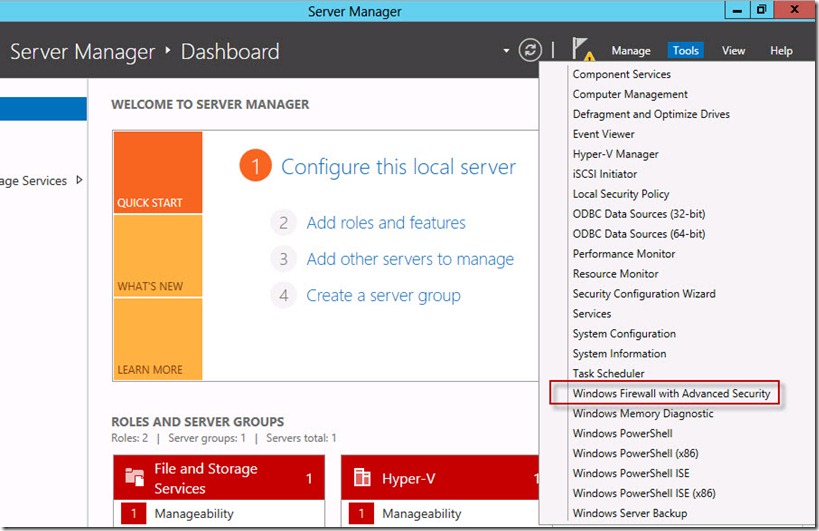
在HV1開啟Server Manager視窗,Tools選單,點選【Windows Firewall with Advanced Security】。
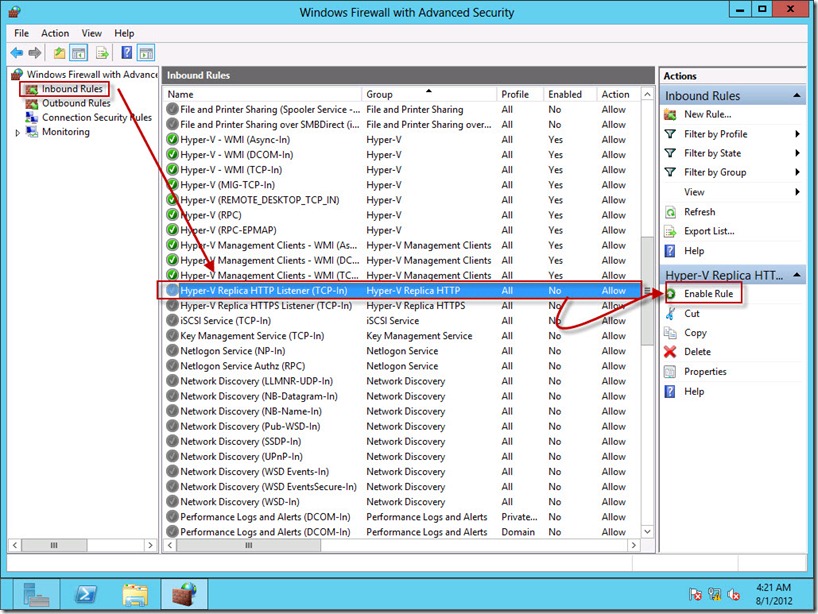
Windows Firewall with Advanced Security視窗,點選Inbound Rules防火牆輸入規則,然後選擇【Hyper-V replica HTTP listener (TCP-In) rule】,預設是關閉的,所以點選【Enable Rule】。
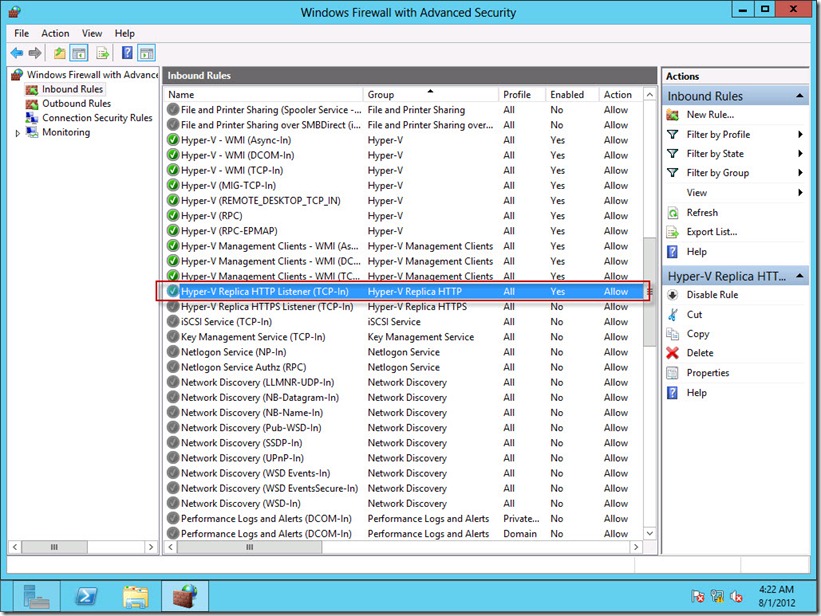
這樣就會開啟Hyper-V replica HTTP listener (TCP-In) rule規則,這樣Replication使用HTTP才可以連通。此為 HV1的操作步驟,HV2也是依此操作。
Exercise 2: Create a Virtual Network and a Virtual Machine to Replicate
此是建立兩台Hyper-V伺服器的相同網路設定,然後再建立一台測試的虛擬機器。
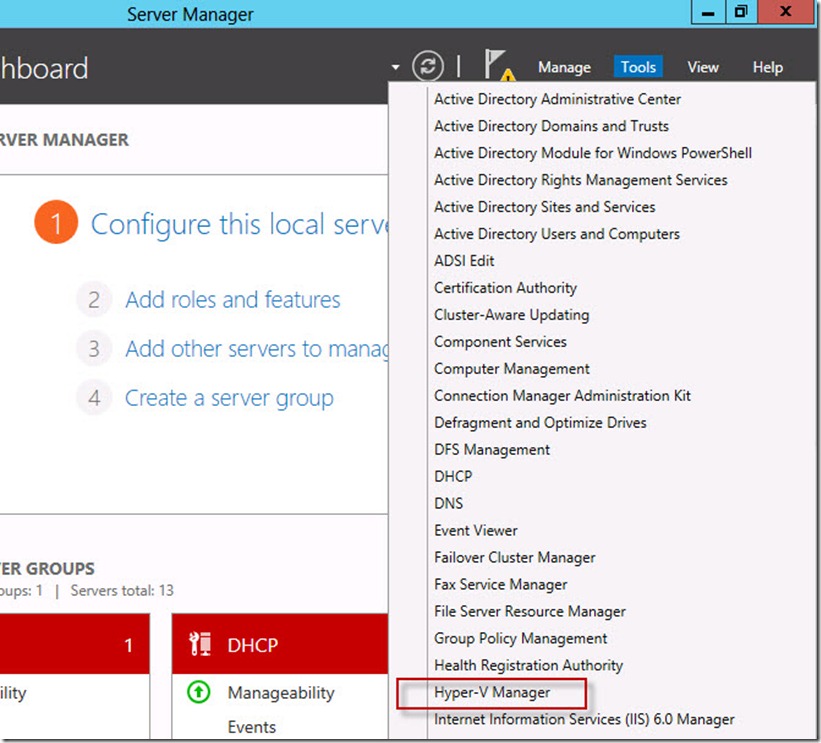
在HV1開啟Server Manager視窗,Tools選單,點選【Hyper-V Manager】。
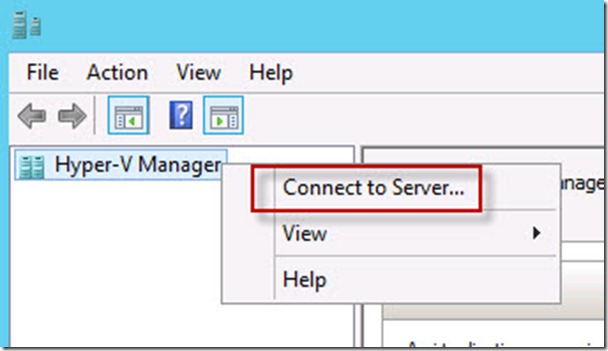
Hyper-V Manager內預設不會任何的 Hyper-V伺服器節點,所以可以將所要連線管理的Hyper-V伺服器加入,在Hyper-V Manager按右鍵選單,點選【Connect to Server】。
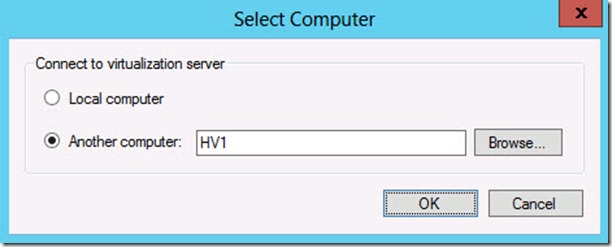
Select Computer輸入要操作的Hyper-V伺服器名稱,這裡先輸入【HV1】,也可以使用 Browse方式選取,輸入完畢後,按【OK】。
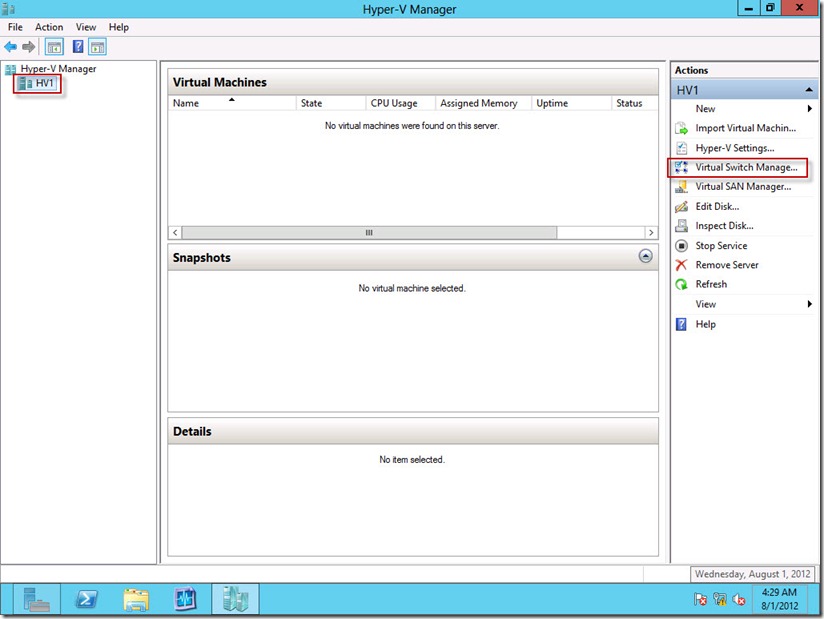
由於HV1伺服器是全新的環境,所以就必須設定Virtual Switch,點選【Virtual Switch Manager】。
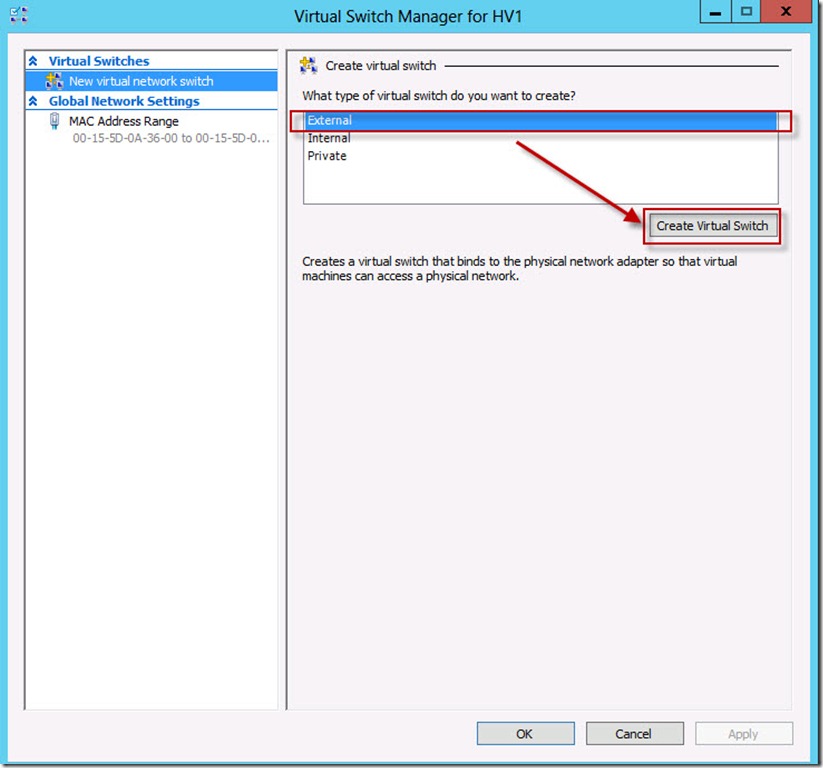
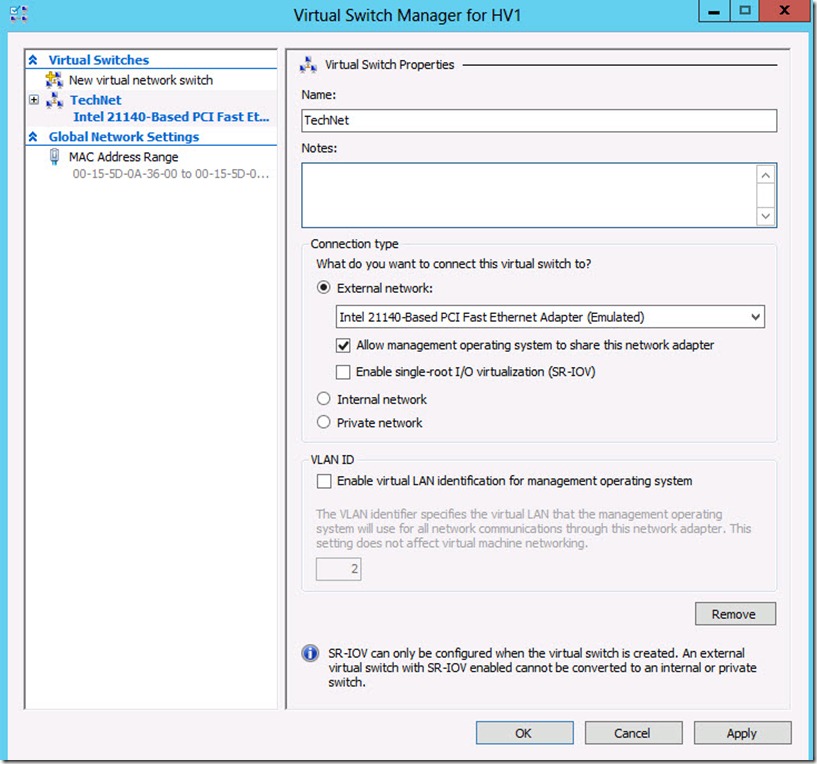
Virtual Switch Manager for HV1視窗建立一個新的網路介面,New virtual network switch建立一個對外的網路介面,點選【External】,然後按【Create Virtual Switch】。
新的Virtual Switch建立好後修改其名稱,Name輸入【TestNet】,然後按【OK】。
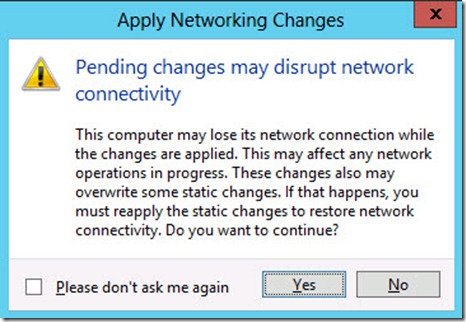
Virtual Switch Manager就會詢問是否套用設定,按【Yes】。
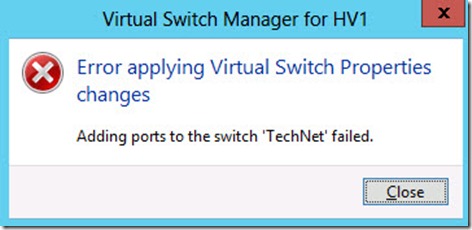
由於是從DC遠端連線修改Hyper-V 伺服器的網路設定,所以就會發生網路失去訊號的問題,所以就會有此錯誤,若是在HV1伺服器本機上操作,那就不會有這個錯誤訊息。那HV1的網路設定完成後,那HV2也依此設定,網路名稱記得名稱都要一樣。
![]() 若是設定完成後,Hyper-V Manager出現有關RPC failure的訊息,那只要重新整理畫面或是等待一兩分鐘就會恢復正常。
若是設定完成後,Hyper-V Manager出現有關RPC failure的訊息,那只要重新整理畫面或是等待一兩分鐘就會恢復正常。
![]() Create a virtual machine
Create a virtual machine
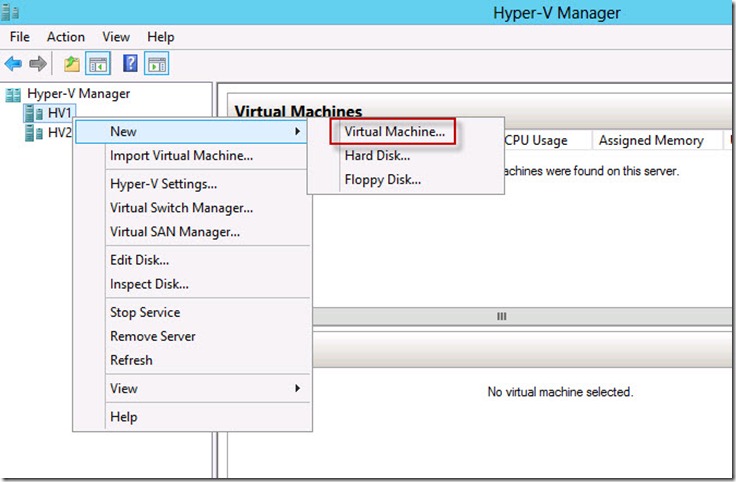
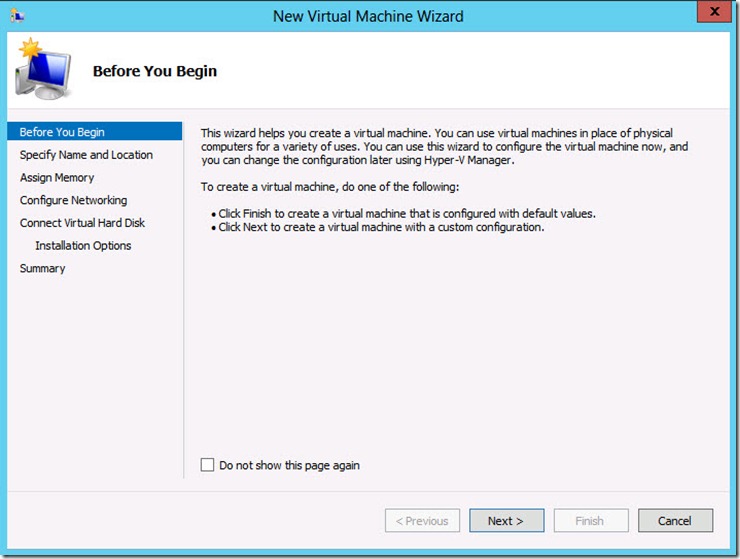
HV1跟HV2網路都設定完成後,那接下來在HV1建立一台測試虛擬機器,Hyper-V Manager的HV1按右鍵選單,點選【New】—>【Virtual Machine】。
New Virtual Machine Wizard開始前簡介,按【Next】。
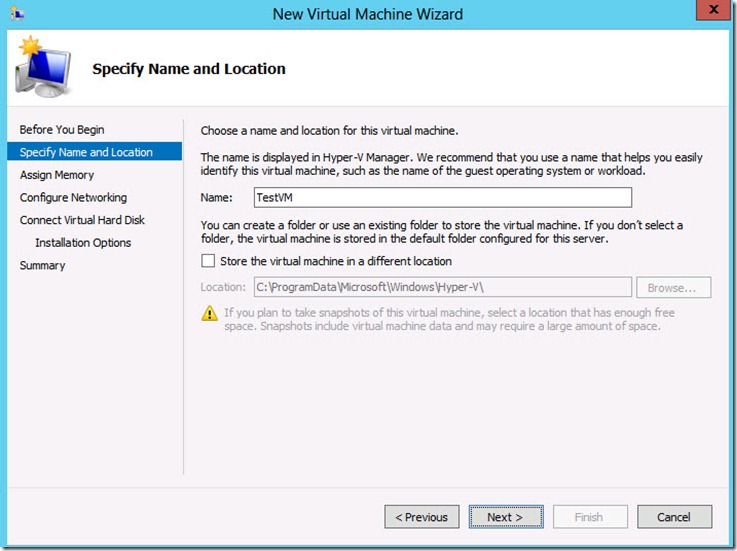
輸入測試虛擬機器的名稱TestVM,輸入完畢後,按【Next】。
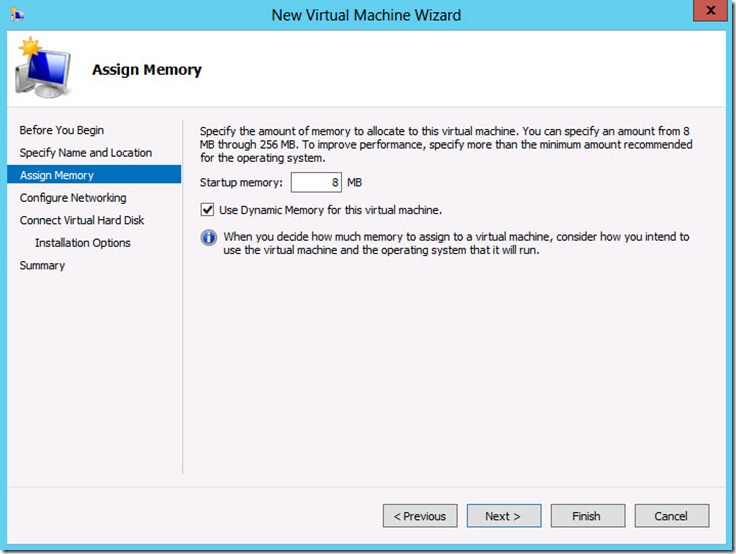
Assign memory將Startup memory輸入為【8】,然後勾選【Use Dynamic Memory for this virtual machine】,使用動態記憶體,然後按【Next】。
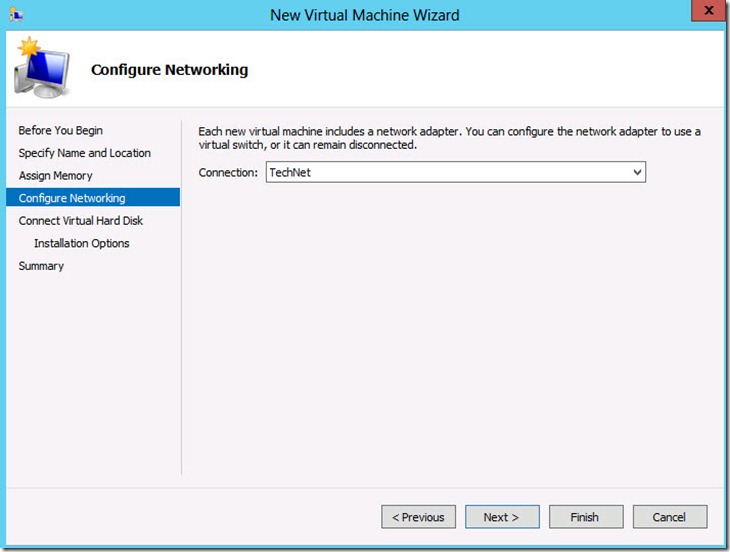
Configure Networking選擇網路介面,選擇前面步驟所建立名稱為TechNet,然後按【Next】。
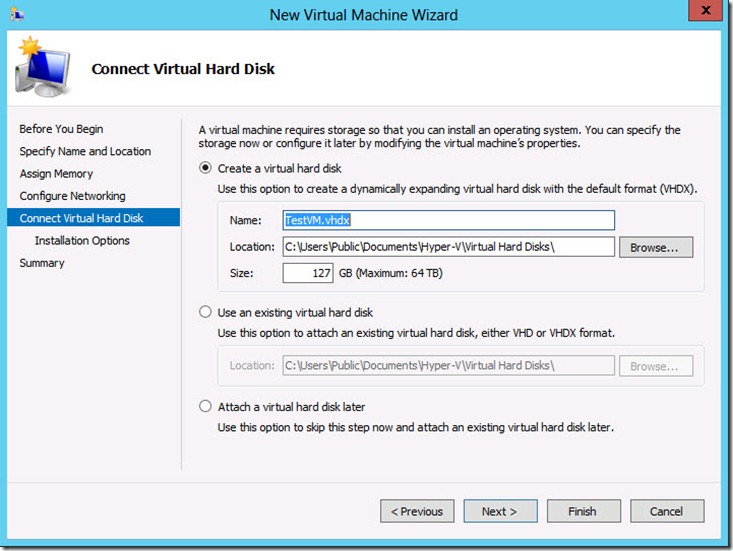
Connect Virtual Hard Disk建立虛擬磁碟,暫不選擇,按【Next】。
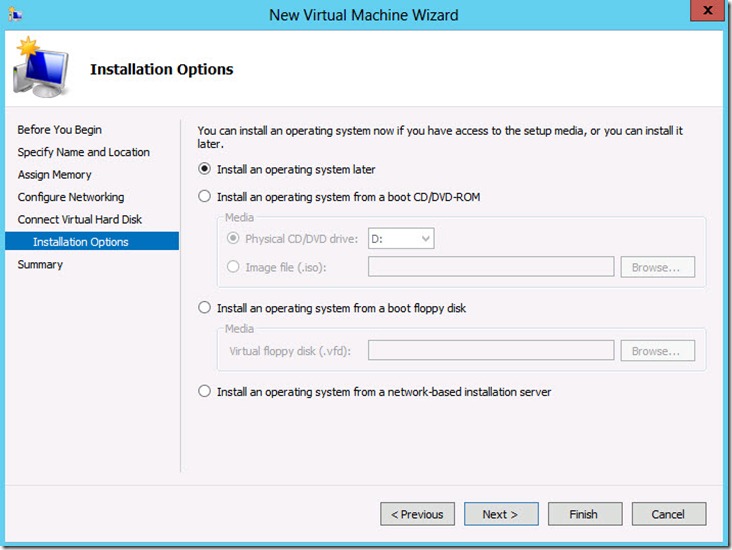
Installation Options選擇【Install operating system later】,然後按【Finish】。
如下圖所示,HV1上的虛擬機器建立完成。HV2不用建立虛擬機器。
Exercise 3: Configure Hyper-V Replication Settings on HV1 and HV2
此為設定HV1和HV2的Replication複寫設定。
![]() Configure replication settings on HV2
Configure replication settings on HV2
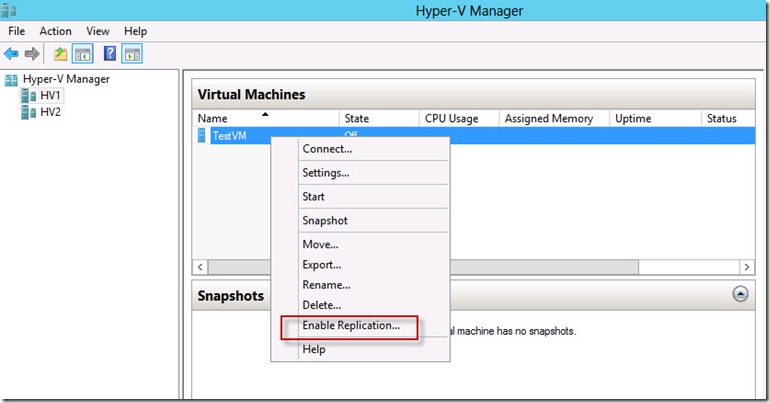
在DC的Hyper-V Manager點選剛剛在HV1上建立的虛擬機器 TestVM,然後按右鍵選單,選擇【Enable Replication】,虛擬機器的Replication啟動。
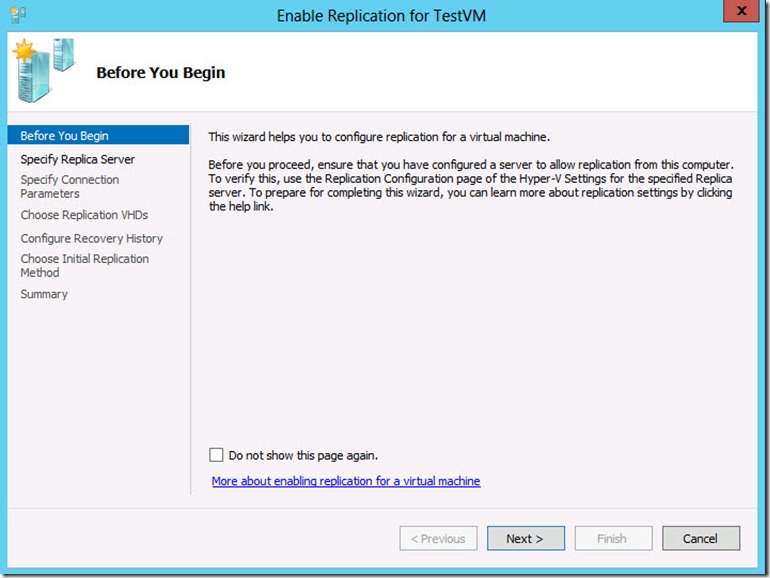
Enable Replication for TestVM歡迎開始選單,按【Next】。
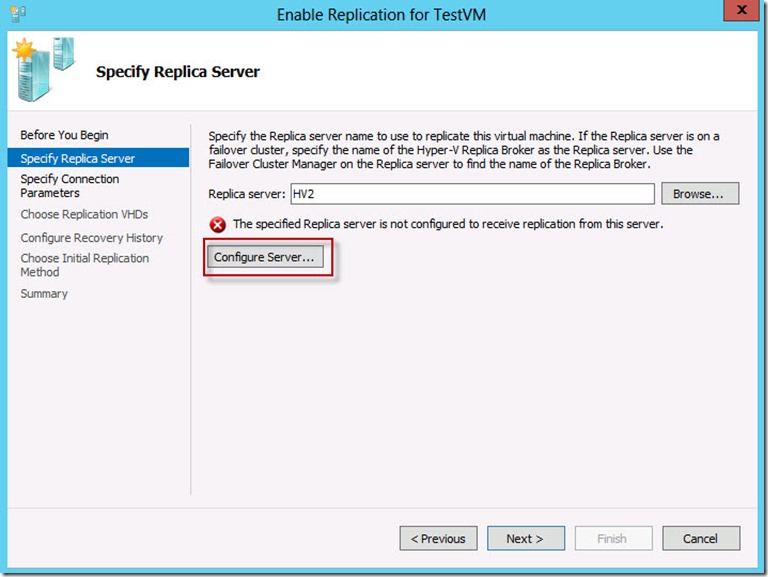
輸入Replica server名稱,HV1上的虛擬機器要複寫到HV2,所以當然輸入HV2的主機名稱,可以輸入完整的FQDN或主機名稱,這裡輸入【HV2.contoso.com】或【HV2】,輸入完成後,按【Next】,那就會出現錯誤訊息,問題就在HV2還沒有設定Replication功能,所以點選【Configure Server】,設定HV2的Replication功能。
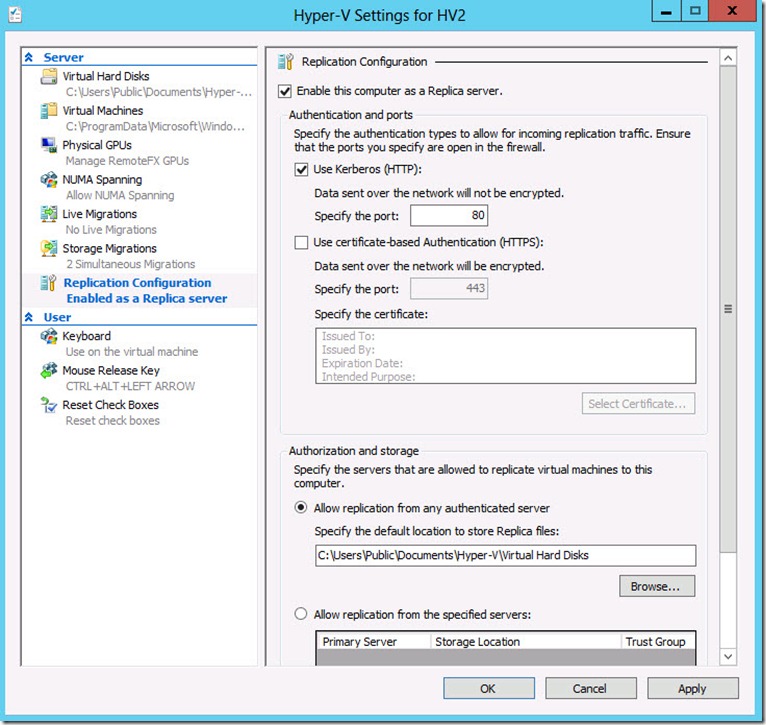
HV2的hyper-V Settings for HV2視窗開啟Replication的功能,Replication Configuration勾選【Enable this computer as a Replica server】,再勾選【Use Kerberos (HTTP)】,之前Hyper-V伺服器所開啟的防火牆是HTTP,最後點選【Allow replication from any authenticated server】,然後按【OK】。
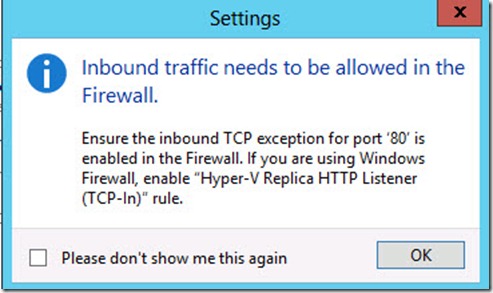
Hyper-V manager也會提醒你防火牆要有開啟Hyper-V replica HTTP listener (TCP-In),不然可能不能複寫成功。
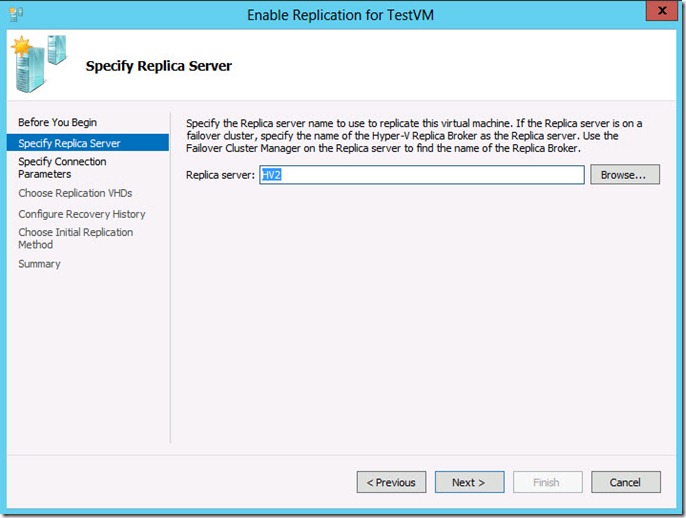
再回到開啟Replication功能的視窗,那這次按 Next就不會再發生錯誤訊息,按【Next】。
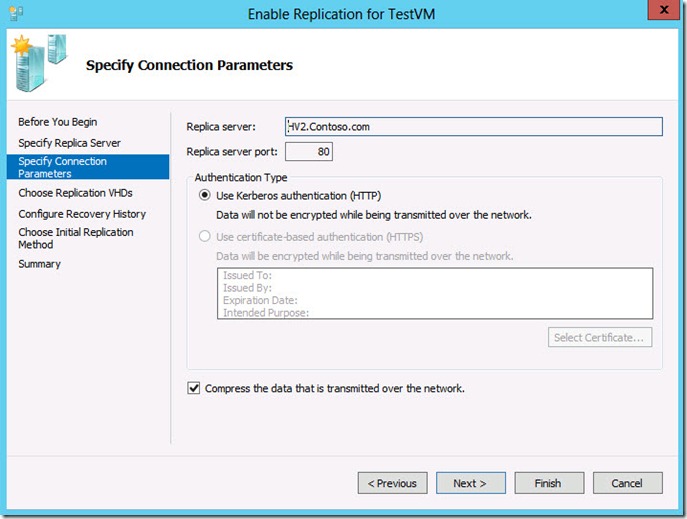
Specify Connection Paramenters檢查replica server是hv2.contoso.com,Replica server port是80,Authentication Type是選擇Use Kerberos authentication (HTTP),並且有勾選Compress the data that is transmitted over the network,那這樣就算設定完成,按【Next】。
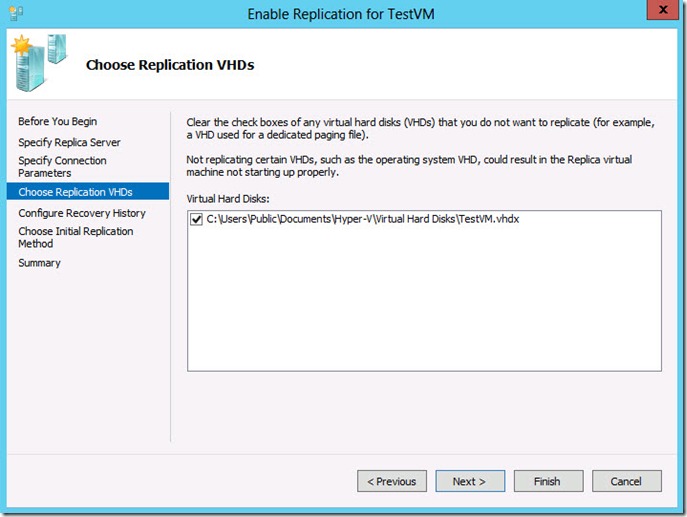
Choose Replication VHDs部分,確認Replication的路徑為C:\Users\Public\Documents\Hyper-V\Virtual Hard Disks\TestVM.vhdx,按【Next】。
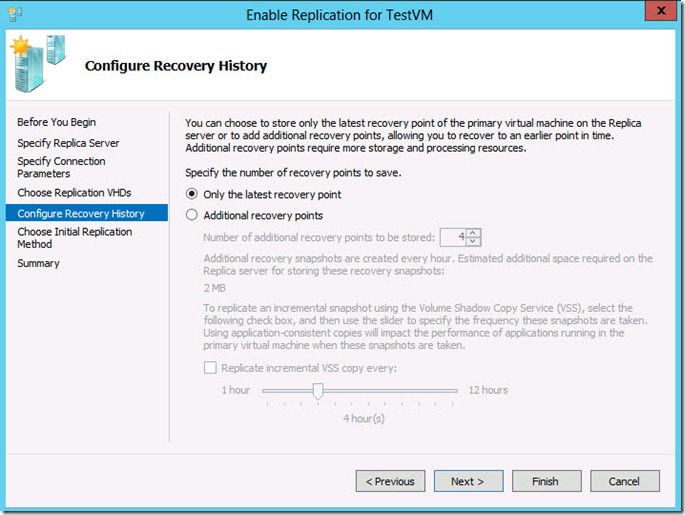
Configure Recovery History部分,按【Next】。
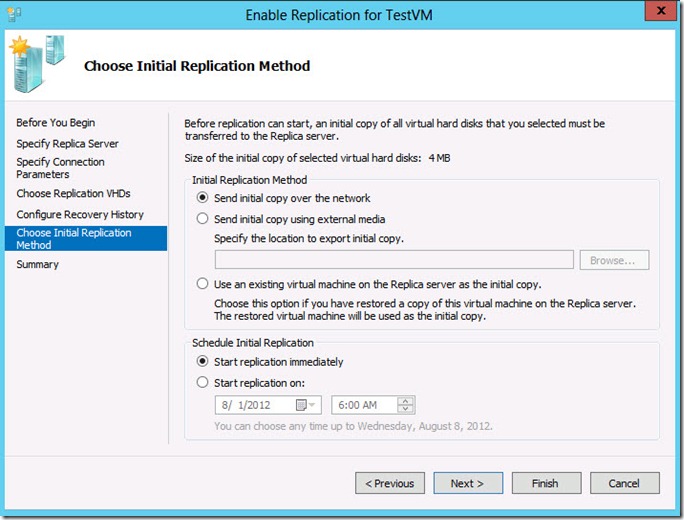
Choose Initial Replication Method部分檢查Send initial copy over the network和Start replication immediately,按【Finish】。
![]() Configure replication settings on HV1
Configure replication settings on HV1
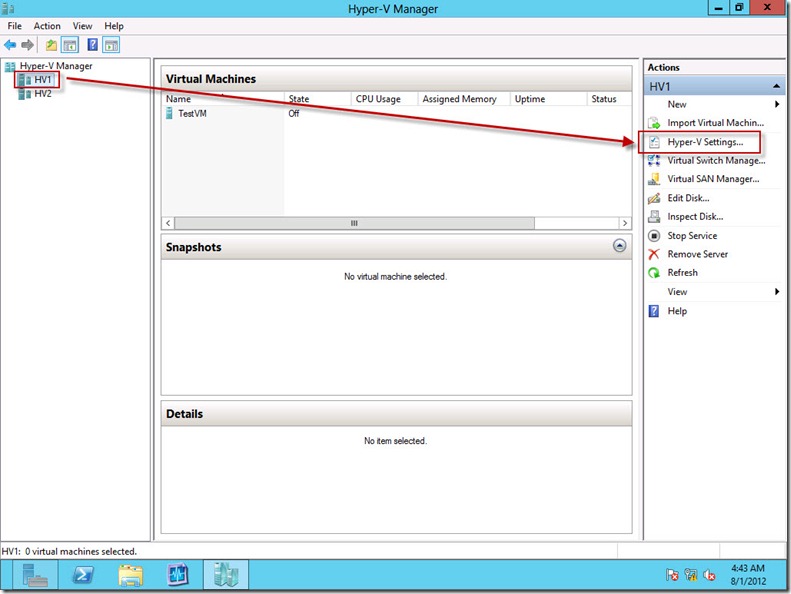
HV2的replication功能設定完成後,那當然也要設定HV1,不然複寫功能就不算完整,DC的Hyper-V Manager點選HV1,然後點選【Hyper-V Settings】。
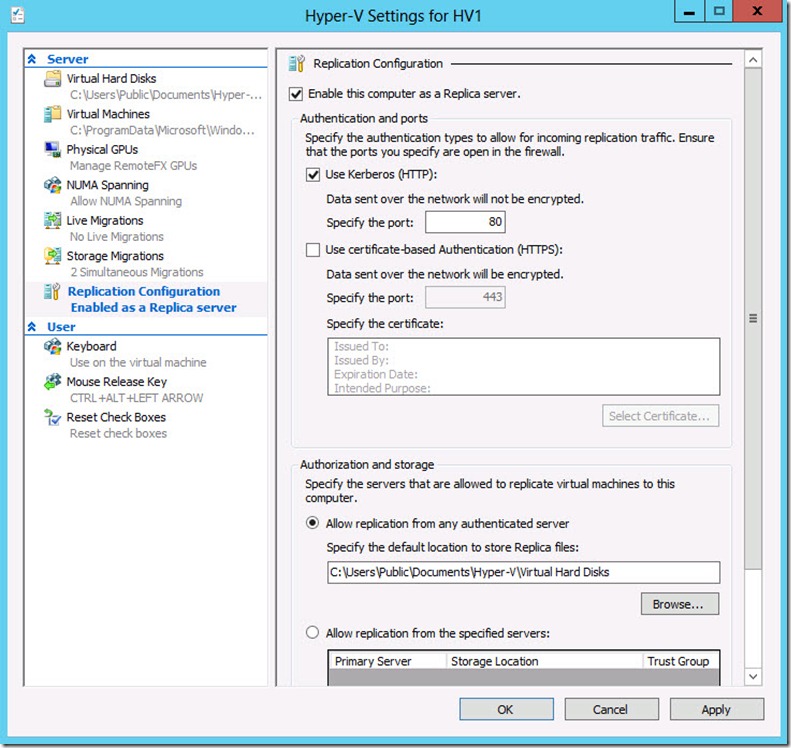
Hyper-V Settings for HV1視窗的Replication Configuration勾選【Enable this computer as a Replica server】,再勾選【Use Kerberos (HTTP)】,之前Hyper-V伺服器所開啟的防火牆是HTTP,最後點選【Allow replication from any authenticated server】,然後按【OK】。
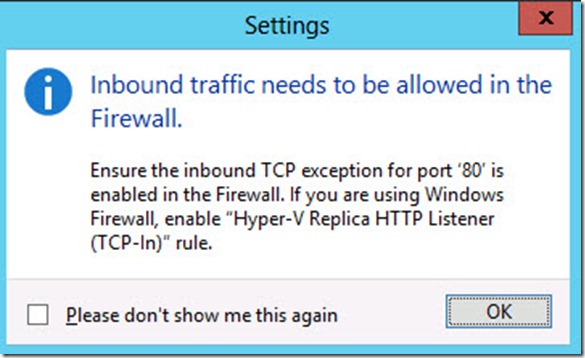
Hyper-V manager也會提醒你防火牆要有開啟Hyper-V replica HTTP listener (TCP-In),不然可能不能複寫成功。

部落格:http://www.dotblogs.com.tw/jerry710822
My MVP Profile
https://mvp.support.microsoft.com/profile/Jerry

