摘要:[EZoApp] 打造九宮格拼圖遊戲 App
這篇要來介紹如何利用 EZoApp ,打造一個九宮格的拼圖遊戲,完成範例 ( 點選 preview 可以預覽 ):http://jqmdesigner.appspot.com/designer.html#&ref=5767590991364096
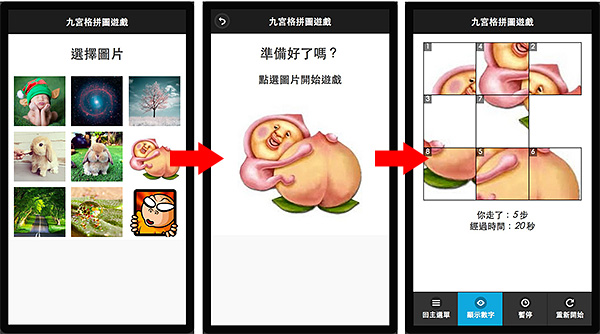
在製作遊戲之前,要先來規劃一下拼圖遊戲大概的流程:
-
一開始選擇想要拼圖的圖片
-
選擇後,先看一下大圖 ( 拼圖一定要先知道圖片長怎樣 )
-
點選圖片開始遊戲
-
遊戲時可以暫停或顯示數字提示
-
隨時可以重新開始遊戲
- 遊戲過程記錄「步數」與「經過時間」
有了流程之後,就按照步驟開始進行,由流程中可以發現,總共會經過三個頁面:「選擇 → 點選開始 → 遊戲」,因此我們先在 page 面板建立三個頁面,分別叫做 index、ready、home。

先來編輯 index 這個頁面,在上方放入 header,然後在下方利用三個 grid 元件放入圖片,這裡我的圖片已經預先都用成正方形,避免長方形的圖片會變形,不過當你放上圖片之後,會發現長相差很大,因為還沒有套用 CSS。( 範例:http://jqmdesigner.appspot.com/designer.html#&ref=5686390339665920 )
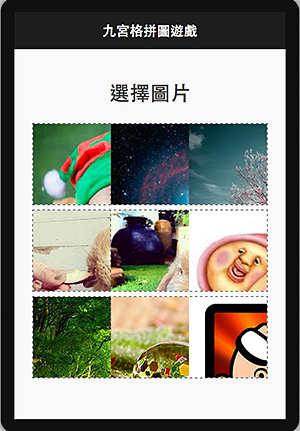
套用樣式之後整體就會好看許多 ( 範例:http://jqmdesigner.appspot.com/designer.html#&ref=4694843586510848 )
CSS:
html,
body {
  width: 100%;
  height: 100%;
  padding: 0;
  margin: 0;
}
#index-menu img{
}
.menu-img img{
  margin:5px;
  width:90%;
}

接下來編輯一下 javascript,最主要是要讓點選的時候,會把這張圖片的網址傳給第二頁,這樣後面就可以直接抓取這張圖,首先建立一個全域變數 bgUrl,目的來儲存點選後的網址,這樣在第二第三頁都可以使用,然後設定點選 tap 事件動作,點選時將 img 的 src 記錄到 bgUrl 裡頭。( 範例:http://jqmdesigner.appspot.com/designer.html#&ref=6607042886238208 )
JS:
var bgUrl;
/*
 ** #index
 */
(function () {
  $(document).on('pageshow', '#index', function () {

    var $menuImg = $('.menu-img');

    $menuImg.on('tap', function () {
      bgUrl = $(this).find('img').attr('src');
    });

  });
})();
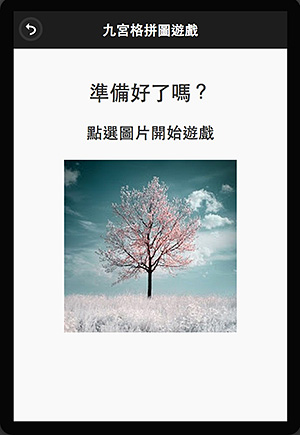
完成第一頁之後就來看看第二頁,與第一頁相同的做法,先放上 header,然後再 ui-content 裡頭放入文字,同時預留 img 的位置出來,img 由 a 包著,目的在於點選圖片之後,會進入遊戲頁面,同樣的加上轉場的效果 data-transition="slide"。
    <h2 is="gk-text" style="text-align:center;">準備好了嗎?</h2>
    <h3 is="gk-text" style="text-align:center;">點選圖片開始遊戲</h3>
    <h3 is="gk-text" style="text-align:center;"><a href="#home" data-transition="slide"><img src style="width:70%;" id="ready-img"></a></h3>
到這邊還沒完成,再來要補上第二頁的 javascript,因為要讀取剛剛第一頁傳進來的 bgUrl,為了避免每次進去出來,都還會看到上一張圖片,所以新增了 $readyImg.removeAttr('src'); 這一段來讓進入頁面時圖片是空的,可以看範例然後點選 preview 看看效果:http://jqmdesigner.appspot.com/designer.html#&ref=6279215682945024
JS:
(function () {
  $(document).on('pageshow', '#ready', function () {

    var $readyImg = $('#ready-img');

    $readyImg.removeAttr('src');
    $readyImg.attr({
      'src': bgUrl
    });

  });
})();
就這樣,前兩頁都完成了,要來最重點的第三頁,一如往常,先編輯第三頁的 HTML,上方放置 header,中間放九個 div,最下面放個 footer 並且塞入四個按鈕,並設計一下 CSS 樣式。( 範例:http://jqmdesigner.appspot.com/designer.html#&ref=4871840799391744 )
HTML:
<div id="home" data-role="page">
  <div data-role="header" data-position="fixed" data-theme="b" data-tap-toggle="false" id="boxheader">
    <h3>九宮格拼圖遊戲</h3>
  </div>
  <!-- 拼圖內容  -->
  <div role="main" class="ui-content">
    <div id="end-image"></div>
    <div id="boxArea">
      <div class="box"></div>
      <div class="box"></div>
      <div class="box"></div>
      <div class="box"></div>
      <div class="box"></div>
      <div class="box"></div>
      <div class="box"></div>
      <div class="box"></div>
      <div id="empty"></div>
    </div>
    <h3 id="completed">恭喜過關</h3>
    <h3 id="tap-num">你走了:<i>0</i> 步</h3>
    <h3 id="play-time">經過時間:<i>0</i> 秒</h3>
  </div>
  <div data-position="fixed" data-role="footer" data-theme="b" data-tap-toggle="false" style="padding:0; height:60px;">
    <div class="ui-grid-c" style="height:100%; margin:0; padding:0">
      <div class="ui-block-a" style="height:100%; margin:0; padding:0;">
        <a id="back-index" class="ui-btn ui-btn-icon-top ui-icon-bars" style="height:100%; width:100%; padding:0; line-height:80px; margin:0;" href="#index" data-transition="flip">回主選單</a>
      </div>
      <div class="ui-block-b" style="height:100%; margin:0;padding:0;">
        <a id="show-num" class="ui-btn ui-btn-icon-top ui-icon-eye" style="height:100%; width:100%; padding:0; line-height:80px; margin:0;">顯示數字</a>
      </div>
      <div class="ui-block-c" style="height:100%">
        <a id="pause" class="ui-btn ui-icon-clock ui-btn-icon-top" style="height:100%; width:100%; padding:0; line-height:80px; margin:0;">暫停</a>
      </div>
      <div class="ui-block-d" style="height:100%">
        <a id="restart" class="ui-btn ui-icon-refresh ui-btn-icon-top" style="height:100%; width:100%; padding:0; line-height:80px; margin:0;">重新開始</a>
      </div>
    </div>
  </div>
</div>
CSS:
#home {
  padding: 0;
  margin: 0;
  height: 75%;
  width: 100%;
}
.ui-content {
  padding: 0;
  margin: 0;
  height: 100%;
  width: 100%;
  background:#fff;
}
#boxArea {
  position: relative;
  margin-top: 15px;
  margin-bottom:20px;
}
#end-image{
  position: absolute;
  z-index: 3;
  background-repeat: no-repeat;
  border: 1px solid #000;
  margin-top: 15px;
  margin-bottom:20px;
  display:none;
}
.box {
  position: absolute;
  z-index: 2;
  background-repeat: no-repeat;
  border: 1px solid #000;
  cursor: pointer;
}
.box h2{
  margin:0;
  padding:0;
  background:rgba(0,0,0,.5);
  color:#fff;
  max-width:15%;
  font-size:12px;
  font-weight:normal;
  text-shadow:none;
  text-align:center;
  display:none;
}
#empty {
  position: absolute;
  background-color: #fff;
  z-index: 1;
  border: 1px solid #fff;
}
#tap-num,#play-time{
  text-align:center;
  padding:0;
  margin:0;
  font-size:16px;
}
#completed{
  color:#f00;
  text-align:center;
  display:none;
  padding:0;
  margin:0;
}
.redcolor{
  color:#f60;
}
完成之後應該可以看到大致的長相已經出來了:

接著要來寫最關鍵的 javascript,完整的 javascript 請看範例 ( http://jqmdesigner.appspot.com/designer.html#&ref=6248894153359360 ),以下將一步步介紹。
第一段主要用來定義會用到的變數,$開頭的是把 jquery 選擇的 DOM 做成變數,就不用再選取一次,windowWidth 和 windowHeight 目的在抓取螢幕長寬,讓九宮格的格子可以根據不同尺寸縮放,a 是一個亂數陣列,記錄圖片打散的順序,boxSize 是每個格子的尺寸,a1、a2、random1、random2 是用來打亂陣列使用,x0、y0、x1、y1 是記錄方格的位置,i、j 是 for 迴圈使用,$boxArea_x、$boxArea_y 是讓九宮格置中的計算位置變數,aIndex,、aEmpty 是用來判斷是否過關的變數,timer、 moveNum、 playtime 計算步數與時間的變數。
    var $box = $('.box'),
      $empty = $('#empty'),
      $boxArea = $('#boxArea'),
      $tapNum = $('#tap-num'),
      $playTime = $('#play-time'),
      $endImage = $('#end-image'),
      windowWidth = $('#home').width(),
      windowHeight = $('#home').height(),
      a = [],
      boxSize, a1, a2, random1, random2, x0, y0, x1, y1, i, j,
      $boxArea_x, $boxArea_y, aIndex, aEmpty, timer, moveNum, playtime;
變數定義完,接著就是遊戲主程式,這裡用一個 _home 把主程式包起來,因為我們有設計一個重新開始的按鈕,點選之後再度執行就會重來一次,在程式一開始要進行初始化的動作,也就是把步數與時間歸零,然後把陣列初始化,停止 timer 計時器,然後把按鈕狀態恢復,把過關畫面移除...等
    function _home() {
      //初始化
      moveNum = 0;
      playtime = 0;
      a = [0, 1, 2, 3, 4, 5, 6, 7];
      clearTimeout(timer);
      $('#pause').removeClass('ui-state-disabled');
      $('#show-num,#pause').removeClass('ui-btn-active').off('tap');
      $('#restart,#back-index').off('tap');
      $box.off('tap');
      $tapNum.find('i').text('0');
      $playTime.find('i').text('0');
      $('#completed').hide();
      $endImage.hide();
初始化完成後就是把剛剛圖片 bgUrl 傳給方塊的背景圖
      $endImage.css({
        'background': 'url(' + bgUrl + ')'
      });
      $box.css({
        'background': 'url(' + bgUrl + ')'
      });
設定計時器的 function , 待會在後面會介紹到
      //設定計時器
      _time();
根據 window 的長寬設置位置以及方塊的長寬,為了避免太大,所以有做了一個最小邊寬的判斷
      //設定 box 的位置
      if (windowWidth < windowHeight) {
        if (windowWidth >= 420) {
          boxSize = (420 - 40) / 3;
        } else {
          boxSize = (windowWidth - 40) / 3;
        }
        _boxPos(boxSize);
      } else {
        if (windowHeight >= 420) {
          boxSize = (420 - 40) / 3;
        } else {
          boxSize = (windowHeight - 40) / 3;
        }
        _boxPos(boxSize);
      }
把陣列做亂數排列,為什麼不直接使用 random 呢?因為若使用 random ,則很有可能出來的陣列會變成 1,2,3,4,5,6,8,7 而不是 1,2,3,4,5,6,7,8 ,若最後是 8,7 不是 7,8,不管如何玩都不可能過關,_addID 的 function 是用來加上 id,後面會介紹。
      //把原本的陣列打散
      for (i = 0; i < 20; i++) {
        random1 = Math.floor(Math.random(10) * 8);
        _randomNum(random1);
        a1 = a[random1];
        a2 = a[random2];
        a[random1] = a2;
        a[random2] = a1;
        if (i == 19) {
          _addID(); //加 id
        }
      }
設置按鈕的點選事件,後面會介紹。
      //點選事件
      $box.on('tap', _play);
設置 footer 按鈕的點選事件,最主要是要讓暫停按鈕會變色,同時會停止 timer 計時器,然後點選顯示數字可以顯示提示數字,這樣會比較容易過關。
      //footer按鈕事件
      $('#pause').on('tap', function () {
        if ($(this).hasClass('ui-btn-active')) {
          $(this).removeClass('ui-btn-active');
          _time();
          $box.on('tap', _play);
        } else {
          $(this).addClass('ui-btn-active');
          clearTimeout(timer);
          $box.off('tap');
        }
      });

      $('#show-num').on('tap', function () {
        if ($(this).hasClass('ui-btn-active')) {
          $(this).removeClass('ui-btn-active');
          $box.find('h2').hide();
        } else {
          $(this).addClass('ui-btn-active');
          $box.find('h2').show();
        }
      });

      $('#restart').on('tap', function () {
        _home();
      });

      $('#back-index').on('tap', function () {
        bgUrl = '';
        clearTimeout(timer);
      });
    }
看完了 _home() ,再來看看剛剛提到的一些 function 行為在做什麼,先看到 _play(),為什麼點選時知道旁邊是空的,要換過去呢?這裡我使用位置進行判斷,當旁邊的空格位置相差大於方格邊長,就表示方格旁邊不是空白,就不能移動,只是一個很簡單的判斷而以。
  function _play() {
      x0 = $(this).offset().left;
      y0 = $(this).offset().top;
      x1 = $empty.offset().left;
      y1 = $empty.offset().top;

      d = Math.abs(x0 - x1) + Math.abs(y0 - y1);

      if (d < (boxSize + 20)) {
        $(this).animate({
          "left": (x1 - $boxArea_x) + "px",
          "top": (y1 - $boxArea_y) + "px"
        }, 100);
        $empty.css({
          "left": (x0 - $boxArea_x) + "px",
          "top": (y0 - $boxArea_y) + "px"
        });

        //計算步數
        moveNum = moveNum + 1;
        $tapNum.find('i').text(moveNum);
利用 indexOf 可以知道陣列的哪個地方是哪些值,每次移動都會判斷一次陣列是否等於 1,2,3,4,5,6,7,8 ,如果是,就過關了。
        //判斷是否完成
        aIndex = $(this).attr('num') * 1;
        aEmpty = a.indexOf(8);
        a[a.indexOf(aIndex)] = 8;
        a[aEmpty] = aIndex;
        _checkCompleted(a);
      }
    };
設定方塊的位置,也是用視窗的長寬來做判斷。
    function _boxPos(s) {
      $boxArea.css({
        'width': (s * 3) + 'px',
        'height': (s * 3) + 'px',
        'margin-left': (windowWidth - (s * 3) - 4) / 2 + 'px'
      });
      $endImage.css({
        'width': (s * 3 + 4) + 'px',
        'height': (s * 3 + 4) + 'px',
        'margin-left': (windowWidth - (s * 3) - 4) / 2 + 'px',
        'background-size': (s * 3 + 4) + 'px ' + (s * 3 + 4) + 'px'
      })

      $boxArea_x = $boxArea.offset().left;
      $boxArea_y = $boxArea.offset().top;

      $box.css({
        'width': s + 'px',
        'height': s + 'px',
        'background-size': (s * 3) + 'px ' + (s * 3) + 'px'
      });
      $empty.css({
        'width': s + 'px',
        'height': s + 'px'
      })
先判斷 y 坐標 1~3、4~6、7~9
      $box.slice(0, 3).css({
        'top': '0'
      });
      $box.slice(3, 6).css({
        'top': s + 1 + 'px'
      });
      $box.slice(6, 9).css({
        'top': s * 2 + 2 + 'px'
      });
再判斷 x 坐標
      $box.eq(0).css({
        'left': '0'
      });
      $box.eq(3).css({
        'left': '0'
      });
      $box.eq(6).css({
        'left': '0'
      });
      $box.eq(1).css({
        'left': s + 1 + 'px'
      });
      $box.eq(4).css({
        'left': s + 1 + 'px'
      });
      $box.eq(7).css({
        'left': s + 1 + 'px'
      });
      $box.eq(2).css({
        'left': s * 2 + 2 + 'px'
      });
      $box.eq(5).css({
        'left': s * 2 + 2 + 'px'
      });
      $empty.css({
        'left': s * 2 + 2 + 'px',
        'top': s * 2 + 2 + 'px'
      });
    }
剛剛亂數的公式,目的不要讓 random1 等於 random2,如果相等就再亂數一次
    function _randomNum(r) {
      random2 = Math.floor(Math.random(10) * 8);
      if (random2 == r) {
        _randomNum(r);
      } else {
        return random2;
      }
    }
增加 id 與數字提示
    function _addID() {
      for (j = 0; j < a.length; j++) {
        $box.eq(j).attr({
          'id': 'box' + a[j],
          'num': a[j]
        }).html(
          '<h2>' + (a[j] + 1) + '</h2>'
        );
        if (j == (a.length - 1)) {
          return _bgPos(boxSize); //放入背景圖
        }
      }
    }
設定背景圖片位置,確保 1,2,3,4,5,6,7 組合起來是剛剛好完整的圖。
    function _bgPos(s) {

      a.push(8);

      $('#box0').css({
        'background-position': '0 0'
      });
      $('#box1').css({
        'background-position': (-s) + 'px 0'
      });
      $('#box2').css({
        'background-position': (-s * 2) + 'px 0'
      });
      $('#box3').css({
        'background-position': '0 ' + (-s) + 'px'
      });
      $('#box4').css({
        'background-position': (-s) + 'px ' + (-s) + 'px'
      });
      $('#box5').css({
        'background-position': (-s) * 2 + 'px ' + (-s) + 'px'
      });
      $('#box6').css({
        'background-position': '0 ' + (-s * 2) + 'px'
      });
      $('#box7').css({
        'background-position': (-s) + 'px ' + (-s * 2) + 'px'
      });
    }
計時器,每一秒會跑一次。
    function _time() {
      timer = setTimeout(function () {
        playtime = playtime + 1;
        $playTime.find('i').text(playtime);
        clearTimeout(timer);
        _time();
      }, 1000);
    }
判斷是否完成,就是由陣列去做判斷,完成之後會鎖住步數以及時間,同時出現原本的圖片和恭喜文字。
    function _checkCompleted(c) {
      if (c[0] == 0 && c[1] == 1 && c[2] == 2 && c[3] == 3 && c[4] == 4 && c[5] == 5 && c[6] == 6 && c[7] == 7) {
        clearTimeout(timer);
        $box.off('tap');
        $('#pause').off('tap').addClass('ui-state-disabled');
        $('#completed').show();
        $endImage.fadeIn(500);
        $tapNum.find('i').css({
          'color': '#f80'
        });
        $playTime.find('i').css({
          'color': '#f80'
        });
      }
    }
完成範例:http://jqmdesigner.appspot.com/designer.html#&ref=6248894153359360
就這樣,就完成了一個九宮格的遊戲囉!