[Test] 如何撰寫測試程式?
背景:
我們都知道測試對軟體品質的重要性,這邊就不再贅述。然而我們最常碰到有關測試的第一個問題通常都是『該如何撰寫測試程式?』。
場景描述:
我的網站裡面有一個使用者登入頁面,頁面上的功能是透過「LoginLibrary組件」裡提供的功能來檢查使用者輸入的帳號及密碼是否相符。
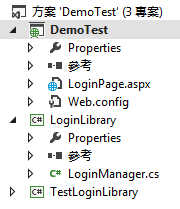
首先我們先看一下這次要做的專案內容有哪些。
- DemoTest: 這是我們的網站,裡面只有「LoginPage.aspx」一個WebForm網頁
- LoginLibrary: 這個組件的功能是將商業邏輯封裝到LogingManager類別,這裡的商業邏輯很簡單,就是「檢查使用者輸入的帳號及密碼是否相符」
- TestLoginLibrary: 這個測試專案就是我們擺放測試程式的地方
WebForm頁面
<%@ Page Language="C#" AutoEventWireup="true" CodeBehind="LoginPage.aspx.cs" Inherits="DemoTest.LoginPage" %>

<!DOCTYPE html>

<html xmlns="http://www.w3.org/1999/xhtml">
<head runat="server">
<meta http-equiv="Content-Type" content="text/html; charset=utf-8"/>
    <title></title>
</head>
<body>
    <form id="form1" runat="server">
    <div>

        <asp:Label ID="Label1" runat="server" Text="Username"></asp:Label>
 <asp:TextBox ID="TextBoxUsername" runat="server"></asp:TextBox><br />
        <asp:Label ID="Label2" runat="server" Text="Password"></asp:Label>
 <asp:TextBox ID="TextBoxPassword" runat="server"></asp:TextBox> <br />
        <asp:Button ID="ButtonLogin" runat="server" Text="Button" OnClick="ButtonLogin_Click" /><br />
        <asp:Label ID="LabelLoginStatus" runat="server" Text=""></asp:Label>
    </div>
    </form>
</body>
</html>
cs檔
using System;
using LoginLibrary;

namespace DemoTest
{
    ///
    /// LoginPage
    ///
    public partial class LoginPage : System.Web.UI.Page
    {
        protected void Page_Load(object sender, EventArgs e)
        {
        }

        protected void ButtonLogin_Click(object sender, EventArgs e)
        {
            string username = this.TextBoxUsername.Text;
            string password = this.TextBoxPassword.Text;

            LoginManager loginManager = new LoginManager();
            bool isLogin = loginManager.IsPasswordCorrect(username, password);

            if (isLogin)
            {
                LabelLoginStatus.Text = "Success";
            }
            else
            {
                LabelLoginStatus.Text = "Failed";
            }
        }
    }
}
單元測試:
單元測試的目標就是取出我們程式中的某個邏輯片段,讓其獨立出來然後檢測該段程式是否有合乎我們的預期。在這裡我們就針對商業邏輯的部分來撰寫單元測試!先來看一下LoginManager類別,類別裡只有一個Public的方法。
方法簽章如下:
public bool IsPasswordCorrect(string username, string passwordFromUI)
方法內容如下:
namespace LoginLibrary
{
    public class LoginManager
    {
        ///
        /// 檢查使用者從UI輸入的密碼是否與資料庫相符
        ///
        public bool IsPasswordCorrect(string username, string passwordFromUI)
        {
            string passwordFromDB = this.GetPasswordFromDB(username);
            return passwordFromUI == passwordFromDB;
        }

        ///
        /// 模擬透過DB取密碼
        ///
        private string GetPasswordFromDB(string useranme)
        {
            return "password";
        }
    }
}
接著我們在測試專案裡面新增一個TestLoginManager的類別,然後我們針對IsPasswordCorrect的方法來寫單元測試。這邊我們會看到測試方法命名的規則會是「類別名稱_方法名稱_自訂內容」,而這樣做的好處是當我們有很多個測試方法時,我們可以很清楚的從測試總管當中找到對應的測試方法!當撰寫測試方法內容時,我們可以透過3A(Arrange,Act,Assert)原則來清楚表達整個步驟。
using System;
using LoginLibrary;
using Microsoft.VisualStudio.TestTools.UnitTesting;

namespace TestLoginLibrary
{
    [TestClass]
    public class TestLoginManager
    {
        private LoginManager loginManager;

        [TestInitialize]
        public void TestInitialize()
        {
            this.loginManager = new LoginManager();
        }

        [TestMethod]
        public void LoginManager_IsPasswordCorrect_密碼正確()
        {
            //// arrange
            bool expected = true;
            string username = "username";
            string password = "password";

            //// act
            bool actual = this.loginManager.IsPasswordCorrect(username, password);

            //// assert
            Assert.AreEqual(expected, actual);
        }

        [TestMethod]
        public void LoginManager_IsPasswordCorrect_密碼失敗()
        {
            //// arrange
            bool expected = false;
            string username = "username";
            string password = "wrong password";

            //// act
            bool actual = this.loginManager.IsPasswordCorrect(username, password);

            //// assert
            Assert.AreEqual(expected, actual);
        }
    }
}
整合測試:
整合測試可以視為單元測試邏輯的延伸,可以幫助我們測試模組與模組間的互動。在這個場景下,我們想要測試WebForm網頁與LoginLibrary組件之間的互動是否如預期。在這裡我們會用到SpecFlow套件以及Selenium WebDriver的套件,請先透過NuGet裝起來。

Step 1 撰寫Feature檔: 我們透過Feature檔來描述我們想要測試的行為是甚麼,而Feature檔裡是透過Step(步驟)來定義測試行為
Feature: SpecFlowFeature_Login
	In order to 驗證使用者輸入的帳密是否正確
	As a LoginLibrary
	I want to 檢查使用者輸入的帳密是否正確

@mytag
Scenario: 使用者提供正確的帳號及密碼
	Given 使用者進入登入頁面
	And 輸入帳號及密碼
	When 使用者點選送出按鈕
	Then 使用者看到成功訊息
Step 2 產生步驟定義: 在Feature檔上按右鍵,點選「Generate Step Definitions」,SpecFlow會自動幫我們產生一個步驟定義檔(SpecFlowFeature_LoginSteps.cs)
using System;
using TechTalk.SpecFlow;

namespace TestLoginLibrary
{
    [Binding]
    public class SpecFlowFeature_LoginSteps
    {
        [Given(@"使用者進入登入頁面")]
        public void Given使用者進入登入頁面()
        {
            ScenarioContext.Current.Pending();
        }

        [Given(@"輸入帳號及密碼")]
        public void Given輸入帳號及密碼()
        {
            ScenarioContext.Current.Pending();
        }

        [When(@"使用者點選送出按鈕")]
        public void When使用者點選送出按鈕()
        {
            ScenarioContext.Current.Pending();
        }

        [Then(@"使用者看到成功訊息")]
        public void Then使用者看到成功訊息()
        {
            ScenarioContext.Current.Pending();
        }
    }
}
Step 3 透過Firefox錄製行為腳本後再轉存為C#測試cs檔

Step 4 把轉存C#測試cs檔的內容複製到步驟定義檔(SpecFlowFeature_LoginSteps.cs)裡對應的Step去
using System;
using System.Text;
using NUnit.Framework;
using OpenQA.Selenium;
using OpenQA.Selenium.Firefox;
using TechTalk.SpecFlow;

namespace TestLoginLibrary
{
    [Binding]
    public class SpecFlowFeature_LoginSteps
    {
        private IWebDriver driver;
        private StringBuilder verificationErrors;
        private string baseURL;

        [BeforeScenario]
        public void SetupTest()
        {
            driver = new FirefoxDriver();
            baseURL = "http://localhost:1104/";
            verificationErrors = new StringBuilder();
        }

        [AfterScenario]
        public void TeardownTest()
        {
            try
            {
                driver.Quit();
            }
            catch (Exception)
            {
                // Ignore errors if unable to close the browser
            }
            Assert.AreEqual("", verificationErrors.ToString());
        }

        [Given(@"使用者進入登入頁面")]
        public void Given使用者進入登入頁面()
        {
            driver.Navigate().GoToUrl(baseURL + "/LoginPage.aspx");
        }

        [Given(@"輸入帳號及密碼")]
        public void Given輸入帳號及密碼()
        {
            driver.FindElement(By.Id("TextBoxUsername")).Clear();
            driver.FindElement(By.Id("TextBoxUsername")).SendKeys("username");
            driver.FindElement(By.Id("TextBoxPassword")).Clear();
            driver.FindElement(By.Id("TextBoxPassword")).SendKeys("password");
        }

        [When(@"使用者點選送出按鈕")]
        public void When使用者點選送出按鈕()
        {
            driver.FindElement(By.Id("ButtonLogin")).Click();
        }

        [Then(@"使用者看到成功訊息")]
        public void Then使用者看到成功訊息()
        {
            string actual = driver.FindElement(By.Id("LabelLoginStatus")).Text;
            Assert.AreEqual("Success", actual);
        }
    }
}
Step 5 修改測試專案的App.config檔案,將UnitTestProvider改為MsTest

Step 6 按下Ctrl + R , A 開始測試

參考: