[Angular2官方tutorial學習04]Routing:RouterModule.forRoot,router-outlet的template樣版概念
雖然聲稱SPA,不過當然還是有很多的頁面功能需要切換來切換去,這時候routing就要出場囉
@執行下列指令以產生routing的模組
一般來說會用app-routing這個名稱來當作routing的模組,flat則是讓angular cli在產生相關檔案的時候,不要新增routing專用的資料夾並放在裡面,而是直接放在src/app資料夾裡面,module=app則是請angular cli順便r加入相關的import到AppModule(即src\app\app.module.ts)
ng generate module app-routing --flat --module=app
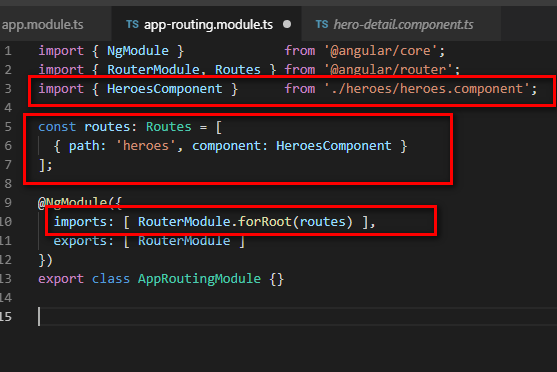
接著打開剛剛被anglar cli新增的檔案src/app/app-routing.module.ts,把原本的內容全部刪除後,取代成下面這樣,這就是for routing專用的基本設定
import { NgModule }             from '@angular/core';
import { RouterModule, Routes } from '@angular/router';

@NgModule({
  exports: [ RouterModule ]
})
export class AppRoutingModule {}
@接著來試著把我們剛才的Hero網頁加入routing之中,原本我們的網址是localhost:4200,現在要把他改為localhost:4200/heroes
同樣在src/app/app-routing.module.ts檔案裡,加入下列內容
import { HeroesComponent }      from './heroes/heroes.component';

const routes: Routes = [
  { path: 'heroes', component: HeroesComponent }
];
再把下面這段import加入@NgModule裡,這段的功用是讓router開始監控網址的變化
imports: [ RouterModule.forRoot(routes) ],
最後src\app\app-routing.module.ts檔案看起來會像是這樣
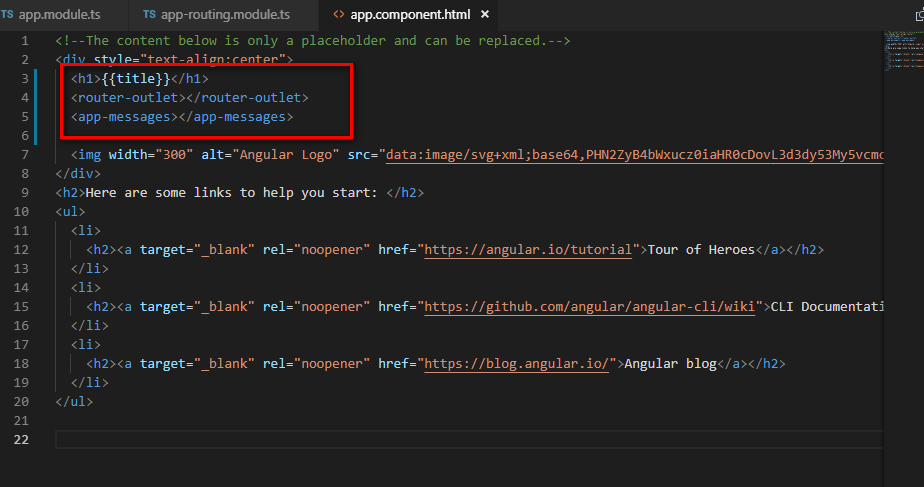
@接著打開src/app/app.component.html,把<app-heroes></app-heroes>取代為下面
router-outlet關鍵字一旦出現,可以說就是以往asp.net webform或是asp.net mvc的template樣版的概念出現了!
<router-outlet></router-outlet>
最後src\app\app.component.html看起來如下
此時的localhost:4200不再載入heros清單,當你開啟網址localhost:4200/heroes的時候,才會載入heros清單,而且載入的位置就是會在router-outlet
此時index.html變的比較像是asp.net MVC的樣版的功能或是asp.net web forms的master template的樣版功能
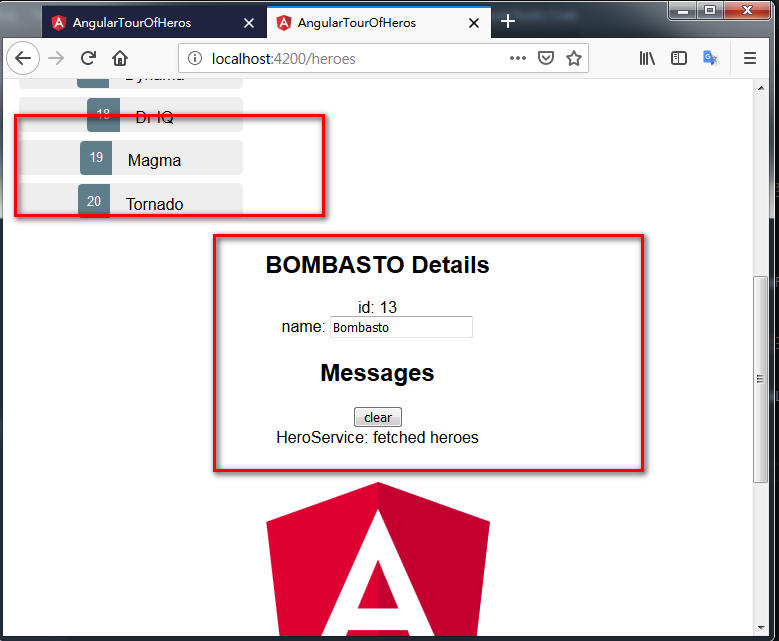
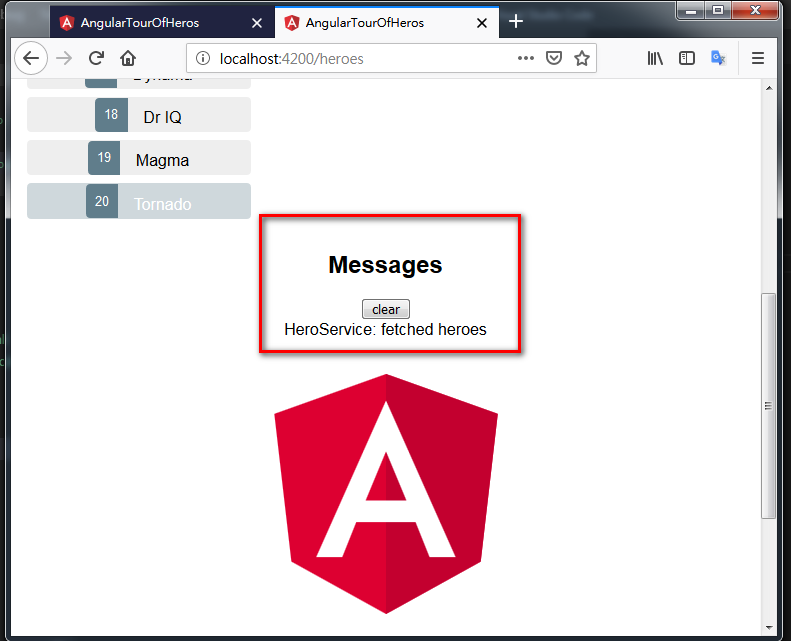
此時打開網頁http://localhost:4200/heroes,heros清單出現囉
這時候如果你去打開localhost:4200的話,是不會看到任何heros的喔:
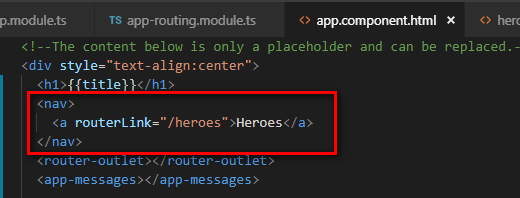
@然後是要試著加入我們第一個超連結,打開src/app/app.component.html之後,將下面超連結加入在<router-outlet></router-outlet>的上面
<nav>
  <a routerLink="/heroes">Heroes</a>
</nav>
加好之後長這樣
這個nav超連結heros的位置就會出現在<router-outlet></router-outlet>的位置囉
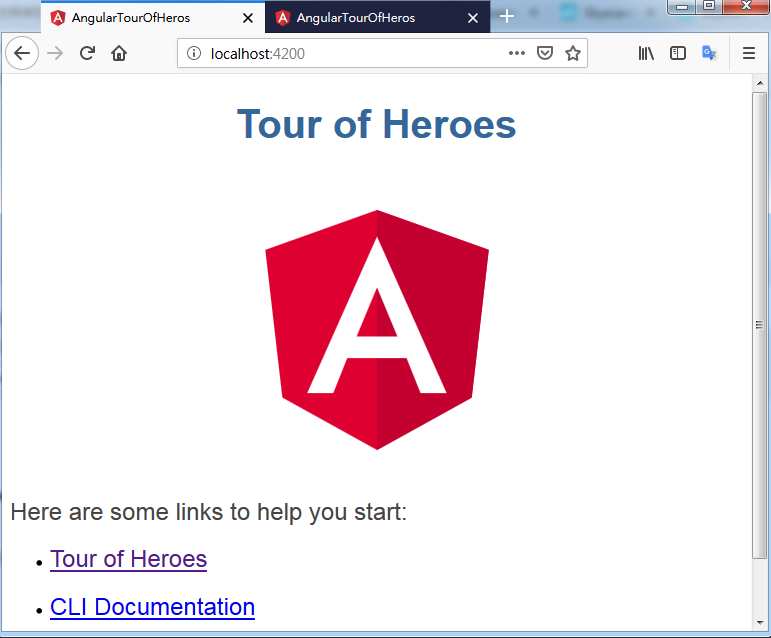
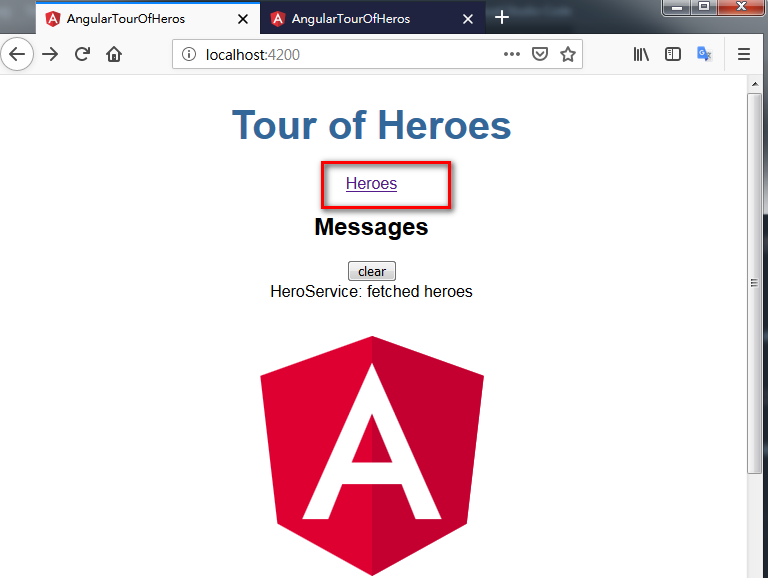
打開瀏覽器localhost:4200一看,果然有heros的超連結囉!
@再來我們要加入一個dashboard計分版component,請執行下列angular cli指令
dashboard是用來顯示排行前幾名的hero的,之後會在src\app\dashboard\dashboard.component.ts裡面會設定為取得top 4前四筆
ng g c dashboard
其實dashboard也是用來顯示hero的清單,只有運用了到目前為止所學習到的angular2的知識,並沒有用到其他新的知識,很簡單,因此這邊就不多做說明,請直接把下面三個檔案的內容自行貼上喔
1. src/app/dashboard/dashboard.component.html
<h3>Top Heroes</h3>
<div class="grid grid-pad">
  <a *ngFor="let hero of heroes" class="col-1-4">
    <div class="module hero">
      <h4>{{hero.name}}</h4>
    </div>
  </a>
</div>
2. src/app/dashboard/dashboard.component.ts
import { Component, OnInit } from '@angular/core';
import { Hero } from '../hero';
import { HeroService } from '../hero.service';

@Component({
  selector: 'app-dashboard',
  templateUrl: './dashboard.component.html',
  styleUrls: [ './dashboard.component.css' ]
})
export class DashboardComponent implements OnInit {
  heroes: Hero[] = [];

  constructor(private heroService: HeroService) { }

  ngOnInit() {
    this.getHeroes();
  }

  getHeroes(): void {
    this.heroService.getHeroes()
      .subscribe(heroes => this.heroes = heroes.slice(1, 5));
  }
}
3. src/app/dashboard/dashboard.component.css
/* DashboardComponent's private CSS styles */
[class*='col-'] {
  float: left;
  padding-right: 20px;
  padding-bottom: 20px;
}
[class*='col-']:last-of-type {
  padding-right: 0;
}
a {
  text-decoration: none;
}
*, *:after, *:before {
  -webkit-box-sizing: border-box;
  -moz-box-sizing: border-box;
  box-sizing: border-box;
}
h3 {
  text-align: center; margin-bottom: 0;
}
h4 {
  position: relative;
}
.grid {
  margin: 0;
}
.col-1-4 {
  width: 25%;
}
.module {
  padding: 20px;
  text-align: center;
  color: #eee;
  max-height: 120px;
  min-width: 120px;
  background-color: #607d8b;
  border-radius: 2px;
}
.module:hover {
  background-color: #eee;
  cursor: pointer;
  color: #607d8b;
}
.grid-pad {
  padding: 10px 0;
}
.grid-pad > [class*='col-']:last-of-type {
  padding-right: 20px;
}
@media (max-width: 600px) {
  .module {
    font-size: 10px;
    max-height: 75px; }
}
@media (max-width: 1024px) {
  .grid {
    margin: 0;
  }
  .module {
    min-width: 60px;
  }
}
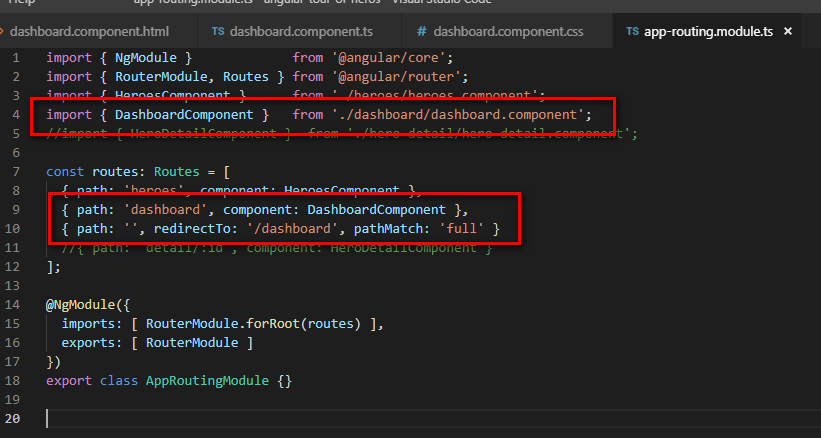
dashboard加入這個元件之後,當然要幫他的routing也設定一下,再次打開src/app/app-routing.module.ts,import下面這個
import { DashboardComponent } from './dashboard/dashboard.component';
然後把path的設定也加入到const routes: Routes這個陣列裡面
{ path: 'dashboard', component: DashboardComponent },
既然都叫做dashboard了,當然預設的首頁就要自動導向他,因此繼續把下面的path設定也加入const routes: Routes這個陣列裡面
下面的寫法就是當path是fully完全的等於空字串的時候,重新導向到/dashboard這個網址
{ path: '', redirectTo: '/dashboard', pathMatch: 'full' },
最後src\app\app-routing.module.ts的內容長這樣
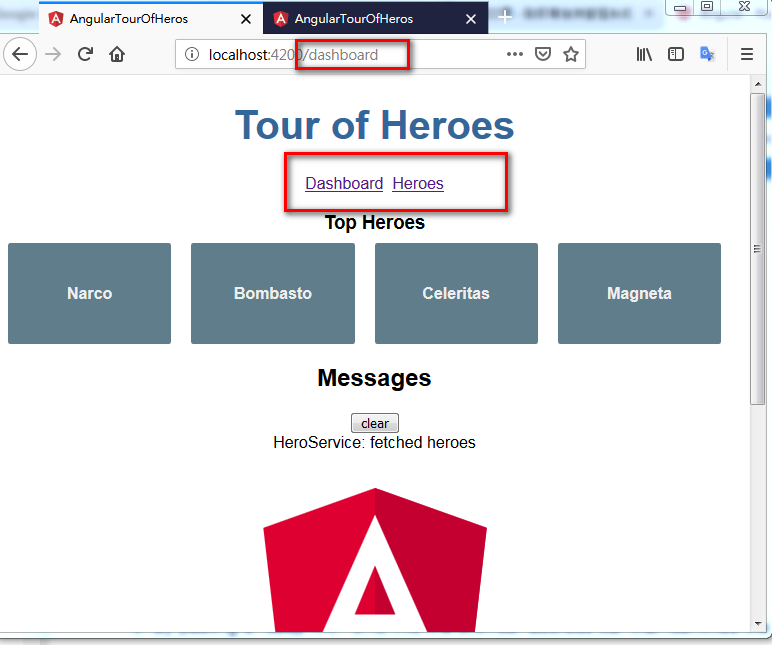
最後再於src/app/app.component.html加入一個dashboard超連結,讓在heros頁面的使用者可以直接連回dashboard喔
<a routerLink="/dashboard">Dashboard</a>
這時候再打開瀏覽器首頁localhost:4200一看,果然自動導向到dashboard囉
@下一步是要把hero detail獨立來到另外一個routing網址喔
首先打開heroes/heroes.component.html,把裡面的<app-hero-detail>刪除,然後打開瀏覽器一看,果然hero的detail資訊都不見了
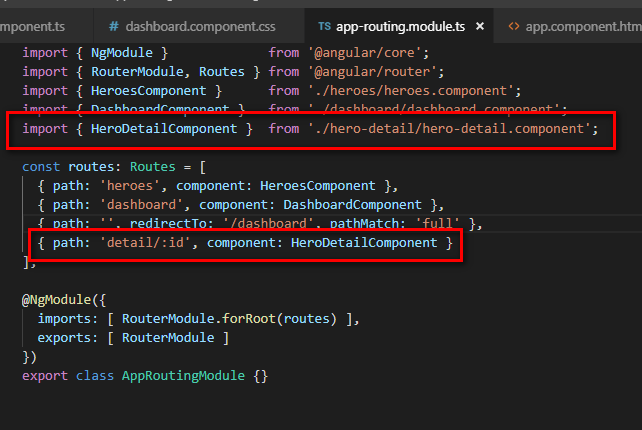
然後打開src/app/app-routing.module.ts,加入下列hero detail的import
import { HeroDetailComponent } from './hero-detail/hero-detail.component';
並且把下列路徑設定加入到const routes: Routes這個陣列裡面
{ path: 'detail/:id', component: HeroDetailComponent },
以上都加進去之後,src\app\app-routing.module.ts看起來結果像是這樣
然後要在dashboard顯示的hero清單加入超連結,每一筆hero都需要包含一個超連結去連到herodetail網頁,請打開src/app/dashboard/dashboard.component.html
把*ngFor那段改成下面這樣,你可以發現其實就是加入一個routerLink="/detail/{{hero.id}}"的超連結而已
<a *ngFor="let hero of heroes" class="col-1-4"
    routerLink="/detail/{{hero.id}}">
  <div class="module hero">
    <h4>{{hero.name}}</h4>
  </div>
</a>
同樣的如法炮製在src/app/heroes/heroes.component.html,也幫他加入一個routerLink="/detail/{{hero.id}}",加完之後長這樣
<h2>My Heroes</h2>
<ul class="heroes">
  <li *ngFor="let hero of heroes">
    <a routerLink="/detail/{{hero.id}}">
      <span class="badge">{{hero.id}}</span> {{hero.name}}
    </a>
  </li>
</ul>
接著再貼入官方提供最新版的heroes.component.css
/* HeroesComponent's private CSS styles */
.heroes {
  margin: 0 0 2em 0;
  list-style-type: none;
  padding: 0;
  width: 15em;
}
.heroes li {
  position: relative;
  cursor: pointer;
  background-color: #EEE;
  margin: .5em;
  padding: .3em 0;
  height: 1.6em;
  border-radius: 4px;
}

.heroes li:hover {
  color: #607D8B;
  background-color: #DDD;
  left: .1em;
}

.heroes a {
  color: #888;
  text-decoration: none;
  position: relative;
  display: block;
  width: 250px;
}

.heroes a:hover {
  color:#607D8B;
}

.heroes .badge {
  display: inline-block;
  font-size: small;
  color: white;
  padding: 0.8em 0.7em 0 0.7em;
  background-color: #607D8B;
  line-height: 1em;
  position: relative;
  left: -1px;
  top: -4px;
  height: 1.8em;
  min-width: 16px;
  text-align: right;
  margin-right: .8em;
  border-radius: 4px 0 0 4px;
}
@而原本herodetail的component是透過在同一個頁面下的heros component的click事件來取得該hero的資料,不過現在已經把hero跟herodetail切割成不同的頁面了,所以click事件應該要刪除,打開src/app/heroes/heroes.component.ts,把selectedHero變數刪除,還有把onSelect()事件也刪除

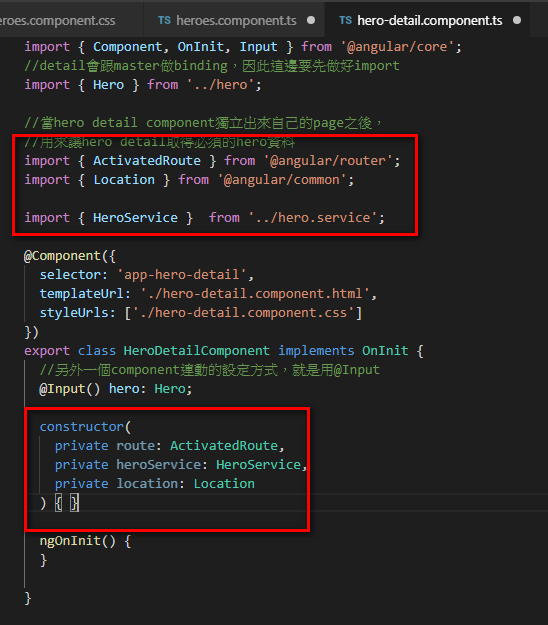
@再來下一步當然是要讓hero detail元件能夠有辦法讀取到db的hero資料,方能正確的在畫面上顯示,打開src/app/hero-detail/hero-detail.component.ts
加入下面三個import
import { ActivatedRoute } from '@angular/router';
import { Location } from '@angular/common';

import { HeroService }  from '../hero.service';
並且在constructor裡面加入這三行服務(官方叫做inject service,真是OOXX不習慣的說法,有夠饒舌)
ActivateRoute關鍵字就是用來接收網址的id參數,例如localhost:4200/detailhero/id的id參數
Location關鍵字是內建的angular service,專門用來做回到上一頁功能的
private route: ActivatedRoute,
  private heroService: HeroService,
  private location: Location
加好之後,src\app\hero-detail\hero-detail.component.ts最後長這樣
繼續在ngOnInit裡面呼叫getHero(id)用來取得資料(只是getHero(id)的service還沒建立就是了,下一步就會建立了)
ngOnInit(): void {
  this.getHero();
}

getHero(): void {
  const id = +this.route.snapshot.paramMap.get('id');
  this.heroService.getHero(id)
    .subscribe(hero => this.hero = hero);
}
@這一步驟當然就是要在服務建立getHero(id),打開src/app/hero.service.ts,加入下面這個method
注意一下messageService.add裡面用的是反引號`,這是為了要把${id}動態的加入到訊息當中,沒什麼特別,就是方便查看狀態而已
getHero(id: number): Observable<Hero> {
  // TODO: send the message _after_ fetching the hero
  this.messageService.add(`HeroService: fetched hero id=${id}`);
  return of(HEROES.find(hero => hero.id === id));
}
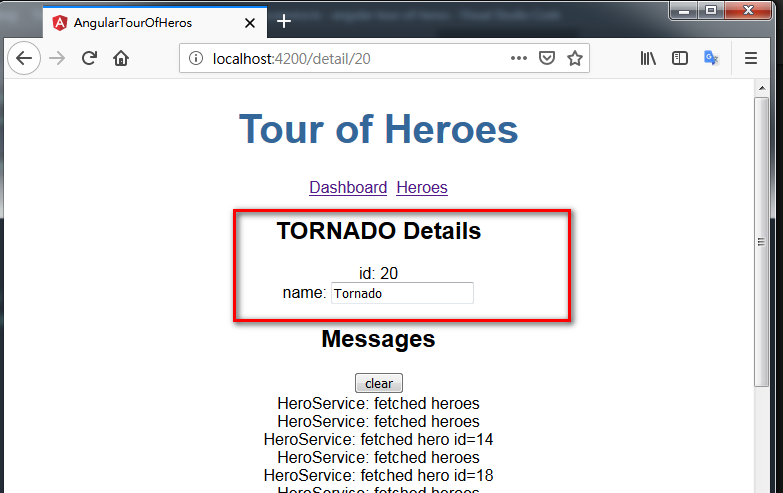
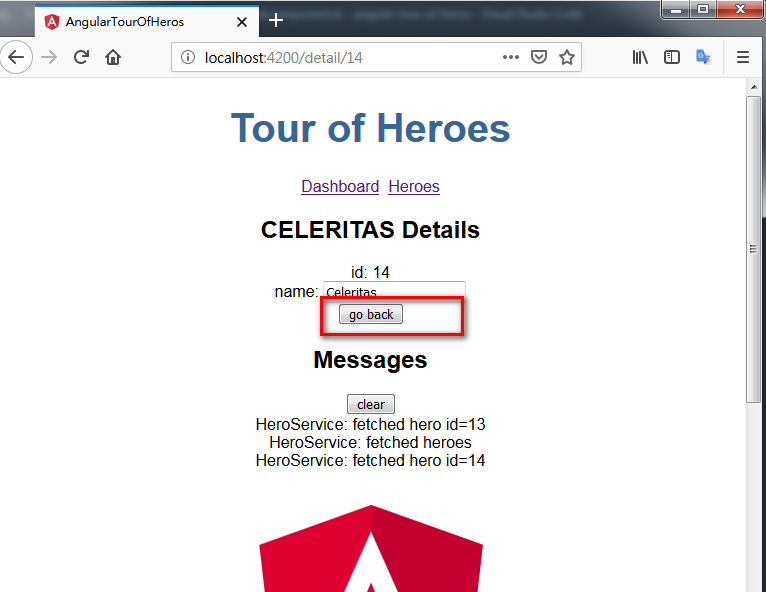
此時打開瀏覽器一看,hero detail專用網址已經正常運作囉 XD
@剛剛有提到回到上一頁的功能,現在當然要加入,請打開src/app/hero-detail/hero-detail.component.html
在*ngIf裡面加入一個回到上一頁按鈕
<button (click)="goBack()">go back</button>
並且設定回到上一頁的功能,請打開src/app/hero-detail/hero-detail.component.ts
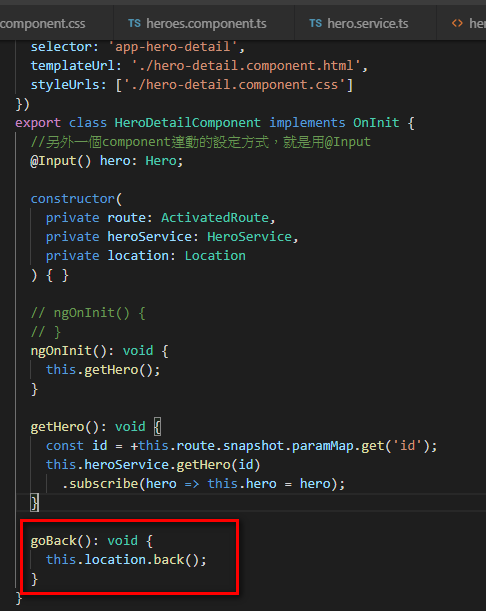
定義一下goBack()這個method,稍微注意一下:location.back()是用angular service內建的回到上一頁功能實做的喔,這並非傳統javascript的回到上一頁的語法
goBack(): void {
  this.location.back();
}
最後src\app\hero-detail\hero-detail.component.ts長這樣
當然,回到上一頁的按鈕也出現了!
結束了!官方的angular tutorial的service部分的課程終於結束了!
謝天謝地
不過後面還有最後一個http的部分的課程,是關於如何使用http client Orz
附上最後完成的程式碼的超連結:(這三個的程式碼應該都幾乎一樣)
官網的live example
官網提供的整個壓縮檔直接下載
我這邊的dropbox直接下載
參考資料:
Add the AppRoutingModule - Angular Official Tutorial
https://angular.io/tutorial/toh-pt5