[Angular2官方tutorial學習05]Http:HttpClient,Error handling,CRUD
angular裡面,對於db的操作,幾乎都是透過web service的方式存取,不論是新增、刪除、修改都是這樣。而HttpClient模組就是angular最常見的http通訊方式。
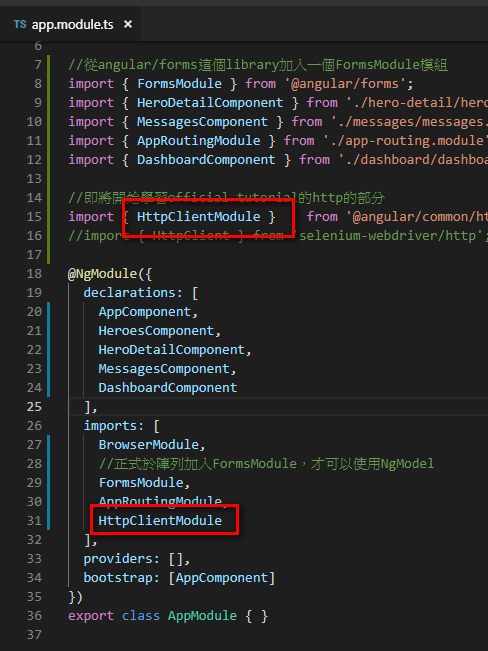
請打開src/app/app.module.ts ,加入下列import以使用HttpClient
import { HttpClientModule } from '@angular/common/http';
並將HttpClient加入到@NgModule的imports陣列,最後src/app/app.module.ts長這樣
@由於tutorial並不存在server讓HttpClient去做request,所以要安裝in memory request來做假的request,請執行下列指令
npm install angular-in-memory-web-api --save
並且在src/app/app.module.ts加入下列import
ps. InMemoryDataService在後續步驟會新增這個typescript檔,因此此時會出現錯誤,先不理他
import { HttpClientInMemoryWebApiModule } from 'angular-in-memory-web-api';
import { InMemoryDataService }  from './in-memory-data.service';
還要把HttpClientInMemoryWebApiModule加入到@NgModule.imports的陣列裡面
記得下面這個HttpClientInMemoryWebApiModule的位置一定要放在HttpClientModule的後面
HttpClientInMemoryWebApiModule.forRoot(
  InMemoryDataService, { dataEncapsulation: false }
)
最後src/app/app.module.ts長這樣

再來產生InMemoryDataService,執行下列指令
ng g s InMemoryData
打開src/app/in-memory-data.service.ts,內容改成如下
這個Service會傳回一堆假資料
其他的.ts要是想呼叫這個假的API,只要把api呼叫的網址設定為 api/變數名稱即可,例如下面有個heros陣列變數,只要透過api/heros就可以取得下面的heros假資料了。
import { InMemoryDbService } from 'angular-in-memory-web-api';
import { Hero } from './hero';
import { Injectable } from '@angular/core';

@Injectable({
  providedIn: 'root',
})
export class InMemoryDataService implements InMemoryDbService {
  createDb() {
    const heroes = [
      { id: 11, name: 'Mr. Nice' },
      { id: 12, name: 'Narco' },
      { id: 13, name: 'Bombasto' },
      { id: 14, name: 'Celeritas' },
      { id: 15, name: 'Magneta' },
      { id: 16, name: 'RubberMan' },
      { id: 17, name: 'Dynama' },
      { id: 18, name: 'Dr IQ' },
      { id: 19, name: 'Magma' },
      { id: 20, name: 'Tornado' }
    ];
    return {heroes};
  }

  // Overrides the genId method to ensure that a hero always has an id.
  // If the heroes array is empty,
  // the method below returns the initial number (11).
  // if the heroes array is not empty, the method below returns the highest
  // hero id + 1.
  genId(heroes: Hero[]): number {
    return heroes.length > 0 ? Math.max(...heroes.map(hero => hero.id)) + 1 : 11;
  }
}
然後請把src\app\mock-heroes.ts檔案刪除了,假資料以後就用in-memory-service來提供
程式碼目前暫時無法正確編譯,因此瀏覽器網頁無法打開,沒關係,我們繼續以下的步驟進行修正
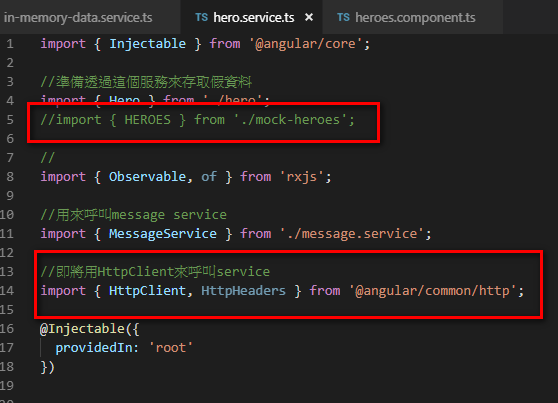
@接著打開src/app/hero.service.ts,import下列內容,表示hero service即將用HttpClient呼叫假的in-memory-service
import { HttpClient, HttpHeaders } from '@angular/common/http';
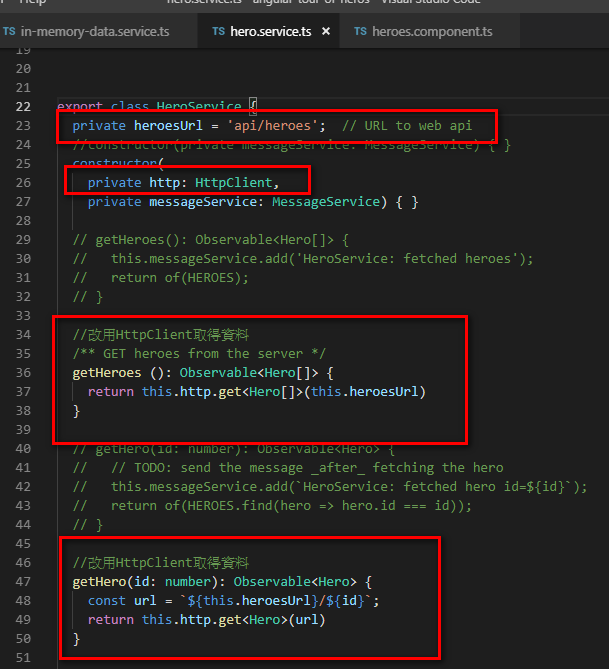
並且在constructor裡面加入一個HttpClient物件如下(messageService是之前的tutorial就加好了,不是這邊加的)
constructor(
  private http: HttpClient,
  private messageService: MessageService) { }
順便加一個寫log的method
/** Log a HeroService message with the MessageService */
private log(message: string) {
  this.messageService.add(`HeroService: ${message}`);
}
還是在src\app\hero.service.ts裡面編輯,定義下面的url,用來呼叫API用的
private heroesUrl = 'api/heroes'; // URL to web api
再來把getHeros()這個method修改如下,改成用HttpClient取得資料
/** GET heroes from the server */
getHeroes (): Observable<Hero[]> {
  return this.http.get<Hero[]>(this.heroesUrl)
}
同樣的getHero()這個method也要修改如下,改用HttpClient取得資料
//改用HttpClient取得資料
  getHero(id: number): Observable<Hero> {
    const url = `${this.heroesUrl}/${id}`;
    return this.http.get<Hero>(url)
  }
最後的src\app\hero.service.ts長這樣
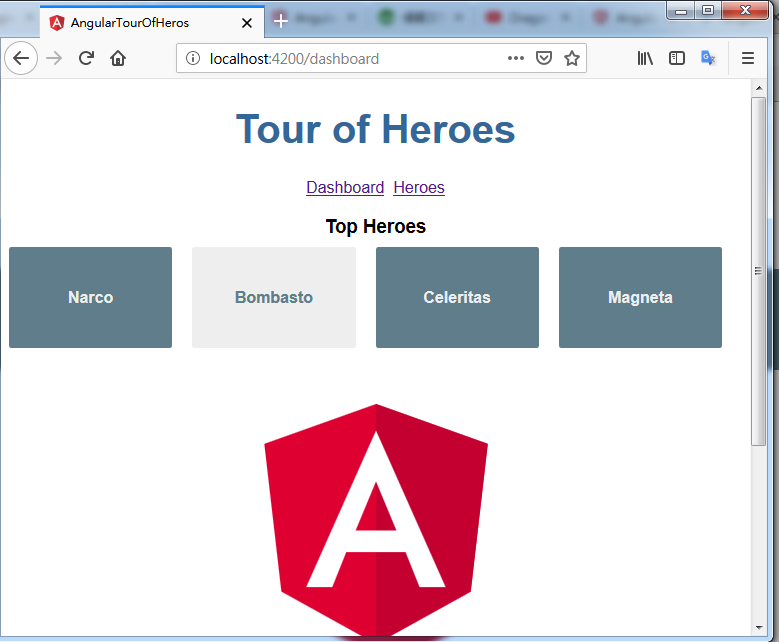
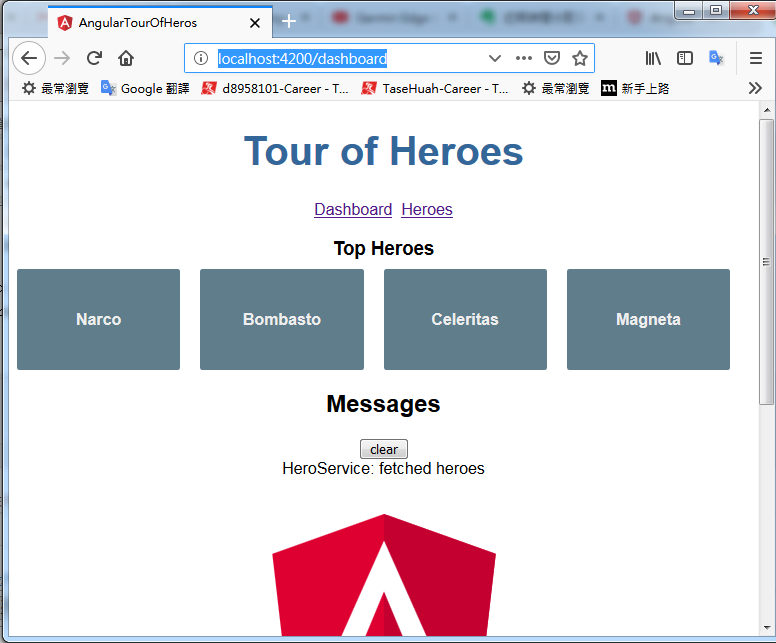
現在你可以執行ng serve並打開瀏覽器,可以正常開啟網頁了!
目前為止的程式碼你可以在這邊下載
https://www.dropbox.com/s/g6qbdsidfmhtxqr/angular-tour-of-heros%E5%AE%8C%E6%88%90http%E7%AC%AC%E4%B8%80%E6%AD%A5.zip?dl=0
@呼叫API的過程中,是有可能發生錯誤的,因此接下來要介紹error handling
一樣打開檔案src\app\hero.service.ts,加入下面的import
import { catchError, map, tap } from 'rxjs/operators';
並且把原本的getHeros()這個method改成下面這樣
pipe + catchError這樣的關鍵字在angular就是用來做error handling的
getHeroes (): Observable<Hero[]> {
  return this.http.get<Hero[]>(this.heroesUrl)
    .pipe(
      catchError(this.handleError('getHeroes', []))
    );
}
同一個檔案,繼續加入下面這個method,這是官方建議的error handling的method
功用主要就是在console寫個錯誤的log還有在瀏覽器畫面上寫個錯誤的log
最後傳回一個空的集合,讓專案的後續程式碼仍可以正常執行,才不會直接讓程式碼翹辮子在那邊不動。
/**
 * Handle Http operation that failed.
 * Let the app continue.
 * @param operation - name of the operation that failed
 * @param result - optional value to return as the observable result
 */
private handleError<T> (operation = 'operation', result?: T) {
  return (error: any): Observable<T> => {

    // TODO: send the error to remote logging infrastructure
    console.error(error); // log to console instead

    // TODO: better job of transforming error for user consumption
    this.log(`${operation} failed: ${error.message}`);

    // Let the app keep running by returning an empty result.
    return of(result as T);
  };
}
然後仍是在同一個檔案,更新getHeroes()這個method如下:
跟上面的版本比較起來是相差了一個tap關鍵字,其實就只是在"成功執行這個method"的時候,會觸發的一個事件,個人覺得在實務上還算蠻實用的!
/** GET heroes from the server */
getHeroes (): Observable<Hero[]> {
  return this.http.get<Hero[]>(this.heroesUrl)
    .pipe(
      tap(_ => this.log('fetched heroes')),
      catchError(this.handleError('getHeroes', []))
    );
}
再來仍是在同樣的檔案,更新getHero(id: number)這個method,加入了try catch機制如下
/** GET hero by id. Will 404 if id not found */
getHero(id: number): Observable<Hero> {
  const url = `${this.heroesUrl}/${id}`;
  return this.http.get<Hero>(url).pipe(
    tap(_ => this.log(`fetched hero id=${id}`)),
    catchError(this.handleError<Hero>(`getHero id=${id}`))
  );
}
打開瀏覽器看畫面,一如往常的沒變,哈~畢竟只是加入try catch機制,核心程式碼其實沒變
@如同所有的官方tutorial一樣,不論是python、MVC……,每一個都一定會介紹到CRUD,接下來就要介紹Update
打開src/app/hero-detail/hero-detail.component.html,加入一個按鈕,然後你會發現save()那邊有compile錯誤,save()這個method在下面的介紹就會加了,別著急
<button (click)="save()">save</button>
再來打開src/app/hero-detail/hero-detail.component.ts,加入save()這個method
同樣的,然後你會發現updateHero()那邊有compile錯誤,updateHero()這個method在下面的介紹就會加了,別著急
.subscribe(() => this.goBack());就是當this.heroService.updateHero()在執行完畢然後return 更新後的hero物件的時候,就執行goBack()回到上一頁
save(): void {
   this.heroService.updateHero(this.hero)
     .subscribe(() => this.goBack());
 }
打開src/app/hero.service.ts,加入updateHero (hero: Hero)這個method
關於http.put,如果你有寫過restful api,可能知道其實PUT就是資料庫的update的意思,注意一下put的url在這邊是this.heroesUrl,但是在實務上應該是RESTful API的服務才對。
程式碼寫到這邊,你可能又發現下面的httpOptions有編譯錯誤,別著急,下面的介紹就會補上,angular官網的tutorial常常來這套,久了你就會習慣的 :-/
/** PUT: update the hero on the server */
updateHero (hero: Hero): Observable<any> {
  return this.http.put(this.heroesUrl, hero, httpOptions).pipe(
    tap(_ => this.log(`updated hero id=${hero.id}`)),
    catchError(this.handleError<any>('updateHero'))
  );
}
一樣在src/app/hero.service.ts,加入httpOptions這個參數,加在import { MessageService }的下面一行,angular習慣把這類的參數放在類似global variable的位置。
這個參數是為了要表示我們這個http.put的服務,他的資料格式是JSON
const httpOptions = {
  headers: new HttpHeaders({ 'Content-Type': 'application/json' })
};
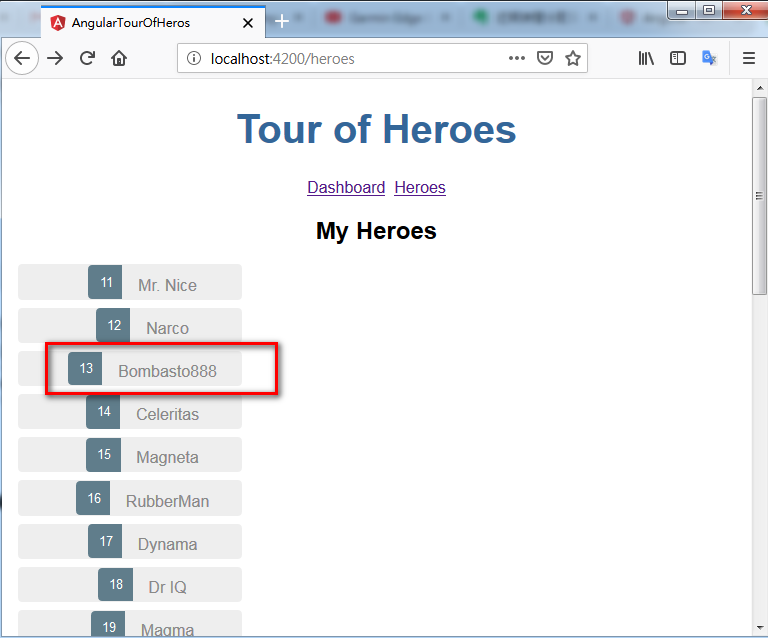
然後就可以打開瀏覽器,隨便測試改一個hero的姓名了,這裡是將其中一個hero的姓名後面加上888,改好之後當然別忘記按下save按鈕存檔
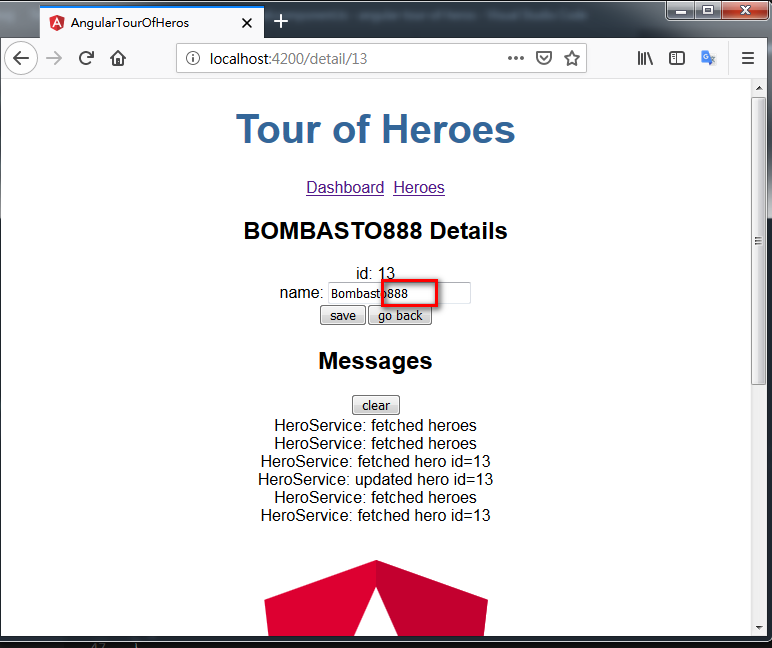
然後你會發現該hero的姓名已經被修改成功!恭喜你,革命已經成功!
不過同志仍須繼續努力 XD
@下一個要來示範如何新增資料
打開src/app/heroes/heroes.component.html,在</h2>的後面加入下面HTML
html語法很特殊,跟我往常認知不太像,不過~知道格式是這樣就可以了,反正不同框架都有不同的格式,習慣就好
<div>
  <label>Hero name:
    <input #heroName />
  </label>
  <!-- (click) passes input value to add() and then clears the input -->
  <button (click)="add(heroName.value); heroName.value=''">
    add
  </button>
</div>
再來於src/app/heroes/heroes.component.ts加入add(name: string),下方關鍵字PUSH就是新增資料的意思
此時你又會發現this.heroService.addHero({ name } as Hero)那邊有編譯錯誤,下面的介紹步驟就會補上,別著急
this.heroService.addHero({ name } as Hero)
.subscribe(hero => {
this.heroes.push(hero);
});
就是當this.heroService.addHero()回傳一個hero物件回來的時候,透過push()的動作把網頁上的hero清單加入新的一筆資料
add(name: string): void {
  name = name.trim();
  if (!name) { return; }
  this.heroService.addHero({ name } as Hero)
    .subscribe(hero => {
      this.heroes.push(hero);
    });
}
下一步驟打開src/app/hero.service.ts,加入下方這個method
注意一下,下面新增資料的寫法是http.post而不是put喔!
注意一下post的url在這邊是this.heroesUrl,但是在實務上應該是RESTful API的服務才對
/** POST: add a new hero to the server */
addHero (hero: Hero): Observable<Hero> {
  return this.http.post<Hero>(this.heroesUrl, hero, httpOptions).pipe(
    tap((hero: Hero) => this.log(`added hero w/ id=${hero.id}`)),
    catchError(this.handleError<Hero>('addHero'))
  );
}
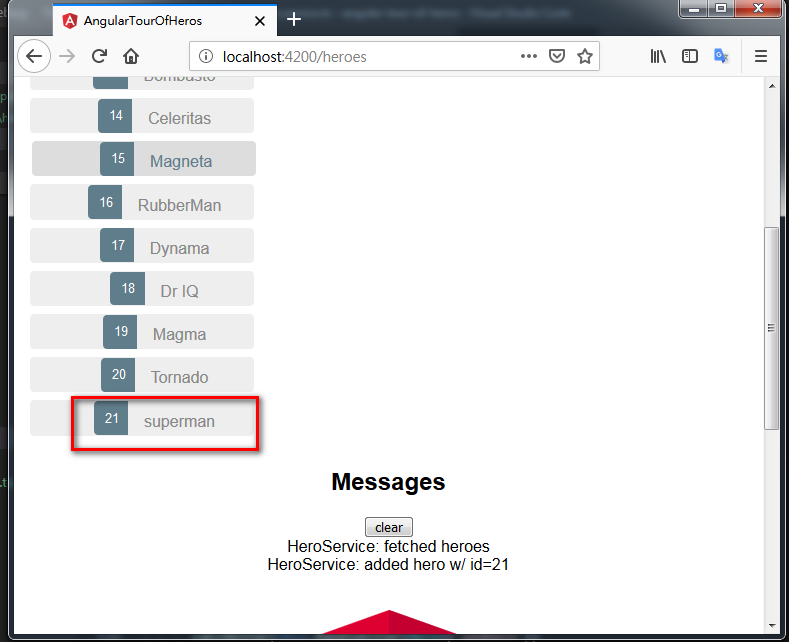
接著打開瀏覽器,試著新增一個hero,這邊新增一個Superman,記得按下add按鈕
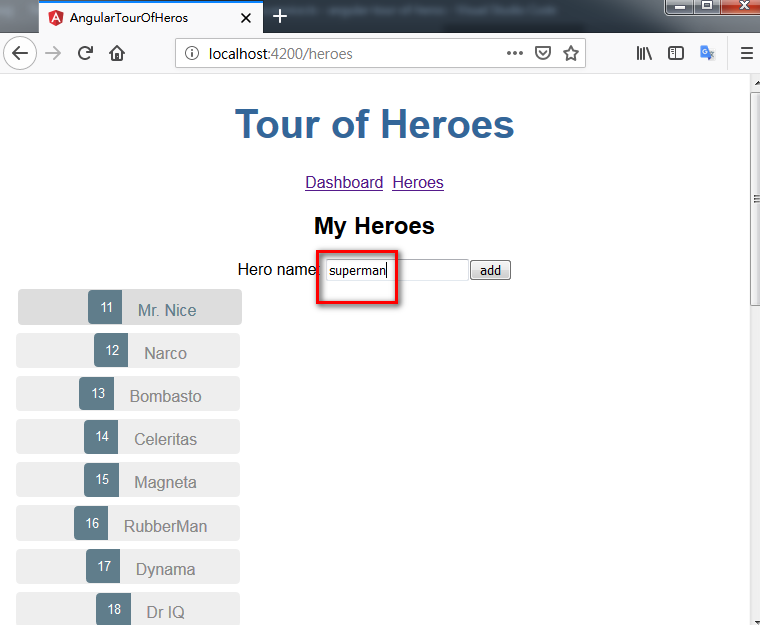
果然很輕易的就新增一筆superman的資料了!恭喜你用angular service新增資料成功!
@如果你常常看官方的tutorial,就知道接下來要講Delete功能的實做了
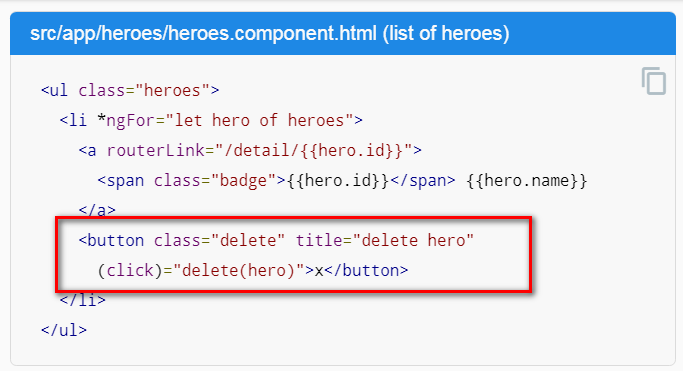
打開src/app/heroes/heroes.component.html,把delete按鈕加進去*ngFor裡面,就像是下面的截圖那樣
<button class="delete" title="delete hero"
  (click)="delete(hero)">x</button>
官網有提到,這時候要再更新一下css,請打開heroes/heroes.component.css,貼上下面官網提供的css
/* HeroesComponent's private CSS styles */
.heroes {
  margin: 0 0 2em 0;
  list-style-type: none;
  padding: 0;
  width: 15em;
}
.heroes li {
  position: relative;
  cursor: pointer;
  background-color: #EEE;
  margin: .5em;
  padding: .3em 0;
  height: 1.6em;
  border-radius: 4px;
}

.heroes li:hover {
  color: #607D8B;
  background-color: #DDD;
  left: .1em;
}

.heroes a {
  color: #888;
  text-decoration: none;
  position: relative;
  display: block;
  width: 250px;
}

.heroes a:hover {
  color:#607D8B;
}

.heroes .badge {
  display: inline-block;
  font-size: small;
  color: white;
  padding: 0.8em 0.7em 0 0.7em;
  background-color: #607D8B;
  line-height: 1em;
  position: relative;
  left: -1px;
  top: -4px;
  height: 1.8em;
  min-width: 16px;
  text-align: right;
  margin-right: .8em;
  border-radius: 4px 0 0 4px;
}

button {
  background-color: #eee;
  border: none;
  padding: 5px 10px;
  border-radius: 4px;
  cursor: pointer;
  cursor: hand;
  font-family: Arial;
}

button:hover {
  background-color: #cfd8dc;
}

button.delete {
  position: relative;
  left: 194px;
  top: -32px;
  background-color: gray !important;
  color: white;
}
下一步請接著打開src/app/heroes/heroes.component.ts,加入伺服器後端的delete(hero: Hero)程式碼
這邊你會發現this.heroService.deleteHero有編譯錯誤,別著急,會在下一個步驟補上
delete(hero: Hero): void {
  this.heroes = this.heroes.filter(h => h !== hero);
  this.heroService.deleteHero(hero).subscribe();
}
再來打開src/app/hero.service.ts,補上deleteHero (hero: Hero | number)這個服務
注意一下http.delete的url在這邊是this.heroesUrl,但是在實務上應該是RESTful API的服務才對
再注意一下http.delete是用來刪除資料的喔!
/** DELETE: delete the hero from the server */
deleteHero (hero: Hero | number): Observable<Hero> {
  const id = typeof hero === 'number' ? hero : hero.id;
  const url = `${this.heroesUrl}/${id}`;

  return this.http.delete<Hero>(url, httpOptions).pipe(
    tap(_ => this.log(`deleted hero id=${id}`)),
    catchError(this.handleError<Hero>('deleteHero'))
  );
}
現在可以打開瀏覽器測試一下刪除功能囉,下面我是打算先刪除Mr. Nice試試看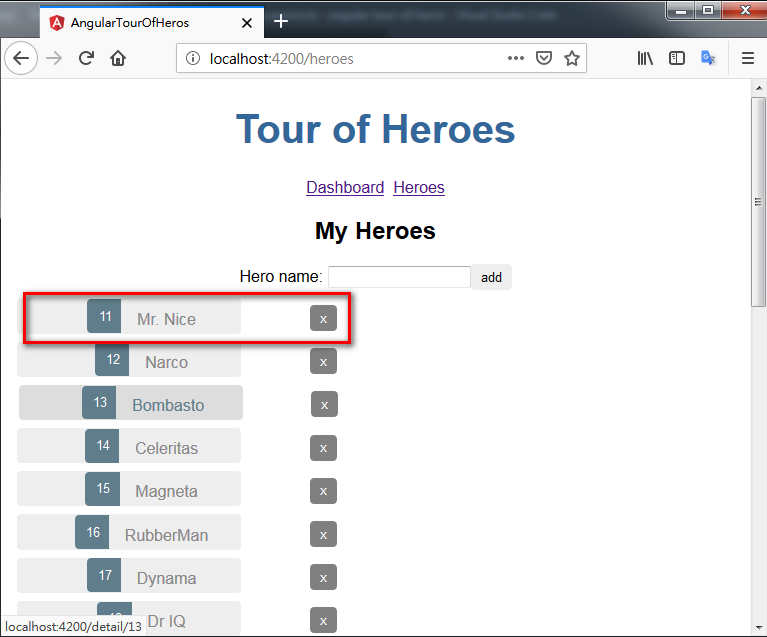
點下X按鈕之後,果然成功刪除Mr. Nice,第一筆已經不是Mr. Nice了,不過點下刪除按鍵時並沒有先提示"是否確認刪除",算是不太好的官方示範
 目前為止的程式碼,你可以在我的dropbox空間直接下載
@再來是要實做Search搜尋功能
先在src/app/hero.service.ts加入一個search服務,?name=${term}應該算是一個angular內建的json剖析功能,可以直接搜尋關鍵字name
官網沒針對這點做解釋,但應該是這樣
/* GET heroes whose name contains search term */
searchHeroes(term: string): Observable<Hero[]> {
  if (!term.trim()) {
    // if not search term, return empty hero array.
    return of([]);
  }
  return this.http.get<Hero[]>(`${this.heroesUrl}/?name=${term}`).pipe(
    tap(_ => this.log(`found heroes matching "${term}"`)),
    catchError(this.handleError<Hero[]>('searchHeroes', []))
  );
}
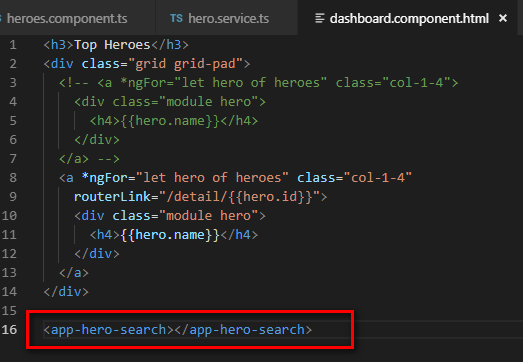
再來於src/app/dashboard/dashboard.component.html加入一個元件HeroSearchComponent(此component將會在後面步驟用angular cli指令建立)
<app-hero-search></app-hero-search>
然後於cmd執行angular cli指令來建立hero-search這個component
ng g c hero-search
再來把src/app/hero-search/hero-search.component.html的內容取代成下面
主要是加入一個textbox用來輸入要搜尋的關鍵字,還有要顯示一個搜尋結果的list,而且這個list是以非同步的方式搜尋的
大概是怕搜尋需要花一點時間,不要讓整個網頁因為list還沒跑完而整個停在那邊不載入
(input)="search(searchBox.value)"其實就是javascript的onkeyup事件的意思,每次user鍵入一個字,都會觸發search()
<div id="search-component">
  <h4>Hero Search</h4>

  <input #searchBox id="search-box" (input)="search(searchBox.value)" />

  <ul class="search-result">
    <li *ngFor="let hero of heroes$ | async" >
      <a routerLink="/detail/{{hero.id}}">
        {{hero.name}}
      </a>
    </li>
  </ul>
</div>
再來是這個元件排版的css,直接使用官網提供的,複製貼上即可,打開hero-search/hero-search.component.css,把下面的css貼上
/* HeroSearch private styles */
.search-result li {
  border-bottom: 1px solid gray;
  border-left: 1px solid gray;
  border-right: 1px solid gray;
  width:195px;
  height: 16px;
  padding: 5px;
  background-color: white;
  cursor: pointer;
  list-style-type: none;
}

.search-result li:hover {
  background-color: #607D8B;
}

.search-result li a {
  color: #888;
  display: block;
  text-decoration: none;
}

.search-result li a:hover {
  color: white;
}
.search-result li a:active {
  color: white;
}
#search-box {
  width: 200px;
  height: 20px;
}


ul.search-result {
  margin-top: 0;
  padding-left: 0;
}
接著打開src/app/hero-search/hero-search.component.ts,加入下列server端程式碼。
注意事項:
1.heroes$: Observable<Hero[]>;就是宣告一個非同步處理的hero陣列,用來顯示搜尋出來的list清單,想來是怕搜尋過程花費太久時間耽誤網頁的其他部分的載入,所以才宣告為非同步
2. private searchTerms = new Subject<string>();就是跟上面第一點的非同步套餐的一部分,你要用非同步做搜尋的話,要搜尋的關鍵字也要宣告為非同步版本的字串物件,只是這個Subject就Rxjs的定義來看,應該算是一個First In First Out的List。
為什麼搜尋的關鍵字要做成list,不是一個單純的string,是因為他搜尋的方式是onkeyup,所以當user的關鍵字包含空格的時候,例如:apple空格
當user輸入完畢apple,程式碼就會用關鍵字搜尋資料,然而很多時候user會習慣性輸入完畢之後按一下space空格(英文寫作的文法,常寫的話,就會習慣順便按一下空格,包括我也會習慣輸入完畢之後加個空格),這時候由於關鍵字是list型態,於是就可以把 apple 跟 apple空格 ,這兩個字串做比較,發現其實是同一個字的時候,就不觸發搜尋的method。回過頭來看,要是關鍵字型態是單純的string,當然就無法對 apple 跟 apple空格 做是否相同的比較囉~
3. search(term: string): void {
this.searchTerms.next(term);
}
以上關鍵字next(term)是一個對非同步的list做push資料進去list的method
4. 下面這個是針對searchTerms做一個onchange事件的監聽,只要出現distinctUntilChanged這個字,就是監聽onchange事件。而debounceTime(300)則是讓user有個打字的時間緩衝,然後switchMap()就是一個隨時可被中斷的執行序,如果用switchMap執行heroService.searchHeroes(term)執行到一半,另外新的關鍵字又跑進來要搜尋,switchMap就會直接把剛才執行到一半的動作立刻取消,改成搜尋新的關鍵字
ngOnInit(): void {
this.heroes$ = this.searchTerms.pipe(
// wait 300ms after each keystroke before considering the term
debounceTime(300),
// ignore new term if same as previous term
distinctUntilChanged(),
// switch to new search observable each time the term changes
switchMap((term: string) => this.heroService.searchHeroes(term)),
);
}
import { Component, OnInit } from '@angular/core';

import { Observable, Subject } from 'rxjs';

import {
   debounceTime, distinctUntilChanged, switchMap
 } from 'rxjs/operators';

import { Hero } from '../hero';
import { HeroService } from '../hero.service';

@Component({
  selector: 'app-hero-search',
  templateUrl: './hero-search.component.html',
  styleUrls: [ './hero-search.component.css' ]
})
export class HeroSearchComponent implements OnInit {
  heroes$: Observable<Hero[]>;
  private searchTerms = new Subject<string>();

  constructor(private heroService: HeroService) {}

  // Push a search term into the observable stream.
  search(term: string): void {
    this.searchTerms.next(term);
  }

  ngOnInit(): void {
    this.heroes$ = this.searchTerms.pipe(
      // wait 300ms after each keystroke before considering the term
      debounceTime(300),

      // ignore new term if same as previous term
      distinctUntilChanged(),

      // switch to new search observable each time the term changes
      switchMap((term: string) => this.heroService.searchHeroes(term)),
    );
  }
}
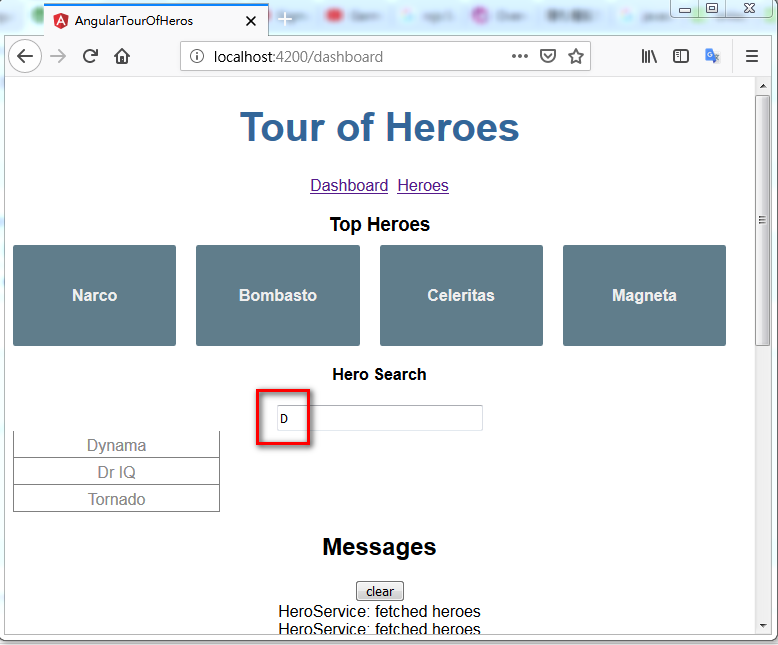
這時候可以測試一下搜尋功能了,搜尋看看這個關鍵字 D ,就出現三個搜尋結果
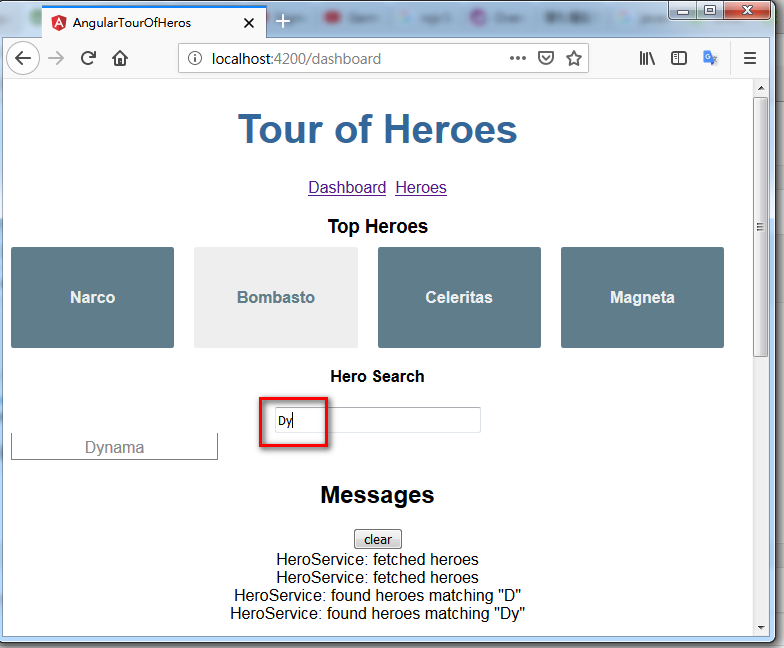
搜尋關鍵字Dy的時候,就只出現一筆了
以上!終於完成angular2的官方tutorial囉
你可以在這下載我完整的程式碼
或是看官網的完整程式碼的live example
或是官網的完整程式碼下載
謝謝收看,下台一鞠躬 orz
參考資料:
HTTP - Angular Official tutorial
https://angular.io/tutorial/toh-pt6