Web Api-Identity 寄Email確認帳號和密碼規則
一樣會從無到有,自己動手做會比較有深刻的理解和體會,那我就先從建立mail寄發開始,建立一個Service的資料夾,然後新增下面類別
using Microsoft.AspNet.Identity;
using System;
using System.Collections.Generic;
using System.Configuration;
using System.Linq;
using System.Net;
using System.Net.Mail;
using System.Threading.Tasks;
using System.Web;

namespace identityDemo.Service
{
    public class EmailService : IIdentityMessageService
    {
        public async Task SendAsync(IdentityMessage message)
        {
            MailMessage mail = new MailMessage();
            NetworkCredential cred = new NetworkCredential("kinanson@gmail.com","您的密碼");
            //收件者
            mail.To.Add(message.Destination);
            mail.Subject = message.Subject;
            //寄件者
            mail.From = new System.Net.Mail.MailAddress("kinanson@gmail.com");
            mail.IsBodyHtml = true;
            mail.Body = message.Body;
            //設定SMTP
            SmtpClient smtp = new SmtpClient("smtp.gmail.com");
            smtp.UseDefaultCredentials = false;
            smtp.EnableSsl = true;
            smtp.Credentials = cred;
            smtp.Port = 587;
            //送出Mail
            await smtp.SendMailAsync(mail);
        }
    }
}
然後打開Infrastructure>ApplicationUserManager,把原有的Create片段,改成如下
public static ApplicationUserManager Create(IdentityFactoryOptions options, IOwinContext context)
        {
            var appDbContext = context.Get();
            var appUserManager = new ApplicationUserManager(new UserStore(appDbContext));
            //下面這些是因應email所新增的片段
            appUserManager.EmailService = new EmailService();
            var dataProtectionProvider = options.DataProtectionProvider;
            if (dataProtectionProvider != null)
            {
                appUserManager.UserTokenProvider = new DataProtectorTokenProvider(dataProtectionProvider.Create("ASP.NET Identity"))
                {
                    TokenLifespan = TimeSpan.FromHours(6)
                };
            }
            //下面是一些驗證規則,包括會自動判別Email是否相同,還有剛剛自訂的mail驗證規則
            appUserManager.UserValidator = new MyCustomUserValidator(appUserManager)
            {
                AllowOnlyAlphanumericUserNames = true,
                RequireUniqueEmail = true
            };
            //下面則是一些密碼驗證的規則
            appUserManager.PasswordValidator = new MyCustomPasswordValidator
            {
                RequiredLength = 6,  //要求長度
                RequireNonLetterOrDigit = true, //要有數字
                RequireDigit = false,   //要有特殊字元
                RequireLowercase = false, //要有大寫
                RequireUppercase = true, //要有小寫
            };
            return appUserManager;
        }
打開Controllers>AccountsController.cs,把原有的CreateUser改成如下
[Route("create")]
        public async Task<IHttpActionResult> CreateUser(CreateUserBindingModel createUserModel)
        {
            if (!ModelState.IsValid)
            {
                return BadRequest(ModelState);
            }
            var user = new ApplicationUser()
            {
                UserName = createUserModel.Username,
                Email = createUserModel.Email,
                FirstName = createUserModel.FirstName,
                LastName = createUserModel.LastName,
                Level = 3,
                JoinDate = DateTime.Now.Date,
            };
            IdentityResult addUserResult = await this.AppUserManager.CreateAsync(user, createUserModel.Password);
            if (!addUserResult.Succeeded)
            {
                return GetErrorResult(addUserResult);
            }
            //下面是為了發出email確認新增的片段
            string code = await this.AppUserManager.GenerateEmailConfirmationTokenAsync(user.Id);
            var callbackUrl = new Uri(Url.Link("ConfirmEmailRoute", new { userId = user.Id, code = code }));
            await this.AppUserManager.SendEmailAsync(user.Id, "Confirm your account", "Please confirm your account by clicking <a href=\"" + callbackUrl + "\">here</a>");
            Uri locationHeader = new Uri(Url.Link("GetUserById", new { id = user.Id }));
            //------------------
            return Created(locationHeader, TheModelFactory.Create(user));
        }
這樣當註冊的時候,就會呼叫如下的url的樣子
http://localhost/api/account/ConfirmEmail?userid=xxxx&code=xxxx
同時新增對應的ConfirmEmail的action,新增在AccountsController之下
[HttpGet]
        [Route("ConfirmEmail", Name = "ConfirmEmailRoute")]
        public async Task<IHttpActionResult> ConfirmEmail(string userId = "", string code = "")
        {
            if (string.IsNullOrWhiteSpace(userId) || string.IsNullOrWhiteSpace(code))
            {
                ModelState.AddModelError("", "User Id and Code are required");
                return BadRequest(ModelState);
            }

            IdentityResult result = await this.AppUserManager.ConfirmEmailAsync(userId, code);

            if (result.Succeeded)
            {
                return Ok();
            }
            else
            {
                return GetErrorResult(result);
            }
        }
配置Email和驗證規則
在Infrastructure新增下面類別,此類別是可以限制Email,我們可以限制只許yahoo或gmail才能註冊
using identityDemo.Infrastructure;
using Microsoft.AspNet.Identity;
using System;
using System.Collections.Generic;
using System.Linq;
using System.Threading.Tasks;
using System.Web;

namespace AspNetIdentity.Infrastructure
{
    public class MyCustomUserValidator : UserValidator<ApplicationUser>
    {

        List<string> _allowedEmailDomains = new List<string> { "outlook.com", "hotmail.com", "gmail.com", "yahoo.com" };

        public MyCustomUserValidator(ApplicationUserManager appUserManager)
            : base(appUserManager)
        {
        }

        public override async Task<IdentityResult> ValidateAsync(ApplicationUser user)
        {
            IdentityResult result = await base.ValidateAsync(user);
            var emailDomain = user.Email.Split('@')[1];
            if (!_allowedEmailDomains.Contains(emailDomain.ToLower()))
            {
                var errors = result.Errors.ToList();
                errors.Add(String.Format("Email domain '{0}' is not allowed", emailDomain));
                result = new IdentityResult(errors);
            }
            return result;
        }
    }
}
在Infrastructure>ApplicationUserManager的Create改成如下
using AspNetIdentity.Infrastructure;
using identityDemo.Service;
using Microsoft.AspNet.Identity;
using Microsoft.AspNet.Identity.EntityFramework;
using Microsoft.AspNet.Identity.Owin;
using Microsoft.Owin;
using System;
using System.Collections.Generic;
using System.Linq;
using System.Web;

namespace identityDemo.Infrastructure
{
    public class ApplicationUserManager : UserManager<ApplicationUser>
    {
        public ApplicationUserManager(IUserStore<ApplicationUser> store)
            : base(store)
        {
        }

        public static ApplicationUserManager Create(IdentityFactoryOptions<ApplicationUserManager> options, IOwinContext context)
        {
            var appDbContext = context.Get<ApplicationDbContext>();
            var appUserManager = new ApplicationUserManager(new UserStore<ApplicationUser>(appDbContext));
            //下面這些是因應email所新增的片段
            appUserManager.EmailService = new EmailService();
            var dataProtectionProvider = options.DataProtectionProvider;
            if (dataProtectionProvider != null)
            {
                appUserManager.UserTokenProvider = new DataProtectorTokenProvider<ApplicationUser>(dataProtectionProvider.Create("ASP.NET Identity"))
                {
                    TokenLifespan = TimeSpan.FromHours(6)
                };
            }
            //下面是一些驗證規則,包括會自動判別Email是否相同,還有剛剛自訂的mail驗證規則
            appUserManager.UserValidator = new MyCustomUserValidator(appUserManager)
            {
                AllowOnlyAlphanumericUserNames = true,
                RequireUniqueEmail = true
            };
            //下面則是一些密碼驗證的規則
            appUserManager.PasswordValidator = new PasswordValidator
            {
                RequiredLength = 6,  //要求長度
                RequireNonLetterOrDigit = true, //要有數字
                RequireDigit = false,   //要有特殊字元
                RequireLowercase = false, //要有大寫
                RequireUppercase = true, //要有小寫
            };
            return appUserManager;
        }
    }
}
也可以自訂密碼規則,比如我們預設何種密碼不能通過驗證,在Infrastructure新增下面類別
using Microsoft.AspNet.Identity;
using System;
using System.Collections.Generic;
using System.Linq;
using System.Threading.Tasks;
using System.Web;

namespace AspNetIdentity.Infrastructure
{
    public class MyCustomPasswordValidator : PasswordValidator
    {
        public override async Task<IdentityResult> ValidateAsync(string password)
        {
            IdentityResult result = await base.ValidateAsync(password);

            if (password.Contains("abcdef") || password.Contains("123456"))
            {
                var errors = result.Errors.ToList();
                errors.Add("Password can not contain sequence of chars");
                result = new IdentityResult(errors);
            }
            return result;
        }
    }
}
接著我們只要把驗證密碼規則改成使用自訂的類別,如下面程式碼,就能套用自訂的密碼驗証規則
 appUserManager.PasswordValidator = new MyCustomPasswordValidator
            {
                RequiredLength = 6,  //要求長度
                RequireNonLetterOrDigit = true, //要有數字
                RequireDigit = false,   //要有特殊字元
                RequireLowercase = false, //要有大寫
                RequireUppercase = true, //要有小寫
            };
新增改變密碼和刪除使用者
在AccountsController新增下面action
[Route("ChangePassword")]
        public async Task<IHttpActionResult> ChangePassword(ChangePasswordBindingModel model)
        {
            if (!ModelState.IsValid)
            {
                return BadRequest(ModelState);
            }
            IdentityResult result = await this.AppUserManager.ChangePasswordAsync(User.Identity.GetUserId(), model.OldPassword, model.NewPassword);
            if (!result.Succeeded)
            {
                return GetErrorResult(result);
            }
            return Ok();
        }
接著在Models新增下面類別,也就是前端要傳來的Model對應
using System;
using System.Collections.Generic;
using System.ComponentModel.DataAnnotations;
using System.Linq;
using System.Web;

namespace identityDemo.Models
{
    public class ChangePasswordBindingModel
    {
        [Required]
        [DataType(DataType.Password)]
        [Display(Name = "Current password")]
        public string OldPassword { get; set; }

        [Required]
        [StringLength(100, ErrorMessage = "The {0} must be at least {2} characters long.", MinimumLength = 6)]
        [DataType(DataType.Password)]
        [Display(Name = "New password")]
        public string NewPassword { get; set; }

        [Required]
        [DataType(DataType.Password)]
        [Display(Name = "Confirm new password")]
        [Compare("NewPassword", ErrorMessage = "The new password and confirmation password do not match.")]
        public string ConfirmPassword { get; set; }
    }
}
最後則是新增刪除使用者的action
[Route("user/{id:guid}")]
        public async Task<IHttpActionResult> DeleteUser(string id)
        {
            var appUser = await this.AppUserManager.FindByIdAsync(id);
            if (appUser != null)
            {
                IdentityResult result = await this.AppUserManager.DeleteAsync(appUser);
                if (!result.Succeeded)
                {
                    return GetErrorResult(result);
                }
                return Ok();
            }
            return NotFound();
        }
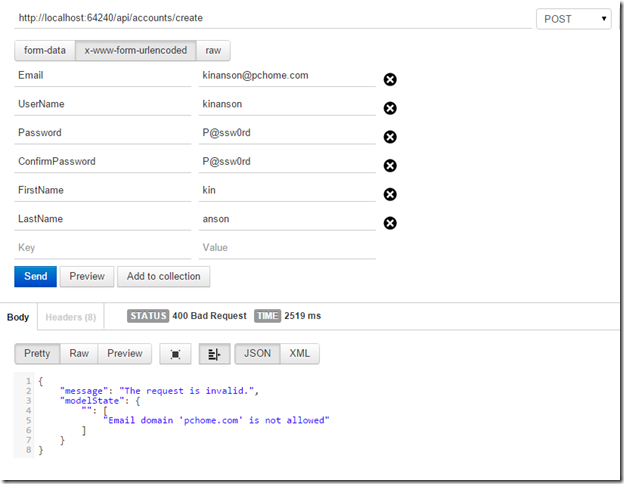
最後我就使用postman來新增一個使用者,假設我要新增一個pchome的帳號,就會被擋了,如下圖

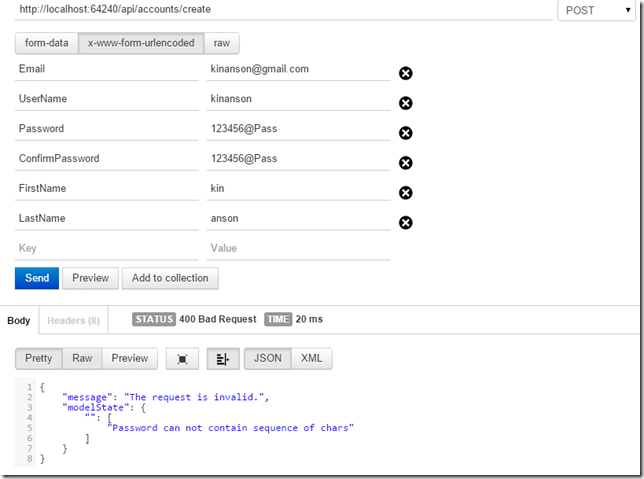
如果我採用的密碼是定義不可使用的,也會被擋,如下圖

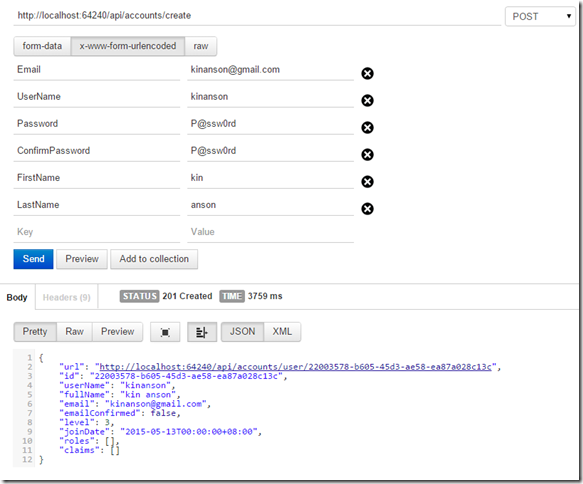
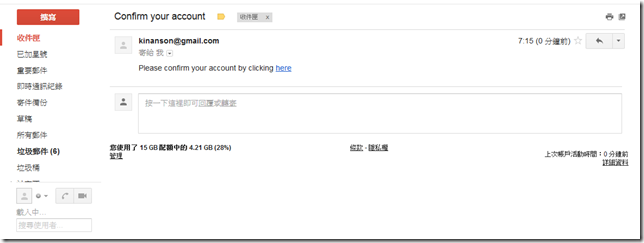
最後我就新增一個使用者,然後確認有收到mail吧


按了here之後,我們可以看看AspNetUsers的欄位,就會變成已驗証狀態
![]()

以上再請多多指教囉。
