讓入門的人,有方向可以知道如何學習angular這套技術
前言
因為需要帶領member如何開始入門,並大方向的懂得angular2的名詞,還有如何從官方文件參考必要的文檔,畢竟官方的文件非常的多,甚至有些光一個主題就非常的長,對入門來說過於嚴苛,要學習一套技術需要花那麼多時間,對很多每天一堆工作的人,其實也是很不切實際,那我想要快速的解釋一下必須知道的一些名詞,點到為止真的需要使用,再去官網找資料學習。
導覽
- angular的優勢
- 快速理解架構層面
- 一切先從module開始
- 入門component
- 入門template
- binding的幾種方式還有組件間最簡單的溝通方式
- 基礎入門結束,接下來該學什麼
- 使用自動化的方式,學習不需要死背
- 結論
angular的優勢
其實目前來說react和angular和vue對於狀態處理的方式都是一致的,所以以前為人詬病的angularjs two way binding還有效能的問題,其實在angular已經都不會再有相關問題了,那angular相對其他框架有什麼優勢呢,最大的優勢就是angular有微軟和google兩個老爸撐腰,這兩個世界最大巨頭的軟體公司,目前來說不是任何一套框架可以相提並論的,還有ide上面的支援,甚至angular都有出現了專屬的IDE(https://www.genuitec.com/products/angular-ide/),相信目前為止vue還有react都還沒有去對開發者體驗做出很大的支援,最後就是angular是個大而全的框架,就不用再浪費自己的時間去做很多元件版本的整合,在追求穩定的企業裡面這確實是很重要的。
快裡理解架構層面
這部份我們可以直接從Architecture(https://angular.io/docs/ts/latest/guide/),去大局的了解一下,我已較簡短的說明來解釋,如果要詳盡的解釋可以直接參考官網,我們先看一下angular所有組合的一些關鍵字詞還有圖示吧
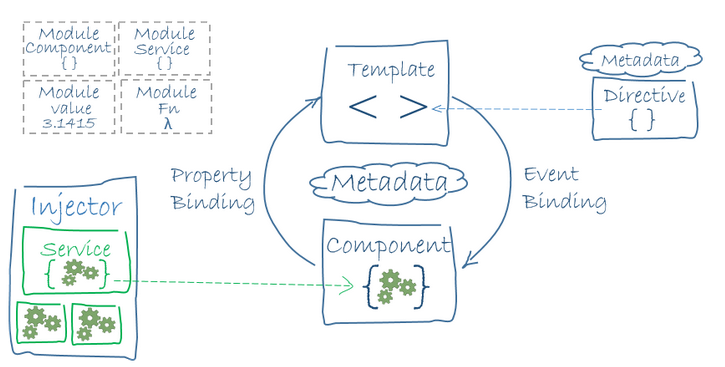
再看一下官網羅列的主要名詞,這些名詞就是構成angular的主要關鍵
- Modules-可以想像成c#裡面的dll,裡面可能放著第三方或自定義的module
- Components-元件,也是angular最主要的部份,所有angular都是由元件組成
- Templates-html樣版,依附在component裡
- Metadata-元數據,告訴angular是一個組件或指令,不然實際上所有的ts不過就是一個類別而已
- Data binding-數據綁定,如何改變畫面的變化,其實就是用binding的方法,angular會檢查數據如果變了,就會針對綁定的部份做變化
- Directives-指令,有分結構指令或屬性指令,結構指令就是類似*ngIf
- Services-類別,其實這個跟下面的di是相對的,雖然可以直接用new的方式建立,但你絕對不會想要這樣做的
- Dependency injection-就是使用注入的方式,可以方便統一在進入點把實做換掉,而且也會自動解構類別
雖然上面很多名詞,但其實都是由component擴散出去的,所以我們入門的時候,就是先focus在元件,還有知道modules要怎麼宣告,其餘的部份再慢慢的學習,我們不需要全部學習完再動手,有時候做應用根本只是用到整個框架的30%而已,不需要一定得學到80%以上才開始動手做,如果想要深入學習各個主題,在這個Architecture的裡面都可以透過連結去探索。
一切先從module開始
當我們新增一個component或service或第三元元件的module,都必須要從module開始,而且這部份真的也是會常常忘記的,所以我建議就是只要你新增什麼檔案,就先從module加上去,再回去寫邏輯,當然如果我們用cli自動產生service或component的時候,正常來講都會自動幫我們加在module裡面,但有時候module變多了,專案變複雜了之後,就會不一定靈驗了,首先來看一下module的部份吧。
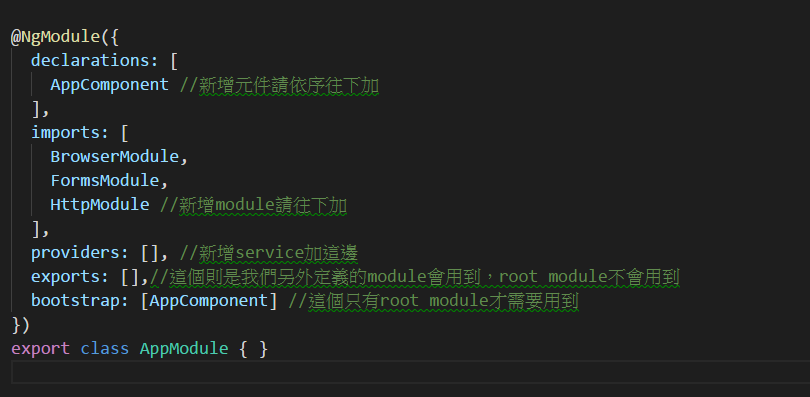
何謂root module呢?也就是主要的module,cli預設幫我們產生的app.module.ts這支檔案。
入門component
我們要學習component很簡單,只需要理解最簡單的就足夠寫應用了,需要用到再去查就好了
import { Component } from '@angular/core';

@Component({ //metadata
  selector: 'app-root', //如果在html使用,會像<app-root></app-root>
  templateUrl: './app.component.html', //可以指定html放在哪邊,./代表同層
  styleUrls: ['./app.component.css'] //指定css也可以替換成scss
})
export class AppComponent {
  title = 'app works!'; //定義數據,這邊不可用var,let,const
  countNumber: number;//可以定義型別,但也可以只給數字,會自動推斷型別
  constructor() {
    this.title = 'change title'; //得用this呼叫class的全局變數
    this.get();
    this.strongGet();
  }

  get() { //沒定義型別,typescript一樣可以使用弱型別,並沒規定一定得要強型別
    let message = 'hello'; //局部必須得宣告let or const or var
    return message;
  }

  strongGet(): string { //定義回傳的型別
    const message = 'strong hello';
    return message;
  }
}
入門template
template的部份就包含了指令和binding的部份,在指令的部份其實最常用的也是沒幾個ngIf,ngFor,ngModel
ngIf代表判斷這個元件是否要顯示或隱藏,但是這個指令是用新增或刪除dom的方式
ngFor就是把陣列foreach出來就對了
ngModel就是針對會讓使用者輸入值來改變數據的綁定,比如說大部份<input type="text"/>
再來則是事件了,其實在angular裡面,只要加上()就是綁定事件了其餘則是原生的javascript事件名稱,比如(click)=onclick的意思,(mouseover)=onmouseover
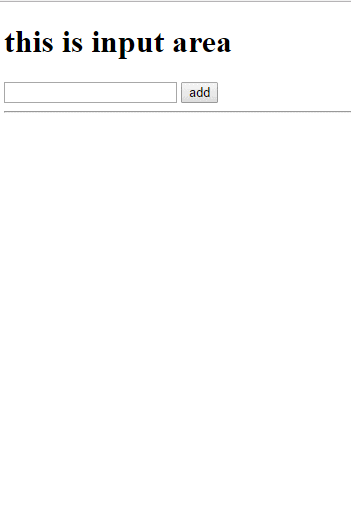
以這些簡單的觀念,我們就能做出新增刪除的簡單範例了,我把程式碼貼在下面供參考
app.component.ts
import { Component } from '@angular/core';

@Component({
  selector: 'app-root',
  templateUrl: './app.component.html',
  styleUrls: ['./app.component.css']
})
export class AppComponent {
  names = [];
  name: string;

  add() {
    this.names.push(this.name);
    this.name = '';
  }

  remove(item) {
    this.names = this.names.filter(x => x !== item);
  }
}
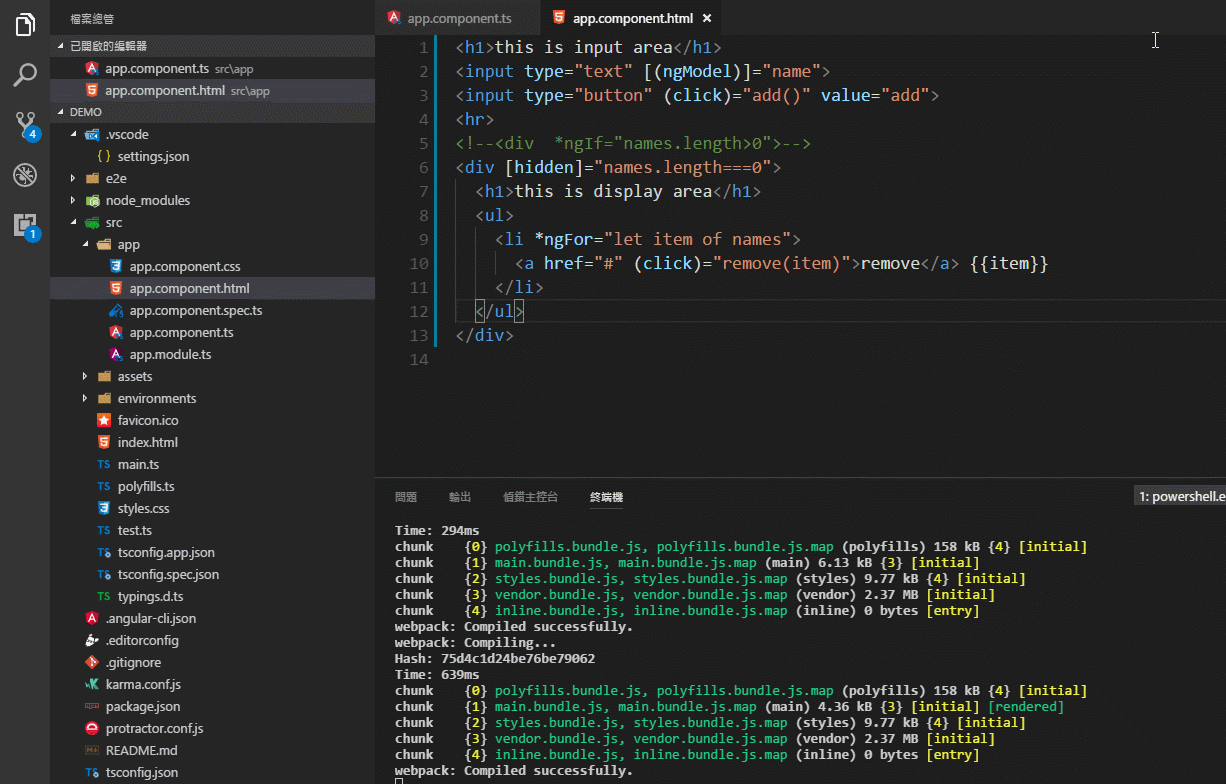
app.component.html
<h1>this is input area</h1>
<input type="text" [(ngModel)]="name">
<input type="button" (click)="add()" value="add">
<hr>
<div *ngIf="names.length>0">
  <h1>this is display area</h1>
  <ul>
    <li *ngFor="let item of names">
      <a href="#" (click)="remove(item)">remove</a>
      {{item}}
    </li>
  </ul>
</div>
binding的幾種方式還有組件間最簡單的溝通方式
接著我們必須了解一下我們在angular如何做binding,其實binding的方式也很簡單,在即有的html裡面,我們只要[]就算binding,比如把剛剛ngIf改成[hidden]也是能執行,只是判斷要反過來
<h1>this is input area</h1>
<input type="text" [(ngModel)]="name">
<input type="button" (click)="add()" value="add">
<hr>
<!--<div  *ngIf="names.length>0">-->
<div [hidden]="names.length===0">
  <h1>this is display area</h1>
  <ul>
    <li *ngFor="let item of names">
      <a href="#" (click)="remove(item)">remove</a> {{item}}
    </li>
  </ul>
</div>
可以注意到hidden是原始的html的屬性,所以任何html的屬性我們只要加個中括號就能binding了,非常的簡單哦,再來就是簡單看一下組件間的溝通方式,丟進去的值有兩種方式,一種是直接丟字串,這樣子的話就不用加[],如果要讓子組件的畫面隨著父組件的值改變而去更新,就需要加上[],那如果要收到子組件的通知,就要加上(),底下就來個例子,我把剛剛那個簡單的新增刪除的例子,改成元件溝通的方式,在子組件需要宣告@Input()來接收父組件丟進來的值,這邊特別說明一下對vue或react熟悉的人應該都知道,子組件是不能異動父組件丟進來的值,在react的話會直接報錯,vue會有警告,但angular是允許這樣做的,如何好好管理狀態不是入門所需要講解的,先關注一下程式碼的部份囉
app.component.html
<h1>this is input area</h1>
<input type="text" [(ngModel)]="name">
<input type="button" (click)="add()" value="add">
<hr>
<app-list [names]="names"></app-list>
app.component.ts
import { Component } from '@angular/core';

@Component({
  selector: 'app-root',
  templateUrl: './app.component.html',
  styleUrls: ['./app.component.css']
})
export class AppComponent {
  names = [];
  name: string;

  add() {
    this.names.push(this.name);
    this.name = '';
  }
}
list.component.html
<!--<div  *ngIf="names.length>0">-->
<div [hidden]="names.length===0">
  <h1>this is display area</h1>
  <ul>
    <li *ngFor="let item of names">
      <a href="#" (click)="remove(item)">remove</a> {{item}}
    </li>
  </ul>
</div>
list.component.ts
import { Component, OnInit, Input } from '@angular/core';

@Component({
  selector: 'app-list',
  templateUrl: './list.component.html',
  styleUrls: ['./list.component.css']
})
export class ListComponent implements OnInit {
  @Input() names = []; //接收父組件傳進來的names
  constructor() { }

  ngOnInit() {
  }

  remove(item) {
    this.names = this.names.filter(x => x !== item);
  }
}
最後結果跟上個新增刪除的範例是一樣的,接著我們來談一下如果子組件異動了想通知父組件怎麼做呢?我們只需要用簡單的output,比如我刪除了值,我想通知上面,而不是由子組件直接異動names,而是把處理邏輯交給父組件,子組件只負責值變了後,就做更新,要通知上面就是用output,我會在需要注意的地方特別下註解哦。
app.component.html
<h1>this is input area</h1>
<input type="text" [(ngModel)]="name">
<input type="button" (click)="add()" value="add">
<hr>
<app-list [names]="names" (onRemove)="onRemove($event)"></app-list>
<!--names是丟到子組件的,onRemove則是接收子組件的通知-->
app.component.ts
import { Component } from '@angular/core';

@Component({
  selector: 'app-root',
  templateUrl: './app.component.html',
  styleUrls: ['./app.component.css']
})
export class AppComponent {
  names = [];
  name: string;

  add() {
    this.names.push(this.name);
    this.name = '';
  }

  onRemove(item) {
    this.names = this.names.filter(x => x !== item);
  }
}
list.component.html
<!--<div  *ngIf="names.length>0">-->
<div [hidden]="names.length===0">
  <h1>this is display area</h1>
  <ul>
    <li *ngFor="let item of names">
      <a href="#" (click)="remove(item)">remove</a> {{item}}
    </li>
  </ul>
</div>
list.component.ts
import { Component, OnInit, Input, EventEmitter, Output } from '@angular/core';

@Component({
  selector: 'app-list',
  templateUrl: './list.component.html',
  styleUrls: ['./list.component.css']
})
export class ListComponent implements OnInit {
  @Input() names = []; //接收父組件傳進來的names
  @Output() onRemove = new EventEmitter();//通知父組件的事件
  constructor() { }

  ngOnInit() {
  }

  remove(item) {
    this.onRemove.emit(item); //通知父組件,並把按下的那一筆送出去
    // this.names = this.names.filter(x => x !== item);
  }
}
如果我們只是想要丟一個字串進去的話,就直接定義屬性就好了,比如說我想要list裡面的標題,是父組件決定的,下面程式碼只貼有異動的部份
app.component.html
<h1>this is input area</h1>
<input type="text" [(ngModel)]="name">
<input type="button" (click)="add()" value="add">
<hr>
<app-list [names]="names" (onRemove)="onRemove($event)" title="this is app defined title"></app-list>
<!--names是丟到子組件的,onRemove則是接收子組件的通知,title是傳進一個變數-->
list.component.html
<!--<div  *ngIf="names.length>0">-->
<div [hidden]="names.length===0">
  <h1>{{title}}</h1>
  <ul>
    <li *ngFor="let item of names">
      <a href="#" (click)="remove(item)">remove</a> {{item}}
    </li>
  </ul>
</div>
list.component.ts
import { Component, OnInit, Input, EventEmitter, Output } from '@angular/core';

@Component({
  selector: 'app-list',
  templateUrl: './list.component.html',
  styleUrls: ['./list.component.css']
})
export class ListComponent implements OnInit {
  @Input() names = [];
  @Output() onRemove = new EventEmitter();
  @Input() title: string; //接收不變的字串
  constructor() { }

  ngOnInit() {
  }

  remove(item) {
    this.onRemove.emit(item);
  }
}
基礎入門結束,接下來該學什麼
上面必須知道的都差不多了,接下來如果我們需要用到ajax的話,就需要參考http的入門章節(https://angular.io/docs/ts/latest/tutorial/toh-pt6.html),然後因為angular要做較完整的應用,一定需要client的路由,我們也可以從路由入門了解(https://angular.io/docs/ts/latest/tutorial/toh-pt5.html),當我們覺得所有程式碼都放在元件裡面,很難維護或者重覆的 程式碼一再出現在不同的元件之間的時候,我們就可以來了解一下service和di的入門部份(https://angular.io/docs/ts/latest/tutorial/toh-pt4.html),或者可以了解一下redux風格的ngRx( https://github.com/ngrx/store),到此要完成一個應用就沒什麼問題了,雖然還有很多主題需要去學習,但是當遇到我們再去涉獵就夠了。
使用自動化的方式,學習不需要死背
我們可以使用工具來自動快速產生component或service等等,我們只要安裝AngularDoc就可以在vscode建立了,不用再到cmd下指令新增,extension如圖示

操作畫面如下
我們也需要安裝snippets來方便一些語法提示,而不需要一定得靠死背或一直查官方文件確認怎麼寫,有時候我們只需要看到知道怎麼寫怎麼改,而不是一直得用背的打出來。

下面是我的一些快速產生的操作示例
關於angular有什麼我覺得可以安裝的工具,我之前也有寫一篇文章說明(https://dotblogs.com.tw/kinanson/2017/03/27/133103),但其實我個人常常會去試用各種extension,所以常常會發覺什麼可能是更好用的,所以僅供參考,如果有發現什麼更好用的,也請再介紹給筆者。
結論
此篇稍微長了一點,程式碼也多了一點,但其實此篇程式碼非常簡單,請花點心思體會一下,然後實際動手做一下,要入門angular真的很簡單。
