vue無法順利執行單元測試?依賴於外部環境讓你不知道怎麼進行下去?使用webpack來切換檔案就對了
前言
之前已有說明過了一系列vue的單元測試(https://dotblogs.com.tw/kinanson/series/1?qq=%E6%B8%AC%E8%A9%A6),以幫助讀者可以順利的在專案上真實使用,而筆者也不覺得寫前端程式一定要走tdd,畢竟因為hot reload的關係,修改後得到回饋的速度比起編譯型語言,快速了許多,但針對一些複雜的邏輯或ui操作,有時候我們要用手動去測試各種情境,可能要試過非常多種組合,而且還有可能會忘記,這個時候我認為加上單元測試,不管是當做以後參考的測試腳本,或者是重構的定心丸,甚至是一系列的自動測試已確保品質,都能帶來非常大的幫助,之前有討論過如何可以順利的把依賴於真實環境去替換掉(https://dotblogs.com.tw/kinanson/2017/08/01/201124),也有人提出建議可以使用inject loader的方式,就連vuex的官網也有提到inject loader(https://vuex.vuejs.org/zh-cn/testing.html),不過個人是使用webpack來做環境的切換,對我來說其實覺得更方便,這樣子不管是組件或者是vuex都可以直接切換成測試的假資料,當然我們可以想像這樣子的話就連e2e都能切成假資料來做ui test了。
導覽
這一系列都是使用同樣的ui操作,所以我附上的也是之前利用生命週期來替換假資料方式的程式碼,先看一下組件的部份
<template>
  <div>
    <table>
      <tr>
        <td>1st</td>
        <td>
          <input class="input__one" type="number" v-model.number="scores.firstSection">
        </td>
      </tr>
      <tr>
        <td>2st</td>
        <td>
          <input class="input__two" type="number" v-model.number="scores.twoSection">
        </td>
      </tr>
      <tr>
        <td>3st</td>
        <td>
          <input class="input__three" type="number" v-model.number="scores.threeSection">
        </td>
      </tr>
      <tr>
        <td>4st</td>
        <td>
          <input class="input__four" type="number" v-model.number="scores.fourSection">
        </td>
      </tr>
      </tr>
      <tr>
        <td>extend</td>
        <td>
          <input class="input__extend" type="number" v-model.number="scores.extendSection">
        </td>
      </tr>
      <tr>
        <td>total</td>
        <td>
          <input class="input__total" type="number" v-model.number="total">
        </td>
      </tr>
    </table>
    <input class="input__submit" type="button" value="submit" @click="submit">
  </div>
</template>

<script>
import axios from 'axios'
import _ from 'lodash'

function mathDistance (num1, num2) {
  return num2 > num1 ? num2 - num1 : num1 - num2
}

export default {
  name: 'hello',
  data () {
    return {
      scores: {},
      cloneScores: {}
    }
  },
  computed: {
    total () {
      return this.scores.firstSection + this.scores.twoSection +
        this.scores.threeSection + this.scores.fourSection + this.scores.extendSection
    }
  },
  methods: {
    submit () {
      let scores = this.scores
      let modifedObject = _.reduce(this.cloneScores, function (result, value, key) {
        return _.isEqual(value, scores[key]) ? result : result.concat(key)
      }, [])
      let isDistanceScore = false
      modifedObject.forEach(property => {
        if (mathDistance(this.cloneScores[property], scores[property]) > 1) {
          isDistanceScore = true
        }
      })

      if (isDistanceScore) alert('只能增加或減少一分')
      if (modifedObject.length > 1) alert('只能更新一節的分數')
      if (!isDistanceScore && modifedObject.length <= 1) {
        //改成呼叫另一個方法的方式
        this.post().then(x => {
          alert('修改成功')
        })
      }
    },
    // 將原本相依在submit方法裡面呼叫ajax的重構出來
    post () {
      return axios.post('http://localhost:55205/apu/book')
    },
    async get () {
      this.scores = await axios.get('http://localhost:55206/api/book').then(x => x.data)
    }
  },
  // async created () {
  //   await this.get()
  //   this.cloneScores = { ...this.scores }
  // }
  // 改成如下
  async beforeMount () {
    await this.get()
    this.cloneScores = { ...this.scores }
  }
}
</script>

<!-- Add "scoped" attribute to limit CSS to this component only -->
<style scoped>

</style>
再來是測試程式碼
// import Vue from 'vue'
import { destroyVM, createComponentTest } from '../util'
import Hello from '@/components/Hello'

describe('Hello', () => {
  let vm, alert

  beforeEach(() => {
    alert = sinon.spy(window, 'alert')
    vm = createComponentTest(Hello)
    vm.get = function () {
      vm.scores = {
        firstSection: 0,
        twoSection: 0,
        threeSection: 0,
        fourSection: 0,
        extendSection: 0
      }
    }
    vm.post = function () { // 將post重寫,並回傳一個空的promise resolve
      return new Promise(resolve => resolve())
    }
    vm.$mount()
  })

  afterEach(() => {
    alert.restore()
    destroyVM(vm)
  })

  it('總分為所有節數加起來的分數', () => {
    vm.scores = {
      firstSection: 1,
      twoSection: 2,
      threeSection: 3,
      fourSection: 5,
      extendSection: 0
    }

    expect(vm.total).to.be.equal(11)
  })

  it('不可以加或減超過一分', async () => {
    await vm.beforeMount // 必須確保生命週期已跑完,所以手動執行此生命週期,並且因為此生命週期有非同步,所以需使用非同步的方式
    vm.scores.firstSection = 2
    vm.submit()
    expect(alert.args[0][0]).to.be.equal('只能增加或減少一分')
  })

  it('只能更新一節的分數', async () => {
    await vm.beforeMount
    vm.scores.firstSection = 1
    vm.scores.twoSection = 1
    vm.submit()
    expect(alert.args[0][0]).to.be.equal('只能更新一節的分數')
  })

  it('不可以加或減超過一分且只能更新一節的數分', async () => {
    await vm.beforeMount
    vm.scores.firstSection = 2
    vm.scores.twoSection = 1
    vm.submit()
    expect(alert.args[0][0]).to.be.equal('只能增加或減少一分')
    expect(alert.args[1][0]).to.be.equal('只能更新一節的分數')
  })

  it('修改成功', async () => {
    await vm.beforeMount
    vm.scores.firstSection = 1
    vm.submit()
    vm.$nextTick(() => { // 因為promise的原因,按下submit之後,調用nextTick確保alert已被調用
      expect(alert.args[0][0]).to.be.equal('修改成功')
    })
  })
})
而目前的util.js被我簡化成如下
import Vue from 'vue'

/**
 * 回收 vm
 * @param  {Object} vm
 */
exports.destroyVM = function (vm) {
  vm.$el &&
    vm.$el.parentNode &&
    vm.$el.parentNode.removeChild(vm.$el)
}

/**
 * 建立一個尚未mount的測試組件
 * @link http://vuejs.org/guide/unit-testing.html#Writing-Testable-Components
 * @param  {Object}  Compo          - 组件对象
 * @param  {Object}  propsData      - props 数据
 * @return {Object} vm
 */
exports.createComponentTest = function (Compo, propsData = {}) {
  const Ctor = Vue.extend(Compo)
  return new Ctor({ propsData })
}

/**
 * 创建一个 Vue 的实例对象
 * @param  {Object|String}  Compo   组件配置,可直接传 template
 * @return {Object} vm
 */
exports.createVue = function (Compo) {
  if (Object.prototype.toString.call(Compo) === '[object String]') {
    Compo = { template: Compo }
  }
  return new Vue(Compo).$mount()
}

/**
 * 创建一个测试组件实例
 * @link http://vuejs.org/guide/unit-testing.html#Writing-Testable-Components
 * @param  {Object}  Compo          - 组件对象
 * @param  {Object}  propsData      - props 数据
 * @return {Object} vm
 */
exports.createTest = function (Compo, propsData = {}) {
  const Ctor = Vue.extend(Compo)
  return new Ctor({ propsData }).$mount()
}
接下來我必須要把寫死在組件裡的ajax,改成相依於外部的js,所以我先建立一個services的資料夾,然後建立axios用到的js檔
services/helloService.js
import axios from 'axios'

export default {
  get () {
    return axios.get('http://localhost:55206/api/book').then(x => x.data)
  },
  post () {
    return axios.post('http://localhost:55206/api/book')
  }
}
接著則是建立一個fakeServices的資料夾,同樣建立我們要使用到的方法,讓測試程式碼實際上是跑到這邊的js檔
fakeServices/helloService.js
export default {
  get() {
    return new Promise(resolve => resolve({
      firstSection: 0,
      twoSection: 0,
      threeSection: 0,
      fourSection: 0,
      extendSection: 0
    }))
  },
  post() {
    return new Promise(resolve => resolve())
  }
}
直接為webpack.base.config.js的alias加上services,請注意筆者修改的部份已加上註解
var path = require('path')
var utils = require('./utils')
var config = require('../config')
var vueLoaderConfig = require('./vue-loader.conf')

function resolve(dir) {
  return path.join(__dirname, '..', dir)
}

/**
 * //判斷環境變數而取得相對應的位置
 */
function getServices() {
  switch (process.env.BABEL_ENV) {
    case 'test':
      return resolve('./src/fakeServices')
    default:
      return resolve('./src/services')
  }
}


module.exports = {
  entry: {
    app: './src/main.js'
  },
  output: {
    path: config.build.assetsRoot,
    filename: '[name].js',
    publicPath: process.env.NODE_ENV === 'production'
      ? config.build.assetsPublicPath
      : config.dev.assetsPublicPath
  },
  resolve: {
    extensions: ['.js', '.vue', '.json'],
    alias: {
      'vue$': 'vue/dist/vue.esm.js',
      '@': resolve('src'),
      'services': getServices() //自行新加的
    }
  },
  module: {
    rules: [
      {
        test: /\.(js|vue)$/,
        loader: 'eslint-loader',
        enforce: 'pre',
        include: [resolve('src'), resolve('test')],
        options: {
          formatter: require('eslint-friendly-formatter')
        }
      },
      {
        test: /\.vue$/,
        loader: 'vue-loader',
        options: vueLoaderConfig
      },
      {
        test: /\.js$/,
        loader: 'babel-loader',
        include: [resolve('src'), resolve('test')]
      },
      {
        test: /\.(png|jpe?g|gif|svg)(\?.*)?$/,
        loader: 'url-loader',
        options: {
          limit: 10000,
          name: utils.assetsPath('img/[name].[hash:7].[ext]')
        }
      },
      {
        test: /\.(woff2?|eot|ttf|otf)(\?.*)?$/,
        loader: 'url-loader',
        options: {
          limit: 10000,
          name: utils.assetsPath('fonts/[name].[hash:7].[ext]')
        }
      }
    ]
  }
}
看一下組件的修改部份
<template>
  <div>
    <table>
      <tr>
        <td>1st</td>
        <td>
          <input class="input__one" type="number" v-model.number="scores.firstSection">
        </td>
      </tr>
      <tr>
        <td>2st</td>
        <td>
          <input class="input__two" type="number" v-model.number="scores.twoSection">
        </td>
      </tr>
      <tr>
        <td>3st</td>
        <td>
          <input class="input__three" type="number" v-model.number="scores.threeSection">
        </td>
      </tr>
      <tr>
        <td>4st</td>
        <td>
          <input class="input__four" type="number" v-model.number="scores.fourSection">
        </td>
      </tr>
      </tr>
      <tr>
        <td>extend</td>
        <td>
          <input class="input__extend" type="number" v-model.number="scores.extendSection">
        </td>
      </tr>
      <tr>
        <td>total</td>
        <td>
          <input class="input__total" type="number" v-model.number="total">
        </td>
      </tr>
    </table>
    <input class="input__submit" type="button" value="submit" @click="submit">
  </div>
</template>

<script>
import service from 'services/helloService'
import _ from 'lodash'

function mathDistance (num1, num2) {
  return num2 > num1 ? num2 - num1 : num1 - num2
}

export default {
  name: 'hello',
  data () {
    return {
      scores: {},
      cloneScores: {}
    }
  },
  computed: {
    total () {
      return this.scores.firstSection + this.scores.twoSection +
        this.scores.threeSection + this.scores.fourSection + this.scores.extendSection
    }
  },
  methods: {
    submit () {
      let scores = this.scores
      let modifedObject = _.reduce(this.cloneScores, function (result, value, key) {
        return _.isEqual(value, scores[key]) ? result : result.concat(key)
      }, [])
      let isDistanceScore = false
      modifedObject.forEach(property => {
        if (mathDistance(this.cloneScores[property], scores[property]) > 1) {
          isDistanceScore = true
        }
      })

      if (isDistanceScore) alert('只能增加或減少一分')
      if (modifedObject.length > 1) alert('只能更新一節的分數')
      if (!isDistanceScore && modifedObject.length <= 1) {
        //相依於axios的部份,抽到service裡面去
        service.post().then(x => {
          alert('修改成功')
        })
      }
    },
    async get () {
      //相依於axios的部份,抽到service裡面去
      this.scores = await service.get()
    }
  },
  async created () {
    await this.get()
    this.cloneScores = { ...this.scores }
  }
}
</script>

<!-- Add "scoped" attribute to limit CSS to this component only -->
<style scoped>

</style>
接著來看一下測試程式碼的部份,因為我裡面包括連結生命週期都使用到了async and await,所以在有使用到的地方非同步的測試程式碼都需要加上非同步的特性
// import Vue from 'vue'
import { destroyVM, createTest } from '../util'
import Hello from '@/components/Hello'

describe('Hello', () => {
  let vm, alert

  beforeEach(async () => {
    alert = sinon.spy(window, 'alert')
    // 對應async created的
    vm = await createTest(Hello)
  })

  afterEach(() => {
    alert.restore()
    destroyVM(vm)
  })

  it('總分為所有節數加起來的分數', () => {
    vm.scores = {
      firstSection: 1,
      twoSection: 2,
      threeSection: 3,
      fourSection: 5,
      extendSection: 0
    }

    expect(vm.total).to.be.equal(11)
  })

  it('不可以加或減超過一分', () => {
    vm.scores.firstSection = 2
    vm.submit()
    expect(alert.args[0][0]).to.be.equal('只能增加或減少一分')
  })

  it('只能更新一節的分數', () => {
    vm.scores.firstSection = 1
    vm.scores.twoSection = 1
    vm.submit()
  })

  it('不可以加或減超過一分且只能更新一節的數分', () => {
    vm.scores.firstSection = 2
    vm.scores.twoSection = 1
    vm.submit()
    expect(alert.args[0][0]).to.be.equal('只能增加或減少一分')
    expect(alert.args[1][0]).to.be.equal('只能更新一節的分數')
  })

  it('修改成功', async () => {
    vm.scores.firstSection = 1
    // 因為submit成功的話會調用非同步,所以這邊也得加上
    await vm.submit()
    expect(alert.args[0][0]).to.be.equal('修改成功')
  })
})
最後一樣看一下結果的部份,確認是全部成功的
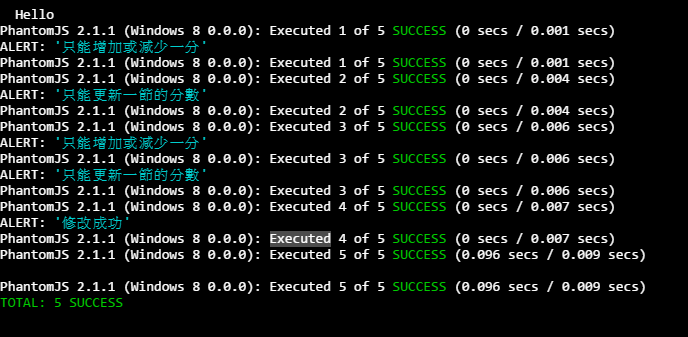
如果預設的單元測試跑起來,跑完一次下次要測試的話,就必須要再重新執行一次,那是因為cli在package加上了--signle-run的指令,一旦我們把package.json改成如下的指令
"unit": "cross-env BABEL_ENV=test karma start test/unit/karma.conf.js"
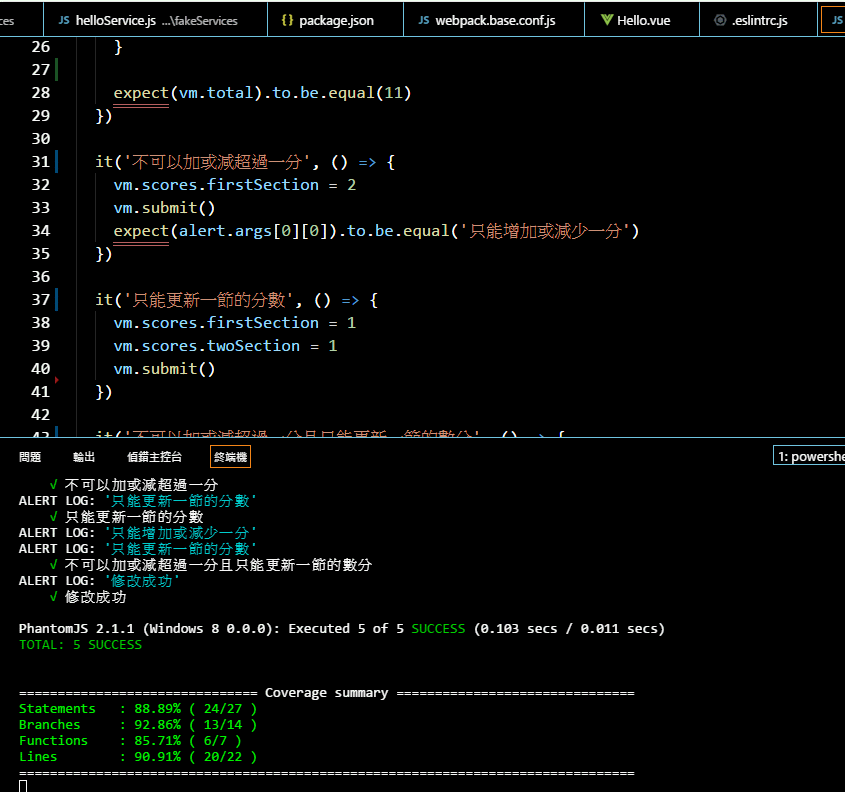
這樣子單元測試就不會執行完就馬上停止了,會持續的監控,一旦我們修改程式碼的話,就會馬上自動進行全部的單元測試程式碼,效果如下圖,可以特別注意一下我故意把測試程式碼改壞又改正確的狀況。
從筆者實做vue單元測試的這幾篇文章應該可以看得出來,其實前端單元測試是完全可行的,而且如果以這篇文章的方式來做測試,在任何情境都可以直接放心做測試,而且維護上也比較方便簡單,如果對此篇有任何想法和意見,再請提供給筆者囉。
