用MVC實作圖片上傳以及裁圖功能(上)
圖片上傳是很常見的功能,除了直接存二進位資料到資料庫外(我覺得比較麻煩)
最直接的,就是直接把開nvarchar把圖檔的路徑存進資料庫中,在將圖檔存到對應的資料夾中。
另外如果網頁中的圖片需要固定大小,在上傳時要是圖片沒有等比例,網頁就會變得十分的醜。
因此裁圖的功能也是非常實用的。
首先一步一步來說上傳跟裁圖的功能如何做
這個時候,就要推薦一個好用,但是文件好難懂的套件啦。
這套件很好用,但也不太容易上手,我中文英文資料都看了好多次,好不容易才試成功。
由於現在都是用MVC在寫,因此很多ASP.NET的範例,都要再想辦法轉成可以在MVC上用
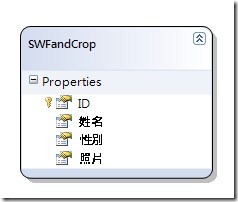
首先先開一個資料表,建立一個LINQ to SQL
除了ID是uniqueidentifier,姓名跟照片都是nvarchar,性別是bit
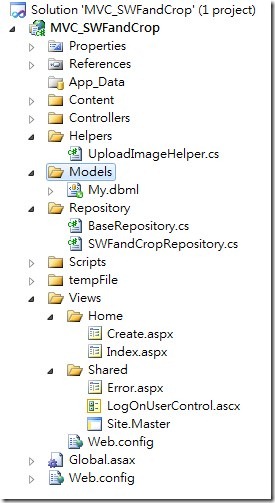
有關MVC的新增修改刪除,以及架構就不重講啦,直接看專案架構吧
Index的地方,將資料撈出來做List,一開始因為還有任何資料所以長下面這樣
<table>
        <tr>
            <th></th>
            <th>姓名</th>
            <th>性別</th>
            <th>照片</th>
        </tr>
    <% foreach (var item in Model) { %>
        <tr>
            <td>
                <%= Html.ActionLink("Edit", "Edit", new { id=item.ID }) %> |
                <%= Html.ActionLink("Delete", "Delete", new { id = item.ID })%>
            </td>
            <td><%= Html.Encode(item.姓名) %></td>
            <td><%= Html.Encode(item.性別) %></td>
            <td><img src="<%=Url.Content(item.照片) %>" alt="" style=" width:100px; height:100px;" /></td>
        </tr>
    <% } %>
    </table>
    <p><%= Html.ActionLink("新增一筆資料", "Create") %></p>
注意一下第16行,圖片的路徑,以及我有固定圖片的寬高
再來開始寫新增的程式碼及View
<% using (Html.BeginForm()) {%>

        <fieldset>
            <legend>Fields</legend>

            <div class="editor-label">
                <%= Html.LabelFor(model => model.姓名) %>
            </div>
            <div class="editor-field">
                <%= Html.TextBoxFor(model => model.姓名) %>
                <%= Html.ValidationMessageFor(model => model.姓名) %>
            </div>

            <div class="editor-label">
                <%= Html.LabelFor(model => model.性別) %>
            </div>
            <div class="editor-field">
                <%=Html.RadioButton("性別",true,new{id="男"}) %><label for="男">男</label>
                <%=Html.RadioButton("性別",false,new{id="女"}) %><label for="女">女</label>
            </div>


            <div class="editor-label">
                <%= Html.LabelFor(model => model.照片) %><br />
               <%=Html.UploadImage() %>
            </div>
            <p>
                <input type="submit" value="Create" />
            </p>
        </fieldset>
   <% } %>
新增的View很簡單,幾乎都是用工具產出來的,重要的只有25行,擴充了HtmlHelper的方法,方法內容如下
public static class UploadImageHelper
   {
       public static string UploadImage(this HtmlHelper helper)
       {
           string id = Guid.NewGuid().ToString();

           StringBuilder sb = new StringBuilder();

           //這段是在準備圖片上傳完的圖片資訊及上傳狀態
           sb.AppendLine("<div class='uploadContainer'><span id='" + id + "_btn-upload' class='Button_Upload'>上傳</span>");
           sb.AppendLine("<span id='上傳狀態'></span>");
           sb.AppendLine("<input type='hidden' id='picName' name='picName' value=''/>");
           //========================================

           //下面這段是在寫出SWFUpload所需的javascript
           sb.AppendLine("<script type='text/javascript'>");
           sb.AppendLine("var swfu_" + id.Replace("-", "") + ";");
           sb.Append("$(function() { ");
           sb.Append("swfu_" + id.Replace("-", "") + " = new SWFUpload({ ");
           sb.Append("upload_url: '/Home/UploadImage', ");
           sb.Append("file_post_name: 'Filedata', ");
           sb.Append("post_params: { ");
           sb.Append("'id':'" + id + "' }, ");
           sb.Append("file_size_limit: '10MB', ");
           sb.Append("file_types: '*.jpg;*.png;*.jpeg;*.gif;*.bmp', ");
           //======================================
           //綁定事件
           sb.Append("file_dialog_complete_handler: fileDialogComplete, ");
           sb.Append("upload_progress_handler: uploadProgress, ");
           sb.Append("upload_error_handler: uploadError, ");
           sb.Append("upload_success_handler: UploadImageSuccess, ");
           //==========================================
           //上傳按鈕的資訊============================
           sb.Append("button_image_url: '/Scripts/btn_upload_1.png', ");
           sb.Append("button_placeholder_id: '" + id + "_btn-upload', ");
           sb.Append("button_width: 95, ");
           sb.Append("button_height: 24, ");
           sb.Append("button_text: '<span class=\"button\">上傳圖片</span>', ");
           sb.Append("button_text_style: '.button { font-family: Helvetica, Arial, sans-serif; font-size: 12pt; text-align: center; }', ");
           sb.Append("button_text_top_padding: 1, ");
           sb.Append("button_text_left_padding: 5, ");
           sb.Append("button_window_mode: 'transparent', ");
           sb.Append("flash_url: '/Scripts/swfupload.swf' ,");
           //============================================
           sb.AppendLine("debug: false }); }) ");
           sb.AppendLine("</script> ");
           //下面這行是上傳後預覽的圖片tag
           sb.AppendLine("<br/> <img id='tmp_img' src='' style='padding-top:5px; display:none;' />");
           sb.AppendLine("</div>");
           return sb.ToString();
       }
   }
由於都是組字串,所以可能不太好懂,但基本上都可以在文件都可以找到
不外乎就是一些上傳檔案大小的設定,按鈕的設定,完成或失敗時所要執行的function
重要的是第31行,當上傳成功時執行UploadImageSuccess這個function,
20-23行Post的路徑,及參數FileData跟id
以及10-12行,與48行自行設定的資訊
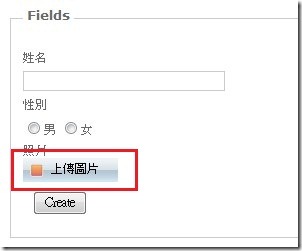
用好之後,把include的的檔案用一用,執行之後,就會出現下面的頁面
按了之後,就可以選檔案了,不過後端也必須要接才行
我設定的Post的路徑是在/Home/UploadImage
程式如下
[HttpPost]
        public ActionResult UploadImage(string id, HttpPostedFileBase Filedata)
        {
            //new 一個自訂的物件ImageData,供等下傳Json出去用
            ImageData imgData = new ImageData() { ID = id , status = "0"};

            //判斷否有檔案,及圖檔的附檔明有沒有符合
            if (Filedata != null &&
                Regex.IsMatch(Path.GetExtension(Filedata.FileName), "^[.](jpg|png|jpeg|gif|bmp)$", RegexOptions.IgnoreCase))
            {
                //先將圖片存在tempFile這個暫存的資料夾
                string tmpPath = Server.MapPath("~/tempFile");

                //當資料夾不存在時,建立此資料夾
                if (!Directory.Exists(tmpPath))
                    Directory.CreateDirectory(tmpPath);

                //將檔案存檔
                tmpPath = Path.Combine(tmpPath, imgData.ID + Path.GetExtension(Filedata.FileName));
                Filedata.SaveAs(tmpPath);

                //將路徑資訊跟狀態指到物件中
                imgData.imgSrc = "/tempFile/" + imgData.ID + Path.GetExtension(Filedata.FileName);
                imgData.status = "1";
            }
            //傳回Json格式
            return Json(imgData);
        }
自訂的物件
class ImageData
    {
        public string imgSrc { get; set; }
        public string imgName { get; set; }
        public string ID { get; set; }
        public string status { get; set; }
    }
還記得剛剛在設定上傳成功時要去執行UploadImageSuccess這個function嗎
SWFload範例有附一些function,但為了需要所以我修改了這個function
function UploadImageSuccess(file, serverData) {
    var retVal = eval('(' + serverData + ')');
    if (retVal.status == '1') {
        $('#上傳狀態').html('上傳成功:' + file.name);
        $('#picName').val(retVal.imgSrc);
        $('#tmp_img').attr('src', retVal.imgSrc).show();
        //下面是裁圖的jQuery========
        $('#tmp_img').Jcrop({
            setSelect: [0, 0, 250, 250],
            onSelect: updateCoords
        });
        //===========================
    }
    else {
        $('#上傳狀態').html('上傳失敗!');
    }
}
function內容滿簡單的,先判斷狀態如果是1代表上傳成功
在先前的helper中已經訂好的id名稱一一對上
id="上傳成功" 的內容放入上傳成功及檔名
id="picName" 是一個隱藏欄位,放暫存圖片的路徑
id="tmp_img" 將src的值改為暫存圖片的路徑
7-11行是裁圖的jQuery 等等再說
完成之後,點上傳檔案選擇完檔案之後,就可以看到成果啦
突然覺得篇幅太長,分成上下兩篇好了。


