開發OneNote Add-ins詳解(上)
前陣子(大概也有三個月了)因為有作筆記的需求,所以自己寫了一套NoteHighLight的Add-Ins
之前沒有寫過這類的程式,但偶爾寫一些不一樣的東西,也可以從中學到很多不同的知識。
這一篇會來教學如何寫出一個OneNote的Add-Ins
開發環境
Win7 x64、Office x64、VS2010、.NET 3.5
範例目標
做出一個類似MSN表情符號的工具
====================================================================================
一、新增一個"類別庫"的專案,範例取名為"FaceImageAddins"
二、於專案上按Alt+Enter(屬性),於"應用程式"→"組件資訊",勾選"讓組件成為COM-Visble"
這個步驟是將.NET 類別對COM完全公開,如果需要部份隱藏,可在成員上加上ComVisable的屬性
接著於"建置",一般區塊中,將平台目標選為x64(因為我的環境是x64,如果是x86則選x86)
然後輸出的區塊,將"註冊COM Interop"勾選。
這個步驟是將.NET 與COM互通,參考連結"Com Interop 的簡單介紹"
三、接著於專案上加入一個xml文件,此文件是拿來定義Ribbon UI用的
Ribbon.xml內輸入
<?xml version="1.0" encoding="utf-8" ?>
<customUI xmlns="http://schemas.microsoft.com/office/2006/01/customui" loadImage="GetImage">
  <ribbon>
    <tabs>
      <tab idMso="TabInsert">
        <group id="groupFaceImage" label="表情圖案">
          <gallery id="gallery" onAction="gallery_Click" label="Icon" size="large" columns="3" rows="10"
             itemHeight="24" itemWidth="24" showItemLabel="false" imageMso="SchedulingEngineGiveFeedback">
            <item id="id_1.png" label="Item1" image="1.png" />
            <item id="id_2.png" label="Item2" image="2.png" />
            <item id="id_3.png" label="Item3" image="3.png" />
            <item id="id_4.png" label="Item4" image="4.png" />
            <item id="id_5.png" label="Item5" image="5.png" />
            <item id="id_6.png" label="Item6" image="6.png" />
            <item id="id_7.png" label="Item7" image="7.png" />
            <item id="id_8.png" label="Item8" image="8.png" />
            <item id="id_9.png" label="Item9" image="9.png" />
            <item id="id_10.png" label="Item10" image="10.png" />
          </gallery>
        </group>
      </tab>
    </tabs>
  </ribbon>
</customUI>
解釋一下這個Ribbon的結構
從第四行開始看,因為我想將功能放在原有的"插入"功能下,因此tab用idMso去指定要在哪個Tab下
而完整的idMso可去下載http://www.microsoft.com/download/en/details.aspx?id=6627,裡頭有Office完整的功能命名
第六行設一個group,顯示的label名稱是表情符號,第七行這邊選用gallery的控制項,並於底下加入
10組圖片的item。
四、加入參考
Assemblies
1.Extensibility
2.System.Drawing
COM
1.Microsoft Office 14.0 Object Library
2.Microsoft OneNote 14.0 Type Library
五、加入FaceImage.cs檔
using以下命名空間
using System.Runtime.InteropServices;
using Extensibility;
using Microsoft.Office.Interop.OneNote;
using Microsoft.Office.Core;
using System.Runtime.InteropServices.ComTypes;
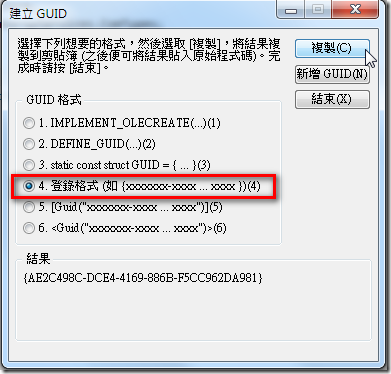
六、使用"工具"→"建立GUID",選擇第四個登入格式,並按複製
在類別上頭加上兩個Attribute,GuidAttribute與ProgIdAttribute,將Guid與命名空間.類別名稱放上
[GuidAttribute("07D707E8-4FDB-4ABC-921E-2A9EEB6AF113"), ProgId("FaceImageAddins.FaceImage")]
public class FaceImage
{
}
七、實作兩個Interface,IDTExtensibility2 與 IRibbonExtensibility,並修改如下
[GuidAttribute("07D707E8-4FDB-4ABC-921E-2A9EEB6AF113"), ProgId("FaceImageAddins.FaceImage")]
public class FaceImage : IDTExtensibility2, IRibbonExtensibility
{
    ApplicationClass onApp = new ApplicationClass();

    public void OnAddInsUpdate(ref Array custom)
    {
    }

    public void OnBeginShutdown(ref Array custom)
    {
        if (onApp != null)
            onApp = null;
    }

    public void OnConnection(object Application, ext_ConnectMode ConnectMode, object AddInInst, ref Array custom)
    {
        onApp = (ApplicationClass)Application;
    }

    public void OnDisconnection(ext_DisconnectMode RemoveMode, ref Array custom)
    {
        onApp = null;
        GC.Collect();
        GC.WaitForPendingFinalizers();
    }

    public void OnStartupComplete(ref Array custom)
    {
    }

    //組件執行所在路徑
    static string codeBase = Path.GetDirectoryName(Assembly.GetExecutingAssembly().Location);

    //LoadUI
    public string GetCustomUI(string RibbonID)
    {
        string path = Path.Combine(codeBase, "Ribbon.xml");

        var ribbon = File.ReadAllText(path);

        return ribbon;
    }

    //LoadImage
    public IStream GetImage(string imageName)
    {
        var path = Path.Combine(codeBase, "images");

        MemoryStream mem = new MemoryStream();

        Image image = Bitmap.FromFile(Path.Combine(path, imageName));

        image.Save(mem, ImageFormat.Png);

        return new CCOMStreamWrapper(mem);
    }

    //Gallery點擊時的事件
    public void gallery_Click(IRibbonControl control, string selectedId, int selectedIndex)
    {
    }
}CCOMStreamWrapper為別人寫的類別,提供原始的載點
GetCustomUI是讀取Ribbon的xml檔,GetImage是讀出item所需的圖檔,兩者都可選為資源檔,
但這邊我用直接讀取實體檔的方式,好處是不用重新編譯就可以修改UI或是更換圖檔(測試時比較方便)。
gallery_Click是當功能被點下去時要觸發的事件,這邊先空著等會再補上。
類別的部分先這樣結束,請編譯兩次(第一次會失敗,第二次就會成功了。)
接著要來做安裝檔
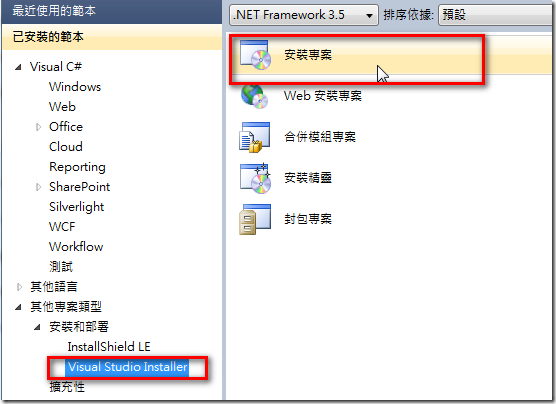
一、新增一個安裝專案
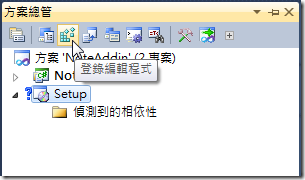
二、開啟登錄編輯程式
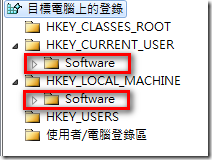
將HKEY_CURRENT_USER與HKEY_LOCAL_MACHINE底下的項目刪除
接著開始新增機碼
- HKEY_CLASSES_ROOT\AppID\{GUID}
字串值 名稱:DllSurrogate 值:空
- HKEY_CLASSES_ROOT\CLSID\{GUID}
字串值 名稱:AppID 值:{GUID}
- HKEY_CURRENT_USER\Software\Classes\AppID\{GUID}
字串值 名稱:DllSurrogate 值:空
- HKEY_CURRENT_USER\Software\Classes\CLSID\{GUID}
字串值 名稱:AppID 值:{GUID}
- HKEY_LOCAL_MACHINE\Software\Classes\AppID\{GUID}
字串值 名稱:DllSurrogate 值:空
- HKEY_LOCAL_MACHINE\Software\Classes\CLSID\{GUID}
字串值 名稱:AppID 值:{GUID}
- HKEY_LOCAL_MACHINE\Software\Microsoft\Office\OneNote\AddIns\[ProgID]
字串值 名稱:Description 值:隨便寫一些描述
字串值 名稱:FriendlyName 值:程式名稱
DWORD 名稱:LoadBehavior 值:3
填寫完後長這個樣子
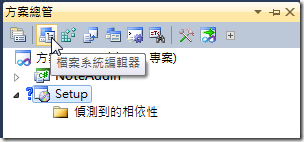
三、開啟檔案系統編輯器
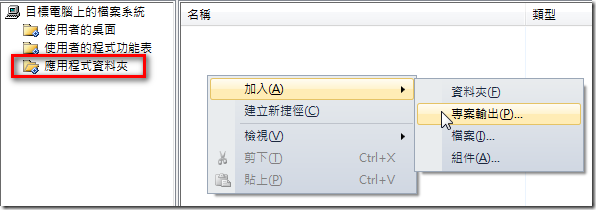
於應用程式資料夾,加入一個專案輸出(就是剛剛建立的那個類別庫專案)
於應用程式資料夾加入檔案,並選前幾步驟新增的那個Ribbon.xml檔
接著在應用程式資料夾加入一個資料夾,並且在加入檔案選擇所需的圖片
四、於安裝專案上按F4(屬性),並做一些設定
Manufacturer為安裝的目錄
ProductName為程式名稱
TargetPlatform為目標的版本(我的環境是x64,如果是x86請選x86)
如照下圖設定,預設程式安裝的路徑會在"C:\Program Files\CodingRoad\FaceImage"
設定完後,編譯安裝專案,並找到安裝檔執行安裝。
安裝完成後開啟OneNote,如在插入頁簽上沒看到新加上的功能
請按"檔案"→"選項"→"增益集"→"執行",並勾選"FaceImage"按下確定,
就會於插入頁簽中看到功能囉。
UI完成了,但功能還沒補上,就留到下一篇再來講如何將圖案插入到OneNote的頁面上。
參考資料
Developing OneNote 2010 Add-Ins - 有完整的教學
http://msdn.microsoft.com/zh-tw/magazine/ff796230.aspx 官方的教學
http://msdn.microsoft.com/en-us/library/ms788684%28v=office.12%29.aspx 官方的詳細文件2007


