CKEditor 自訂ToolBar按鈕
CKEditor是個強大的編輯器,在很多專案中都是用這個編輯器讓user編輯頁面。
因為介面十分類似Word,所以一般人都能輕易上手。
只是最好還是要有Html的底子,不然有時候要排版也是會有困難。
基本的CKeditor的安裝跟使用還有跟CKFinder整合我就不多說啦。
直接進入正題,自訂一個ToolBar按鈕。
將CKEditor下載回來解壓縮丟到網站目錄中,在ckeditor資料夾下可以看到一個"config.js"檔,
這檔案是拿來做一些設定用的
    config.uiColor = '#AADC6E';
    config.contentsCss = ['/Content/layout.css', '/Content/html.css'];
    config.toolbar_Full = [['Source', '-', 'Save', 'NewPage', 'Preview', '-', 'Templates'],
                           ['Undo', 'Redo', '-', 'SelectAll', 'RemoveFormat'],
                           ['Styles', 'Format', 'Font', 'FontSize'],
                           ['TextColor', 'BGColor'],
                           ['Maximize', 'ShowBlocks', '-', 'About'], '/',
                           ['Bold', 'Italic', 'Underline', 'Strike', '-', 'Subscript', 'Superscript'],
                           ['NumberedList', 'BulletedList', '-', 'Outdent', 'Indent', 'Blockquote', 'CreateDiv'],
                           ['JustifyLeft', 'JustifyCenter', 'JustifyRight', 'JustifyBlock'],
                           ['Link', 'Unlink', 'Anchor'],
                           ['Image', 'Flash', 'Table', 'HorizontalRule', 'Smiley', 'SpecialChar', 'PageBreak'],
                           ['Code']];
    config.extraPlugins = 'CodePlugin';
};
前幾行的設定都是一般的設定,uiColor是ckeditor的框框顏色,contentsCss是可以將css檔載入,
在編輯時就可以看到套用css後的效果
toolbar_Full是設定所要的功能,因為有很多我都用不到,所以就剩下上面所列的這些,
注意最後一個['Code'],這不是內建的功能,這是我待會要擴充的功能,因此先放到toolbar中。
最後一行也是比較重要的就是 config.extraPlugins = 'CodePlugin';
CodePlugin就是等等我們擴充的功能名稱(可自訂)。
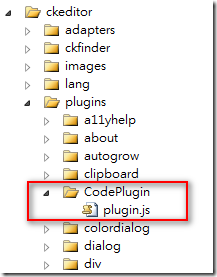
接著在ckeditor/plugins底下新增一個同上面那個名稱的資料夾,並在裡面加入一個plugin.js檔,如下圖所示
接著就在plugin.js檔內加入下面的code
{
    init: function (editor) {
        // Add the link and unlink buttons.
        editor.addCommand('CodePlugin', new CKEDITOR.dialogCommand('CodePlugin')); //定義dialog,也就是下面的code
        editor.ui.addButton('Code',     //定義button的名稱及圖片,以及按下後彈出的dialog
        {                               //這裡將button名字取叫'Code',因此剛剛上方的toolbar也是加入名為Code的按鈕
            label: '插入高亮程式碼',
            icon: '/images/icon/codeicon.png',
            command: 'CodePlugin'
        });
        //CKEDITOR.dialog.add( 'link’, this.path + 'dialogs/link.js’ );
        //dialog也可用抽離出去變一個js,不過這裡我直接寫在下面
        CKEDITOR.dialog.add('CodePlugin', function (editor) {
        //以下開始定義dialog的屬性及事件
            return {                        //定義簡單的title及寬高
                title: '插入程式碼',
                minWidth: 500,
                minHeight: 400,
                contents: [
                    {
                        id: 'code',
                        label: 'code',
                        title: 'code',
                        elements:              //elements是定義dialog內部的元件,除了下面用到的select跟textarea之外
                            [                  //還有像radio或是file之類的可以選擇
                            {
                                type: 'select',
                                label: 'Language',
                                id: 'language',
                                //required: true,
                                'default': 'csharp',
                                items: [['C#', 'csharp'], ['CSS', 'css'], ['Html', 'xhtml'], ['JavaScript', 'js'], ['SQL', 'sql'], ['XML', 'xml']]
                            }
                            , {
                                id: 'codecontent',
                                type: 'textarea',
                                label: '請輸入程式碼',
                                style: 'width:700px;height:500px',
                                rows: 30,
                                'default': ''
                            }
                            ]
                    }
                    ],
                onOk: function () {
                    //當按下ok鈕時,將上方定義的元件值取出來,利用insertHtml
                    //將組好的字串插入ckeditor的內容中
                     code = this.getValueOf('code', 'codecontent');
                     lang = this.getValueOf('code', 'language');
                     editor.insertHtml("<pre class=\"brush:" + lang + ";\">" + code + "</pre>");
                }
           };
       });
    }
})
基本上這樣就好了。其實不難,只是有點繁瑣而已。
先來看看結果
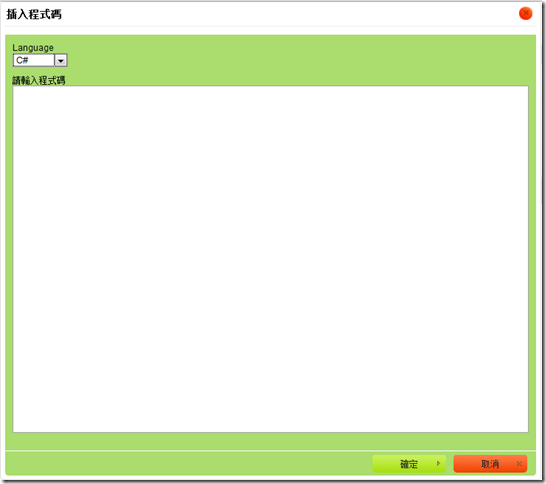
按下之後跳出的dialog
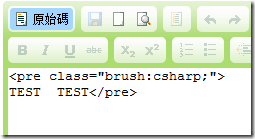
按下確定之後,就會生出我們設定的Tag來,其餘的東西,就是要記得載入高亮語法的套件囉。
參考資料:


